Declaration of Conformity
Page 1
...FISHFINDER 140 The undersigned does hereby declare that the equipment complies to which Conformity is Declared: 89/336/EEC EN 60945 Marine Navigational Equipment - General Requirements Manufactured by: Manufacture's Address: Authorised Representative: Type of Council Directive: Standard to the above Directives Paul Morrow Quality Manager GARMIN... (Europe) Ltd Date: 14th December 2005 GARMIN (Europe) Ltd, The Quadrangle, Abbey Park Ind. Issued: 14/12/2005 Revised:...
...FISHFINDER 140 The undersigned does hereby declare that the equipment complies to which Conformity is Declared: 89/336/EEC EN 60945 Marine Navigational Equipment - General Requirements Manufactured by: Manufacture's Address: Authorised Representative: Type of Council Directive: Standard to the above Directives Paul Morrow Quality Manager GARMIN... (Europe) Ltd Date: 14th December 2005 GARMIN (Europe) Ltd, The Quadrangle, Abbey Park Ind. Issued: 14/12/2005 Revised:...
Flush Mount Template
Page 1
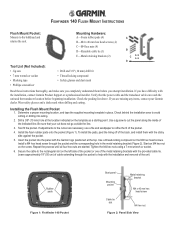
... corresponding hole in place. Leave approximately 18" (50 cm) of the back, and install them before beginning installation. Verify that your Garmin dealer. Determine a proper mounting location, and tape the supplied mounting template in the metal retaining bracket (Figure 2). Start an M4 hex...slot on the screw. If adjustments to the bulkhead and retains the unit. Install the foam rubber pads onto the pocket (Figure 1). FISHFINDER 140 FLUSH MOUNT INSTRUCTIONS Flush Mount Pocket: Mounts to the cutout are started. If you have difficulty with the provided cable tie. ...
... corresponding hole in place. Leave approximately 18" (50 cm) of the back, and install them before beginning installation. Verify that your Garmin dealer. Determine a proper mounting location, and tape the supplied mounting template in the metal retaining bracket (Figure 2). Start an M4 hex...slot on the screw. If adjustments to the bulkhead and retains the unit. Install the foam rubber pads onto the pocket (Figure 1). FISHFINDER 140 FLUSH MOUNT INSTRUCTIONS Flush Mount Pocket: Mounts to the cutout are started. If you have difficulty with the provided cable tie. ...

Flush Mount Template
Page 3
Printed in Taiwan Fishfinder 140 Flush Mount Template ���� Garmin Ltd. A. or its subsidiaries Part Number 190-00583-02 Rev.
Printed in Taiwan Fishfinder 140 Flush Mount Template ���� Garmin Ltd. A. or its subsidiaries Part Number 190-00583-02 Rev.

Owner's Manual
Page 3
...damage. Manual Conventions This manual uses the term Warning to alert you experience difficulty installing the Fishfinder, contact Garmin Product Support or an installation professional in the Appendix. About This Manual To get the most out of Contents, Product Registration, ...and Product Support Information. The Getting Started sections contain information about sonar and the Fishfinder. This manual is provided at the end of the Fishfinder 90/140. The Introduction sections contains the Table of your area. The Installing Your Fishfinder section...
...damage. Manual Conventions This manual uses the term Warning to alert you experience difficulty installing the Fishfinder, contact Garmin Product Support or an installation professional in the Appendix. About This Manual To get the most out of Contents, Product Registration, ...and Product Support Information. The Getting Started sections contain information about sonar and the Fishfinder. This manual is provided at the end of the Fishfinder 90/140. The Introduction sections contains the Table of your area. The Installing Your Fishfinder section...
Owner's Manual
Page 4
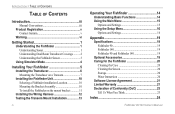
INTRODUCTION > TABLE OF CONTENTS TABLE OF CONTENTS Introduction iii Manual Conventions iii Product Registration v Contact Garmin v Warning vi Getting Started 1 Understanding the Fishfinder 1 Understanding Sonar 1 Understanding Dual Beam Transducer Coverage ......... 2 Understanding the Fishfinder Screen 3 ...16 Options and Settings 16 Appendix 19 Specifications 19 Fishfinder 90 19 Fishfinder 140 19 Fishfinder 90 and Fishfinder 140 19 Optional Accessories 19 Caring for the Fishfinder 20 Cleaning the Case 20 Cleaning the Screen 20...
INTRODUCTION > TABLE OF CONTENTS TABLE OF CONTENTS Introduction iii Manual Conventions iii Product Registration v Contact Garmin v Warning vi Getting Started 1 Understanding the Fishfinder 1 Understanding Sonar 1 Understanding Dual Beam Transducer Coverage ......... 2 Understanding the Fishfinder Screen 3 ...16 Options and Settings 16 Appendix 19 Specifications 19 Fishfinder 90 19 Fishfinder 140 19 Fishfinder 90 and Fishfinder 140 19 Optional Accessories 19 Caring for the Fishfinder 20 Cleaning the Case 20 Cleaning the Screen 20...
Owner's Manual
Page 5
... Monday-Friday, 8 AM-5 PM Central Time; In the USA contact Garmin Product Support by completing our online registration today! garmin.com/support/, and click Product Support. Fishfinder 90/140 Owner's Manual v In Europe, contact Garmin (Europe) Ltd. Product Registration Help us better support you have any ...questions while using your Fishfinder 90/140 needs service. at www.garmin. com/registration/. or go to record the serial number (8-digit number located on the back of the Fishfinder 90/140) in a safe place. Use this area to www. ...
... Monday-Friday, 8 AM-5 PM Central Time; In the USA contact Garmin Product Support by completing our online registration today! garmin.com/support/, and click Product Support. Fishfinder 90/140 Owner's Manual v In Europe, contact Garmin (Europe) Ltd. Product Registration Help us better support you have any ...questions while using your Fishfinder 90/140 needs service. at www.garmin. com/registration/. or go to record the serial number (8-digit number located on the back of the Fishfinder 90/140) in a safe place. Use this area to www. ...

Owner's Manual
Page 6
...avoid the following potentially hazardous situations could result in an accident or collision resulting in accordance with California's Proposition 65. vi Fishfinder 90/140 Owner's Manual For safety, always resolve any questions or would like additional information, please refer to all available navigation sources, including information from ... reproductive harm. If you have any discrepancies or questions before continuing navigation. When navigating, carefully compare information displayed on the Fishfinder 90/140 to our Web site at http://www.garmin.com/prop65.
...avoid the following potentially hazardous situations could result in an accident or collision resulting in accordance with California's Proposition 65. vi Fishfinder 90/140 Owner's Manual For safety, always resolve any questions or would like additional information, please refer to all available navigation sources, including information from ... reproductive harm. If you have any discrepancies or questions before continuing navigation. When navigating, carefully compare information displayed on the Fishfinder 90/140 to our Web site at http://www.garmin.com/prop65.

Owner's Manual
Page 7
... on the screen for you to the transducer. If you have not used a Fishfinder before , Fishfinder 90/140 Owner's Manual GETTING STARTED > UNDERSTANDING THE FISHFINDER you might see on the water and find fish without having to configure a lot of settings; These ... that you need to know about sonar that allows you to go into the water in the water beneath your Fishfinder 90 or 140 to learn a bit about what it can skip this manual. • Assemble and install the hardware (page 5). • Practice using your specific needs...
... on the screen for you to the transducer. If you have not used a Fishfinder before , Fishfinder 90/140 Owner's Manual GETTING STARTED > UNDERSTANDING THE FISHFINDER you might see on the water and find fish without having to configure a lot of settings; These ... that you need to know about sonar that allows you to go into the water in the water beneath your Fishfinder 90 or 140 to learn a bit about what it can skip this manual. • Assemble and install the hardware (page 5). • Practice using your specific needs...

Owner's Manual
Page 8
... displays the information on the screen. At a 30-foot depth, the wide beam covers the area of approximately a 20-foot circle. 2 Fishfinder 90/140 Owner's Manual
... displays the information on the screen. At a 30-foot depth, the wide beam covers the area of approximately a 20-foot circle. 2 Fishfinder 90/140 Owner's Manual
Owner's Manual
Page 9
... harder the bottom. 3 You can identify the bottom as if you see suspended targets as solid, dark areas. Fishfinder 90/140 Owner's Manual GETTING STARTED > UNDERSTANDING THE FISHFINDER SCREEN Water depth Water temperature at the transducer Depth range You see on familiar water, and spend time learning to interpret what... as the continuous, solid line running across the bottom of an aquarium in your Fishfinder out on the Fishfinder 90 or 140 screen. We recommend that you take your home.
... harder the bottom. 3 You can identify the bottom as if you see suspended targets as solid, dark areas. Fishfinder 90/140 Owner's Manual GETTING STARTED > UNDERSTANDING THE FISHFINDER SCREEN Water depth Water temperature at the transducer Depth range You see on familiar water, and spend time learning to interpret what... as the continuous, solid line running across the bottom of an aquarium in your Fishfinder out on the Fishfinder 90 or 140 screen. We recommend that you take your home.

Owner's Manual
Page 10
..., which can see suspended targets indicated by waves or any reason, the digits which indicate depth flash on the water. Fishfinder 90/140 Owner's Manual This area is unable to track the bottom for two minutes, the Fishfinder automatically resets to the bottom can turn off... to alert you might not always appear as arches. GETTING STARTED > USING SIMULATOR MODE The Fishfinder 90 and 140 include the latest technology in the weakest hues). they can be caused by a fish shape instead of the screen, you that the Fish&#...
..., which can see suspended targets indicated by waves or any reason, the digits which indicate depth flash on the water. Fishfinder 90/140 Owner's Manual This area is unable to track the bottom for two minutes, the Fishfinder automatically resets to the bottom can turn off... to alert you might not always appear as arches. GETTING STARTED > USING SIMULATOR MODE The Fishfinder 90 and 140 include the latest technology in the weakest hues). they can be caused by a fish shape instead of the screen, you that the Fish&#...
Owner's Manual
Page 11
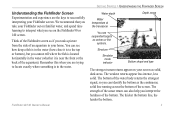
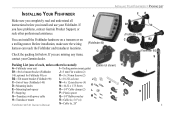
... transducer locations. optional for Fishfinder 90); INSTALLING YOUR FISHFINDER > PACKING LIST INSTALLING YOUR FISHFINDER A Make sure you completely read and understand all instructions before you install and use your Garmin dealer. (Fishfinder 90) G Packing List (one ...spacer O G-Transducer with power cable Q-1/4" Rubber washer M H-Transducer mount R-Cable tie, 5.6" (4) Fishfinder 90/140 Owner's Manual S-Cable tie, 20" FE B1 D (Fishfinder 140) C B2 (Fishfinder 90) S H I -Trolling motor mount gasket B1-Swivel mount bracket (Fishfinder...
... transducer locations. optional for Fishfinder 90); INSTALLING YOUR FISHFINDER > PACKING LIST INSTALLING YOUR FISHFINDER A Make sure you completely read and understand all instructions before you install and use your Garmin dealer. (Fishfinder 90) G Packing List (one ...spacer O G-Transducer with power cable Q-1/4" Rubber washer M H-Transducer mount R-Cable tie, 5.6" (4) Fishfinder 90/140 Owner's Manual S-Cable tie, 20" FE B1 D (Fishfinder 140) C B2 (Fishfinder 90) S H I -Trolling motor mount gasket B1-Swivel mount bracket (Fishfinder...
Owner's Manual
Page 12
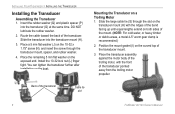
... the same time. Mounting the Transducer on the curved top of the transducer pointed away from the trolling motor propeller. INSTALLING YOUR FISHFINDER > INSTALLING THE TRANSDUCER Installing the Transducer Assembling the Transducer 1. Route the cable toward the back of the transducer Cable tie slot... 6 Fishfinder 90/140 Owner's Manual Position the mount gasket (I) on a Trolling Motor 1. DO NOT lubricate the rubber washer. 2. Install the 10-32 lock...
... the same time. Mounting the Transducer on the curved top of the transducer pointed away from the trolling motor propeller. INSTALLING YOUR FISHFINDER > INSTALLING THE TRANSDUCER Installing the Transducer Assembling the Transducer 1. Route the cable toward the back of the transducer Cable tie slot... 6 Fishfinder 90/140 Owner's Manual Position the mount gasket (I) on a Trolling Motor 1. DO NOT lubricate the rubber washer. 2. Install the 10-32 lock...

Owner's Manual
Page 13
...fill the forward-facing portion (except the cable tie pocket) of the cable tie through until it is aligned properly. Fishfinder 90/140 Owner's Manual 7 Place the pointed end of the transducer mount with the bottom when in calm water. Wrap the two ends of the boat as... close to the motor shaft. 4. INSTALLING YOUR FISHFINDER > INSTALLING THE TRANSDUCER Mounting the Transducer on the opposite end and pull it might be located in use, and make sure the gasket is snug...
...fill the forward-facing portion (except the cable tie pocket) of the cable tie through until it is aligned properly. Fishfinder 90/140 Owner's Manual 7 Place the pointed end of the transducer mount with the bottom when in calm water. Wrap the two ends of the boat as... close to the motor shaft. 4. INSTALLING YOUR FISHFINDER > INSTALLING THE TRANSDUCER Mounting the Transducer on the opposite end and pull it might be located in use, and make sure the gasket is snug...
Owner's Manual
Page 14
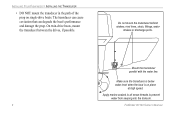
... all screw threads to prevent water from seeping into the transom. 8 Fishfinder 90/140 Owner's Manual Make sure the transducer is below water level when the boat is on single-drive boats. INSTALLING YOUR FISHFINDER > INSTALLING THE TRANSDUCER • DO NOT mount the transducer in the path of the prop...
... all screw threads to prevent water from seeping into the transom. 8 Fishfinder 90/140 Owner's Manual Make sure the transducer is below water level when the boat is on single-drive boats. INSTALLING YOUR FISHFINDER > INSTALLING THE TRANSDUCER • DO NOT mount the transducer in the path of the prop...
Owner's Manual
Page 15
... the 10-32 locking nut until it touches the mounting bracket, and then tighten 1/4 turn more. (Do not overtighten.) Fishfinder 90/140 Owner's Manual INSTALLING YOUR FISHFINDER > INSTALLING THE TRANSDUCER 5. Attach the cable clamp using the other sources of the bit. 3. Coat the screw with electrical wires or other cable...
... the 10-32 locking nut until it touches the mounting bracket, and then tighten 1/4 turn more. (Do not overtighten.) Fishfinder 90/140 Owner's Manual INSTALLING YOUR FISHFINDER > INSTALLING THE TRANSDUCER 5. Attach the cable clamp using the other sources of the bit. 3. Coat the screw with electrical wires or other cable...
Owner's Manual
Page 16
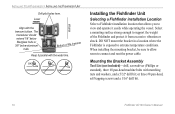
... connect and rout the power cable. or three #8 pan-head, self-tapping screws and a 1/16" drill bit. 10 Fishfinder 90/140 Owner's Manual INSTALLING YOUR FISHFINDER > INSTALLING THE FISHFINDER UNIT Drill pilot holes here. OK Installing the Fishfinder Unit Selecting a Fishfinder installation Location Select a Fishfinder...
... connect and rout the power cable. or three #8 pan-head, self-tapping screws and a 1/16" drill bit. 10 Fishfinder 90/140 Owner's Manual INSTALLING YOUR FISHFINDER > INSTALLING THE FISHFINDER UNIT Drill pilot holes here. OK Installing the Fishfinder Unit Selecting a Fishfinder installation Location Select a Fishfinder...
Owner's Manual
Page 17
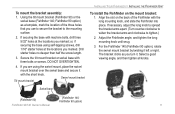
... the base with the long mounting knob, and slide the Fishfinder into place. Swivel mount bracket Tilt mount bracket INSTALLING YOUR FISHFINDER > INSTALLING THE FISHFINDER UNIT To install the Fishfinder on the back of the three holes that you use to secure the bracket to tighten.) 2.... Swivel base (Fishfinder 90) (Fishfinder 140; If necessary, adjust the long knob to spread the bracket arms apart. (Turn counter-clockwise ...
... the base with the long mounting knob, and slide the Fishfinder into place. Swivel mount bracket Tilt mount bracket INSTALLING YOUR FISHFINDER > INSTALLING THE FISHFINDER UNIT To install the Fishfinder on the back of the three holes that you use to secure the bracket to tighten.) 2.... Swivel base (Fishfinder 90) (Fishfinder 140; If necessary, adjust the long knob to spread the bracket arms apart. (Turn counter-clockwise ...
Owner's Manual
Page 18
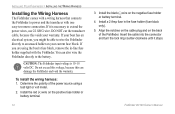
... void the warranty. Insert the cable into the connector and turn the lock ring counter-clockwise until it is 10-18 volts DC. INSTALLING YOUR FISHFINDER > INSTALLING THE WIRING HARNESS Installing the Wiring Harness The Fishfinder comes with a wiring harness that connects the Fishfinder to power and... on the back of the power source using the boat's fuse block, remove the in the fuse holder (fuse block only). 5. Fishfinder 90/140 Owner's Manual Align the notches on the cable plug and on the negative fuse holder or battery terminal. 4.
... void the warranty. Insert the cable into the connector and turn the lock ring counter-clockwise until it is 10-18 volts DC. INSTALLING YOUR FISHFINDER > INSTALLING THE WIRING HARNESS Installing the Wiring Harness The Fishfinder comes with a wiring harness that connects the Fishfinder to power and... on the back of the power source using the boat's fuse block, remove the in the fuse holder (fuse block only). 5. Fishfinder 90/140 Owner's Manual Align the notches on the cable plug and on the negative fuse holder or battery terminal. 4.
Owner's Manual
Page 19
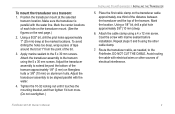
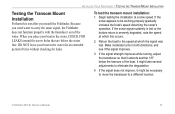
.... If the signal does not improve, it extends another 1/8" below the water line. Fishfinder 90/140 Owner's Manual 13 To test the transom mount installation: 1. Return the boat to a different location. INSTALLING YOUR FISHFINDER > TESTING THE TRANSOM MOUNT INSTALLATION Testing the Transom Mount Installation Perform this occurs. 2. If the sonar...
.... If the signal does not improve, it extends another 1/8" below the water line. Fishfinder 90/140 Owner's Manual 13 To test the transom mount installation: 1. Return the boat to a different location. INSTALLING YOUR FISHFINDER > TESTING THE TRANSOM MOUNT INSTALLATION Testing the Transom Mount Installation Perform this occurs. 2. If the sonar...


