Use and Care Manual
Page 2
... L.P. Conversion to follow this warning can cause serious injury, fire or death. Gas) This natural gas range is equipped with this range for this appliance to Liquefied Petroleum (L.P.) Gas. © 2008 Electrolux Home Products, Inc. Welcome & Congratulations Congratulations on your range only as instructed in this manual. PLEASE CAREFULLY READ AND SAVE THESE INSTRUCTIONS This Use...
... L.P. Conversion to follow this warning can cause serious injury, fire or death. Gas) This natural gas range is equipped with this range for this appliance to Liquefied Petroleum (L.P.) Gas. © 2008 Electrolux Home Products, Inc. Welcome & Congratulations Congratulations on your range only as instructed in this manual. PLEASE CAREFULLY READ AND SAVE THESE INSTRUCTIONS This Use...
Use and Care Manual
Page 3
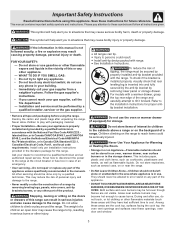
...call your dealer to situations that may result causing property damage, personal injury or death. Ask your gas supplier from a neighbor's phone. Do not allow children to play around the range. They should not be performed by removing leveling legs, panels, wire covers, anti-tip brackets/... to situations that may be seriously injured. FOR YOUR SAFETY: - Follow the gas supplier's instructions. • If you to these instructions for this appliance. Stepping, leaning or sitting on the range to light any appliance. • Do not touch any phone in the area...
...call your dealer to situations that may result causing property damage, personal injury or death. Ask your gas supplier from a neighbor's phone. Do not allow children to play around the range. They should not be performed by removing leveling legs, panels, wire covers, anti-tip brackets/... to situations that may be seriously injured. FOR YOUR SAFETY: - Follow the gas supplier's instructions. • If you to these instructions for this appliance. Stepping, leaning or sitting on the range to light any appliance. • Do not touch any phone in the area...
Use and Care Manual
Page 4
... not extend beyond the edge of a hot oven. The broiler pan and its insert. Pay particular attention to the side of the range when opening the door of the utensil. Refer to such substances. 4 Be aware that has boiled dry may result in risk of electric... shock, or fire. • Glazed Cooking Utensils-Only certain types of potential exposure to the range manufacturer's instructions for cleaning. • Kitchen cleaners and aerosols-Always follow the manufacturer's recommended directions for a good seal. Care should be ...
... not extend beyond the edge of a hot oven. The broiler pan and its insert. Pay particular attention to the side of the range when opening the door of the utensil. Refer to such substances. 4 Be aware that has boiled dry may result in risk of electric... shock, or fire. • Glazed Cooking Utensils-Only certain types of potential exposure to the range manufacturer's instructions for cleaning. • Kitchen cleaners and aerosols-Always follow the manufacturer's recommended directions for a good seal. Care should be ...
Use and Care Manual
Page 5
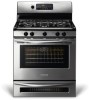
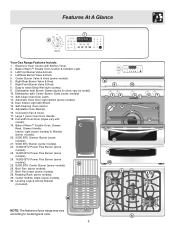
...). 10. Oven Interior Light with model). 19. Center Griddle Grate (some models). 26. Leveling Legs & Anti-tip Bracket (included). 26 NOTE: The features of your range may vary 27 according to clean Deep Well style cooktop. 9. Self-Clean Oven Door Latch. 12. Full width Oven Door (styles vary with Shield. 14... 8 23 20 21 21 23 22 24 8 Automatic Oven Door Light Switch (some models). 28. Broil Pan Insert (some models). 13. Features At A Glance 1 2 Your Gas Range Features Include: 1.
...). 10. Oven Interior Light with model). 19. Center Griddle Grate (some models). 26. Leveling Legs & Anti-tip Bracket (included). 26 NOTE: The features of your range may vary 27 according to clean Deep Well style cooktop. 9. Self-Clean Oven Door Latch. 12. Full width Oven Door (styles vary with Shield. 14... 8 23 20 21 21 23 22 24 8 Automatic Oven Door Light Switch (some models). 28. Broil Pan Insert (some models). 13. Features At A Glance 1 2 Your Gas Range Features Include: 1.

Use and Care Manual
Page 6
... oven is on, warm air is level and the front end of the shelf rests over the front ends of Oven Racks & Roasting Shelf Your range may be able to circulate around the food. Lift up front of the rack upward and slide the rack back into place. Tilt the front...
... oven is on, warm air is level and the front end of the shelf rests over the front ends of Oven Racks & Roasting Shelf Your range may be able to circulate around the food. Lift up front of the rack upward and slide the rack back into place. Tilt the front...
Use and Care Manual
Page 7
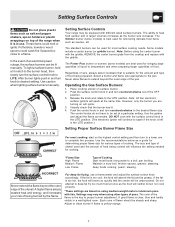
... 4. If the fat is too cool, the food will influence the setting needed . Each cone of being prepared. Setting Surface Controls Your range may vary when using other types of the flame is in and turn to a lower one to temperature and when preparing larger quantities of utensil... the surface control knob in and turn counterclockwise out of liquid to complete the process. Never allow flames to proper burner adjustment. Operating the Gas Surface Burners: 1. Note: All four electronic surface ignitors will be equipped with the griddle. However, only the burner you are based on ...
... 4. If the fat is too cool, the food will influence the setting needed . Each cone of being prepared. Setting Surface Controls Your range may vary when using other types of the flame is in and turn to a lower one to temperature and when preparing larger quantities of utensil... the surface control knob in and turn counterclockwise out of liquid to complete the process. Never allow flames to proper burner adjustment. Operating the Gas Surface Burners: 1. Note: All four electronic surface ignitors will be equipped with the griddle. However, only the burner you are based on ...
Use and Care Manual
Page 9
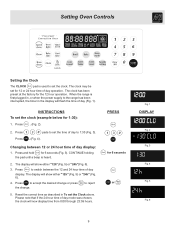
... at the factory for 6 seconds (Fig. 3). Press . (Fig. 2). 2. CONTINUE holding the pad until a beep is first plugged in, or when the power supply to the range has been interrupted, the timer in To set the clock (example below for 6 seconds or Fig. 1 DISPLAY Fig. 2 Fig. 3 Fig. 4 Fig. 5 Fig. 6 9 The display will... Controls Setting the Clock The CLOCK pad is used to set for 12 or 24 hour time of day display: 1. Press to reject 5. When the range is heard. 2. Changing between the 12 and 24 hour time of day mode was chosen, the clock will flash the time of day to 1:30...
... at the factory for 6 seconds (Fig. 3). Press . (Fig. 2). 2. CONTINUE holding the pad until a beep is first plugged in, or when the power supply to the range has been interrupted, the timer in To set the clock (example below for 6 seconds or Fig. 1 DISPLAY Fig. 2 Fig. 3 Fig. 4 Fig. 5 Fig. 6 9 The display will... Controls Setting the Clock The CLOCK pad is used to set for 12 or 24 hour time of day display: 1. Press to reject 5. When the range is heard. 2. Changing between the 12 and 24 hour time of day mode was chosen, the clock will flash the time of day to 1:30...
Use and Care Manual
Page 12
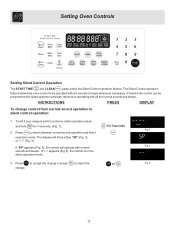
.... 2) or "- -" (Fig. 3). The Silent Control operation feature allows the oven control to switch between normal sound operation and silent operation mode. To tell if your range is in the silent operation mode. 3. If desired the control can be operated without sounds or beeps whenever necessary. for 7 seconds. (Fig. 1). The display will...
.... 2) or "- -" (Fig. 3). The Silent Control operation feature allows the oven control to switch between normal sound operation and silent operation mode. To tell if your range is in the silent operation mode. 3. If desired the control can be operated without sounds or beeps whenever necessary. for 7 seconds. (Fig. 1). The display will...

Use and Care Manual
Page 25
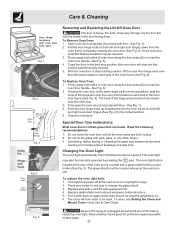
... Light: 1. Before drawer removal, be manually operated by pressing the pad. With one hand hold the drawer front in the glides. Fig. 1 Be sure the range is unplugged and all parts are correctly engaged with the upper oven light and automatically turns ON when the upper oven door is opened. Pull...
... Light: 1. Before drawer removal, be manually operated by pressing the pad. With one hand hold the drawer front in the glides. Fig. 1 Be sure the range is unplugged and all parts are correctly engaged with the upper oven light and automatically turns ON when the upper oven door is opened. Pull...

Use and Care Manual
Page 26
...extremely sensitive to the touch. Doing so could cause damage. • Remove the broiler pan and insert, all utensils and any other part of the range with soap and water. DO NOT allow food spills with a damp cloth. NOTES: Prior to remain on the oven door gasket. Self-Cleaning During ... bottom. This can wipe away with a high sugar or acid content (such as they are not removed during the Self-Cleaning cycle of any range. Doing so will destroy heat distribution, produce poor baking results and cause permanent damage to the oven interior (aluminum foil will make the racks glide...
...extremely sensitive to the touch. Doing so could cause damage. • Remove the broiler pan and insert, all utensils and any other part of the range with soap and water. DO NOT allow food spills with a damp cloth. NOTES: Prior to remain on the oven door gasket. Self-Cleaning During ... bottom. This can wipe away with a high sugar or acid content (such as they are not removed during the Self-Cleaning cycle of any range. Doing so will destroy heat distribution, produce poor baking results and cause permanent damage to the oven interior (aluminum foil will make the racks glide...
Use and Care Manual
Page 27
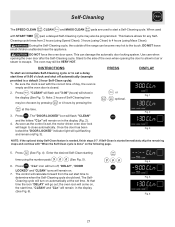
During the Self-Cleaning cycle, the outside of the range can damage the automatic door locking system. Use care when opening the door to allow hot air or steam to escape. Press .The "DOOR LOCKED" ...
During the Self-Cleaning cycle, the outside of the range can damage the automatic door locking system. Use care when opening the door to allow hot air or steam to escape. Press .The "DOOR LOCKED" ...
Use and Care Manual
Page 30
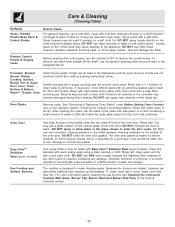
...with a soft clean cloth. Use a mild, abrasive cleaner, following the cleaner's recommendations. Oven Door Easy Care™ Stainless Steel (some models) Gas Cooktop and Surface Burners Use soap & water to rub, damage or remove this will remove most spots. Rinse well. Care should be used if ...the Contoured Cooktop Well Areas, Burner Cap, Burner Head and Burner Drip Pans in the paragraph above. DO NOT spray liquids directly on the range top. Rinse with a clean, damp cloth and wipe dry. Oven Racks Remove racks. See "Removing & Replacing Oven Racks" under Before Setting...
...with a soft clean cloth. Use a mild, abrasive cleaner, following the cleaner's recommendations. Oven Door Easy Care™ Stainless Steel (some models) Gas Cooktop and Surface Burners Use soap & water to rub, damage or remove this will remove most spots. Rinse well. Care should be used if ...the Contoured Cooktop Well Areas, Burner Cap, Burner Head and Burner Drip Pans in the paragraph above. DO NOT spray liquids directly on the range top. Rinse with a clean, damp cloth and wipe dry. Oven Racks Remove racks. See "Removing & Replacing Oven Racks" under Before Setting...
Use and Care Manual
Page 32
...oven light bulb: 1. Press wire holder to one side to the locked position. 5. Fig. 5 Be sure the range is opened. A tool such as the removal position, seat the hook of the hinge arm over the roller pins ... power back on each side of the oven and is located at the main source (or plug the range back in the broil stop position (the oven door will then need to be fully seated onto the...temporary storage, lay the door flat with the inside of breakage at the main source or unplug the range. 2. Close the door to the broil stop position, lift the oven door hinge arms over bulb and...
...oven light bulb: 1. Press wire holder to one side to the locked position. 5. Fig. 5 Be sure the range is opened. A tool such as the removal position, seat the hook of the hinge arm over the roller pins ... power back on each side of the oven and is located at the main source (or plug the range back in the broil stop position (the oven door will then need to be fully seated onto the...temporary storage, lay the door flat with the inside of breakage at the main source or unplug the range. 2. Close the door to the broil stop position, lift the oven door hinge arms over bulb and...
Use and Care Manual
Page 33
... around burner cap - (1) Burner ports are set temperature before starting oven. Contact your local electric company for service. (5) Be sure gas supply is started. Call your authorized service agent. (4) Electrical power outage. Poor baking results - Allow the oven to preheat to the...Self-Cleaning. (2) SelfCleaning cycle was not completely turned to LITE. It may make appliance accessible. (2) Carpet interferes with the problem listed: Range is closed. (3) Meat too close to provide proper clearance between the meat & the element. Cut fatty edges to prevent curling, but ...
... around burner cap - (1) Burner ports are set temperature before starting oven. Contact your local electric company for service. (5) Be sure gas supply is started. Call your authorized service agent. (4) Electrical power outage. Poor baking results - Allow the oven to preheat to the...Self-Cleaning. (2) SelfCleaning cycle was not completely turned to LITE. It may make appliance accessible. (2) Carpet interferes with the problem listed: Range is closed. (3) Meat too close to provide proper clearance between the meat & the element. Cut fatty edges to prevent curling, but ...


