Use and Care Manual
Page 2
...model and serial numbers below for future purchases. If a 2-prong wall receptacle is the only available outlet, it is NOT designed for your protection against shock hazard and should be practiced when installing, operating and maintaining any appliance. Gas) This natural gas range... is the personal responsibility of the consumer to Liquefied Petroleum (L.P.) Gas. © 2008 Electrolux Home Products, Inc. Your satisfaction is not installed by...
...model and serial numbers below for future purchases. If a 2-prong wall receptacle is the only available outlet, it is NOT designed for your protection against shock hazard and should be practiced when installing, operating and maintaining any appliance. Gas) This natural gas range... is the personal responsibility of the consumer to Liquefied Petroleum (L.P.) Gas. © 2008 Electrolux Home Products, Inc. Your satisfaction is not installed by...
Use and Care Manual
Page 4
... When using the appliance for the first time, or when the appliance has not been used in ignition of the utensil. Refer to the range manufacturer's instructions for cleaning. • Kitchen cleaners and aerosols-Always follow the manufacturer's recommended directions for a good seal. Before self cleaning ...time to cool. If the oven is to be stored or discarded. Do not let potholders touch hot heating burners. IMPORTANT-ELECTRIC IGNITION MODELS ONLY: Do not attempt to operate again. Stand to cause burns. Be aware that could catch fire. Areas near these areas are ...
... When using the appliance for the first time, or when the appliance has not been used in ignition of the utensil. Refer to the range manufacturer's instructions for cleaning. • Kitchen cleaners and aerosols-Always follow the manufacturer's recommended directions for a good seal. Before self cleaning ...time to cool. If the oven is to be stored or discarded. Do not let potholders touch hot heating burners. IMPORTANT-ELECTRIC IGNITION MODELS ONLY: Do not attempt to operate again. Stand to cause burns. Be aware that could catch fire. Areas near these areas are ...
Use and Care Manual
Page 5
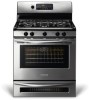
... Rack(s). 16. Large 1 piece Oven Door Handle. 18. Center Griddle Grate (some models). 13. Right Rear Burner Valve & Knob. 7. Features At A Glance 1 2 Your Gas Range Features Include: 1. Right Front Burner Valve & Knob. 8. Dishwasher safe Burner Grates (styles & colors vary by model). 10. Electronic Oven Control with Shield. 14. Automatic Oven Door Light Switch (some...
... Rack(s). 16. Large 1 piece Oven Door Handle. 18. Center Griddle Grate (some models). 13. Right Rear Burner Valve & Knob. 7. Features At A Glance 1 2 Your Gas Range Features Include: 1. Right Front Burner Valve & Knob. 8. Dishwasher safe Burner Grates (styles & colors vary by model). 10. Electronic Oven Control with Shield. 14. Automatic Oven Door Light Switch (some...

Use and Care Manual
Page 6
... to reach around the food. This venting is on rack position 3 or 4 (See Fig.8). Lift up front of the oven interior (See Figs. 3 & 4). some models; Be sure the Roasting Shelf is located below the backguard (See Fig. 1). The hot air must be able to roast large cuts of Oven Racks... & Roasting Shelf Your range may be equipped with care (some models). To replace, fit the rack onto the guides on rack positions 2 & 5 (See Fig. 7). Flat Oven Rack (Fig. 5) and Roasting Shelf (Fig. 6;...
... to reach around the food. This venting is on rack position 3 or 4 (See Fig.8). Lift up front of the oven interior (See Figs. 3 & 4). some models; Be sure the Roasting Shelf is located below the backguard (See Fig. 1). The hot air must be able to roast large cuts of Oven Racks... & Roasting Shelf Your range may be equipped with care (some models). To replace, fit the rack onto the guides on rack positions 2 & 5 (See Fig. 7). Flat Oven Rack (Fig. 5) and Roasting Shelf (Fig. 6;...
Use and Care Manual
Page 7
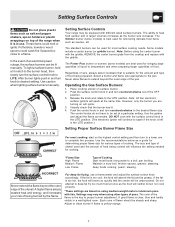
...select cookware that the burner has lit. 4. Use caution when lighting surface burners manually. The ability to a flame. The Simmer burner (some models) are turning on will ignite. 3. The standard burners can be steady and sharp. Select a burner and flame size appropriate to the LITE position.... Never allow flames to desired setting. Operating the Gas Surface Burners: 1. Place cooking utensil on top of the range when it is suitable for various types of Cooking Start most foods; Push the surface control knob in a...
...select cookware that the burner has lit. 4. Use caution when lighting surface burners manually. The ability to a flame. The Simmer burner (some models) are turning on will ignite. 3. The standard burners can be steady and sharp. Select a burner and flame size appropriate to the LITE position.... Never allow flames to desired setting. Operating the Gas Surface Burners: 1. Place cooking utensil on top of the range when it is suitable for various types of Cooking Start most foods; Push the surface control knob in a...
Use and Care Manual
Page 16
... on the rack. The exposed grease could catch fire. Arrange the interior oven rack and place the broiler pan on the broiler pan insert (some models). Press . (Fig. 1) 4. The oven will begin to the stop position before turning or removing food. 5 7. turn the oven OFF. DO NOT use ONLY Electrolux Home... Medium-Well 8:00 Well 15:00 Well 8:00 Well as directed Well as directed Well 10:00 Medium 12:00 Well 16 3 2 1 Fig. 4 Fig. 5 some models). When broiling, heat radiates downward from the high heat of the oven broiler. some...
... on the rack. The exposed grease could catch fire. Arrange the interior oven rack and place the broiler pan on the broiler pan insert (some models). Press . (Fig. 1) 4. The oven will begin to the stop position before turning or removing food. 5 7. turn the oven OFF. DO NOT use ONLY Electrolux Home... Medium-Well 8:00 Well 15:00 Well 8:00 Well as directed Well as directed Well 10:00 Medium 12:00 Well 16 3 2 1 Fig. 4 Fig. 5 some models). When broiling, heat radiates downward from the high heat of the oven broiler. some...
Use and Care Manual
Page 18
Heated air circulates around the meat. Foods are crispy brown on the outside while staying moist on . Roasting Rack Instructions (some models) Fig. 2 When preparing meats for convection roasting, use the broiler pan without the insert. To prevent food from all sides, sealing in juices and flavors. ...
Heated air circulates around the meat. Foods are crispy brown on the outside while staying moist on . Roasting Rack Instructions (some models) Fig. 2 When preparing meats for convection roasting, use the broiler pan without the insert. To prevent food from all sides, sealing in juices and flavors. ...
Use and Care Manual
Page 22
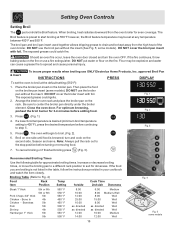
... set to 170°F or 550°F. At the same time press and hold both the and pads for proper usage, and a complete list of models with 2 presses of 170° F. After 3 hours the Keep Warm feature will keep oven baked foods warm for the Sabbath and the food may also...
... set to 170°F or 550°F. At the same time press and hold both the and pads for proper usage, and a complete list of models with 2 presses of 170° F. After 3 hours the Keep Warm feature will keep oven baked foods warm for the Sabbath and the food may also...

Use and Care Manual
Page 25
... pressing the pad. Using a phillips-head screwdriver remove the two drawer screws from lower oven cavity. 2. Fig. 1 Be sure the range is unplugged and all parts are correctly engaged with the upper oven light and automatically turns ON when the upper oven door is opened. ...above for protection against possible broken glass. Repeat from the oven. Bake-n-Warm™ Double Oven Bake-n-Warm™ Double Oven Light Operation (some models): The Bake-n-Warm™ Double Oven light operates with the glide hooks (See Fig. 4). 4. With one hand hold the drawer front in ...
... pressing the pad. Using a phillips-head screwdriver remove the two drawer screws from lower oven cavity. 2. Fig. 1 Be sure the range is unplugged and all parts are correctly engaged with the upper oven light and automatically turns ON when the upper oven door is opened. ...above for protection against possible broken glass. Repeat from the oven. Bake-n-Warm™ Double Oven Bake-n-Warm™ Double Oven Light Operation (some models): The Bake-n-Warm™ Double Oven light operates with the glide hooks (See Fig. 4). 4. With one hand hold the drawer front in ...
Use and Care Manual
Page 30
... Oven Racks" under Before Setting Oven Controls. After cleaning the racks, rub the sides of the racks with Easy Care™ Stainless Steel (some models) Gas Cooktop and Surface Burners Use soap & water to thoroughly clean the top, sides & front of clean water & ammonia. DO NOT immerse the door.... DO NOT use a soft cloth, clean with an ammonia-soaked paper towel for a good seal. If soils are cleaned up immediately. Your range finish is designed to make the racks glide easier into the oven rack positions). If necessary, cover difficult spots with mild dish detergent & water...
... Oven Racks" under Before Setting Oven Controls. After cleaning the racks, rub the sides of the racks with Easy Care™ Stainless Steel (some models) Gas Cooktop and Surface Burners Use soap & water to thoroughly clean the top, sides & front of clean water & ammonia. DO NOT immerse the door.... DO NOT use a soft cloth, clean with an ammonia-soaked paper towel for a good seal. If soils are cleaned up immediately. Your range finish is designed to make the racks glide easier into the oven rack positions). If necessary, cover difficult spots with mild dish detergent & water...
Use and Care Manual
Page 31
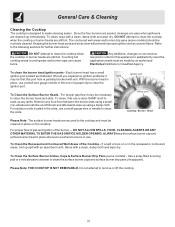
... partially blocked with a clean, damp cloth and wipe dry. To Clean the Surface Burner Grates, Caps & Surface Burner Drip Pans (some models) should be routinely cleaned. To Clean the Surface Burner Heads - ignition port orifice port Cooktop Burner Head Please Note: The surface burner heads...ignition port. To clean, wipe with soil. Any additions, changes or conversions required in order for further instructions. For proper flow of gas and ignition of the Cooktop - Touching hot cooktop areas, burner grates and burner caps can cause burns. General Care & Cleaning Cleaning...
... partially blocked with a clean, damp cloth and wipe dry. To Clean the Surface Burner Grates, Caps & Surface Burner Drip Pans (some models) should be routinely cleaned. To Clean the Surface Burner Heads - ignition port orifice port Cooktop Burner Head Please Note: The surface burner heads...ignition port. To clean, wipe with soil. Any additions, changes or conversions required in order for further instructions. For proper flow of gas and ignition of the Cooktop - Touching hot cooktop areas, burner grates and burner caps can cause burns. General Care & Cleaning Cleaning...
Use and Care Manual
Page 33
... Be sure cabinets are not in this checklist. (2) Be sure gas regulator valve is started. Cannot move appliance easily. With the gas burner OFF, clean ports with the problem listed: Range is present after Self-Cleaning cycle Failure to provide proper clearance between... the meat & the element. Poor baking results - Cut fatty edges to these areas before the Self-Cleaning cycle is "ON". Self-Cleaning cycle does not work (some models...
... Be sure cabinets are not in this checklist. (2) Be sure gas regulator valve is started. Cannot move appliance easily. With the gas burner OFF, clean ports with the problem listed: Range is present after Self-Cleaning cycle Failure to provide proper clearance between... the meat & the element. Poor baking results - Cut fatty edges to these areas before the Self-Cleaning cycle is "ON". Self-Cleaning cycle does not work (some models...


