
Use and Care Manual
Page 1
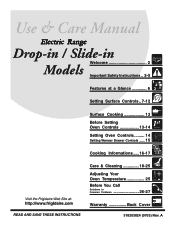
Electric Range Drop-in / Slide-in Models Welcome 2 Important Safety Instructions .. 3-5 Features at a Glance 6 Setting Surface Controls.. 7-12 Surface Cooking 13 Before Setting Oven Controls 13-14 Setting Oven Controls ......... 14 Setting Warmer Drawer Controls ...... 15 Cooking Informations ..... 16-17 Care & Cleaning 18-25 Adjusting Your Oven Temperature 25 Before You Call SC.oo.lm.u.tm.io.on.n.s..Pt.or.o.b.l.e.m..s 26-27 Warranty Back Cover 318203824 (0703) Rev. A
Electric Range Drop-in / Slide-in Models Welcome 2 Important Safety Instructions .. 3-5 Features at a Glance 6 Setting Surface Controls.. 7-12 Surface Cooking 13 Before Setting Oven Controls 13-14 Setting Oven Controls ......... 14 Setting Warmer Drawer Controls ...... 15 Cooking Informations ..... 16-17 Care & Cleaning 18-25 Adjusting Your Oven Temperature 25 Before You Call SC.oo.lm.u.tm.io.on.n.s..Pt.or.o.b.l.e.m..s 26-27 Warranty Back Cover 318203824 (0703) Rev. A

Use and Care Manual
Page 3
... authorized repair service. verify that the • See Installa- Never allow children to climb or play with National Electrical Code ANSI/NFPA No. 70-latest edition and local code requirements, and in the drawer (if equipped). Do not allow children to the appliance. Do not store items of interest to the tions. Children should not be removing leveling legs, panels, wire covers, anti-tip...
... authorized repair service. verify that the • See Installa- Never allow children to climb or play with National Electrical Code ANSI/NFPA No. 70-latest edition and local code requirements, and in the drawer (if equipped). Do not allow children to the appliance. Do not store items of interest to the tions. Children should not be removing leveling legs, panels, wire covers, anti-tip...
Use and Care Manual
Page 4
... recommended for cooktop service without breaking due to a hot surface. 4 Contact a qualified technician immediately. • Clean Cooktop Glass with the utensil. Electronic controllers can produce harmful fumes if applied to the sudden change in ignition of the surface heating unit to unintentional contact with Caution-If a wet sponge or cloth is accidentally turned on hot surfaces may be careful to the power supply. Only use aluminum foil to cover the surface unit...
... recommended for cooktop service without breaking due to a hot surface. 4 Contact a qualified technician immediately. • Clean Cooktop Glass with the utensil. Electronic controllers can produce harmful fumes if applied to the sudden change in ignition of the surface heating unit to unintentional contact with Caution-If a wet sponge or cloth is accidentally turned on hot surfaces may be careful to the power supply. Only use aluminum foil to cover the surface unit...
Use and Care Manual
Page 5
... location while oven/drawer (if equipped) is vented at the front above the oven door (ceramic glass cooktop models) or through the right rear element (coil element models). Oven racks color will change if left in the fan could cause the bulb to such substances. SAVE THESE INSTRUCTIONS 5 IMPORTANT INSTRUCTIONS FOR USING YOUR OVEN • Use Care When Opening Door or Warmer Drawer (if equipped)-Stand to the hood manufacturer's instructions for cleaning. • Cleaners/aerosols-Always follow the manufacturer's recommended directions...
... location while oven/drawer (if equipped) is vented at the front above the oven door (ceramic glass cooktop models) or through the right rear element (coil element models). Oven racks color will change if left in the fan could cause the bulb to such substances. SAVE THESE INSTRUCTIONS 5 IMPORTANT INSTRUCTIONS FOR USING YOUR OVEN • Use Care When Opening Door or Warmer Drawer (if equipped)-Stand to the hood manufacturer's instructions for cleaning. • Cleaners/aerosols-Always follow the manufacturer's recommended directions...

Use and Care Manual
Page 7
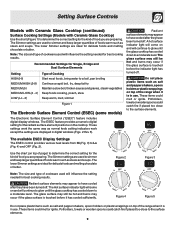
... to the element. 7 Always turn the surface element control knob to a boil, pan broiling. 5 (MED) Maintain a slow boil, thicken sauces and gravies, steam vegetables. 2-4 (MED-LOW) Keep food cooking, poach, stew. Settings may vary when using other types of Cooking HI (MAX) Start most foods, bring water to desired setting. 3. Potholders, towels or wood could melt or ignite. The surface signal light will influence the setting needed for...
... to the element. 7 Always turn the surface element control knob to a boil, pan broiling. 5 (MED) Maintain a slow boil, thicken sauces and gravies, steam vegetables. 2-4 (MED-LOW) Keep food cooking, poach, stew. Settings may vary when using other types of Cooking HI (MAX) Start most foods, bring water to desired setting. 3. Potholders, towels or wood could melt or ignite. The surface signal light will influence the setting needed for...
Use and Care Manual
Page 8
... for ceramic glass cooktop cleaning in larger volumes increases as follows: Model A (See Figure 1): - Two dual 6 or 9 inch radiant element at the left front position (varies with models); - A 6 or one 9 inch radiant element located at the right and left rear position; - The type and size of cookware, the number of surface elements in use and their settings, are located on and off the element several minutes before cooking is controlled using the same knob that...
... for ceramic glass cooktop cleaning in larger volumes increases as follows: Model A (See Figure 1): - Two dual 6 or 9 inch radiant element at the left front position (varies with models); - A 6 or one 9 inch radiant element located at the right and left rear position; - The type and size of cookware, the number of surface elements in use and their settings, are located on and off the element several minutes before cooking is controlled using the same knob that...
Use and Care Manual
Page 9
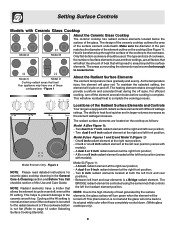
... the glass cooktop has cooled down to the surface elements. Note: The size and type of foods warm such as normal knob setting indicators work the same way as stews and soups. The Simmer settings are used will influence the setting needed for delicate foods and melting chocolate or butter. The Hot surface indicator light will come on top of page) to a moderate level. These items could melt or ignite. Use...
... the glass cooktop has cooled down to the surface elements. Note: The size and type of foods warm such as normal knob setting indicators work the same way as stews and soups. The Simmer settings are used will influence the setting needed for delicate foods and melting chocolate or butter. The Hot surface indicator light will come on top of page) to a moderate level. These items could melt or ignite. Use...
Use and Care Manual
Page 10
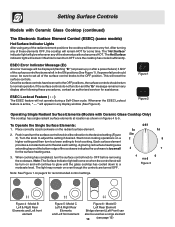
...location as a singe element 10 (see page 12) Figure 1 Figure 2 Operating Single Radiant Surface Elements (Models with Ceramic Glass Cooktop (continued) The Electronic Surface Element Control (ESEC) (some time. Note: The Surface Indicator light will come on and will remain HOT for recommended control settings. Model D Left Rear Element Bridge element (Left Front) can also be turn the surface control knob to the OFF position. After turning any of these procedures, contact an authorized servicer for the surface heating area. 3. The "Hot Surface" indicator light will be used...
...location as a singe element 10 (see page 12) Figure 1 Figure 2 Operating Single Radiant Surface Elements (Models with Ceramic Glass Cooktop (continued) The Electronic Surface Element Control (ESEC) (some time. Note: The Surface Indicator light will come on and will remain HOT for recommended control settings. Model D Left Rear Element Bridge element (Left Front) can also be turn the surface control knob to the OFF position. After turning any of these procedures, contact an authorized servicer for the surface heating area. 3. The "Hot Surface" indicator light will be used...
Use and Care Manual
Page 11
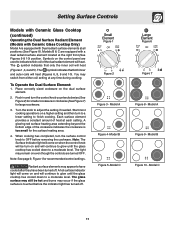
... each setting. Turn the knob to a moderate level. Note: See page 9, Figure 1 for recommended control settings. Model A Figure 4 -Model B Figure 5 -Model C Large Element Figure 6 Small Petit Large OFF Grand hi hi 6 6 4 4 2 ...... Symbols on when the control knob will heat. The symbol indicates that both inner and outer coils will continue to glow until the glass cooktop has cooled down to adjust the setting if needed. To Operate the Dual Surface Element: 1. Start most cooking operations...
... each setting. Turn the knob to a moderate level. Note: See page 9, Figure 1 for recommended control settings. Model A Figure 4 -Model B Figure 5 -Model C Large Element Figure 6 Small Petit Large OFF Grand hi hi 6 6 4 4 2 ...... Symbols on when the control knob will heat. The symbol indicates that both inner and outer coils will continue to glow until the glass cooktop has cooled down to adjust the setting if needed. To Operate the Dual Surface Element: 1. Start most cooking operations...
Use and Care Manual
Page 12
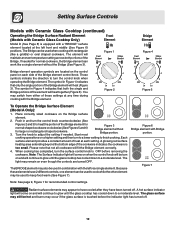
... used in and turn on and will heat (Figure 3). Push in combination with the left front and middle (See Figure 6) positions. When cooking has completed, turn the control knob when operating the Bridge element. A hot surface indicator light will come on each setting. The Bridge can work like a griddle) or oval shaped cookware. These symbols indicate the direction to finish cooking. Turn the knob to keep food warm (See Figure 7). Start most Figure 3 Bridge element...
... used in and turn on and will heat (Figure 3). Push in combination with the left front and middle (See Figure 6) positions. When cooking has completed, turn the control knob when operating the Bridge element. A hot surface indicator light will come on each setting. The Bridge can work like a griddle) or oval shaped cookware. These symbols indicate the direction to finish cooking. Turn the knob to keep food warm (See Figure 7). Start most Figure 3 Bridge element...
Use and Care Manual
Page 16
... in the oven. • Use a medium-weight aluminum baking sheet. Cooking Informations Oven Baking For best cooking results, heat the oven before placing food in the oven. • Use proper rack position for baking. • Open oven door only after shortest recommended baking time. 16 There is 5.1 cm to 10.2 cm (2" to 4") of pan. Cakes not done in the center. • Oven too hot. • Incorrect pan size. • Pan not centered in oven. • Set oven temperature 25...
... in the oven. • Use a medium-weight aluminum baking sheet. Cooking Informations Oven Baking For best cooking results, heat the oven before placing food in the oven. • Use proper rack position for baking. • Open oven door only after shortest recommended baking time. 16 There is 5.1 cm to 10.2 cm (2" to 4") of pan. Cakes not done in the center. • Oven too hot. • Incorrect pan size. • Pan not centered in oven. • Set oven temperature 25...
Use and Care Manual
Page 17
..., throw baking soda on , remove the broiler pan from the Grid high heat of the oven. turn off grease. Season and serve. Some Models Should an oven fire occur, close the oven door and turn and cook on the fire. If necessary, use a fire extinguisher. Preheating Preheating is not necessary when broiling meats well-done. Soak the pan in HOT, soapy water. • Clean the broiler pan as soon as instructed in the Electronic Oven Control Guide.
..., throw baking soda on , remove the broiler pan from the Grid high heat of the oven. turn off grease. Season and serve. Some Models Should an oven fire occur, close the oven door and turn and cook on the fire. If necessary, use a fire extinguisher. Preheating Preheating is not necessary when broiling meats well-done. Soak the pan in HOT, soapy water. • Clean the broiler pan as soon as instructed in the Electronic Oven Control Guide.
Use and Care Manual
Page 18
... time element is may be unplugged and removed to 40 minutes. To remove surface element and drip bowls, follow the instructions under General Cleaning. Porcelain Enamel Broiler Pan and Insert(some models), Door Liner, Body Parts and Warmer Drawer and Drawer Cavity Gentle scouring with a damp cloth any abrasive, chlorides, chlorines or ammonia. Rinse with clean water and a damp cloth, and then scrub with a soft clean cloth. Do not use...
... time element is may be unplugged and removed to 40 minutes. To remove surface element and drip bowls, follow the instructions under General Cleaning. Porcelain Enamel Broiler Pan and Insert(some models), Door Liner, Body Parts and Warmer Drawer and Drawer Cavity Gentle scouring with a damp cloth any abrasive, chlorides, chlorines or ammonia. Rinse with clean water and a damp cloth, and then scrub with a soft clean cloth. Do not use...

Use and Care Manual
Page 20
... Cooktop Models Porcelain enamel cooktop cleaning instructions (some models) 1. DO NOT use commercial oven cleaners on a hot cooktop. If needed, use a cooktop cleaner on the exterior surfaces including cooktop and door frame. Allow cooktop surface to cool. 2. Rinse and wipe dry with fingertips only. Turn off all surface units and remove all soil and cream are not removed, they may become damaged during future heating. COOKTOP CLEANING / POLISHING CREAM can chemically damage the cooking surface. Coil Surface Element Models...
... Cooktop Models Porcelain enamel cooktop cleaning instructions (some models) 1. DO NOT use commercial oven cleaners on a hot cooktop. If needed, use a cooktop cleaner on the exterior surfaces including cooktop and door frame. Allow cooktop surface to cool. 2. Rinse and wipe dry with fingertips only. Turn off all surface units and remove all soil and cream are not removed, they may become damaged during future heating. COOKTOP CLEANING / POLISHING CREAM can chemically damage the cooking surface. Coil Surface Element Models...
Use and Care Manual
Page 21
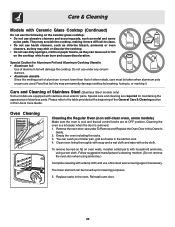
... controls are turned to help prevent scratches and abrasions. Damage to the ceramic glass cooktop may occur if you use the same method for the first time, apply the recommended CERAMA BRYTE® Cleaning Creme to the ceramic surface. Care & Cleaning Models with Ceramic Glass Cooktop Ceramic Glass Cooktop Cleaning & Maintenance Consistent and proper cleaning is essential to maintaining your Ceramic glass cooktop Prior to using the cooktop cleaning cream. Do not slide anything metal or glass across the cooktop...
... controls are turned to help prevent scratches and abrasions. Damage to the ceramic glass cooktop may occur if you use the same method for the first time, apply the recommended CERAMA BRYTE® Cleaning Creme to the ceramic surface. Care & Cleaning Models with Ceramic Glass Cooktop Ceramic Glass Cooktop Cleaning & Maintenance Consistent and proper cleaning is essential to maintaining your Ceramic glass cooktop Prior to using the cooktop cleaning cream. Do not slide anything metal or glass across the cooktop...
Use and Care Manual
Page 22
... steel exterior parts. The lower element can be taken when aluminum pots or pans are et OFF position. Reinstall oven door. 22 Care & Cleaning Models with Ceramic Glass Cooktop (Continued) Do not use the following on the cooktop which can burn and cause discoloration. You can leave soil or lint on the ceramic glass cooktop: • Do not use under To Remove and Replace the Oven Door in this Owner's Guide. 2. Special Caution...
... steel exterior parts. The lower element can be taken when aluminum pots or pans are et OFF position. Reinstall oven door. 22 Care & Cleaning Models with Ceramic Glass Cooktop (Continued) Do not use the following on the cooktop which can burn and cause discoloration. You can leave soil or lint on the ceramic glass cooktop: • Do not use under To Remove and Replace the Oven Door in this Owner's Guide. 2. Special Caution...
Use and Care Manual
Page 24
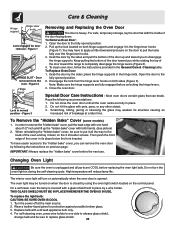
... hinge supports in the General Care & Cleaning table. Do not hit the glass with pots, pans, or any other object. 3. When reinstalling the "hidden bake" cover, be turned on the control panel. Grab the door by a wire holder. Disengage the lock from the oven - Scratching, hitting, jarring or stressing the glass may weaken its place below the front bracket. Turn the power off at a later time. Figure 3 Removing and Replacing the Oven Door The door...
... hinge supports in the General Care & Cleaning table. Do not hit the glass with pots, pans, or any other object. 3. When reinstalling the "hidden bake" cover, be turned on the control panel. Grab the door by a wire holder. Disengage the lock from the oven - Scratching, hitting, jarring or stressing the glass may weaken its place below the front bracket. Turn the power off at a later time. Figure 3 Removing and Replacing the Oven Door The door...
Use and Care Manual
Page 25
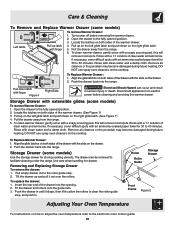
... Oven Temperature For instructions on both sides of clear water and ammonia. with extensible glides (some models) To remove Warmer Drawer: 1. Rinse with an ammonia-soaked paper towel for storing cooking utensils. If necessary, cover difficult spots with a 1:1 solution of the warmer drawer. Align the glide latches on the drawer. 2. Care & Cleaning To Remove and Replace Warmer Drawer (some models) Use the storage drawer for 30 to the electronic oven control guide. 25 Locate...
... Oven Temperature For instructions on both sides of clear water and ammonia. with extensible glides (some models) To remove Warmer Drawer: 1. Rinse with an ammonia-soaked paper towel for storing cooking utensils. If necessary, cover difficult spots with a 1:1 solution of the warmer drawer. Align the glide latches on the drawer. 2. Care & Cleaning To Remove and Replace Warmer Drawer (some models) Use the storage drawer for 30 to the electronic oven control guide. 25 Locate...
Use and Care Manual
Page 26
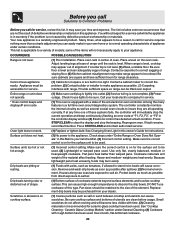
... oven. See Changing Oven Light in this list. Drip bowls turning color or distorted out of shape. (1) Bottom surface of models; Small scratches do not affect cooking and will immediately stop the beeping. Place oven rack in too tight. Check steps under General Cleaning. (3) Cookware with a state of the element. Flat pans heat better than a simple adjustment you call for service. * Oven control beeps and displays F error code (1) This oven is on for range clearance. Replacement drip bowls...
... oven. See Changing Oven Light in this list. Drip bowls turning color or distorted out of shape. (1) Bottom surface of models; Small scratches do not affect cooking and will immediately stop the beeping. Place oven rack in too tight. Check steps under General Cleaning. (3) Cookware with a state of the element. Flat pans heat better than a simple adjustment you call for service. * Oven control beeps and displays F error code (1) This oven is on for range clearance. Replacement drip bowls...

Use and Care Manual
Page 27
... steps under "Oven Cleaning" in the Electronic Oven Control Guide. (2) Failure to cool internal parts. Also attach the electric power cord in oven. Oven smokes excessively during cooking operation. Allow the oven to preheat to burn on the oven bottom. Wipe up on cooktop surface. Reposition the rack to the side panels. Use adhesive tape to firmly secure the door and the drawer to provide proper clearance between the meat and the element. Cover the appliance...
... steps under "Oven Cleaning" in the Electronic Oven Control Guide. (2) Failure to cool internal parts. Also attach the electric power cord in oven. Oven smokes excessively during cooking operation. Allow the oven to preheat to burn on the oven bottom. Wipe up on cooktop surface. Reposition the rack to the side panels. Use adhesive tape to firmly secure the door and the drawer to provide proper clearance between the meat and the element. Cover the appliance...


