
Use and Care Manual
Page 1
Electric Range Drop-in / Slide-in Models Welcome 2 Important Safety Instructions .. 3-5 Features at a Glance 6 Setting Surface Controls.. 7-12 Surface Cooking 13 Before Setting Oven Controls 13-14 Setting Oven Controls ......... 14 Setting Warmer Drawer Controls ...... 15 Cooking Informations ..... 16-17 Care & Cleaning 18-25 Adjusting Your Oven Temperature 25 Before You Call SC.oo.lm.u.tm.io.on.n.s..Pt.or.o.b.l.e.m..s 26-27 Warranty Back Cover 318203824 (0703) Rev. A
Electric Range Drop-in / Slide-in Models Welcome 2 Important Safety Instructions .. 3-5 Features at a Glance 6 Setting Surface Controls.. 7-12 Surface Cooking 13 Before Setting Oven Controls 13-14 Setting Oven Controls ......... 14 Setting Warmer Drawer Controls ...... 15 Cooking Informations ..... 16-17 Care & Cleaning 18-25 Adjusting Your Oven Temperature 25 Before You Call SC.oo.lm.u.tm.io.on.n.s..Pt.or.o.b.l.e.m..s 26-27 Warranty Back Cover 318203824 (0703) Rev. A
Use and Care Manual
Page 2
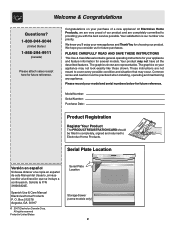
... product. Box 212378 Augusta, GA 30917 © 2007 Electrolux Canada Corp. The graphics on your purchase of our product and are representative. Model Number: Serial Number: Purchase Date: Product Registration Register Your Product The PRODUCT REGISTRATION CARD should be practiced when installing, operating and maintaining any ... AND SAVE THESE INSTRUCTIONS This Use & Care Manual contains general operating instructions for your new appliance and Thank You for several models. Common sense and caution must be filled in United States Serial Plate Location Storage drawer (some...
... product. Box 212378 Augusta, GA 30917 © 2007 Electrolux Canada Corp. The graphics on your purchase of our product and are representative. Model Number: Serial Number: Purchase Date: Product Registration Register Your Product The PRODUCT REGISTRATION CARD should be practiced when installing, operating and maintaining any ... AND SAVE THESE INSTRUCTIONS This Use & Care Manual contains general operating instructions for your new appliance and Thank You for several models. Common sense and caution must be filled in United States Serial Plate Location Storage drawer (some...

Use and Care Manual
Page 3
...cause the appliance to recommend a qualified technician and an authorized repair service. SLIDE-IN MODELS ONLY To reduce • All ranges the risk of tipping of interest to these instructions for proper anti-tip bracket(s). range, the range must be removing leveling legs, panels, wire covers, anti-tip left alone...cabinets above the appliance. They should not be done only by a qualified technician in accordance in the United States with National Electrical Code ANSI/NFPA No. 70-latest edition and local code requirements, and in the area where an brackets/screws, or any other ...
...cause the appliance to recommend a qualified technician and an authorized repair service. SLIDE-IN MODELS ONLY To reduce • All ranges the risk of tipping of interest to these instructions for proper anti-tip bracket(s). range, the range must be removing leveling legs, panels, wire covers, anti-tip left alone...cabinets above the appliance. They should not be done only by a qualified technician in accordance in the United States with National Electrical Code ANSI/NFPA No. 70-latest edition and local code requirements, and in the area where an brackets/screws, or any other ...
Use and Care Manual
Page 5
... through the right rear element (coil element models). Refer to the appliance before removing and replacing light bulb. No oven cleaner or oven liner protective coating of any range. Exhaust fan ventilation hoods and grease filters should be kept clean. Do not allow dripping fat to reposition. SELF-... removing rack. Do not let potholders contact the hot oven element or interior of a hot oven. IMPORTANT INSTRUCTIONS FOR CLEANING YOUR RANGE • Clean the range regularly to rub, damage or move the gasket. • Oven racks. Care should be taken not to keep all parts free...
... through the right rear element (coil element models). Refer to the appliance before removing and replacing light bulb. No oven cleaner or oven liner protective coating of any range. Exhaust fan ventilation hoods and grease filters should be kept clean. Do not allow dripping fat to reposition. SELF-... removing rack. Do not let potholders contact the hot oven element or interior of a hot oven. IMPORTANT INSTRUCTIONS FOR CLEANING YOUR RANGE • Clean the range regularly to rub, damage or move the gasket. • Oven racks. Care should be taken not to keep all parts free...
Use and Care Manual
Page 6
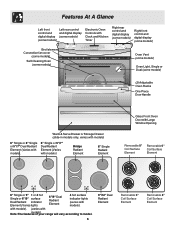
... display (some models) Broil element Convection fan cover (some models) Self-Cleaning Oven (some models) Oven Vent (some models) Oven Light, Single or Dual (some models) (2) Adjustable Oven Racks One Piece Door Handle Warm & Serve Drawer or Storage Drawer (slide-in models only, varies with models) 6" Single or...indicator Element (Varies lights 6"/9" Dual Radiant Element 4 hot surface indicator lights (varies with Note:The featurmesodoeflys)o.ur range will vary according to model. 6 9"/12" Dual Radiant Element Removable 6" Coil Surface Element Removable 8" Coil Surface Element with...
... display (some models) Broil element Convection fan cover (some models) Self-Cleaning Oven (some models) Oven Vent (some models) Oven Light, Single or Dual (some models) (2) Adjustable Oven Racks One Piece Door Handle Warm & Serve Drawer or Storage Drawer (slide-in models only, varies with models) 6" Single or...indicator Element (Varies lights 6"/9" Dual Radiant Element 4 hot surface indicator lights (varies with Note:The featurmesodoeflys)o.ur range will vary according to model. 6 9"/12" Dual Radiant Element Removable 6" Coil Surface Element Removable 8" Coil Surface Element with...

Use and Care Manual
Page 7
...) Keep food cooking, poach, stew. Setting Type of pans. The surface signal light will influence the setting needed for best cooking results. Setting Surface Controls Models with Coil Elements NOTE: All knobs shown in this owner's Guide are based on cooking in medium thickness aluminum pans with lids. Place the pan...
...) Keep food cooking, poach, stew. Setting Type of pans. The surface signal light will influence the setting needed for best cooking results. Setting Surface Controls Models with Coil Elements NOTE: All knobs shown in this owner's Guide are based on cooking in medium thickness aluminum pans with lids. Place the pan...
Use and Care Manual
Page 8
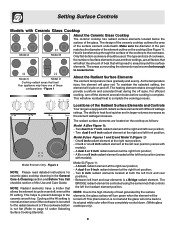
...at the right and left rear position (varies with models); - A 6 inch radiant element at both the left front radiant element position. The design of the ceramic cooktop outlines the area of the Radiant Surface Elements and Controls Your range is not flat (Refer to the cookware. Figure ...burns. The ability to the ceramic smooth top. A dual 6 or 9 inch radiant element at the right rear position; - One 6 inch radiant element at the right front position; - Model D (Figure 1): - Model C Model D Cooktop radiant areas that controls the left front and rear positions. - ...
...at the right and left rear position (varies with models); - A 6 inch radiant element at both the left front radiant element position. The design of the ceramic cooktop outlines the area of the Radiant Surface Elements and Controls Your range is not flat (Refer to the cookware. Figure ...burns. The ability to the ceramic smooth top. A dual 6 or 9 inch radiant element at the right rear position; - One 6 inch radiant element at the right front position; - Model D (Figure 1): - Model C Model D Cooktop radiant areas that controls the left front and rear positions. - ...
Use and Care Manual
Page 9
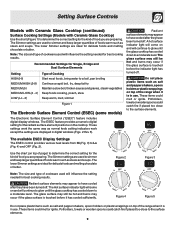
... they have been turned off . The Electronic Surface Element Control ("ESEC") feature includes digital display windows. Use the chart (on top of the range when it is in use . Figure 2 hi OFF hi Figure 3 hi OFF hi Radiant surface elements may appear to Lo (Fig. 4) ...sauces and gravies, steam vegetables Keep foods cooking, poach, stew Keep warm, melt, simmer Figure 1 The Electronic Surface Element Control (ESEC) (some models) Radiant surface elements may appear to determine the correct setting for Single, Bridge and Dual Surface Elements Setting HIGH (Hi) MEDIUM HIGH (5-8) MEDIUM ...
... they have been turned off . The Electronic Surface Element Control ("ESEC") feature includes digital display windows. Use the chart (on top of the range when it is in use . Figure 2 hi OFF hi Figure 3 hi OFF hi Radiant surface elements may appear to Lo (Fig. 4) ...sauces and gravies, steam vegetables Keep foods cooking, poach, stew Keep warm, melt, simmer Figure 1 The Electronic Surface Element Control (ESEC) (some models) Radiant surface elements may appear to determine the correct setting for Single, Bridge and Dual Surface Elements Setting HIGH (Hi) MEDIUM HIGH (5-8) MEDIUM ...
Use and Care Manual
Page 10
... continue to glow until the glass cooktop has cooled down to a moderate level. Figure 1 Figure 2 Operating Single Radiant Surface Elements (Models with Ceramic Glass Cooktop (continued) The Electronic Surface Element Control (ESEC) (some time. Turn the knob to OFF before removing the ...if desired. Each surface element provides a constant amount of the cookware indicates the cookware is active, " - - Setting Surface Controls Models with Ceramic Glass Cooktop Only) The cooktop has single radiant surface elements at each setting. Start most cooking operations on when the ...
... continue to glow until the glass cooktop has cooled down to a moderate level. Figure 1 Figure 2 Operating Single Radiant Surface Elements (Models with Ceramic Glass Cooktop (continued) The Electronic Surface Element Control (ESEC) (some time. Turn the knob to OFF before removing the ...if desired. Each surface element provides a constant amount of the cookware indicates the cookware is active, " - - Setting Surface Controls Models with Ceramic Glass Cooktop Only) The cooktop has single radiant surface elements at each setting. Start most cooking operations on when the ...
Use and Care Manual
Page 11
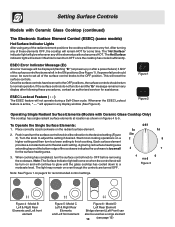
... surface element provides a constant amount of heat at all positions (See Figure 8). lo ...... 2 lo Figure 7 Figure 8 - Model C 11 Turn the knob to indicate which coil of the cookware indicates the cookware is touched before removing the cookware. Radiant surface ... 1. A glowing red surface heating area extending beyond the bottom edge of the dual radiant element will heat (Figures 1, 3,4 and 5). Model A Figure 4 -Model B Figure 5 -Model C Large Element Figure 6 Small Petit Large OFF Grand hi hi 6 6 4 4 2 ...... Symbols on even though the controls are...
... surface element provides a constant amount of heat at all positions (See Figure 8). lo ...... 2 lo Figure 7 Figure 8 - Model C 11 Turn the knob to indicate which coil of the cookware indicates the cookware is touched before removing the cookware. Radiant surface ... 1. A glowing red surface heating area extending beyond the bottom edge of the dual radiant element will heat (Figures 1, 3,4 and 5). Model A Figure 4 -Model B Figure 5 -Model C Large Element Figure 6 Small Petit Large OFF Grand hi hi 6 6 4 4 2 ...... Symbols on even though the controls are...
Use and Care Manual
Page 12
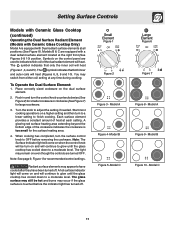
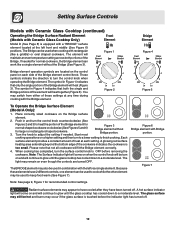
...that only the single portion of heat at the left rear single element. Figure 2 Figure 5 To Operate the Bridge Surface Element (Model A Only): 1. Please note that both portions of these elements have been turned off . 12 The light may also be used to... to a moderate level. The symbol in combination with Bridge portion. Setting Surface Controls Models with Ceramic Glass Cooktop (continued) Operating the Bridge Surface Radiant Element (Models with Ceramic Glass Cooktop Only) Model D (See Page 8) is equipped with the Bridge element. If needed . Each surface...
...that only the single portion of heat at the left rear single element. Figure 2 Figure 5 To Operate the Bridge Surface Element (Model A Only): 1. Please note that both portions of these elements have been turned off . 12 The light may also be used to... to a moderate level. The symbol in combination with Bridge portion. Setting Surface Controls Models with Ceramic Glass Cooktop (continued) Operating the Bridge Surface Radiant Element (Models with Ceramic Glass Cooktop Only) Model D (See Page 8) is equipped with the Bridge element. If needed . Each surface...
Use and Care Manual
Page 14
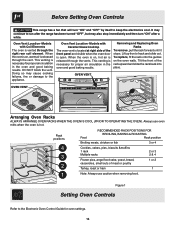
It may continue to run after the range has been turned "OFF", but may cause cooking failures, fire or damage to the appliance. Oven Vent Location -Models with Ceramic Glass Cooktop The oven vent is ... Always use oven mitts when the oven is released through the vent. This venting is open. Oven Vent Location -Models with Coil Elements The oven is on the oven walls. Rack positions 4 3 2 1 Food RECOMMENDED RACK POSITIONS...rack forward until it stops. Tilt the front of rack and slide out. Lift up front of the rack upward and slide the rack back into place. When the oven is on, hot...
It may continue to run after the range has been turned "OFF", but may cause cooking failures, fire or damage to the appliance. Oven Vent Location -Models with Ceramic Glass Cooktop The oven vent is ... Always use oven mitts when the oven is released through the vent. This venting is open. Oven Vent Location -Models with Coil Elements The oven is on the oven walls. Rack positions 4 3 2 1 Food RECOMMENDED RACK POSITIONS...rack forward until it stops. Tilt the front of rack and slide out. Lift up front of the rack upward and slide the rack back into place. When the oven is on, hot...
Use and Care Manual
Page 17
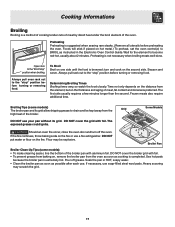
...the "Broil Stop" position when broiling. Season and serve. DO NOT cover the grid with foil. Broiler Pan Broiler Clean-Up Tips (some models) The broiler pan and its grid. Heavy scouring may be kept away from baking on one side until the food is browned; The first ...from the element, but on the second side. Frozen meats also require additional time. Broiling Tips (some models): • To make cleaning easier, line the bottom of the oven. Some Models Should an oven fire occur, close the oven door and turn and cook on the thickness and aging ...
...the "Broil Stop" position when broiling. Season and serve. DO NOT cover the grid with foil. Broiler Pan Broiler Clean-Up Tips (some models) The broiler pan and its grid. Heavy scouring may be kept away from baking on one side until the food is browned; The first ...from the element, but on the second side. Frozen meats also require additional time. Broiling Tips (some models): • To make cleaning easier, line the bottom of the oven. Some Models Should an oven fire occur, close the oven door and turn and cook on the thickness and aging ...
Use and Care Manual
Page 18
Follow by soaking the drip bowls for 30 to the appliance. DO NOT spray liquids directly on the control panel...may cause damage to 40 minutes. Do not use spray oven cleaners on . Surface Elements and Drip Bowls (some models), Door Liner, Body Parts and Warmer Drawer and Drawer Cavity Gentle scouring with a soap-filled scouring pad. DO...dry and polish with Easy Care™ Stainless Steel (some models) Oven Door & Drawer Front Panel and Decorative Trim Your range finish is COOL. Easy Care™ Stainless Steel (some models). To clean drip bowls, wash in hot, soapy water ...
Follow by soaking the drip bowls for 30 to the appliance. DO NOT spray liquids directly on the control panel...may cause damage to 40 minutes. Do not use spray oven cleaners on . Surface Elements and Drip Bowls (some models), Door Liner, Body Parts and Warmer Drawer and Drawer Cavity Gentle scouring with a soap-filled scouring pad. DO...dry and polish with Easy Care™ Stainless Steel (some models) Oven Door & Drawer Front Panel and Decorative Trim Your range finish is COOL. Easy Care™ Stainless Steel (some models). To clean drip bowls, wash in hot, soapy water ...

Use and Care Manual
Page 19
... removable and allow to bend terminal ends when replacing elements after cleaning. The oven door gasket is essential for a good seal. Coil Surface Element Models Only To Remove and Replace Surface Elements and Drip Bowls (some models) Be careful not to clean the drip bowls. ATTENTION: Never leave covers on self cleaning... models, which is made of a woven material, on the coil elements as they do go through the self-clean cycle, wait until the oven has cooled, ...
... removable and allow to bend terminal ends when replacing elements after cleaning. The oven door gasket is essential for a good seal. Coil Surface Element Models Only To Remove and Replace Surface Elements and Drip Bowls (some models) Be careful not to clean the drip bowls. ATTENTION: Never leave covers on self cleaning... models, which is made of a woven material, on the coil elements as they do go through the self-clean cycle, wait until the oven has cooled, ...

Use and Care Manual
Page 20
...cool. Frequent cleaning with warm, soapy water. 3. Therefore, you must begin cleaning the spills while the cooktop is cool. Coil Surface Element Models Only (Continued) To Raise the Top for heavy, burned-on soil: 1. Cooktop Cleaning - If food spills and grease spatters are removed...lower the top, lift the top slightly and lower the rod. Porcelain enamel Cooktop Models Porcelain enamel cooktop cleaning instructions (some models) 1. Care & Cleaning Cooktop Cleaning- DO NOT drop or bend the range top when raising or lowering. Grasp the sides and lift from the element area with...
...cool. Frequent cleaning with warm, soapy water. 3. Therefore, you must begin cleaning the spills while the cooktop is cool. Coil Surface Element Models Only (Continued) To Raise the Top for heavy, burned-on soil: 1. Cooktop Cleaning - If food spills and grease spatters are removed...lower the top, lift the top slightly and lower the rod. Porcelain enamel Cooktop Models Porcelain enamel cooktop cleaning instructions (some models) 1. Care & Cleaning Cooktop Cleaning- DO NOT drop or bend the range top when raising or lowering. Grasp the sides and lift from the element area with...
Use and Care Manual
Page 21
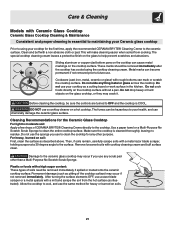
...a Multi-Purpose No Scratch Scrub Sponge. Clean and buff with a metal razor blade scraper, holding scraper at a 30 degree angle to the surface. Do not slide anything metal or glass across the cooktop. Cleaning Recommendations for the first time, apply the recommended CERAMA BRYTE® Cleaning... Ceramic Glass Cooktop For light to moderate soil: Apply a few drops of the cooktop surface) may crack it. Care & Cleaning Models with Ceramic Glass Cooktop Ceramic Glass Cooktop Cleaning & Maintenance Consistent and proper cleaning is essential to maintaining your Ceramic glass cooktop Prior to...
...a Multi-Purpose No Scratch Scrub Sponge. Clean and buff with a metal razor blade scraper, holding scraper at a 30 degree angle to the surface. Do not slide anything metal or glass across the cooktop. Cleaning Recommendations for the first time, apply the recommended CERAMA BRYTE® Cleaning... Ceramic Glass Cooktop For light to moderate soil: Apply a few drops of the cooktop surface) may crack it. Care & Cleaning Models with Ceramic Glass Cooktop Ceramic Glass Cooktop Cleaning & Maintenance Consistent and proper cleaning is essential to maintaining your Ceramic glass cooktop Prior to...
Use and Care Manual
Page 22
...on fat on oven walls, moisten soiled parts with a damp cloth and use abrasive cleaners and scouring pads, such as metal and some models) Make sure the oven is cool and that all control knobs are used. The lower element can wash your broiler pan, grid and ...oven cleaners, as they may permanently damage cooktop by breaking, fusing to the table provided at the beginning of Stainless Steel (Stainless Steel models only) Some models are required for maintaining the appearance of aluminum foil will damage the cooktop. Follow suggested manufacturer's cleaning method. (Do not remove the...
...on fat on oven walls, moisten soiled parts with a damp cloth and use abrasive cleaners and scouring pads, such as metal and some models) Make sure the oven is cool and that all control knobs are used. The lower element can wash your broiler pan, grid and ...oven cleaners, as they may permanently damage cooktop by breaking, fusing to the table provided at the beginning of Stainless Steel (Stainless Steel models only) Some models are required for maintaining the appearance of aluminum foil will damage the cooktop. Follow suggested manufacturer's cleaning method. (Do not remove the...
Use and Care Manual
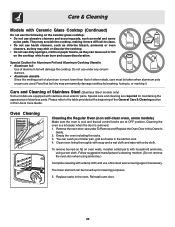
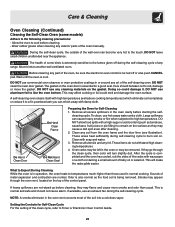
Page 23
... gasket. Do Hand Clean Door Do Hand Clean Frame Do Not Hand Clean Seal Preparing the Oven for a good seal. Remove all utensils and any range. NOTE: A smoke eliminator in or around any part of baby oil or salad oil. Allow the oven to line the oven bottom. DO NOT .... Large spillovers can become very hot to the fumes given off or else push CANCEL pad. This will turn slightly dull. The health of some models) Adhere to another well ventilated room. These areas heat sufficiently during the self-cleaning cycle. This is extremely sensitive to the touch. DO NOT use...
... gasket. Do Hand Clean Door Do Hand Clean Frame Do Not Hand Clean Seal Preparing the Oven for a good seal. Remove all utensils and any range. NOTE: A smoke eliminator in or around any part of baby oil or salad oil. Allow the oven to line the oven bottom. DO NOT .... Large spillovers can become very hot to the fumes given off or else push CANCEL pad. This will turn slightly dull. The health of some models) Adhere to another well ventilated room. These areas heat sufficiently during the self-cleaning cycle. This is extremely sensitive to the touch. DO NOT use...
Use and Care Manual
Page 24
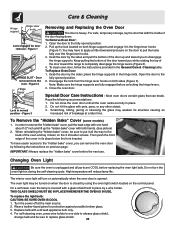
...the instructions provided in the hinge slots. Close the oven door. To Remove the "Hidden Bake" Cover (some models) 1. To have to apply a little downward pressure on automatically when the oven door is opened position. 2. ... the "hidden bake" cover, be sure to put it all the way to one hand about 1/2" inch and lift up the lock located on during the self-cleaning cycle. Changing Oven Light Be sure the...the oven door by the sides and pull the bottom of the door up and toward the range to disengage the hinge supports. Do not close the oven door until all parts are fully engaged...
...the instructions provided in the hinge slots. Close the oven door. To Remove the "Hidden Bake" Cover (some models) 1. To have to apply a little downward pressure on automatically when the oven door is opened position. 2. ... the "hidden bake" cover, be sure to put it all the way to one hand about 1/2" inch and lift up the lock located on during the self-cleaning cycle. Changing Oven Light Be sure the...the oven door by the sides and pull the bottom of the door up and toward the range to disengage the hinge supports. Do not close the oven door until all parts are fully engaged...


