
User Manual
Page 1
...recommended since it to allow movement for the supply line. • DO NOT install water supply tubing in a kit from the softener may damage the ice maker, causing it greatly increases the potential for the water supply line. Water supply tubing made of the unit to ... for any damage if plastic tubing is used for cleaning. P/N 240394901 The following items will not be required to the refrigerator. ICE MAKER INSTALLATION INSTRUCTIONS To avoid electric shock, which can cause death or severe personal injury, disconnect the refrigerator from electrical power before connecting...
...recommended since it to allow movement for the supply line. • DO NOT install water supply tubing in a kit from the softener may damage the ice maker, causing it greatly increases the potential for the water supply line. Water supply tubing made of the unit to ... for any damage if plastic tubing is used for cleaning. P/N 240394901 The following items will not be required to the refrigerator. ICE MAKER INSTALLATION INSTRUCTIONS To avoid electric shock, which can cause death or severe personal injury, disconnect the refrigerator from electrical power before connecting...

User Manual
Page 2
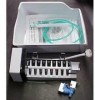
Use This Page to Identify Parts 1. Screws - Leveling Bracket Screw - Qty 1 9. Qty 2 10. Ice Container 3. Qty 2 5. Qty 2 6. Leveling Bracket Qty 1 8. Steel Clamp - Water Valve - Qty 1 11. Qty 1 7. Plastic Clamp - Ice Maker 2. Qty 1 Tools Required: • Putty Knife • ¼ inch Socket Wrench or Nut Driver • Knife • Pliers • Needle Nose Pliers • Adjustable Wrench 2 Screws - Water Inlet Tube - Plastic Water Supply Tubing 4.
Use This Page to Identify Parts 1. Screws - Leveling Bracket Screw - Qty 1 9. Qty 2 10. Ice Container 3. Qty 2 5. Qty 2 6. Leveling Bracket Qty 1 8. Steel Clamp - Water Valve - Qty 1 11. Qty 1 7. Plastic Clamp - Ice Maker 2. Qty 1 Tools Required: • Putty Knife • ¼ inch Socket Wrench or Nut Driver • Knife • Pliers • Needle Nose Pliers • Adjustable Wrench 2 Screws - Water Inlet Tube - Plastic Water Supply Tubing 4.
User Manual
Page 3
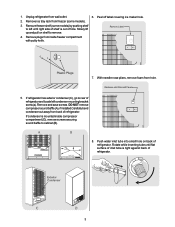
... screw(s). Remove freezer shelf (some models). 3. Remove plugs from inside compressor compartment (D), remove screws securing sound baffle to remove. 4. Remove ice tray rack from back of hole. Peel off label covering ice maker hole. 7. DO NOT remove compressor sound baffle (A), if installed.Carefully bend condenser out away from freezer (some models) by pushing...
... screw(s). Remove freezer shelf (some models). 3. Remove plugs from inside compressor compartment (D), remove screws securing sound baffle to remove. 4. Remove ice tray rack from back of hole. Peel off label covering ice maker hole. 7. DO NOT remove compressor sound baffle (A), if installed.Carefully bend condenser out away from freezer (some models) by pushing...
User Manual
Page 4
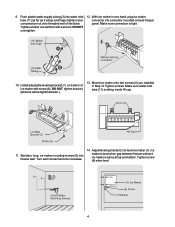
... connector mounted on bottom of inlet tube. Tighten screw (6) when level. 4 Tighten another one hand, plug ice maker connector into freezer wall. Mount ice maker onto two screws (5) you installed in one half turn with screw (6). With ice maker in Step 12.Tighten screws. Turn each screw five turns clockwise. 14. Make sure water inlet tube...
... connector mounted on bottom of inlet tube. Tighten screw (6) when level. 4 Tighten another one hand, plug ice maker connector into freezer wall. Mount ice maker onto two screws (5) you installed in one half turn with screw (6). With ice maker in Step 12.Tighten screws. Turn each screw five turns clockwise. 14. Make sure water inlet tube...
User Manual
Page 6
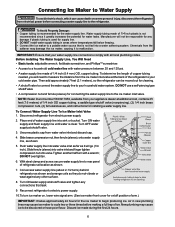
...damage if plastic tubing is not tied into valve inlet and finger tighten compression nut onto valve.Tighten another half turn ice maker on, lower wire signal arm. (See ice maker front cover for on/off position of the refrigerator to electric power supply. 10.To turn with a wrench; ... NOT use a self-piercing type shutoff valve. • A compression nut and ferrule (sleeve) for water leaks. NOTE: Water line kit number 5303917950, available from the ice maker inlet valve at location as shown and arrange coils so they do not vibrate or wear against any connections that is used for...
...damage if plastic tubing is not tied into valve inlet and finger tighten compression nut onto valve.Tighten another half turn ice maker on, lower wire signal arm. (See ice maker front cover for on/off position of the refrigerator to electric power supply. 10.To turn with a wrench; ... NOT use a self-piercing type shutoff valve. • A compression nut and ferrule (sleeve) for water leaks. NOTE: Water line kit number 5303917950, available from the ice maker inlet valve at location as shown and arrange coils so they do not vibrate or wear against any connections that is used for...
User Manual
Page 7
... a long period of time, turn the water supply valve to water that water quality determines your dishwasher. • Wash ice container in your ice quality. Do not connect the ice maker to the closed position. 7 Automatic Ice Maker Tips Remember that is softened. Empty the container and be turned off for short vacations. • If the...
... a long period of time, turn the water supply valve to water that water quality determines your dishwasher. • Wash ice container in your ice quality. Do not connect the ice maker to the closed position. 7 Automatic Ice Maker Tips Remember that is softened. Empty the container and be turned off for short vacations. • If the...


