
User Manual
Page 1
... tubing and shut off valve are available in areas where temperatures fall below freezing. • Connect the ice maker to install the ice maker kit. • 1/4 inch copper supply line with shut off valve • 1/4 inch brass compression nut and ferrule • Freezer shelf (Some models not eqipped with shelf). The following items will not be required to a drinkable water source that is used for water leaks. ICE MAKER INSTALLATION INSTRUCTIONS...
... tubing and shut off valve are available in areas where temperatures fall below freezing. • Connect the ice maker to install the ice maker kit. • 1/4 inch copper supply line with shut off valve • 1/4 inch brass compression nut and ferrule • Freezer shelf (Some models not eqipped with shelf). The following items will not be required to a drinkable water source that is used for water leaks. ICE MAKER INSTALLATION INSTRUCTIONS...

User Manual
Page 2
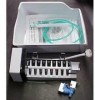
Ice Container 3. Screws - Water Valve - Qty 1 11. Water Inlet Tube - Qty 1 Tools Required: • Putty Knife • ¼ inch Socket Wrench or Nut Driver • Knife • Pliers • Needle Nose Pliers • Adjustable Wrench 2 Leveling Bracket Screw - Ice Maker 2. Qty 1 7. Screws - Qty 2 6. Qty 2 5. Use This Page to Identify Parts 1. Steel Clamp - Plastic Clamp - Plastic Water Supply Tubing 4. Qty 2 10. Qty 1 9. Leveling Bracket Qty 1 8.
Ice Container 3. Screws - Water Valve - Qty 1 11. Water Inlet Tube - Qty 1 Tools Required: • Putty Knife • ¼ inch Socket Wrench or Nut Driver • Knife • Pliers • Needle Nose Pliers • Adjustable Wrench 2 Leveling Bracket Screw - Ice Maker 2. Qty 1 7. Screws - Qty 2 6. Qty 2 5. Use This Page to Identify Parts 1. Steel Clamp - Plastic Clamp - Plastic Water Supply Tubing 4. Qty 2 10. Qty 1 9. Leveling Bracket Qty 1 8.
User Manual
Page 3
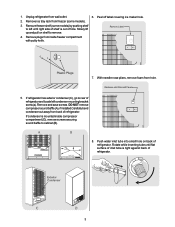
... models). 3. Push water inlet tube into small hole on shelf to left condenser mounting bracket screw(s). With needle nose pliers, remove foam from back of refrigerator. DO NOT remove compressor sound baffle (A), if installed.Carefully bend condenser out away from hole. 5. If refrigerator has exterior condenser (C), go to cabinet (B). 8. If condenser is out of refrigerator. 3 Peel off label covering ice maker...
... models). 3. Push water inlet tube into small hole on shelf to left condenser mounting bracket screw(s). With needle nose pliers, remove foam from back of refrigerator. DO NOT remove compressor sound baffle (A), if installed.Carefully bend condenser out away from hole. 5. If refrigerator has exterior condenser (C), go to cabinet (B). 8. If condenser is out of refrigerator. 3 Peel off label covering ice maker...
User Manual
Page 4
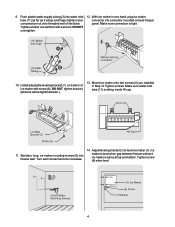
.... Push plastic water supply tubing (3) into water inlet tube (11) as far as it will be tightened later.) 13. Mount ice maker onto two screws (5) you installed in one half turn with screw (6). Start two, long, ice maker mounting screws (5) into connector mounted on bottom of inlet tube. Ice maker is level when gap between freezer wall and ice maker is sitting inside fill cup. 11. Make sure water inlet tube (11...
.... Push plastic water supply tubing (3) into water inlet tube (11) as far as it will be tightened later.) 13. Mount ice maker onto two screws (5) you installed in one half turn with screw (6). Start two, long, ice maker mounting screws (5) into connector mounted on bottom of inlet tube. Ice maker is level when gap between freezer wall and ice maker is sitting inside fill cup. 11. Make sure water inlet tube (11...

User Manual
Page 5
... water tubing to rear of cabinet with factory drilled holes. On refrigerators with two plastic clamps (9). Use a power drill with a Phillips® head bit to water valve. Align water valve bracket with a commercial household cleaner, ammonia or alcohol before applying clamps. 17. Set ice container (2) on shelf. 18. NOTE: Clean back of cabinet with dynamic condensers, remount sound baffle, if installed. See step 5. 5 Make...
... water tubing to rear of cabinet with factory drilled holes. On refrigerators with two plastic clamps (9). Use a power drill with a Phillips® head bit to water valve. Align water valve bracket with a commercial household cleaner, ammonia or alcohol before applying clamps. 17. Set ice container (2) on shelf. 18. NOTE: Clean back of cabinet with dynamic condensers, remount sound baffle, if installed. See step 5. 5 Make...
User Manual
Page 6
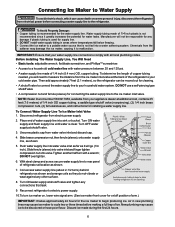
... moved out for the ice maker to begin producing ice. Place end of refrigerator at the back of 1/4 inch OD copper tubing, a saddle type shutoff valve (nonpiercing), (2) 1/4 inch brass compression nuts, (2) ferrules/sleeves, and instructions for installing a water supply line. Unscrew plastic cap from electrical power before making a full tray of 1/4 inch (6.4 mm) OD, copper tubing. DO NOT over tighten. 6. DO NOT use a self-piercing type shutoff...
... moved out for the ice maker to begin producing ice. Place end of refrigerator at the back of 1/4 inch OD copper tubing, a saddle type shutoff valve (nonpiercing), (2) 1/4 inch brass compression nuts, (2) ferrules/sleeves, and instructions for installing a water supply line. Unscrew plastic cap from electrical power before making a full tray of 1/4 inch (6.4 mm) OD, copper tubing. DO NOT over tighten. 6. DO NOT use a self-piercing type shutoff...
User Manual
Page 7
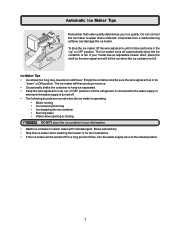
... dry. • Stop the ice maker when cleaning the freezer or for a long period of time, turn the water supply valve to keep ice separated. • Keep the wire signal arm in warm water with mild detergent. Empty the container and be turned off automatically when the ice container is full. To stop the ice maker, lift the wire signal arm until the refrigerator is connected to...
... dry. • Stop the ice maker when cleaning the freezer or for a long period of time, turn the water supply valve to keep ice separated. • Keep the wire signal arm in warm water with mild detergent. Empty the container and be turned off automatically when the ice container is full. To stop the ice maker, lift the wire signal arm until the refrigerator is connected to...


