Use and Care Manual
Page 2
...'s phone. Installation and service must be used when elevating the washer for the environment and human health, which could result in the Use and Care Guide, Operating Instructions, Installation Instructions and on the dryer • Operation serial plate located of the left side of the door opening. For more detailed information about recycling of this or any phone in a safe place. This Record Your Model and Serial Numbers book contains...
...'s phone. Installation and service must be used when elevating the washer for the environment and human health, which could result in the Use and Care Guide, Operating Instructions, Installation Instructions and on the dryer • Operation serial plate located of the left side of the door opening. For more detailed information about recycling of this or any phone in a safe place. This Record Your Model and Serial Numbers book contains...
Use and Care Manual
Page 3
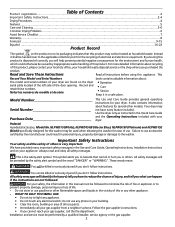
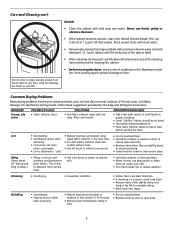
... after each load. Items contaminated with 3-prong grounding plug CORRECT Use this Use and Care Guide are not meant to cooking oils in the surrounding area. • Do not obstruct the flow of children's reach. If your dryer. Risk of the dryer, lint screen housing and exhaust duct should be killed or seriously injured if you don't follow this way ONLY Power supply cord with cooking...
... after each load. Items contaminated with 3-prong grounding plug CORRECT Use this Use and Care Guide are not meant to cooking oils in the surrounding area. • Do not obstruct the flow of children's reach. If your dryer. Risk of the dryer, lint screen housing and exhaust duct should be killed or seriously injured if you don't follow this way ONLY Power supply cord with cooking...

Use and Care Manual
Page 4
... possible, turn it will fill the drum 1/3 to begin the cycle. • To add or remove items when the dryer is running open the door. Dryer heat may not have it checked and reinstalled by an authorized servicer unless specifically recommended in this dryer. 1. The dryer will stop before attempting any type spray cleanser when cleaning dryer interior. Drying Procedures Follow fabric care label instructions. Check that attract lint. Fill out the load with...
... possible, turn it will fill the drum 1/3 to begin the cycle. • To add or remove items when the dryer is running open the door. Dryer heat may not have it checked and reinstalled by an authorized servicer unless specifically recommended in this dryer. 1. The dryer will stop before attempting any type spray cleanser when cleaning dryer interior. Drying Procedures Follow fabric care label instructions. Check that attract lint. Fill out the load with...
Use and Care Manual
Page 5
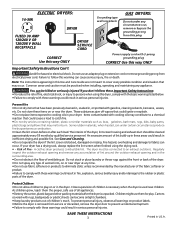
Reversible Dryer Door Your dryer is not in place, tumbling items could result in Important Safety Instructions and those listed below. • Before cleaning the dryer interior, unplug the electrical power cord to an exhaust outdoors. Use only the Air Fluff/No Heat option for directions on top of the rack. When items are dry, remove the rack and replace the lint screen. To reduce risk of fire or serious injury to persons or...
Reversible Dryer Door Your dryer is not in place, tumbling items could result in Important Safety Instructions and those listed below. • Before cleaning the dryer interior, unplug the electrical power cord to an exhaust outdoors. Use only the Air Fluff/No Heat option for directions on top of the rack. When items are dry, remove the rack and replace the lint screen. To reduce risk of fire or serious injury to persons or...
Use and Care Manual
Page 6
... is clean and in washer or dryer to electricity. • Or, add a fabric softener sheet and reduce static electricity. • Lint screen not clean tumble without heat. • Remove items when they are slightly damp when cycle began. • Use lint brush or roller to "pills." • Check that lint screen is normal with diluted chlorine bleach [1/2 cup (120 ml) in dryer after cycle ends. • Reduce load size and tumble...
... is clean and in washer or dryer to electricity. • Or, add a fabric softener sheet and reduce static electricity. • Lint screen not clean tumble without heat. • Remove items when they are slightly damp when cycle began. • Use lint brush or roller to "pills." • Check that lint screen is normal with diluted chlorine bleach [1/2 cup (120 ml) in dryer after cycle ends. • Reduce load size and tumble...
Use and Care Manual
Page 7
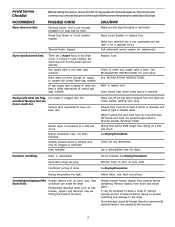
... INSTALLATION INSTRUCTIONS. Drying cycle takes too long, outside of the Foreign objects such as coins, pins, clips drum finish. Make sure all lint has been removed from drum and restart dryer. Drying time will not operate. Items left in wall outlet. or buttons are 2 house fuses in this list. Replace fuse. Dryer should heat when utility service is on a 240 volt circuit. Outside exhaust hood or exhaust duct may turn but won't heat. Exhaust duct must not exceed length listed in or plug...
... INSTALLATION INSTRUCTIONS. Drying cycle takes too long, outside of the Foreign objects such as coins, pins, clips drum finish. Make sure all lint has been removed from drum and restart dryer. Drying time will not operate. Items left in wall outlet. or buttons are 2 house fuses in this list. Replace fuse. Dryer should heat when utility service is on a 240 volt circuit. Outside exhaust hood or exhaust duct may turn but won't heat. Exhaust duct must not exceed length listed in or plug...
Use and Care Manual
Page 8
...owner to another party or removed outside the USA or Canada. 3. Products purchased "as removal of Alaska. 12. Obligations for servicing, such as -is installed, used in your appliance is warranted by Electrolux Major Appliances North America, a division of appliance or home incurred during installation, including but not limited to repair or replace appliance light bulbs, air filters, water filters...this warranty must be required. For one year limited warranty. use your appliance is warranted by Electrolux Canada Corp. THIS WRITTEN WARRANTY GIVES YOU SPECIFIC LEGAL RIGHTS. ...
...owner to another party or removed outside the USA or Canada. 3. Products purchased "as removal of Alaska. 12. Obligations for servicing, such as -is installed, used in your appliance is warranted by Electrolux Major Appliances North America, a division of appliance or home incurred during installation, including but not limited to repair or replace appliance light bulbs, air filters, water filters...this warranty must be required. For one year limited warranty. use your appliance is warranted by Electrolux Canada Corp. THIS WRITTEN WARRANTY GIVES YOU SPECIFIC LEGAL RIGHTS. ...


