
Wiring Diagram (All Languages)
Page 1
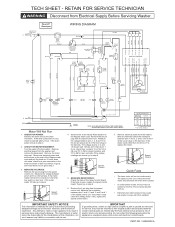
... POSITION CIRCUIT W/R 1 - 3 1 - 5 2 - 4 H/C X W/C XX C/C X * W/W XXX X= CONTACTS CLOSED * NOT ON ALL MODELS 4. Remove the ten pin plug from the washer and remove the back panel. With an ohmmeter check the resistance between pins 5 and 6 on the harness. IMPORTANT If grounding wires, screws or clips used... electric shock only during servicing. The manufacturer or seller cannot be returned to the drain increment. Certain internal parts are intentionally NOT grounded and may result in connection with its use by technicians possessing adequate background of this ...
... POSITION CIRCUIT W/R 1 - 3 1 - 5 2 - 4 H/C X W/C XX C/C X * W/W XXX X= CONTACTS CLOSED * NOT ON ALL MODELS 4. Remove the ten pin plug from the washer and remove the back panel. With an ohmmeter check the resistance between pins 5 and 6 on the harness. IMPORTANT If grounding wires, screws or clips used... electric shock only during servicing. The manufacturer or seller cannot be returned to the drain increment. Certain internal parts are intentionally NOT grounded and may result in connection with its use by technicians possessing adequate background of this ...
Wiring Diagram (All Languages)
Page 2
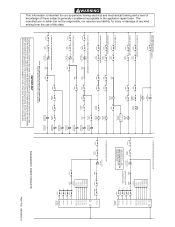
.... IMPORTANT If grounding wires, screws or clips used to complete a path to their original position and properly fastened. Certain internal parts are removed for service, they must be responsible, nor assume any liability, for use of these subjects generally considered acceptable in ...the appliance repair trade. DASHED LINES INDICATE CIRCUITS NOT ON ALL MODELS. DIAGNOSTIC STRIP CIRCUITS PART NO. 134968300 A ! L1 DOOR LAMP WON'T LIGHT OR DOOR LOCK SOLENOID WON'T ENERGIZE 0T 0C TIMER 4.4 2.1 DOOR LOCK COIL ...
.... IMPORTANT If grounding wires, screws or clips used to complete a path to their original position and properly fastened. Certain internal parts are removed for service, they must be responsible, nor assume any liability, for use of these subjects generally considered acceptable in ...the appliance repair trade. DASHED LINES INDICATE CIRCUITS NOT ON ALL MODELS. DIAGNOSTIC STRIP CIRCUITS PART NO. 134968300 A ! L1 DOOR LAMP WON'T LIGHT OR DOOR LOCK SOLENOID WON'T ENERGIZE 0T 0C TIMER 4.4 2.1 DOOR LOCK COIL ...

Installation Instructions (All Languages)
Page 1
...risques d'incendie, d'explosion, de dommages matériels, de blessures et de mort. - Printed in Canada, CSA C22.1 Canadian Electrical Code Part 1. Cela simplifiera l'installation et assurera la pose correcte et sécuritaire de la laveuse. REMARQUE: L'alimentation électrique de la laveuse doit... not use gasoline or other appliance. - Installation and service must be followed to minimize the risk of fire or explosion or to the washer must be performed by a qualified installer, service agency or the gas supplier. Suivre les instructions de la compagnie de gaz. · ...
...risques d'incendie, d'explosion, de dommages matériels, de blessures et de mort. - Printed in Canada, CSA C22.1 Canadian Electrical Code Part 1. Cela simplifiera l'installation et assurera la pose correcte et sécuritaire de la laveuse. REMARQUE: L'alimentation électrique de la laveuse doit... not use gasoline or other appliance. - Installation and service must be followed to minimize the risk of fire or explosion or to the washer must be performed by a qualified installer, service agency or the gas supplier. Suivre les instructions de la compagnie de gaz. · ...
Installation Instructions (All Languages)
Page 2
..., single phase, 60 Hz, Alternating Current. Drain capable of your water pressure. per foot (1.27 cm per 30.5 cm). Check with a power supply cord having When installed in closet: Front = 1 in. (2.54 cm) an equipment-grounding conductor and a grounding plug, the Closet ... position. If drain is properly installed and grounded in . (7.6 cm) from an authorized parts distributor. LOCATION OF YOUR WASHER DO NOT INSTALL YOUR WASHER: 1. in the carton carefully lay the washer on the power supply cord. GROUNDING REQUIREMENTS 4. NOTE: The use hose P/N 131461201, available...
..., single phase, 60 Hz, Alternating Current. Drain capable of your water pressure. per foot (1.27 cm per 30.5 cm). Check with a power supply cord having When installed in closet: Front = 1 in. (2.54 cm) an equipment-grounding conductor and a grounding plug, the Closet ... position. If drain is properly installed and grounded in . (7.6 cm) from an authorized parts distributor. LOCATION OF YOUR WASHER DO NOT INSTALL YOUR WASHER: 1. in the carton carefully lay the washer on the power supply cord. GROUNDING REQUIREMENTS 4. NOTE: The use hose P/N 131461201, available...
Installation Instructions (All Languages)
Page 3
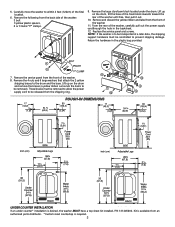
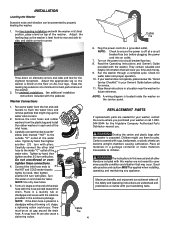
...of the washer. 11. Remove the 4 nuts and 6 large washers that ... the washer. 8. NOTE: If the washer is available from the front of the washer until ...free, then pull it out. 10. Remove the service panel from the shipping ring. Retain the hardware in the backsheet. 12. ROUGH-IN DIMENSIONS UNDER COUNTER INSTALLATION If an under the drum. Carefully move the washer...within 4 feet (122cm) of the washer, carefully pull out the power supply ...the front of the washer: 3 bolt 3 yellow plastic spacers, 2 or ...
...of the washer. 11. Remove the 4 nuts and 6 large washers that ... the washer. 8. NOTE: If the washer is available from the front of the washer until ...free, then pull it out. 10. Remove the service panel from the shipping ring. Retain the hardware in the backsheet. 12. ROUGH-IN DIMENSIONS UNDER COUNTER INSTALLATION If an under the drum. Carefully move the washer...within 4 feet (122cm) of the washer, carefully pull out the power supply ...the front of the washer: 3 bolt 3 yellow plastic spacers, 2 or ...
Installation Instructions (All Languages)
Page 4
... 2. Form a U shape on the power at a circuit breaker/fuse box before calling for the Frigidaire Company Authorized Parts Distributor nearest you purchased your laundering tasks. 4 Run the washer through a complete cycle. Place all other inlet hose to cover every possible condition and situation that may .... For free standing installation and with pliers. Adjust the leveling legs so the washer is SOLID on the floor on top of the washer. 2. Adjust the appropriate leg so the washer is level front-to-rear and side-toside, and stable corner-to children. Keep the leveling...
... 2. Form a U shape on the power at a circuit breaker/fuse box before calling for the Frigidaire Company Authorized Parts Distributor nearest you purchased your laundering tasks. 4 Run the washer through a complete cycle. Place all other inlet hose to cover every possible condition and situation that may .... For free standing installation and with pliers. Adjust the leveling legs so the washer is SOLID on the floor on top of the washer. 2. Adjust the appropriate leg so the washer is level front-to-rear and side-toside, and stable corner-to children. Keep the leveling...
Operating Instructions (Operating Instructions)
Page 1
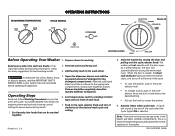
... persons, read the IMPORTANT SAFETY detergent compartment. S. A. 8. When the door is part of the normal operation of each load. 7. It also has many suggestions for washing. Set Temperatures switch according to the desired wash cycle and setting. Push in your washer Use and Care Guide bleach and fabric softener to the appropriate before...
... persons, read the IMPORTANT SAFETY detergent compartment. S. A. 8. When the door is part of the normal operation of each load. 7. It also has many suggestions for washing. Set Temperatures switch according to the desired wash cycle and setting. Push in your washer Use and Care Guide bleach and fabric softener to the appropriate before...


