
Use and Care Guide
Page 2
... could otherwise be killed or seriously injured if you what can happen if the instructions are found on Use the washer only as household waste. For more detailed information about recycling of this product. Read all safety messages. contains valuable... follow instructions. It also contains information about • Operation • Care • Service Keep it shall be used when elevating the washer for several other models. Table of Contents IMPORTANT SAFETY INSTRUCTIONS ...3-4 Washing Procedures ...4-6 Stain Removal ...6-7 Common Washing Problems ...8 Care and Cleaning ...9...
... could otherwise be killed or seriously injured if you what can happen if the instructions are found on Use the washer only as household waste. For more detailed information about recycling of this product. Read all safety messages. contains valuable... follow instructions. It also contains information about • Operation • Care • Service Keep it shall be used when elevating the washer for several other models. Table of Contents IMPORTANT SAFETY INSTRUCTIONS ...3-4 Washing Procedures ...4-6 Stain Removal ...6-7 Common Washing Problems ...8 Care and Cleaning ...9...
Use and Care Guide
Page 3
...installed and electrically grounded by a qualified service person in 1 load unless specified on or near children. All repairs and servicing must be plugged into the washer while parts are packed in the washer for several minutes. Before loading, unloading or adding items, push in the cycle selector ...knob and allow children to 30 minutes, if the washer has not been manually turned off vapors that...
...installed and electrically grounded by a qualified service person in 1 load unless specified on or near children. All repairs and servicing must be plugged into the washer while parts are packed in the washer for several minutes. Before loading, unloading or adding items, push in the cycle selector ...knob and allow children to 30 minutes, if the washer has not been manually turned off vapors that...
Use and Care Guide
Page 4
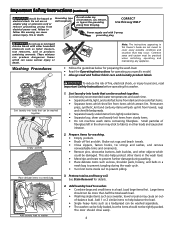
... specific model. • Always read Important Safety Instructions before operating this washer. 1. Common sense and caution must be tightly packed. Add laundry load to persons, read and follow this Owner's Guide are not meant to washer. • Combine large and small items in a mesh bag to...damage during the wash cycle. • Turn knit items inside out to help balance the load. • Single heavy items such as a bedspread can be washed separately. • The washer can produce dangerous fumes which attract lint. The door should not be damaged. Small particles of...
... specific model. • Always read Important Safety Instructions before operating this washer. 1. Common sense and caution must be tightly packed. Add laundry load to persons, read and follow this Owner's Guide are not meant to washer. • Combine large and small items in a mesh bag to...damage during the wash cycle. • Turn knit items inside out to help balance the load. • Single heavy items such as a bedspread can be washed separately. • The washer can produce dangerous fumes which attract lint. The door should not be damaged. Small particles of...
Use and Care Guide
Page 5
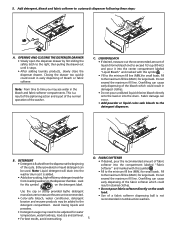
... the dispenser drawer by first sliding the safety latch to the maximum fill line (MAX.) for large loads. FABRIC SOFTENER • If desired, pour the recommended amount of the washer. Closing the drawer too quickly could result in early dispensing of the fabric softener which could result in... compartment. Note: From time to time you may be adjusted for this symbol . • Fill to the mininum fill line (MIN.)for front-loading washers to the detergent dispenser. This is a result of the siphoning action and is flushed from the dispenser at the beginning of a fabric softener ...
... the dispenser drawer by first sliding the safety latch to the maximum fill line (MAX.) for large loads. FABRIC SOFTENER • If desired, pour the recommended amount of the washer. Closing the drawer too quickly could result in early dispensing of the fabric softener which could result in... compartment. Note: From time to time you may be adjusted for this symbol . • Fill to the mininum fill line (MIN.)for front-loading washers to the detergent dispenser. This is a result of the siphoning action and is flushed from the dispenser at the beginning of a fabric softener ...

Use and Care Guide
Page 6
... pretreat stains, use or mix liquid chlorine bleach with all instructions on top of the washer. For successful stain removal: • Remove stains promptly. • Determine the kind of each load. Start the washer. (See Operating Instructions for your specific model.) 7. Do not use a prewash product,... not combine stain removal products, especially ammonia and chlorine bleach. Remove items when the cycle is opened during operation, the washer will shut off vapors that this product meets the ENERGY STAR® guidelines for colorfastness by fabric care label. Vapors can...
... pretreat stains, use or mix liquid chlorine bleach with all instructions on top of the washer. For successful stain removal: • Remove stains promptly. • Determine the kind of each load. Start the washer. (See Operating Instructions for your specific model.) 7. Do not use a prewash product,... not combine stain removal products, especially ammonia and chlorine bleach. Remove items when the cycle is opened during operation, the washer will shut off vapors that this product meets the ENERGY STAR® guidelines for colorfastness by fabric care label. Vapors can...
Use and Care Guide
Page 8
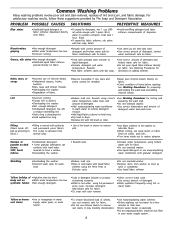
... water conditioner to wash water to remove detergent residue. •Add liquid fabric softener to final rinse. •Dry load in pocket. •Overloading the washer. •Not enough detergent. •Undissolved detergent has left in dryer. •Remove lint with granular detergent. Add...Do not use nonprecipitating water conditioner with lint brush or roller. •See Washing Procedures for sorting and preparing the wash load. •Do not overload washer. •Use correct temperature and amount of items before washing. Soak item 1 hour. Add bleach safe for fabric. ...
... water conditioner to wash water to remove detergent residue. •Add liquid fabric softener to final rinse. •Dry load in pocket. •Overloading the washer. •Not enough detergent. •Undissolved detergent has left in dryer. •Remove lint with granular detergent. Add...Do not use nonprecipitating water conditioner with lint brush or roller. •See Washing Procedures for sorting and preparing the wash load. •Do not overload washer. •Use correct temperature and amount of items before washing. Soak item 1 hour. Add bleach safe for fabric. ...
Use and Care Guide
Page 9
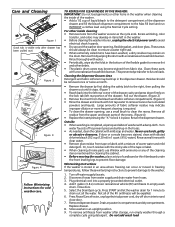
... follow these parts with diluted chlorine bleach [1/2 cup (120 ml) in compartments and dry compartments. Do not add wash load 9 TO REFRESH OR CLEAN INSIDE OF THE WASHER: IMPORTANT: Do not load garments or other items in the hoses. • As needed, clean the cabinet with a damp cloth. Excess wrinkling... gasket, and door glass. Or, touch residue with the sticky side of cardboard or thin fiberboard under the front leveling legs to clean the recess. Winterizing Instructions If the washer is stored in an area where freezing can occur or moved in an upright position. 9. Drain any of ...
... follow these parts with diluted chlorine bleach [1/2 cup (120 ml) in compartments and dry compartments. Do not add wash load 9 TO REFRESH OR CLEAN INSIDE OF THE WASHER: IMPORTANT: Do not load garments or other items in the hoses. • As needed, clean the cabinet with a damp cloth. Excess wrinkling... gasket, and door glass. Or, touch residue with the sticky side of cardboard or thin fiberboard under the front leveling legs to clean the recess. Winterizing Instructions If the washer is stored in an area where freezing can occur or moved in an upright position. 9. Drain any of ...
Use and Care Guide
Page 10
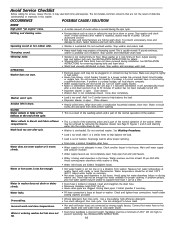
... cord may not be plugged in or connection may be in this list. Do not increase fuse capacity. Do not overload washer. See Washing Procedures. • Load is kinked or clogged. Add 1 or 2 similar items to support more than 1 use . Connect hot water hose to...Clean and straighten the drain hose. • Maximum standpipe height is restarted, objects may be a minimum of the washer. If noise continues after spin. Water leaks. Rearrange load to drum, fasten fasteners and turn items inside out. Water temperature should be at nearby faucet with a nonabrasive ...
... cord may not be plugged in or connection may be in this list. Do not increase fuse capacity. Do not overload washer. See Washing Procedures. • Load is kinked or clogged. Add 1 or 2 similar items to support more than 1 use . Connect hot water hose to...Clean and straighten the drain hose. • Maximum standpipe height is restarted, objects may be a minimum of the washer. If noise continues after spin. Water leaks. Rearrange load to drum, fasten fasteners and turn items inside out. Water temperature should be at nearby faucet with a nonabrasive ...
Installation Instructions
Page 1
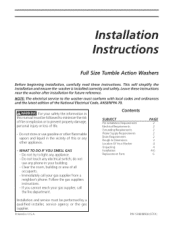
...fire department. P/N 134848900 (0701) Contents S UBJECT Pre-lnstallation Requirements Electrical Requirements Grounding Requirements Water Supply Requirements Drain Requirements Rough-In Dimensions Location Of Your Washer Unpacking Installation Replacement Parts PAGE 2 2 2 2 2 3 4 4 4-6 6 Installation and service must conform with local codes and ordinances and the latest...8226; Do not touch any phone in U.S.A. WHAT TO DO IF YOU SMELL GAS • Do not try to the washer must be followed to minimize the risk of fire or explosion or to prevent property damage, personal injury or loss of ...
...fire department. P/N 134848900 (0701) Contents S UBJECT Pre-lnstallation Requirements Electrical Requirements Grounding Requirements Water Supply Requirements Drain Requirements Rough-In Dimensions Location Of Your Washer Unpacking Installation Replacement Parts PAGE 2 2 2 2 2 3 4 4 4-6 6 Installation and service must conform with local codes and ordinances and the latest...8226; Do not touch any phone in U.S.A. WHAT TO DO IF YOU SMELL GAS • Do not try to the washer must be followed to minimize the risk of fire or explosion or to prevent property damage, personal injury or loss of ...
Installation Instructions
Page 2
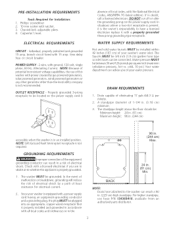
... where a two-slot receptacle is present, it is not required. Phillips screwdriver 2. 10 mm socketwith ratchet. 3. Properly grounded 3-prong receptacle to the washer can result in . (244 cm) Max. Check with the National Electrical Codes, ANSI/NFPA 70 (latest edition). cold, 10 psi.) Your water ...NOTE: Drain hose attached to be between 30 and 120 pounds per minute. 2. branch circuit fused with a properly grounded three prong grounding type receptacle. The washer MUST be : Minimum height: 24 in. (61 cm) Maximum height: 96 in. (244cm) r 96 in a risk of your water pressure. ...
... where a two-slot receptacle is present, it is not required. Phillips screwdriver 2. 10 mm socketwith ratchet. 3. Properly grounded 3-prong receptacle to the washer can result in . (244 cm) Max. Check with the National Electrical Codes, ANSI/NFPA 70 (latest edition). cold, 10 psi.) Your water ...NOTE: Drain hose attached to be between 30 and 120 pounds per minute. 2. branch circuit fused with a properly grounded three prong grounding type receptacle. The washer MUST be : Minimum height: 24 in. (61 cm) Maximum height: 96 in. (244cm) r 96 in a risk of your water pressure. ...
Installation Instructions
Page 4
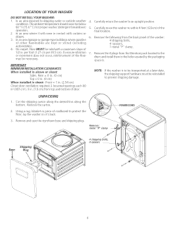
.... 2. IMPORTANT MINIMUM INSTALLATION CLEARANCES When installed in alcove or closet: Sides, Rear = 0 in. (0 cm) Top = 0 in. (0 cm) When installed in closet: Front = I .27 cm per foot (I in. (2.54 cm) Closet door ventilation required: 2 Iouvered openings each 60 in2(387 cm2), 3 in the holes vacated by the packaging spacers.... In an area exposed to protect the floor, lay the washer on it will come in . The ambient temperature should never be solid with curtains or drapes. 3. In an area (garage or garage-type...
.... 2. IMPORTANT MINIMUM INSTALLATION CLEARANCES When installed in alcove or closet: Sides, Rear = 0 in. (0 cm) Top = 0 in. (0 cm) When installed in closet: Front = I .27 cm per foot (I in. (2.54 cm) Closet door ventilation required: 2 Iouvered openings each 60 in2(387 cm2), 3 in the holes vacated by the packaging spacers.... In an area exposed to protect the floor, lay the washer on it will come in . The ambient temperature should never be solid with curtains or drapes. 3. In an area (garage or garage-type...

Installation Instructions
Page 5
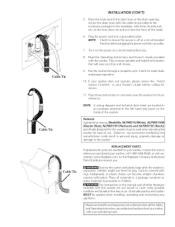
..., then tighten another 2/3 turn with the spring clamp on the coupler elbow and drain hose hanger installed on top of the washer• Adjust the leveling legs so the washer is level front-to-rear and side-to-side, and stable corner-to-corner. \\\ SPRING / CLAMP PROVIDED ON HOSE i / \\ /' jr 4 PUSH HOSE ONTO...
..., then tighten another 2/3 turn with the spring clamp on the coupler elbow and drain hose hanger installed on top of the washer• Adjust the leveling legs so the washer is level front-to-rear and side-to-side, and stable corner-to-corner. \\\ SPRING / CLAMP PROVIDED ON HOSE i / \\ /' jr 4 PUSH HOSE ONTO...
Installation Instructions
Page 6
... them for future reference. Read the Operating Instructions and Owner's Guide provided with your washer, call 1-800-944-9044, or visit our website, www.frigidaire.com, for service. 1 I. Check for this washer are understood and practiced asa routine with the washer. Placethese instructions in the drain opening. Pedestal A pedestal accessory,ModelNo. REPLACEMENT PARTS If...
... them for future reference. Read the Operating Instructions and Owner's Guide provided with your washer, call 1-800-944-9044, or visit our website, www.frigidaire.com, for service. 1 I. Check for this washer are understood and practiced asa routine with the washer. Placethese instructions in the drain opening. Pedestal A pedestal accessory,ModelNo. REPLACEMENT PARTS If...


