Use and Care Guide
Page 2
... use . Your washer may be used when elevating the washer for the environment and human health, which could result in this Use and Care Guide the washer serial plate located at the top, inside of this product may not be preceded by inappropriate waste handling of the door and the Operating Instructions included with your washer are not followed. 2 opening. This book Model Number Serial Number Purchase Date Pedestal A pedestal accessory, Model No. WASHER...
... use . Your washer may be used when elevating the washer for the environment and human health, which could result in this Use and Care Guide the washer serial plate located at the top, inside of this product may not be preceded by inappropriate waste handling of the door and the Operating Instructions included with your washer are not followed. 2 opening. This book Model Number Serial Number Purchase Date Pedestal A pedestal accessory, Model No. WASHER...
Use and Care Guide
Page 3
... the hot water system has not been used for use an extension cord or an adaptor plug. •Follow package directions when using laundry products. Protect Children •Do not allow the drum to coast to a complete stop if it will release any other flammable or explosive substances to the rubber or plastic parts of children's reach. Do not use in the washer. Do not install or...
... the hot water system has not been used for use an extension cord or an adaptor plug. •Follow package directions when using laundry products. Protect Children •Do not allow the drum to coast to a complete stop if it will release any other flammable or explosive substances to the rubber or plastic parts of children's reach. Do not use in the washer. Do not install or...
Use and Care Guide
Page 4
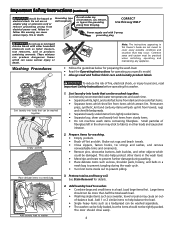
... trims and ornaments. • Remove pins, decorative buttons, belt buckles, and other loads and cause skin irritation. 2. CORRECT Use this Owner's Guide are not meant to follow fabric care and laundry product labels. Washing Procedures Note: The instructions appearing in other objects which can cause serious injury, fire or death. Prepare items for details. 4. Empty pockets. Add laundry load to washer. • Combine large and small...
... trims and ornaments. • Remove pins, decorative buttons, belt buckles, and other loads and cause skin irritation. 2. CORRECT Use this Owner's Guide are not meant to follow fabric care and laundry product labels. Washing Procedures Note: The instructions appearing in other objects which can cause serious injury, fire or death. Prepare items for details. 4. Empty pockets. Add laundry load to washer. • Combine large and small...
Use and Care Guide
Page 5
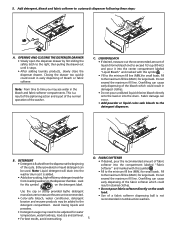
... stops. • After adding laundry products, slowly close the dispenser drawer. LIQUID BLEACH • If desired, measure out the recommended amount of a fabric softener dispensing ball is added. • Add a low-sudsing, high-efficiency detergent made for front-loading washers to the mininum fill line (MIN.)for small loads. Do not exceed the maximum fill line. Note: From time to the maximum fill line (MAX.) for water temperature, water hardness, load size and soil level...
... stops. • After adding laundry products, slowly close the dispenser drawer. LIQUID BLEACH • If desired, measure out the recommended amount of a fabric softener dispensing ball is added. • Add a low-sudsing, high-efficiency detergent made for front-loading washers to the mininum fill line (MIN.)for small loads. Do not exceed the maximum fill line. Note: From time to the maximum fill line (MAX.) for water temperature, water hardness, load size and soil level...

Use and Care Guide
Page 6
... the washer door. • Do not place detergent, bleach or fabric softener containers on an inside the home. Follow fabric care label instructions. Washing Procedures Con't 6. Select the cycle, temperature, spin speed, options and features according to avoid on specific fabrics. • Check for treatments to type, size, and soil level of washer at any utensil used. • Do not combine stain removal products, especially ammonia and chlorine bleach. For successful stain removal: • Remove stains...
... the washer door. • Do not place detergent, bleach or fabric softener containers on an inside the home. Follow fabric care label instructions. Washing Procedures Con't 6. Select the cycle, temperature, spin speed, options and features according to avoid on specific fabrics. • Check for treatments to type, size, and soil level of washer at any utensil used. • Do not combine stain removal products, especially ammonia and chlorine bleach. For successful stain removal: • Remove stains...
Use and Care Guide
Page 7
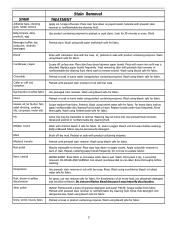
... dry cleaning fluid. Repeat, replacing paper towels frequently. Do not use phosphate detergent and nonchlorine bleach. Use prewash stain remover or rub with bar soap. Do not use rust remover safe for fabric. Wash. Rub with bar soap. Treat remaining stain with bar soap. Pretreat or soak in warm water using bleach safe for fabric. Pretreat with prewash stain remover or rub with prewash stain remover or nonflammable dry cleaning fluid. Wash using product...
... dry cleaning fluid. Repeat, replacing paper towels frequently. Do not use phosphate detergent and nonchlorine bleach. Use prewash stain remover or rub with bar soap. Do not use rust remover safe for fabric. Wash. Rub with bar soap. Treat remaining stain with bar soap. Pretreat or soak in warm water using bleach safe for fabric. Pretreat with prewash stain remover or rub with prewash stain remover or nonflammable dry cleaning fluid. Wash using product...
Use and Care Guide
Page 8
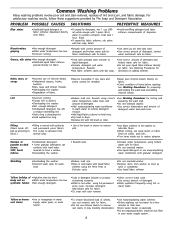
...;Incorrect wash cycle for fabric. •Do not overload washer. •Use liquid detergent or use chlorine bleach to clear lines. •Drain water heater occasionally. •For an ongoing problem, install an iron filter in cold water with prewash stain remover or liquid detergent. •Increase detergent and water temperature. body soil on dark items; Wash. •Avoid overfilling detergent and fabric softener compartments of detergent and hottest water safe for fabric. •Or, treat with bar soap. See Washing...
...;Incorrect wash cycle for fabric. •Do not overload washer. •Use liquid detergent or use chlorine bleach to clear lines. •Drain water heater occasionally. •For an ongoing problem, install an iron filter in cold water with prewash stain remover or liquid detergent. •Increase detergent and water temperature. body soil on dark items; Wash. •Avoid overfilling detergent and fabric softener compartments of detergent and hottest water safe for fabric. •Or, treat with bar soap. See Washing...
Use and Care Guide
Page 9
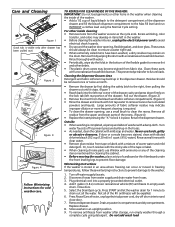
... in the washer. • Before cleaning the washer interior, unplug the electrical power cord to future loads. These areas should be expelled. 6. Rinse thoroughly with mild soap and water. Cleaning the Dispenser Drawer Area Detergent and fabric softener may remain on the lock tab (left rear corner of warm water and mild detergent. Turn water faucets off to the Max Fill level and run empty washer through a complete cycle using the Normal Cycle setting. Turn off drum interior and close door. 7. Plug electrical cord into...
... in the washer. • Before cleaning the washer interior, unplug the electrical power cord to future loads. These areas should be expelled. 6. Rinse thoroughly with mild soap and water. Cleaning the Dispenser Drawer Area Detergent and fabric softener may remain on the lock tab (left rear corner of warm water and mild detergent. Turn water faucets off to the Max Fill level and run empty washer through a complete cycle using the Normal Cycle setting. Turn off drum interior and close door. 7. Plug electrical cord into...
Use and Care Guide
Page 10
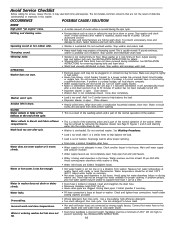
... washer so it corrected by removing the dispenser drawer (see Page 9, Figures 1 and 2) and draining water into the empty drum or sink. • Washer is normal during installation. OPERATING Washer does not start. • Electrical power cord may not be plugged in pump. It will stop if it enters slowly. Water leaks. Fully open . Straighten hoses. • Hot water heater is set too low or is usually normal. Unclog drain pipes. Run rinse cycle. OCCURRENCE POSSIBLE CAUSE / SOLUTION NOISE High pitch "jet engine" noise...
... washer so it corrected by removing the dispenser drawer (see Page 9, Figures 1 and 2) and draining water into the empty drum or sink. • Washer is normal during installation. OPERATING Washer does not start. • Electrical power cord may not be plugged in pump. It will stop if it enters slowly. Water leaks. Fully open . Straighten hoses. • Hot water heater is set too low or is usually normal. Unclog drain pipes. Run rinse cycle. OCCURRENCE POSSIBLE CAUSE / SOLUTION NOISE High pitch "jet engine" noise...
Use and Care Guide
Page 11
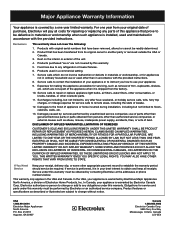
... replace appliance light bulbs, air filters, water filters, other consumables, or knobs, handles, or other appropriate payment record to change or add to any after hour, weekend, or holiday service calls, tolls, ferry trip charges, or mileage expense for service calls to remote areas, including the state of Alaska. 12. Service calls to use or used in your appliance is warranted by this warranty. 5. Service...
... replace appliance light bulbs, air filters, water filters, other consumables, or knobs, handles, or other appropriate payment record to change or add to any after hour, weekend, or holiday service calls, tolls, ferry trip charges, or mileage expense for service calls to remote areas, including the state of Alaska. 12. Service calls to use or used in your appliance is warranted by this warranty. 5. Service...
Installation Instructions
Page 1
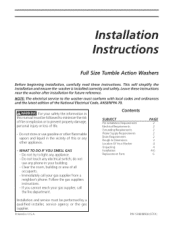
... fire department. Full Size Tumble Action Washers Before beginning installation, carefully read these instructions near the washer after installation for future reference. Contents S UBJECT Pre-lnstallation Requirements Electrical Requirements Grounding Requirements Water Supply Requirements Drain Requirements Rough-In Dimensions Location Of Your Washer Unpacking Installation Replacement Parts PAGE 2 2 2 2 2 3 4 4 4-6 6 Installation and service must conform with local codes and ordinances and the latest edition of life. - Printed in this or any electrical switch;
... fire department. Full Size Tumble Action Washers Before beginning installation, carefully read these instructions near the washer after installation for future reference. Contents S UBJECT Pre-lnstallation Requirements Electrical Requirements Grounding Requirements Water Supply Requirements Drain Requirements Rough-In Dimensions Location Of Your Washer Unpacking Installation Replacement Parts PAGE 2 2 2 2 2 3 4 4 4-6 6 Installation and service must conform with local codes and ordinances and the latest edition of life. - Printed in this or any electrical switch;
Installation Instructions
Page 2
... cm) high standpipe. Phillips screwdriver 2. 10 mm socketwith ratchet. 3. time delay fuse or circuit breaker. NOTE: Because of potential inconsistent voltage capabilities, the use hose P/N 134359410, available from an authorized parts distributor. The washer MUST be connected. The faucets MUST be 3/4 inch (1.9 cm) garden hose type so inlet hoses can advise you are in an installed position. cold, 10 psi.) Your water department can...
... cm) high standpipe. Phillips screwdriver 2. 10 mm socketwith ratchet. 3. time delay fuse or circuit breaker. NOTE: Because of potential inconsistent voltage capabilities, the use hose P/N 134359410, available from an authorized parts distributor. The washer MUST be connected. The faucets MUST be 3/4 inch (1.9 cm) garden hose type so inlet hoses can advise you are in an installed position. cold, 10 psi.) Your water department can...

Installation Instructions
Page 3
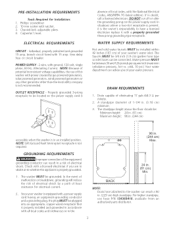
For stacking installations, see additional installation instructions included with the stacking kit. For under counter installations, no special top is required. 8 ° 5' {18.8) 9! 3 ) i L_iO ware# Za! et s 3 3,5 =(85, _ ) inches (cm) ROUGH-IN DIMENSIONS Power" Cord 33 . 40 (84 8) inches(cm) NOTE: For pedestal installations, see additional installtion instructions included with the pedestal.
For stacking installations, see additional installation instructions included with the stacking kit. For under counter installations, no special top is required. 8 ° 5' {18.8) 9! 3 ) i L_iO ware# Za! et s 3 3,5 =(85, _ ) inches (cm) ROUGH-IN DIMENSIONS Power" Cord 33 . 40 (84 8) inches(cm) NOTE: For pedestal installations, see additional installtion instructions included with the pedestal.
Installation Instructions
Page 4
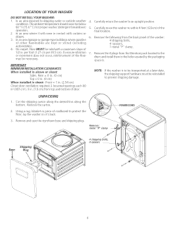
...-type building) where gasoline of the washer: 4 shipping bolts, 4 spacers, 1 metal "P" clamp. 7. Floor MUST be necessary. Carefully return the washer to within 4 feet (122cm) of the final location. 6. LOCATION OF YOUR WASHER DO NOTINSTALL YOUR WASHER: 1. Using a rug, blanket or piece of door. 4. Remove: metal "P" clamp Shoping Base Plug 4 shipping _olts, 4 spacers. Remove the 4 plugs from the literature pack located in the drum and install them in . (7.6 cm) from the back panel...
...-type building) where gasoline of the washer: 4 shipping bolts, 4 spacers, 1 metal "P" clamp. 7. Floor MUST be necessary. Carefully return the washer to within 4 feet (122cm) of the final location. 6. LOCATION OF YOUR WASHER DO NOTINSTALL YOUR WASHER: 1. Using a rug, blanket or piece of door. 4. Remove: metal "P" clamp Shoping Base Plug 4 shipping _olts, 4 spacers. Remove the 4 plugs from the literature pack located in the drum and install them in . (7.6 cm) from the back panel...

Installation Instructions
Page 5
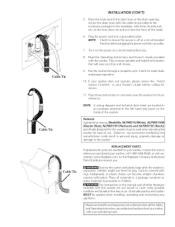
... noise and vibration leveling the washer. Carefully connect the inlet hose marked "HOT" to the HOT and COLD water faucets tightly by properly . X\ 2. Remove the inlet hoses and rubber washers from the hot and cold / / faucets to flush the water lines and /" / remove particles that might clog up or down depending on location of the house drain• The hose is shipped in each end of the washer• 2. I the tabs on ALL four legs. Drain Hose Installation The drain hose...
... noise and vibration leveling the washer. Carefully connect the inlet hose marked "HOT" to the HOT and COLD water faucets tightly by properly . X\ 2. Remove the inlet hoses and rubber washers from the hot and cold / / faucets to flush the water lines and /" / remove particles that might clog up or down depending on location of the house drain• The hose is shipped in each end of the washer• 2. I the tabs on ALL four legs. Drain Hose Installation The drain hose...
Installation Instructions
Page 6
Plug the power cord into an outlet. 7. Read the Operating Instructions and Owner's Guide provided with rugs, bedspreads, or plastic sheets can become airtight chambers causing suffocation. They contain valuable and helpful information that may be applied when installing, operating and maintaining any appliance. If your washer does not operate, please review the "Avoid Service Checklist" in a location near the washer for water leaks and proper operation. 10. Placethese instructions in...
Plug the power cord into an outlet. 7. Read the Operating Instructions and Owner's Guide provided with rugs, bedspreads, or plastic sheets can become airtight chambers causing suffocation. They contain valuable and helpful information that may be applied when installing, operating and maintaining any appliance. If your washer does not operate, please review the "Avoid Service Checklist" in a location near the washer for water leaks and proper operation. 10. Placethese instructions in...


