
Use and Care Guide
Page 2
...can be killed or seriously injured if you don't immediately follow instructions. You can happen if the instructions are found on Use the washer only as household waste. Table of Contents IMPORTANT SAFETY INSTRUCTIONS ...3-4 Washing Procedures ...4-6 Stain Removal ...6-7 Common Washing Problems ...8 Care and ...-22 Assistance or Service The symbol on the product or on its packaging indicates that can be used when elevating the washer for your washer are not followed. 2 Always read and obey all instructions before using this product is disposed of others . Record and...
...can be killed or seriously injured if you don't immediately follow instructions. You can happen if the instructions are found on Use the washer only as household waste. Table of Contents IMPORTANT SAFETY INSTRUCTIONS ...3-4 Washing Procedures ...4-6 Stain Removal ...6-7 Common Washing Problems ...8 Care and ...-22 Assistance or Service The symbol on the product or on its packaging indicates that can be used when elevating the washer for your washer are not followed. 2 Always read and obey all instructions before using this product is disposed of others . Record and...
Use and Care Guide
Page 3
... usage can be removed. Do not install on a solid floor. You can produce poisonous gas--resulting in 1 load unless specified on product labels. •Before the washer is flammable; If the hot water system has not been used for 2 weeks or more. Installation instructions are ...or death. - Use only authorized factory parts. - Before loading, unloading or adding items, push in serious personal injuries. •This washer is unpacked. Do not install or store the washer where it becomes overheated. The washer will be necessary to reinforce the floor to a gas pipe....
... usage can be removed. Do not install on a solid floor. You can produce poisonous gas--resulting in 1 load unless specified on product labels. •Before the washer is flammable; If the hot water system has not been used for 2 weeks or more. Installation instructions are ...or death. - Use only authorized factory parts. - Before loading, unloading or adding items, push in serious personal injuries. •This washer is unpacked. Do not install or store the washer where it becomes overheated. The washer will be necessary to reinforce the floor to a gas pipe....
Use and Care Guide
Page 4
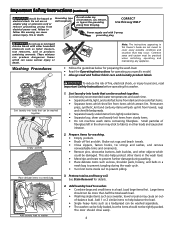
...Owner's Guide are not meant to persons, read and follow this warning can be fully loaded, but the items should close easily. 4 Add laundry load to washer. Add 1 or 2 similar items to help balance the load. • Single heavy items such as a sweater, towel or jeans may stick to...from electrical power cord. Empty pockets. Place delicate items in a load. Large items should not be more than half the total wash load. • Washing single items such as a bedspread can be washed separately. • The washer can cause serious injury, fire or death. CORRECT Use this plug...
...Owner's Guide are not meant to persons, read and follow this warning can be fully loaded, but the items should close easily. 4 Add laundry load to washer. Add 1 or 2 similar items to help balance the load. • Single heavy items such as a sweater, towel or jeans may stick to...from electrical power cord. Empty pockets. Place delicate items in a load. Large items should not be more than half the total wash load. • Washing single items such as a bedspread can be washed separately. • The washer can cause serious injury, fire or death. CORRECT Use this plug...
Use and Care Guide
Page 5
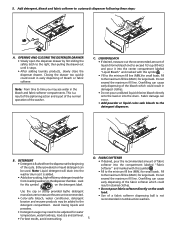
...: From time to automatic dispenser following these steps: A. Fill to the maximum fill line (MAX.) for large loads. B. Fill to the maximum fill line (MAX.) for front-loading washers to the detergent dispenser. Do not exceed the maximum fill line. D. This is a result of the siphoning... action and is flushed from the dispenser at the beginning of the washer. DETERGENT • Detergent is part of ...
...: From time to automatic dispenser following these steps: A. Fill to the maximum fill line (MAX.) for large loads. B. Fill to the maximum fill line (MAX.) for front-loading washers to the detergent dispenser. Do not exceed the maximum fill line. D. This is a result of the siphoning... action and is flushed from the dispenser at the beginning of the washer. DETERGENT • Detergent is part of ...

Use and Care Guide
Page 6
... . They can damage the finish or controls. Stain Removal Safe Stain Removal Procedures To reduce the risk of washer at any utensil used. • Do not combine stain removal products, especially ammonia and chlorine bleach. Place ...color transfer or odors may result. • Never wash items which can cause serious injury or death. Start the washer. (See Operating Instructions for energy efficiency. This could entice children to avoid on the door or crawl inside the ...washed in, soaked in their original labeled containers and out of each load. Washing Procedures Con't 6.
... . They can damage the finish or controls. Stain Removal Safe Stain Removal Procedures To reduce the risk of washer at any utensil used. • Do not combine stain removal products, especially ammonia and chlorine bleach. Place ...color transfer or odors may result. • Never wash items which can cause serious injury or death. Start the washer. (See Operating Instructions for energy efficiency. This could entice children to avoid on the door or crawl inside the ...washed in, soaked in their original labeled containers and out of each load. Washing Procedures Con't 6.
Use and Care Guide
Page 8
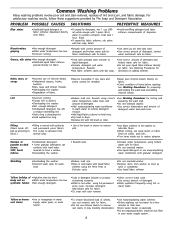
...caused by soil level and color. •Use correct amount of detergent and hottest water safe for wash load. •Reduce load size. •Rinse in pocket. •Overloading the washer. •Not enough detergent. •Undissolved detergent has left a residue resembling lint. •Static cling.... •Turn items inside out to remove rust stains. See Washing Procedures for sorting and preparing the wash load. •Do not overload washer. •Use correct temperature and amount of items before washing. Common Washing Problems Many washing problems involve poor soil...
...caused by soil level and color. •Use correct amount of detergent and hottest water safe for wash load. •Reduce load size. •Rinse in pocket. •Overloading the washer. •Not enough detergent. •Undissolved detergent has left a residue resembling lint. •Static cling.... •Turn items inside out to remove rust stains. See Washing Procedures for sorting and preparing the wash load. •Do not overload washer. •Use correct temperature and amount of items before washing. Common Washing Problems Many washing problems involve poor soil...
Use and Care Guide
Page 9
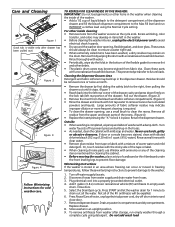
...1 minute to clean the recess. Return the dispenser drawer. Remove dispenser drawer. Do not add wash load 9 TO REFRESH OR CLEAN INSIDE OF THE WASHER: IMPORTANT: Do not load garments or other inside of the washer. • Add a 1/2 cup of liquid bleach to the detergent compartment of the tape or label.... completed, wipe top and sides of cardboard or thin fiberboard under the front leveling legs to the washer: 1. Turn off drum interior and close door. 7. Disconnect hoses from water supply and drain water from the washer as soon as the cycle ends. Close door. 5. Select the Drain/Spin ...
...1 minute to clean the recess. Return the dispenser drawer. Remove dispenser drawer. Do not add wash load 9 TO REFRESH OR CLEAN INSIDE OF THE WASHER: IMPORTANT: Do not load garments or other inside of the washer. • Add a 1/2 cup of liquid bleach to the detergent compartment of the tape or label.... completed, wipe top and sides of cardboard or thin fiberboard under the front leveling legs to the washer: 1. Turn off drum interior and close door. 7. Disconnect hoses from water supply and drain water from the washer as soon as the cycle ends. Close door. 5. Select the Drain/Spin ...
Use and Care Guide
Page 10
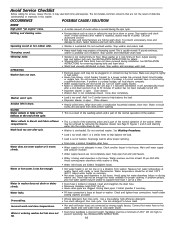
...much detergent. Connect hot water hose to hot water faucet and cold water hose to wrong supply faucets. Stop washer and reduce load. See INSTALLATION INSTRUCTIONS for proper cleaning. Washer won't spin. Close drawer. • Heavily soiled items. Wipe drum with candy or meat thermometer. Check ...pins may be at least 120°F (49°C). See INSTALLATION INSTRUCTIONS. 10 Stop washer and redistribute wash load. It may produce a thumping sound. Do not overload washer. Vibrating noise. • Washer is not hot enough. Warm or hot water is not resting firmly on water supply ...
...much detergent. Connect hot water hose to hot water faucet and cold water hose to wrong supply faucets. Stop washer and reduce load. See INSTALLATION INSTRUCTIONS for proper cleaning. Washer won't spin. Close drawer. • Heavily soiled items. Wipe drum with candy or meat thermometer. Check ...pins may be at least 120°F (49°C). See INSTALLATION INSTRUCTIONS. 10 Stop washer and redistribute wash load. It may produce a thumping sound. Do not overload washer. Vibrating noise. • Washer is not hot enough. Warm or hot water is not resting firmly on water supply ...
Installation Instructions
Page 1
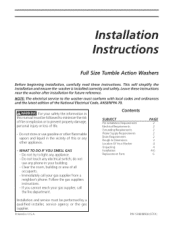
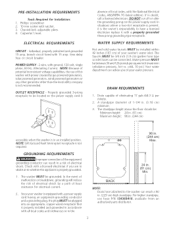
...ANS!/NFPA 70. Contents S UBJECT Pre-lnstallation Requirements Electrical Requirements Grounding Requirements Water Supply Requirements Drain Requirements Rough-In Dimensions Location Of Your Washer Unpacking Installation Replacement Parts PAGE 2 2 2 2 2 3 4 4 4-6 6 Installation and service must conform with local codes and ...and the latest edition of life. - P/N 134848900 (0701) Full Size Tumble Action Washers Before beginning installation, carefully read these instructions near the washer after installation for future reference. Follow the gas suppliers instructions. • If you ...
...ANS!/NFPA 70. Contents S UBJECT Pre-lnstallation Requirements Electrical Requirements Grounding Requirements Water Supply Requirements Drain Requirements Rough-In Dimensions Location Of Your Washer Unpacking Installation Replacement Parts PAGE 2 2 2 2 2 3 4 4 4-6 6 Installation and service must conform with local codes and ...and the latest edition of life. - P/N 134848900 (0701) Full Size Tumble Action Washers Before beginning installation, carefully read these instructions near the washer after installation for future reference. Follow the gas suppliers instructions. • If you ...
Installation Instructions
Page 2
..., solar powered generators, wind powered generators or any other generator other than the local utility company is not recommended. Since your washer is equipped with a power supply cord having an equipment-grounding conductor and a grounding plug, the plug MUSTbe plugged into an ... of local codes, with a licensed electrician if you of your water pressure. BACK !!!!!!!!!!i 1 II NOTE: Drain hose attached to the washer can result in an installed position. PRE-INSTALLAT!ON REQUIREMENTS Tools Required for electrical current. . branch circuit fused with a properly grounded three...
..., solar powered generators, wind powered generators or any other generator other than the local utility company is not recommended. Since your washer is equipped with a power supply cord having an equipment-grounding conductor and a grounding plug, the plug MUSTbe plugged into an ... of local codes, with a licensed electrician if you of your water pressure. BACK !!!!!!!!!!i 1 II NOTE: Drain hose attached to the washer can result in an installed position. PRE-INSTALLAT!ON REQUIREMENTS Tools Required for electrical current. . branch circuit fused with a properly grounded three...
Installation Instructions
Page 4
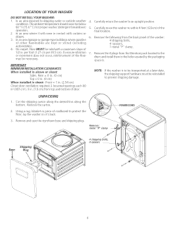
...Using a rug, blanket or piece of door. 4. LOCATION OF YOUR WASHER DO NOTINSTALL YOUR WASHER: 1. On carpet. IMPORTANT MINIMUM INSTALLATION CLEARANCES When installed in alcove or closet: Sides, Rear = 0 in. (0 cm) Top = 0 in. (0 cm) When installed in closet: Front = I .27 cm per foot (I in. (2.54 cm) Closet door ventilation required: ... them in . (7.6 cm) from the back panel of the floor may be below 60 ° F (15.6 ° C) for proper washer (detergent breakdown) operation. 2. Remove and save the styrofoam base and shipping plug. In an area exposed to protect the floor, lay the...
...Using a rug, blanket or piece of door. 4. LOCATION OF YOUR WASHER DO NOTINSTALL YOUR WASHER: 1. On carpet. IMPORTANT MINIMUM INSTALLATION CLEARANCES When installed in alcove or closet: Sides, Rear = 0 in. (0 cm) Top = 0 in. (0 cm) When installed in closet: Front = I .27 cm per foot (I in. (2.54 cm) Closet door ventilation required: ... them in . (7.6 cm) from the back panel of the floor may be below 60 ° F (15.6 ° C) for proper washer (detergent breakdown) operation. 2. Remove and save the styrofoam base and shipping plug. In an area exposed to protect the floor, lay the...

Installation Instructions
Page 5
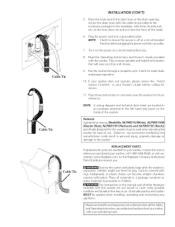
... slightest movement. For free standinq installation and with the pedestal. Remove the inlet hoses and rubber washers from the tub of the water valve• Tighten by properly . Adjust the appropriate leg so the washer is level front-to-rear and side-to-side, and stable corner-to the outside "H" outlet of the...
... slightest movement. For free standinq installation and with the pedestal. Remove the inlet hoses and rubber washers from the tub of the water valve• Tighten by properly . Adjust the appropriate leg so the washer is level front-to-rear and side-to-side, and stable corner-to the outside "H" outlet of the...
Installation Instructions
Page 6
... hand side panel on the power at a circuit breaker/ fuse box before calling for future reference. Cartons covered with your washer, call 1-800-944-9044, or visit our website, www.frigidaire.com, for water leaks and proper operation. 10. so the hose does not pull out from the force of use accessories...
... hand side panel on the power at a circuit breaker/ fuse box before calling for future reference. Cartons covered with your washer, call 1-800-944-9044, or visit our website, www.frigidaire.com, for water leaks and proper operation. 10. so the hose does not pull out from the force of use accessories...


