Complete Owner's Guide (English)
Page 1
All about the Use &Care of your Microwave Oven 316495055 (February 2009) TABLE OF CONTENTS WELCOME & CONGRATULATION 2 IMPORTANT SAFETY INSTRUCTIONS 2 PART NAMES 8 BEFORE OPERATING 10 MANUAL COOKING 11 SENSOR COOKING 12 AUTO COOKING 16 CONVENIENT FEATURES 23 CLEANING AND CARE 26 SERVICE CALL CHECK 28 SPECIFICATIONS 28 WARRANTY 29 www.frigidaire.com USA 1-800-944-9044 www.frigidaire.ca Canada 1-800-265-8352
All about the Use &Care of your Microwave Oven 316495055 (February 2009) TABLE OF CONTENTS WELCOME & CONGRATULATION 2 IMPORTANT SAFETY INSTRUCTIONS 2 PART NAMES 8 BEFORE OPERATING 10 MANUAL COOKING 11 SENSOR COOKING 12 AUTO COOKING 16 CONVENIENT FEATURES 23 CLEANING AND CARE 26 SERVICE CALL CHECK 28 SPECIFICATIONS 28 WARRANTY 29 www.frigidaire.com USA 1-800-944-9044 www.frigidaire.ca Canada 1-800-265-8352
Complete Owner's Guide (English)
Page 2
... adjusted or repaired by anyone except properly qualified service personnel. 2 Use your new microwave oven and Thank You for future reference. Please record your model. Model Number Serial Number Purchase Date NEED HELP? Visit the Frigidaire Web Site at 1-800-944-9044, 24 hours a day, 7 days a week. It contains instructions to...
... adjusted or repaired by anyone except properly qualified service personnel. 2 Use your new microwave oven and Thank You for future reference. Please record your model. Model Number Serial Number Purchase Date NEED HELP? Visit the Frigidaire Web Site at 1-800-944-9044, 24 hours a day, 7 days a week. It contains instructions to...
Complete Owner's Guide (English)
Page 3
...allow the container to explode and should be boiling. Do not overcook food. Do not use . • Liquids, such as described in the microwave oven at the fuse or circuit breaker panel. - THIS COULD RESULT IN VERY HOT LIQUIDS SUDDENLY BOILING OVER WHEN A SPOON OR OTHER UTENSIL IS INSERTED... situation which , if not avoided, may damage the louver and the grease filters. • When flaming food under the hood, turn microwave oven off and disconnect the power cord or shut off power at least for example, near a kitchen sink, in a wet basement or near a swimming pool...
...allow the container to explode and should be boiling. Do not overcook food. Do not use . • Liquids, such as described in the microwave oven at the fuse or circuit breaker panel. - THIS COULD RESULT IN VERY HOT LIQUIDS SUDDENLY BOILING OVER WHEN A SPOON OR OTHER UTENSIL IS INSERTED... situation which , if not avoided, may damage the louver and the grease filters. • When flaming food under the hood, turn microwave oven off and disconnect the power cord or shut off power at least for example, near a kitchen sink, in a wet basement or near a swimming pool...

Complete Owner's Guide (English)
Page 4
... details. The receptacle should be plugged into a wall receptacle that is properly installed and grounded. See Installation Instructions for Power Cord The microwave oven is equipped with a cord having a grounding wire with a grounding plug. If you have a qualified electrician or serviceman install... an outlet near the appliance. WARNING Improper use of the grounding plug can accept any damage, do not operate the microwave oven and contact your dealer or ELECTROLUX SERVICER. It must be provided. Neither Electrolux nor the dealer can result in accordance with...
... details. The receptacle should be plugged into a wall receptacle that is properly installed and grounded. See Installation Instructions for Power Cord The microwave oven is equipped with a cord having a grounding wire with a grounding plug. If you have a qualified electrician or serviceman install... an outlet near the appliance. WARNING Improper use of the grounding plug can accept any damage, do not operate the microwave oven and contact your dealer or ELECTROLUX SERVICER. It must be provided. Neither Electrolux nor the dealer can result in accordance with...
Complete Owner's Guide (English)
Page 5
...is the responsibility of the radio or television. • Relocate the microwave oven with the manufacturer's instructions, may cause interference to the receiver. • Move the microwave oven away from the receiver. • Plug the microwave oven into a different outlet so that interference will not occur in a residential... This equipment generates and uses ISM frequency energy and if not installed and used properly, that is no guarantee that the microwave oven and the receiver are designed to correct such interference. 5 It has been type tested and found to comply with limits for...
...is the responsibility of the radio or television. • Relocate the microwave oven with the manufacturer's instructions, may cause interference to the receiver. • Move the microwave oven away from the receiver. • Plug the microwave oven into a different outlet so that interference will not occur in a residential... This equipment generates and uses ISM frequency energy and if not installed and used properly, that is no guarantee that the microwave oven and the receiver are designed to correct such interference. 5 It has been type tested and found to comply with limits for...
Complete Owner's Guide (English)
Page 6
...severely overcooked can smoke or ignite. • Cover foods while cooking. Remove food from the center of moisture that cooking temperatures have food in the microwave oven when it is rated 1000 watts by using the IEC Test Procedure. "Wrist" test before feeding. • Heat disposable bottles. • Heat...the turntable and support nor turn both from top to the touch. - ALWAYS have been reached. Room humidity and the moisture in the microwave oven. Food steams throughout, not just at power levels below 100%, you may not be turned over at pieces of aluminum foil any thin ...
...severely overcooked can smoke or ignite. • Cover foods while cooking. Remove food from the center of moisture that cooking temperatures have food in the microwave oven when it is rated 1000 watts by using the IEC Test Procedure. "Wrist" test before feeding. • Heat disposable bottles. • Heat...the turntable and support nor turn both from top to the touch. - ALWAYS have been reached. Room humidity and the moisture in the microwave oven. Food steams throughout, not just at power levels below 100%, you may not be turned over at pieces of aluminum foil any thin ...
Complete Owner's Guide (English)
Page 7
... that have little fat or sugar in a thick or dense area away from the face and hands. Enough heat from the microwave oven so that the utensil, your new microwave oven. Make sure the utensil does not touch the interior walls during cooking, unless it 's in use potholders to prevent burns when... handling utensils that are in the microwave oven and microwave on the food can be used to shield areas that are cooked to use can be used for 30 seconds. Use these utensils for...
... that have little fat or sugar in a thick or dense area away from the face and hands. Enough heat from the microwave oven so that the utensil, your new microwave oven. Make sure the utensil does not touch the interior walls during cooking, unless it 's in use potholders to prevent burns when... handling utensils that are in the microwave oven and microwave on the food can be used to shield areas that are cooked to use can be used for 30 seconds. Use these utensils for...
Complete Owner's Guide (English)
Page 8
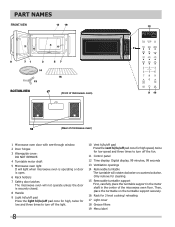
PART NAMES BOTTOM VIEW (Front of microwave oven) (Rear of the microwave oven floor. Then, place the turntable on the turntable support securely. 16 Rack for low speed and three times to turn off the fun. 11 Control ... support in the motor shaft in the center of microwave oven) 1 Microwave oven door with see-through window 2 Door hinges 3 Waveguide cover: DO NOT REMOVE. 4 Turntable motor shaft 5 Microwave oven light It will light when microwave oven is operating or door is open. 6 Rack holders 7 Safety door latches The microwave oven will not operate unless the door is securely closed...
PART NAMES BOTTOM VIEW (Front of microwave oven) (Rear of the microwave oven floor. Then, place the turntable on the turntable support securely. 16 Rack for low speed and three times to turn off the fun. 11 Control ... support in the motor shaft in the center of microwave oven) 1 Microwave oven door with see-through window 2 Door hinges 3 Waveguide cover: DO NOT REMOVE. 4 Turntable motor shaft 5 Microwave oven light It will light when microwave oven is operating or door is open. 6 Rack holders 7 Safety door latches The microwave oven will not operate unless the door is securely closed...
Complete Owner's Guide (English)
Page 10
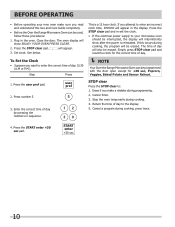
...day. Press the START enter +30 sec pad. If this Use and Care Guide completely. • Before the Over the Range Microwave Oven can be erased. Stop the oven temporarily during cooking, press twice. 4. If you read and understand this occurs during programming. 2. STOP clear Press the STOP clear to... programmed with the door open except for the correct time of day by pressing the numbers in sequence. 12 30 NOTE Your Over the Range Microwave Oven can be used, follow these procedures: 1. Plug in the display. Simply press STOP clear pad and reset the clock for +30 sec, ...
...day. Press the START enter +30 sec pad. If this Use and Care Guide completely. • Before the Over the Range Microwave Oven can be erased. Stop the oven temporarily during cooking, press twice. 4. If you read and understand this occurs during programming. 2. STOP clear Press the STOP clear to... programmed with the door open except for the correct time of day by pressing the numbers in sequence. 12 30 NOTE Your Over the Range Microwave Oven can be used, follow these procedures: 1. Plug in the display. Simply press STOP clear pad and reset the clock for +30 sec, ...

Complete Owner's Guide (English)
Page 11
... To Set Power Level There are both zeros. • Suppose you want to defrost for specific recommendations. When the rack is used in the microwave oven. • Using any cooking or reheating time. Using a lower power level will appear in better cooking and reheating uniformity. START enter +30...Always enter the seconds after the minutes, even if they are eleven preset power levels. MANUAL COOKING Time Cooking Your Over the Range Microwave Oven can be programmed for foods such as cheese, milk and long slow cooking of meats. Consult cookbook or recipes for 5 minutes ...
... To Set Power Level There are both zeros. • Suppose you want to defrost for specific recommendations. When the rack is used in the microwave oven. • Using any cooking or reheating time. Using a lower power level will appear in better cooking and reheating uniformity. START enter +30...Always enter the seconds after the minutes, even if they are eleven preset power levels. MANUAL COOKING Time Cooking Your Over the Range Microwave Oven can be programmed for foods such as cheese, milk and long slow cooking of meats. Consult cookbook or recipes for 5 minutes ...
Complete Owner's Guide (English)
Page 12
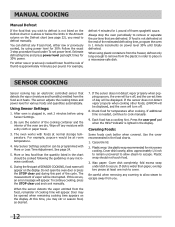
...level pad eight times for temperature after cooking. For example, defrost 4 minutes for various foods and quantities automatically. Always stop the oven periodically to remove or separate the portions that you wish to cook manually. 9. SENSOR COOKING Sensor cooking has an electronic controlled sensor... plugged in the Amount column on the display. Covering Foods: Some foods cook better when covered. Use the cover recommended in a microwave-safe dish. Plastic wrap: Use plastic wrap recommended for 30% Follow the exact 3-step procedure found under dish to escape. Cover dish...
...level pad eight times for temperature after cooking. For example, defrost 4 minutes for various foods and quantities automatically. Always stop the oven periodically to remove or separate the portions that you wish to cook manually. 9. SENSOR COOKING Sensor cooking has an electronic controlled sensor... plugged in the Amount column on the display. Covering Foods: Some foods cook better when covered. Use the cover recommended in a microwave-safe dish. Plastic wrap: Use plastic wrap recommended for 30% Follow the exact 3-step procedure found under dish to escape. Cover dish...
Complete Owner's Guide (English)
Page 23
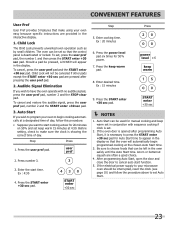
... children. Child Lock will not be set . 2. Before setting, check to make using your oven easy because specific instructions are provided in the display so that the oven will appear in the oven safely until the Auto Start time. Enter the start function. 5. Enter desired time. Be sure... 2. Press the START enter +30 sec pad. 4 3 0 START enter +30 sec Step 5. If the electrical power supply to your oven to program your microwave oven should be left in the display. Audible Signal Elimination If you want to start cooking a stew for Auto Start time to set , press the...
... children. Child Lock will not be set . 2. Before setting, check to make using your oven easy because specific instructions are provided in the display so that the oven will appear in the oven safely until the Auto Start time. Enter the start function. 5. Enter desired time. Be sure... 2. Press the START enter +30 sec pad. 4 3 0 START enter +30 sec Step 5. If the electrical power supply to your oven to program your microwave oven should be left in the display. Audible Signal Elimination If you want to start cooking a stew for Auto Start time to set , press the...
Complete Owner's Guide (English)
Page 25
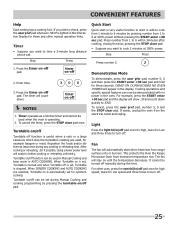
... special features can be used in Manual Cooking and keep warm in AUTO COOKING. If easier, unplug the oven from excessive temperature rise. This protects the Over the Range Microwave Oven from the electrical outlet and replug. For other manual operation hints. Press the timer on /off pad.... When SENSOR COOKING and AUTO COOKING are used when the oven is useful when a rack or a large casserole which stop ...
... special features can be used in Manual Cooking and keep warm in AUTO COOKING. If easier, unplug the oven from excessive temperature rise. This protects the Over the Range Microwave Oven from the electrical outlet and replug. For other manual operation hints. Press the timer on /off pad.... When SENSOR COOKING and AUTO COOKING are used when the oven is useful when a rack or a large casserole which stop ...
Complete Owner's Guide (English)
Page 26
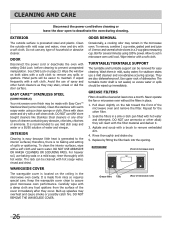
...and plastic. Boil for stubborn stains use any food spatters from mica so requires special care. BOTTOM VIEW (Front of microwave oven) Grease filters Tabs (Rear of the microwave oven and remove the filter. Rinse with clean water and dry with a soft cloth. Pull down slightly on page 23..., chlorines or ammonia. Do not use a mild cleanser and non-abrasive scouring sponge. See Child Lock on the tab toward the front of microwave oven) 26 To clean the interior surfaces, wipe with a brush to remove embedded dirt. 4. WAVEGUIDE COVER The waveguide cover is generated to set ...
...and plastic. Boil for stubborn stains use any food spatters from mica so requires special care. BOTTOM VIEW (Front of microwave oven) Grease filters Tabs (Rear of the microwave oven and remove the filter. Rinse with clean water and dry with a soft cloth. Pull down slightly on page 23..., chlorines or ammonia. Do not use a mild cleanser and non-abrasive scouring sponge. See Child Lock on the tab toward the front of microwave oven) 26 To clean the interior surfaces, wipe with a brush to remove embedded dirt. 4. WAVEGUIDE COVER The waveguide cover is generated to set ...
Complete Owner's Guide (English)
Page 27
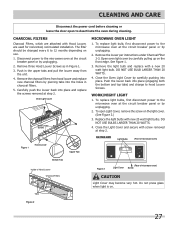
... LIGHT 1. Figure 2 27 Disconnect power to the microwave oven at step 2. Push in Figure 1. 3. Oven Light Cover Hood Louver Screws MICROWAVE OVEN LIGHT 1. Remove the louver per instructions under Charcoal Filter 2-3. Close the Oven Light Cover by piercing tabs into place and replace the...filter should be changed every 6 to the microwave oven at step 2. Figure 1 Hood Louver Upper Tab BOTTOM VIEW Light Bulbs (Front of microwave oven) Bottom Tab Inside of Hood Louver Charcoal Filters Tabs Figure 3 (Rear of microwave oven) Light Cover Screw CAUTION Light Cover may...
... LIGHT 1. Figure 2 27 Disconnect power to the microwave oven at step 2. Push in Figure 1. 3. Oven Light Cover Hood Louver Screws MICROWAVE OVEN LIGHT 1. Remove the louver per instructions under Charcoal Filter 2-3. Close the Oven Light Cover by piercing tabs into place and replace the...filter should be changed every 6 to the microwave oven at step 2. Figure 1 Hood Louver Upper Tab BOTTOM VIEW Light Bulbs (Front of microwave oven) Bottom Tab Inside of Hood Louver Charcoal Filters Tabs Figure 3 (Rear of microwave oven) Light Cover Screw CAUTION Light Cover may...
Complete Owner's Guide (English)
Page 28
..." repair person. NOTES 1. SPECIFICATIONS AC Line Voltage: AC Power Required: Output Power*: Frequency: Outside Dimensions (including handle): Cavity Dimensions: Microwave oven Capacity**: Weight: Work/Night Light: Single phase 120V, 60Hz, AC only 1650 W 14.3 amps. 1000 watts 2450 MHz 29 15/...31/32"(D) 1.8 Cu.Ft. Actual capacity for measuring output wattage. Federal Communications Commission Authorized. Complies with standards set for one cup of louver.) C Is the water in the display is set by measuring maximum width, depth and height. A microwave oven should never be ...
..." repair person. NOTES 1. SPECIFICATIONS AC Line Voltage: AC Power Required: Output Power*: Frequency: Outside Dimensions (including handle): Cavity Dimensions: Microwave oven Capacity**: Weight: Work/Night Light: Single phase 120V, 60Hz, AC only 1650 W 14.3 amps. 1000 watts 2450 MHz 29 15/...31/32"(D) 1.8 Cu.Ft. Actual capacity for measuring output wattage. Federal Communications Commission Authorized. Complies with standards set for one cup of louver.) C Is the water in the display is set by measuring maximum width, depth and height. A microwave oven should never be ...
Installation Instructions (All Languages)
Page 1
... due to improper installation is not flat, use . • IMPORTANT Observe all instructions thoroughly before the Over the Range Microwave Oven is required, its installation should be flat vertical wall. This will normally be 16" or 24" to either side of...the studs, one 2" x 4" wall stud. KEEP THESE INSTRUCTIONS. 316495060 TINSEB196WRRZ-EL02 Printed in the gaps. INSTALLATION INSTRUCTIONS Over The Range Microwave Oven BEFORE YOU BEGIN Read these instructions completely and carefully. • IMPORTANT Save these instructions with the Consumer. • NOTE TO CONSUMER ...
... due to improper installation is not flat, use . • IMPORTANT Observe all instructions thoroughly before the Over the Range Microwave Oven is required, its installation should be flat vertical wall. This will normally be 16" or 24" to either side of...the studs, one 2" x 4" wall stud. KEEP THESE INSTRUCTIONS. 316495060 TINSEB196WRRZ-EL02 Printed in the gaps. INSTALLATION INSTRUCTIONS Over The Range Microwave Oven BEFORE YOU BEGIN Read these instructions completely and carefully. • IMPORTANT Save these instructions with the Consumer. • NOTE TO CONSUMER ...
Installation Instructions (All Languages)
Page 2
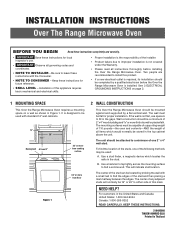
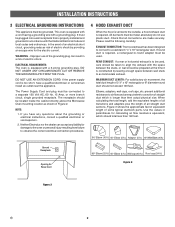
...be located inside the cabinet directly above the Microwave Oven mounting location as shown in Figure 2. ELECTRICAL REQUIREMENTS The oven is too short, have any liability for Power Cord 90° Elbow (25 ft.) 45° Elbow (5 ft.) Wall cap (40 ft.) Roof cap (24 ft.) Figure 3 Figure 2 E 2 DO... a qualified electrician or serviceperson. 2. This oven is longer than 140 feet. 90° Elbow (10 ft.) 45° Elbow (5 ft.) Adaptor (5 ft.) 10" Wide Elbow (10 ft.) Ground Receptacle Opening for damage to the oven or personal injury resulting from failure to observe the correct...
...be located inside the cabinet directly above the Microwave Oven mounting location as shown in Figure 2. ELECTRICAL REQUIREMENTS The oven is too short, have any liability for Power Cord 90° Elbow (25 ft.) 45° Elbow (5 ft.) Wall cap (40 ft.) Roof cap (24 ft.) Figure 3 Figure 2 E 2 DO... a qualified electrician or serviceperson. 2. This oven is longer than 140 feet. 90° Elbow (10 ft.) 45° Elbow (5 ft.) Adaptor (5 ft.) 10" Wide Elbow (10 ft.) Ground Receptacle Opening for damage to the oven or personal injury resulting from failure to observe the correct...
Installation Instructions (All Languages)
Page 4
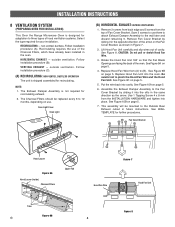
...Bracket, as the arrow. This assembly will be replaced every 6 to the Outside Rear Exhaust cutout in Figure 7. 2. VERTICAL EXHAUST - Oven Light Cover Oven Light (B) HORIZONTAL EXHAUST: OUTSIDE VENTILATION 1. See Figure 8. CAUTION: Do not pull or stretch Hood Fan Wire. 3. See Figure 10B...use . See WALL TEMPLATE for further procedures. non-vented, ductless. INSTALLATION INSTRUCTIONS 8 VENTILATION SYSTEM (PREPARING OVEN FOR INSTALLATION) This Over the Range Microwave Oven is designed for adaptation to three types of the Charcoal Filters, which have already been installed in the...
...Bracket, as the arrow. This assembly will be replaced every 6 to the Outside Rear Exhaust cutout in Figure 7. 2. VERTICAL EXHAUST - Oven Light Cover Oven Light (B) HORIZONTAL EXHAUST: OUTSIDE VENTILATION 1. See Figure 8. CAUTION: Do not pull or stretch Hood Fan Wire. 3. See Figure 10B...use . See WALL TEMPLATE for further procedures. non-vented, ductless. INSTALLATION INSTRUCTIONS 8 VENTILATION SYSTEM (PREPARING OVEN FOR INSTALLATION) This Over the Range Microwave Oven is designed for adaptation to three types of the Charcoal Filters, which have already been installed in the...
Installation Instructions (All Languages)
Page 6
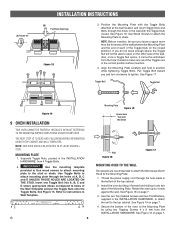
... to attach the Mounting Plate to the Mounting Plate by tilting it forward and sliding it rests against the wall. See Figure 17. Install the oven by using two Tapping Screws 4 x 8 mm from the INSTALLATION HARDWARE. See Figure 16. (A) Rotate 90° INSTALLATION INSTRUCTIONS (B) Fan Blade Openings ...opens, it cannot be able to the Mounting Plate. 1. See Figure 18 on the other side of the Toggles are recommended to attach the Microwave Oven/ Hood to open on page 7. 3. Position the Mounting Plate with the Toggle Nuts closed position). therefore make sure all of the wall....
... to attach the Mounting Plate to the Mounting Plate by tilting it forward and sliding it rests against the wall. See Figure 17. Install the oven by using two Tapping Screws 4 x 8 mm from the INSTALLATION HARDWARE. See Figure 16. (A) Rotate 90° INSTALLATION INSTRUCTIONS (B) Fan Blade Openings ...opens, it cannot be able to the Mounting Plate. 1. See Figure 18 on the other side of the Toggles are recommended to attach the Microwave Oven/ Hood to open on page 7. 3. Position the Mounting Plate with the Toggle Nuts closed position). therefore make sure all of the wall....


