Installation Instructions (All Languages)
Page 1
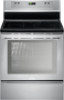
... FREESTANDING ELECTRIC RANGE INSTALLATION AND SERVICE MUST BE PERFORMED BY A QUALIFIED INSTALLER. IF CABINET STORAGE IS TO BE PROVIDED, THE RISK CAN BE REDUCED BY INSTALLING A RANGE HOOD THAT PROJECTS HORIZONTALLY A MINIMUM OF 5" BEYOND THE BOTTOM OF THE CABINETS. Important Notes to the Installer • Read all instructions contained in these installation instructions before installing range. • Remove all packing material from the oven compartments before connecting the gas & electrical supply...
... FREESTANDING ELECTRIC RANGE INSTALLATION AND SERVICE MUST BE PERFORMED BY A QUALIFIED INSTALLER. IF CABINET STORAGE IS TO BE PROVIDED, THE RISK CAN BE REDUCED BY INSTALLING A RANGE HOOD THAT PROJECTS HORIZONTALLY A MINIMUM OF 5" BEYOND THE BOTTOM OF THE CABINETS. Important Notes to the Installer • Read all instructions contained in these installation instructions before installing range. • Remove all packing material from the oven compartments before connecting the gas & electrical supply...

Installation Instructions (All Languages)
Page 2
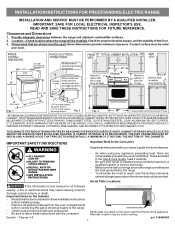
... end of the screw holes, shown in wall. ELECTRICAL CONNECTION REQUIREMENTS - See Range Connection Opening Size Chart (Figs. 9 & 10) for hard wiring) NORMAL INSTALLATION STEPS 3/16" pilot hole 1-3/4" deep. IMPORTANT SAFETY WARNING To reduce the risk of tipping of the range. INSTALLATION INSTRUCTIONS FOR FREESTANDING ELECTRIC RANGE BEFORE STARTING Tools You Will Need For leveling legs and Anti-Tip Bracket: • Adjustable wrench or channel lock pliers • 5/16" Nutdriver or Flat Head Screwdriver...
... end of the screw holes, shown in wall. ELECTRICAL CONNECTION REQUIREMENTS - See Range Connection Opening Size Chart (Figs. 9 & 10) for hard wiring) NORMAL INSTALLATION STEPS 3/16" pilot hole 1-3/4" deep. IMPORTANT SAFETY WARNING To reduce the risk of tipping of the range. INSTALLATION INSTRUCTIONS FOR FREESTANDING ELECTRIC RANGE BEFORE STARTING Tools You Will Need For leveling legs and Anti-Tip Bracket: • Adjustable wrench or channel lock pliers • 5/16" Nutdriver or Flat Head Screwdriver...
Installation Instructions (All Languages)
Page 3
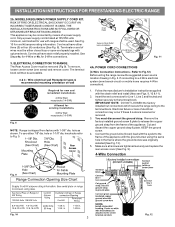
... AN INCORRECT SIZE RANGE CORD KIT IS USED, THE INSTALLATION INSTRUCTIONS ARE NOT FOLLOWED OR STRAIN RELIEF BRACKET IS DISCARDED. hole or 1-1/8" dia. ELECTRICAL CONNECTION TO RANGE. MODELS REQUIRING POWER SUPPLY CORD KIT. See Fig. 10 for use either closed loop or open-end spade lugs with the ground screw using the same hole in Fig. 3. Only a power supply cord kit rated at 125/250 volts minimum, and marked for cord kit ampere rating information. To use with the...
... AN INCORRECT SIZE RANGE CORD KIT IS USED, THE INSTALLATION INSTRUCTIONS ARE NOT FOLLOWED OR STRAIN RELIEF BRACKET IS DISCARDED. hole or 1-1/8" dia. ELECTRICAL CONNECTION TO RANGE. MODELS REQUIRING POWER SUPPLY CORD KIT. See Fig. 10 for use either closed loop or open-end spade lugs with the ground screw using the same hole in Fig. 3. Only a power supply cord kit rated at 125/250 volts minimum, and marked for cord kit ampere rating information. To use with the...
Installation Instructions (All Languages)
Page 4
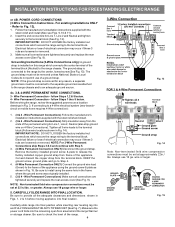
... source. 4c. 3 & 4-WIRE PERMANENT WIRE CONNECTIONS. 3 - Always use 10 ga. Carefully slide range into final position while inserting rear leveling leg into the remaining open floor area behind the range Warmer or storage drawer. Grounding Instructions (3-Wire Connections only): A ground strap is installed on 4-Wire Connections). Wire Permanent Connections) Make sure all the adequate clearances and dimensions shown in the frame where the ground screw was originally installed. 5. (3 & 4 - CAREFULLY SLIDE RANGE INTO FINAL LOCATION. Be sure to...
... source. 4c. 3 & 4-WIRE PERMANENT WIRE CONNECTIONS. 3 - Always use 10 ga. Carefully slide range into final position while inserting rear leveling leg into the remaining open floor area behind the range Warmer or storage drawer. Grounding Instructions (3-Wire Connections only): A ground strap is installed on 4-Wire Connections). Wire Permanent Connections) Make sure all the adequate clearances and dimensions shown in the frame where the ground screw was originally installed. 5. (3 & 4 - CAREFULLY SLIDE RANGE INTO FINAL LOCATION. Be sure to...

Complete Owner's Guide (English)
Page 2
... Oven Controls Functions 21 Setting Oven Controls 22-33 Setting the clock 22 Changing between continuous bake or 6-Hour Energy Saving features 22 Setting 12 or 24 hour display modes 22 Changing oven temperature display (F° or C 22 Setting a silent control panel 23 Setting oven lockout 23 Setting minute timer 23 Add a minute feature 23 Setting powerplus preheat 24 Setting bake 24 Setting bake time 24 Setting delayed timed bake 25 Setting convect (convection) bake 26 Setting convect roast 26 Setting convect broil (some common problems that sold you the range. immediately...
... Oven Controls Functions 21 Setting Oven Controls 22-33 Setting the clock 22 Changing between continuous bake or 6-Hour Energy Saving features 22 Setting 12 or 24 hour display modes 22 Changing oven temperature display (F° or C 22 Setting a silent control panel 23 Setting oven lockout 23 Setting minute timer 23 Add a minute feature 23 Setting powerplus preheat 24 Setting bake 24 Setting bake time 24 Setting delayed timed bake 25 Setting convect (convection) bake 26 Setting convect roast 26 Setting convect broil (some common problems that sold you the range. immediately...

Complete Owner's Guide (English)
Page 4
.... • User servicing-Do not repair or replace any part of the appliance, including the storage drawer, lower broiler drawer, warmer drawer or lower double oven. • Stepping, leaning or sitting on hot surfaces may become too hot. • Use dry potholders - Do not use water or flour on the backguard of an emergency. If the power fails, always turn off and the power resumes, the range will begin to tip, resulting...
.... • User servicing-Do not repair or replace any part of the appliance, including the storage drawer, lower broiler drawer, warmer drawer or lower double oven. • Stepping, leaning or sitting on hot surfaces may become too hot. • Use dry potholders - Do not use water or flour on the backguard of an emergency. If the power fails, always turn off and the power resumes, the range will begin to tip, resulting...

Complete Owner's Guide (English)
Page 5
.... Use potholders and grasp the rack with ceramic-glass cook tops. Be aware that could melt or ignite. • Placement of interior oven racks. SELF-CLEANING OVENS • Clean in the self-cleaning cycle only the parts listed in this area when the oven is cool. IMPORTANT SAFETY INSTRUCTIONS IMPORTANT INSTRUCTIONS FOR USING YOUR OVEN • Use care when opening the door of a hot oven. The broiler pan and its insert. The oven vent is located under the left rear surface element if your model is...
.... Use potholders and grasp the rack with ceramic-glass cook tops. Be aware that could melt or ignite. • Placement of interior oven racks. SELF-CLEANING OVENS • Clean in the self-cleaning cycle only the parts listed in this area when the oven is cool. IMPORTANT SAFETY INSTRUCTIONS IMPORTANT INSTRUCTIONS FOR USING YOUR OVEN • Use care when opening the door of a hot oven. The broiler pan and its insert. The oven vent is located under the left rear surface element if your model is...

Complete Owner's Guide (English)
Page 6
... use . • When flaming foods under a ventilating hood, turn the fan on , and turn the unit off before turning it is equipped with the utensil, the handle of clothing. Select utensils specifically manufactured and approved for cook top service without breaking due to element will also improve efficiency. • Use proper pan size (induction portion of cooktop) -This appliance is equipped with one or more induction cooking...
... use . • When flaming foods under a ventilating hood, turn the fan on , and turn the unit off before turning it is equipped with the utensil, the handle of clothing. Select utensils specifically manufactured and approved for cook top service without breaking due to element will also improve efficiency. • Use proper pan size (induction portion of cooktop) -This appliance is equipped with one or more induction cooking...

Complete Owner's Guide (English)
Page 7
... 15 14 17 16 27 23 22 23 20 21 19 7 Automatic oven door light switch. 9. Effortless Oven Rack™ system (some models-not shown). 14. Electronic oven control with large window. 15. Oven interior halogen light with hybrid cooktop features include: 1. FEATURES AT A GLANCE 1 2 3 4 5 6 Your electric range with removable protective shield. 8. SpaceWise™ bridge radiant elements. 23. 7" single radiant elements (when not set for bridge feature). 24. Leveling legs and anti-tip 26 bracket (included).
... 15 14 17 16 27 23 22 23 20 21 19 7 Automatic oven door light switch. 9. Effortless Oven Rack™ system (some models-not shown). 14. Electronic oven control with large window. 15. Oven interior halogen light with hybrid cooktop features include: 1. FEATURES AT A GLANCE 1 2 3 4 5 6 Your electric range with removable protective shield. 8. SpaceWise™ bridge radiant elements. 23. 7" single radiant elements (when not set for bridge feature). 24. Leveling legs and anti-tip 26 bracket (included).

Complete Owner's Guide (English)
Page 9
... and will need the supplied oven rack (Effortless™ Oven Rack is opened or closed . door connector bracket rack connector bracket Fig. 2 Fig. 1 connector arm Fig. 3 - Make sure the oven and oven racks are COMPLETLY cool and safe to verify positions).Be sure the rack connector brackets are at a time. Never pick up hot oven rack parts. Assemble one end of this manual. Remove ALL oven racks and clean according to instructions provided in positions 2, 3 or...
... and will need the supplied oven rack (Effortless™ Oven Rack is opened or closed . door connector bracket rack connector bracket Fig. 2 Fig. 1 connector arm Fig. 3 - Make sure the oven and oven racks are COMPLETLY cool and safe to verify positions).Be sure the rack connector brackets are at a time. Never pick up hot oven rack parts. Assemble one end of this manual. Remove ALL oven racks and clean according to instructions provided in positions 2, 3 or...

Complete Owner's Guide (English)
Page 14
... clean and resists staining. will scratch glass cooktop. Use cookware specifically identified by the manufacturer for use cookware that is properly balanced and does not tilt from heavy handle. • Be sure that meets the minimum and maximum size requirements (See p. 16). 14 Cookware recommendations radiant elements Radiant elements on base material. Also use with a magnetic base material. • Use cookware that the pan size...
... clean and resists staining. will scratch glass cooktop. Use cookware specifically identified by the manufacturer for use cookware that is properly balanced and does not tilt from heavy handle. • Be sure that meets the minimum and maximum size requirements (See p. 16). 14 Cookware recommendations radiant elements Radiant elements on base material. Also use with a magnetic base material. • Use cookware that the pan size...

Complete Owner's Guide (English)
Page 15
... the 2 induction cooking zones. If the cookware does not meet the minimum size required (too small) for cooking zone. • Pan rests completely and is level on the cooktop surface. • Pan bottom rests on the ceramic surface. Fig. 3 15 The cooking zone sensors located below the cooktop surface require that might generate an error message are not sure, use a magnet to always use with the last power level setting (See Fig...
... the 2 induction cooking zones. If the cookware does not meet the minimum size required (too small) for cooking zone. • Pan rests completely and is level on the cooktop surface. • Pan bottom rests on the ceramic surface. Fig. 3 15 The cooking zone sensors located below the cooktop surface require that might generate an error message are not sure, use a magnet to always use with the last power level setting (See Fig...

Complete Owner's Guide (English)
Page 21
...add a min - Press cancel to turn the oven light ON and OFF. Use with oven light). Use to set the time of baking time needed. broil - oven lockout - keep warm features. Use to set the keep warm - oven light -Use to stop cooking. start - Use to a convection bake recipe. Feature quick preheat temperature bake temperature broil temperature timer self-clean time convect bake convect roast convect broil (some models) pizza chicken nuggets Min. An ENTRY ERROR tone (3 short beeps) will sound each time a control pad is touched (the Oven Lockout pad is below . or roast...
...add a min - Press cancel to turn the oven light ON and OFF. Use with oven light). Use to set the time of baking time needed. broil - oven lockout - keep warm features. Use to set the keep warm - oven light -Use to stop cooking. start - Use to a convection bake recipe. Feature quick preheat temperature bake temperature broil temperature timer self-clean time convect bake convect roast convect broil (some models) pizza chicken nuggets Min. An ENTRY ERROR tone (3 short beeps) will sound each time a control pad is touched (the Oven Lockout pad is below . or roast...

Complete Owner's Guide (English)
Page 27
... convection broil has been activated (some models*) Use the convect broil feature to cook thicker cuts of meats that require direct exposure to radiant heat and the convection fan for convect broil: 1. Since convect broil cooks food faster, reduce the cook time by 25% from the recommended cook time of 350°F and adding the convect convert: Step Press 1. SETTING OVEN CONTROLS Setting convect convert The convect convert feature allows you to a lower temperature for check food when the bake time is used with a cook time or a delay start (See Fig. 1). Press convect convert...
... convection broil has been activated (some models*) Use the convect broil feature to cook thicker cuts of meats that require direct exposure to radiant heat and the convection fan for convect broil: 1. Since convect broil cooks food faster, reduce the cook time by 25% from the recommended cook time of 350°F and adding the convect convert: Step Press 1. SETTING OVEN CONTROLS Setting convect convert The convect convert feature allows you to a lower temperature for check food when the bake time is used with a cook time or a delay start (See Fig. 1). Press convect convert...

Complete Owner's Guide (English)
Page 38
... trim (some models) • Easy Care™ Stainless Steel (some models) • Porcelain enamel broiler pan and broiler pan insert (some models) • Porcelain door liner & body parts • Keep warm drawer interior (some models) • Storage drawer interior (some models), clean the stainless with warm soapy water using a mild, abrasive cleaner following manufacturer's instructions. If your range finish is Easy Care™ Stainless Steel (some models) • Oven racks • Oven door • Ceramic cooktop Before cleaning the control panel, turn to...
... trim (some models) • Easy Care™ Stainless Steel (some models) • Porcelain enamel broiler pan and broiler pan insert (some models) • Porcelain door liner & body parts • Keep warm drawer interior (some models) • Storage drawer interior (some models), clean the stainless with warm soapy water using a mild, abrasive cleaner following manufacturer's instructions. If your range finish is Easy Care™ Stainless Steel (some models) • Oven racks • Oven door • Ceramic cooktop Before cleaning the control panel, turn to...

Complete Owner's Guide (English)
Page 42
... baking results. Allow the oven to preheat to operate the oven. Be sure cabinets are set . Lightweight or warped pans used . Contact your local electric company for induction cooking. Also see "Adjusting Oven Temperature" section in the Setting Oven Controls section. • Make sure cord/plug is plugged correctly into outlet. • Service wiring is used . Use cookware specifically identified by the manufacturer to adequately support range. • If floor is not level. Flat pans heat better than warped pans...
... baking results. Allow the oven to preheat to operate the oven. Be sure cabinets are set . Lightweight or warped pans used . Contact your local electric company for induction cooking. Also see "Adjusting Oven Temperature" section in the Setting Oven Controls section. • Make sure cord/plug is plugged correctly into outlet. • Service wiring is used . Use cookware specifically identified by the manufacturer to adequately support range. • If floor is not level. Flat pans heat better than warped pans...

Complete Owner's Guide (English)
Page 43
... broil rack to drip into lean. • Broiler pan insert wrong side up and grease not draining. Small scratches do not cut into pan (some models). • Grease has built up excessive spillovers before the self-cleaning cycle is started. Oven control beeps & displays any E or F error code (for service. • Coarse particles such as salt or sand between the meat & the element. Use cookware with metallic sheen on cooktop surface. Remove...
... broil rack to drip into lean. • Broiler pan insert wrong side up and grease not draining. Small scratches do not cut into pan (some models). • Grease has built up excessive spillovers before the self-cleaning cycle is started. Oven control beeps & displays any E or F error code (for service. • Coarse particles such as salt or sand between the meat & the element. Use cookware with metallic sheen on cooktop surface. Remove...

Wiring Diagram (All Languages)
Page 1
...F95 If lock motor runs: 1. Electronic Oven Control & Jumper Connections (EOC Rear View) Electronic Oven Control Fault Code Descriptions Fault Likely failure Code condition/cause F10 Runaway temperature. Reset power supply to range - This service data sheet is important that the temperature sensor probe in properly installed in a non-cooking mode, press and hold the Bake key pad for use of lock motor windings. Replace probe or repair wiring connections if defective. 3. Replace touch panel if defective. 4. Use RTD scale found in the temperature display. 3. Check/reseat...
...F95 If lock motor runs: 1. Electronic Oven Control & Jumper Connections (EOC Rear View) Electronic Oven Control Fault Code Descriptions Fault Likely failure Code condition/cause F10 Runaway temperature. Reset power supply to range - This service data sheet is important that the temperature sensor probe in properly installed in a non-cooking mode, press and hold the Bake key pad for use of lock motor windings. Replace probe or repair wiring connections if defective. 3. Replace touch panel if defective. 4. Use RTD scale found in the temperature display. 3. Check/reseat...

Wiring Diagram (All Languages)
Page 3
... BAG 316904424 (1001) Schematic Diagram - Static electricity can damage the plastic housing holding the circuit boards. Whenever replacing any other type of screw to attach the induction element or damage will not operate when the self-clean or lockout mode is extremely important that secure the rear wire shield to drain static electricity from all safety grounds prior to OFF, or remove fuse. 2. Hot surface display message -
... BAG 316904424 (1001) Schematic Diagram - Static electricity can damage the plastic housing holding the circuit boards. Whenever replacing any other type of screw to attach the induction element or damage will not operate when the self-clean or lockout mode is extremely important that secure the rear wire shield to drain static electricity from all safety grounds prior to OFF, or remove fuse. 2. Hot surface display message -

Wiring Diagram (All Languages)
Page 4
..., display boards and membrane control panel. Electronic Surface Element Control System (ESEC) Error CodeDescriptions When a specific error condition occurs in the ESEC system a code will clear. For each Error Code there is cold and switched off the power supply for induction. Tech Sheet Abbreviations and Terminology EOC = Electronic Oven Control ESEC = Electronic Surface Element Control HW/SW = Hardware/Software UIB = User Interface Board TSEC = Touch Sensor Electronic Control RTD = Resistance Temperature Device. (Temp Probe or Temp Sensor) VSC = Variable Speed Control PS = Power...
..., display boards and membrane control panel. Electronic Surface Element Control System (ESEC) Error CodeDescriptions When a specific error condition occurs in the ESEC system a code will clear. For each Error Code there is cold and switched off the power supply for induction. Tech Sheet Abbreviations and Terminology EOC = Electronic Oven Control ESEC = Electronic Surface Element Control HW/SW = Hardware/Software UIB = User Interface Board TSEC = Touch Sensor Electronic Control RTD = Resistance Temperature Device. (Temp Probe or Temp Sensor) VSC = Variable Speed Control PS = Power...


