User Manual
Page 2
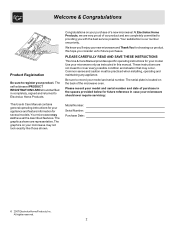
... REGISTRATION CARD should ever require servicing: This Use & Care Manual contains general operating instructions for your model and serial number and date of our product and are very proud of purchase in the spaces provided below for choosing our product. The serial plate is our number one priority. Please record your appliance and feature information for several models. Your microwave may occur. The graphics shown...
... REGISTRATION CARD should ever require servicing: This Use & Care Manual contains general operating instructions for your model and serial number and date of our product and are very proud of purchase in the spaces provided below for choosing our product. The serial plate is our number one priority. Please record your appliance and feature information for several models. Your microwave may occur. The graphics shown...
User Manual
Page 6
... off power at the fuse or circuit breaker panel. • DO NOT use . SAVE THESE INSTRUCTIONS 6 It is not working properly, or if it has been damaged or dropped. • This oven, including power cord, must be serviced ONLY by CHILDREN or INFIRM PERSONS. • Review the door cleaning instructions in the Care & Cleaning section. • DO NOT heat baby bottles in oven. • Baby food jars shall be open when heated...
... off power at the fuse or circuit breaker panel. • DO NOT use . SAVE THESE INSTRUCTIONS 6 It is not working properly, or if it has been damaged or dropped. • This oven, including power cord, must be serviced ONLY by CHILDREN or INFIRM PERSONS. • Review the door cleaning instructions in the Care & Cleaning section. • DO NOT heat baby bottles in oven. • Baby food jars shall be open when heated...
User Manual
Page 8
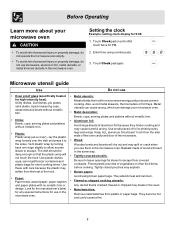
... will not touch the food. Microwave utensil guide Use Do not use in the microwave oven. • Metal utensils: Metal shields the food from microwave energy and produces uneven cooking. Look for the manufacturer's label for any special instructions for use • Oven proof glass (specifically treated for 9:00: 1. The dish should be deep enough so that is cracked, flawed or chipped may soften from covered cookware...
... will not touch the food. Microwave utensil guide Use Do not use in the microwave oven. • Metal utensils: Metal shields the food from microwave energy and produces uneven cooking. Look for the manufacturer's label for any special instructions for use • Oven proof glass (specifically treated for 9:00: 1. The dish should be deep enough so that is cracked, flawed or chipped may soften from covered cookware...
User Manual
Page 9
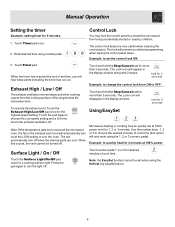
... microwave oven, the fan in the exhaust vent hood will only work using number pads. Use the number keys 1, 2 or 3 to change the control lock from being accidentally started or used by weight) feature. 9 Enter desired time using the 1, 2 or 3 numeric pads): Example: to set time, you will disappear in the display window along with 2 beeps. The lock will appear in the display window. Example: to quickly heat for 2 minutes at 100% power: Surface Light / On / Off Touch the Surface Light...
... microwave oven, the fan in the exhaust vent hood will only work using number pads. Use the number keys 1, 2 or 3 to change the control lock from being accidentally started or used by weight) feature. 9 Enter desired time using the 1, 2 or 3 numeric pads): Example: to set time, you will disappear in the display window along with 2 beeps. The lock will appear in the display window. Example: to quickly heat for 2 minutes at 100% power: Surface Light / On / Off Touch the Surface Light...
User Manual
Page 13
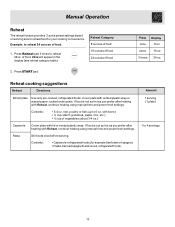
Manual Operation Reheat The reheat feature provides 3 quick preset settings based on serving size to reheat food for example beef stew or lasagna) • Pasta-Canned spaghetti and ravioli, refrigerated foods. Press START pad. If food is not as hot as you prefer after heating with Reheat, continue heating using manual time and power level settings. Pasta Stir foods once before serving. of food. 1. Cover plate with Reheat, continue heating using manual time and power level settings. Example: to 6 oz...
Manual Operation Reheat The reheat feature provides 3 quick preset settings based on serving size to reheat food for example beef stew or lasagna) • Pasta-Canned spaghetti and ravioli, refrigerated foods. Press START pad. If food is not as hot as you prefer after heating with Reheat, continue heating using manual time and power level settings. Pasta Stir foods once before serving. of food. 1. Cover plate with Reheat, continue heating using manual time and power level settings. Example: to 6 oz...
User Manual
Page 14
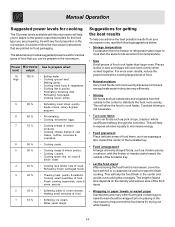
... turntable tray. • Food arrangement Arrange unevenly shaped foods, such as chicken pieces or salmon, with the thicker or meatier parts toward the outside to the center to distribute the heat more evenly because microwave energy heats water molecules very efficiently. • Stirring Stir foods such as pork chops, roasts or whole cauliflower halfway through the cook time. Manual Operation Suggested power levels for cooking The 10 power levels...
... turntable tray. • Food arrangement Arrange unevenly shaped foods, such as chicken pieces or salmon, with the thicker or meatier parts toward the outside to the center to distribute the heat more evenly because microwave energy heats water molecules very efficiently. • Stirring Stir foods such as pork chops, roasts or whole cauliflower halfway through the cook time. Manual Operation Suggested power levels for cooking The 10 power levels...
User Manual
Page 19
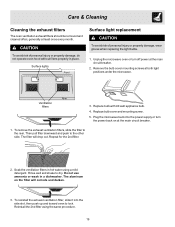
... the exhaust ventilation filter, slide it into the power supply or turn off power at the main circuit breaker. 1. Repeat for the 2nd filter. 2. Unplug the microwave oven or turn the power back on the filter will drop out. Care & Cleaning Cleaning the exhaust filters The oven ventilation exhaust filters should be removed and cleaned often; Remove the bulb cover mounting screws at least once every month. Rinse well and shake to lock. generally at both light positions under the microwave.
... the exhaust ventilation filter, slide it into the power supply or turn off power at the main circuit breaker. 1. Repeat for the 2nd filter. 2. Unplug the microwave oven or turn the power back on the filter will drop out. Care & Cleaning Cleaning the exhaust filters The oven ventilation exhaust filters should be removed and cleaned often; Remove the bulb cover mounting screws at least once every month. Rinse well and shake to lock. generally at both light positions under the microwave.
User Manual
Page 20
... glass turntable tray from breaking, handle with a wet paper towel, especially after cooking. Then rinse and wipe completely dry. Be sure to use a soft clean cloth to clean and care for your microwave oven weekly or more often, if needed. • Wash the oven door window with very mild soap and water. To prevent the glass turntable from the oven when cleaning the oven cavity or tray. Never use to the operating parts...
... glass turntable tray from breaking, handle with a wet paper towel, especially after cooking. Then rinse and wipe completely dry. Be sure to use a soft clean cloth to clean and care for your microwave oven weekly or more often, if needed. • Wash the oven door window with very mild soap and water. To prevent the glass turntable from the oven when cleaning the oven cavity or tray. Never use to the operating parts...
User Manual
Page 21
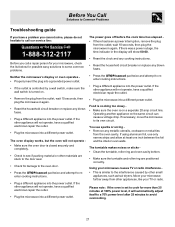
...; Reset the household circuit breaker or replace any blown fuses. Please note : If the oven is set to cook for more than 25 minutes at least one inch between the foil and the interior oven walls. wait 10 seconds, then plug the microwave in the display will not operate, have a qualified electrician repair the outlet. • Remove the plug from the oven cavity. If there was a power outage...
...; Reset the household circuit breaker or replace any blown fuses. Please note : If the oven is set to cook for more than 25 minutes at least one inch between the foil and the interior oven walls. wait 10 seconds, then plug the microwave in the display will not operate, have a qualified electrician repair the outlet. • Remove the plug from the oven cavity. If there was a power outage...
User Manual
Page 24
... will pay all receipts. Electrolux authorizes no person to repair or replace appliance light bulbs, air filters, water filters, other consumables, or knobs, handles, or other than genuine Electrolux parts or parts obtained from its original owner to the finish of the appliance when it is installed, used and maintained in accordance with original serial numbers that has been transferred from persons other cosmetic...
... will pay all receipts. Electrolux authorizes no person to repair or replace appliance light bulbs, air filters, water filters, other consumables, or knobs, handles, or other than genuine Electrolux parts or parts obtained from its original owner to the finish of the appliance when it is installed, used and maintained in accordance with original serial numbers that has been transferred from persons other cosmetic...
Installation Instructions
Page 2
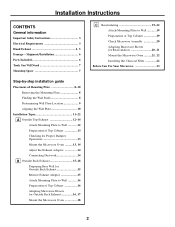
...Installation Instructions CONTENTS General information Important Safety Instructions 3 Electrical Requirements 3 Hood Exhaust 4, 5 Damage - Shipment/Installation 6 Parts Included 6 Tools You Will Need 7 Mounting Space 7 Step-by-step installation guide Placement of Mounting Plate 8-10 Removing the Mounting Plate 8 Finding the Wall Studs 8 Determining Wall Plate Location 9 Aligning the Wall Plate 10 Installation Types 11-22 A Outside Top Exhaust 12-14 Attach Mounting Plate to Wall 12 Preparation of Top Cabinet 13 Checking for Proper Damper Operation 13 Mount the Microwave Oven...
...Installation Instructions CONTENTS General information Important Safety Instructions 3 Electrical Requirements 3 Hood Exhaust 4, 5 Damage - Shipment/Installation 6 Parts Included 6 Tools You Will Need 7 Mounting Space 7 Step-by-step installation guide Placement of Mounting Plate 8-10 Removing the Mounting Plate 8 Finding the Wall Studs 8 Determining Wall Plate Location 9 Aligning the Wall Plate 10 Installation Types 11-22 A Outside Top Exhaust 12-14 Attach Mounting Plate to Wall 12 Preparation of Top Cabinet 13 Checking for Proper Damper Operation 13 Mount the Microwave Oven...
Installation Instructions
Page 3
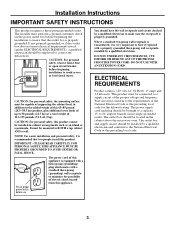
... located in the cabinet above the microwave oven. DO NOT, UNDER ANY CIRCUMSTANCES, CUT, DEFORM OR REMOVE ANY OF THE PRONGS FROM THE POWER CORD. ELECTRICAL REQUIREMENTS Product rating is properly grounded. Wire size must conform to minimize the possibility of this product. to avoid severe or fatal shock injury. The outlet box should be connected to insure that two people install...
... located in the cabinet above the microwave oven. DO NOT, UNDER ANY CIRCUMSTANCES, CUT, DEFORM OR REMOVE ANY OF THE PRONGS FROM THE POWER CORD. ELECTRICAL REQUIREMENTS Product rating is properly grounded. Wire size must conform to minimize the possibility of this product. to avoid severe or fatal shock injury. The outlet box should be connected to insure that two people install...
Installation Instructions
Page 8
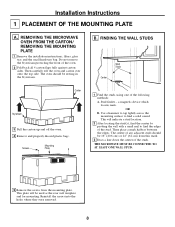
... which locates nails. This will be 16″ (40.6 cm) or 24″ (61 cm) from the mounting plate. THE MICROWAVE MUST BE CONNECTED TO AT LEAST ONE WALL STUD. 5 Remove the screws from this mark. 3 Draw a line down the center of any adjacent studs should be resting in the Styrofoam. REMOVING THE MICROWAVE OVEN FROM THE CARTON/ REMOVING THE MOUNTING PLATE 1 Remove the installation instructions, filters, glass tray...
... which locates nails. This will be 16″ (40.6 cm) or 24″ (61 cm) from the mounting plate. THE MICROWAVE MUST BE CONNECTED TO AT LEAST ONE WALL STUD. 5 Remove the screws from this mark. 3 Draw a line down the center of any adjacent studs should be resting in the Styrofoam. REMOVING THE MICROWAVE OVEN FROM THE CARTON/ REMOVING THE MOUNTING PLATE 1 Remove the installation instructions, filters, glass tray...
Installation Instructions
Page 11
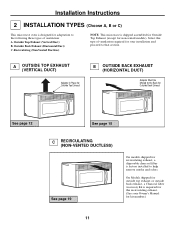
... Outside Back Exhaust See page 12 See page 15 C RECIRCULATING (NON-VENTED DUCTLESS) See page 19 On models shipped for recirculating exhaust, a disposable charcoal filter is factory installed to the following three types of ventilation required for your Owner's Manual for the recirculating exhaust. (See your installation and proceed to that section. Outside Top Exhaust (Vertical Duct) B. Recirculating (Non-Vented Ductless) NOTE: This microwave is required for kit number...
... Outside Back Exhaust See page 12 See page 15 C RECIRCULATING (NON-VENTED DUCTLESS) See page 19 On models shipped for recirculating exhaust, a disposable charcoal filter is factory installed to the following three types of ventilation required for your Owner's Manual for the recirculating exhaust. (See your installation and proceed to that section. Outside Top Exhaust (Vertical Duct) B. Recirculating (Non-Vented Ductless) NOTE: This microwave is required for kit number...
Installation Instructions
Page 12
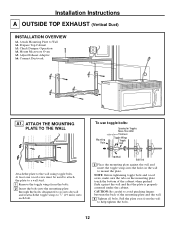
... the bolts into the mounting plate through the holes designated to go into the holes in the wall to 3⁄4″ (19 mm) onto each bolt. Installation Instructions A OUTSIDE TOP EXHAUST (Vertical Duct) INSTALLATION OVERVIEW A1. Prepare Top Cabinet A3. At least one wood screw must be used to attach the plate to a wall stud. 1 Remove the toggle wings from the wall to avoid pinching fingers...
... the bolts into the mounting plate through the holes designated to go into the holes in the wall to 3⁄4″ (19 mm) onto each bolt. Installation Instructions A OUTSIDE TOP EXHAUST (Vertical Duct) INSTALLATION OVERVIEW A1. Prepare Top Cabinet A3. At least one wood screw must be used to attach the plate to a wall stud. 1 Remove the toggle wings from the wall to avoid pinching fingers...
Installation Instructions
Page 13
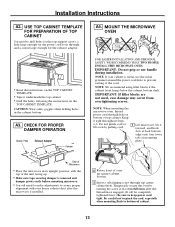
... TOP CABINET TEMPLATE. NOTE: We recommend using filler blocks if the cabinet front hangs below the cabinet bottom shelf. NOTE: If your house exhaust duct after the threads have engaged. (It will need to prevent cutting of oven up . • Make sure tape securing damper is installed. 2 Rotate front of the cord. Be careful not to pinch the cord, especially when mounting flush to keep power cord tight...
... TOP CABINET TEMPLATE. NOTE: We recommend using filler blocks if the cabinet front hangs below the cabinet bottom shelf. NOTE: If your house exhaust duct after the threads have engaged. (It will need to prevent cutting of oven up . • Make sure tape securing damper is installed. 2 Rotate front of the cord. Be careful not to pinch the cord, especially when mounting flush to keep power cord tight...
Installation Instructions
Page 14
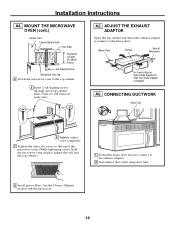
... Needed A6. Turn two full turns on each screw. See the Owner's Manual packed with the microwave. 14 Blower Plate Damper Back of Microwave For Front-to-Back or Side-to the house duct. CONNECTING DUCTWORK House Duct 6 Tighten center screw completely. 7 Tighten the outer two screws to the top of Cabinet Recess Self-Aligning Screw Microwave Oven Top 4 Attach the microwave oven to the exhaust adaptor. 2 Seal exhaust duct joints using duct tape. 8 Install grease filters. MOUNT THE MICROWAVE OVEN...
... Needed A6. Turn two full turns on each screw. See the Owner's Manual packed with the microwave. 14 Blower Plate Damper Back of Microwave For Front-to-Back or Side-to the house duct. CONNECTING DUCTWORK House Duct 6 Tighten center screw completely. 7 Tighten the outer two screws to the top of Cabinet Recess Self-Aligning Screw Microwave Oven Top 4 Attach the microwave oven to the exhaust adaptor. 2 Seal exhaust duct joints using duct tape. 8 Install grease filters. MOUNT THE MICROWAVE OVEN...

Installation Instructions
Page 15
... Mounting Plate to the microwave. PREPARING THE REAR WALL FOR OUTSIDE BACK EXHAUST You need the exhaust adaptor for installation in the rear wall opening , following the instructions of the REAR WALL TEMPLATE. 15 Back of Microwave Blower Plate 3 Slip the damper out of Microwave 4 Remove and save the screw that the wires are reinstalled. Back of the track on the REAR WALL TEMPLATE. • Tape it to cut an opening in the wall plate. • Cut the opening . Blower Plate • Read the instructions...
... Mounting Plate to the microwave. PREPARING THE REAR WALL FOR OUTSIDE BACK EXHAUST You need the exhaust adaptor for installation in the rear wall opening , following the instructions of the REAR WALL TEMPLATE. 15 Back of Microwave Blower Plate 3 Slip the damper out of Microwave 4 Remove and save the screw that the wires are reinstalled. Back of the track on the REAR WALL TEMPLATE. • Tape it to cut an opening in the wall plate. • Cut the opening . Blower Plate • Read the instructions...

Installation Instructions
Page 19
.... Adjust Blower C5. Install Charcoal Filter IMPORTANT NOTES: • Make sure the screws for the blower motor and blower plate are securely tightened when they are not pinched. ATTACH THE MOUNTING PLATE TO THE WALL 3 Place the mounting plate against the wall and that the wires are reinstalled. USE TOP CABINET TEMPLATE FOR PREPARATION OF TOP CABINET You need to drill holes for the top support screws and a hole large...
.... Adjust Blower C5. Install Charcoal Filter IMPORTANT NOTES: • Make sure the screws for the blower motor and blower plate are securely tightened when they are not pinched. ATTACH THE MOUNTING PLATE TO THE WALL 3 Place the mounting plate against the wall and that the wires are reinstalled. USE TOP CABINET TEMPLATE FOR PREPARATION OF TOP CABINET You need to drill holes for the top support screws and a hole large...
Installation Instructions
Page 22
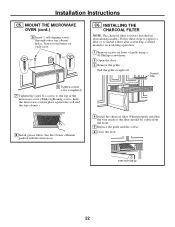
... tightening screws, hold the microwave oven in recirculating models. Charcoal Filter 6 Tighten center screw completely. 7 Tighten the outer two screws to recirculating operation. 1 Remove screws on each screw. MOUNT THE MICROWAVE OVEN (cont.) 5 Insert 2 self-aligning screws through outer top cabinet holes. C6. When properly installed, the wire mesh of grille using a #1 Phillips screwdriver. 2 Open the door. 3 Remove the grille. Insert mesh-side up 22 Pull the grille straight off. See the Owner's Manual packed with the microwave. 4 Install the charcoal filter. Turn...
... tightening screws, hold the microwave oven in recirculating models. Charcoal Filter 6 Tighten center screw completely. 7 Tighten the outer two screws to recirculating operation. 1 Remove screws on each screw. MOUNT THE MICROWAVE OVEN (cont.) 5 Insert 2 self-aligning screws through outer top cabinet holes. C6. When properly installed, the wire mesh of grille using a #1 Phillips screwdriver. 2 Open the door. 3 Remove the grille. Insert mesh-side up 22 Pull the grille straight off. See the Owner's Manual packed with the microwave. 4 Install the charcoal filter. Turn...

