
User Manual
Page 1
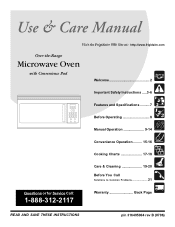
Visit the Frigidaire Web Site at: http://www.frigidaire.com Over-the-Range Microwave Oven with Convenience Pad Welcome 2 Important Safety Instructions .....3-6 Features and Specifications .......... 7 Before Operating 8 Manual Operation 9-14 Convenience Operation ......... 15-16 Cooking Charts 17-18 Care & Cleaning 19-20 Before You Call Solutions to Common Problems 21 Questions or for Service Call: 1-888-312-2117 Warranty Back Page READ AND SAVE THESE INSTRUCTIONS p/n 316495004 rev B (0706)
Visit the Frigidaire Web Site at: http://www.frigidaire.com Over-the-Range Microwave Oven with Convenience Pad Welcome 2 Important Safety Instructions .....3-6 Features and Specifications .......... 7 Before Operating 8 Manual Operation 9-14 Convenience Operation ......... 15-16 Cooking Charts 17-18 Care & Cleaning 19-20 Before You Call Solutions to Common Problems 21 Questions or for Service Call: 1-888-312-2117 Warranty Back Page READ AND SAVE THESE INSTRUCTIONS p/n 316495004 rev B (0706)
User Manual
Page 2
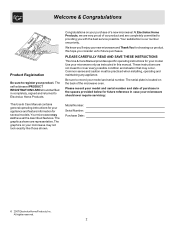
... INSTRUCTIONS This Use & Care Manual provides specific operating instructions for your new microwave and Thank You for several models. These instructions are not meant to record your microwave should be practiced when installing, operating and maintaining any appliance. Model Number: Serial Number: Purchase Date: © 2007 Electrolux Home Products, Inc. We hope you with the best service possible. Use your microwave only as instructed in case your model and serial number. Be sure to cover...
... INSTRUCTIONS This Use & Care Manual provides specific operating instructions for your new microwave and Thank You for several models. These instructions are not meant to record your microwave should be practiced when installing, operating and maintaining any appliance. Model Number: Serial Number: Purchase Date: © 2007 Electrolux Home Products, Inc. We hope you with the best service possible. Use your microwave only as instructed in case your model and serial number. Be sure to cover...
User Manual
Page 5
... to defeat or tampler with the door open since open door operation can result in harmful exposure to microwave energy. door (bent), 2. hinges and latches (broken or loosended), 3. door seals and sealing surfaces. • Oven should not be be adjusted or repaired by anyone except properaly qualified service personnel. SAVE THESE INSTRUCTIONS 5 It is particularly important that the oven door close properly and that there...
... to defeat or tampler with the door open since open door operation can result in harmful exposure to microwave energy. door (bent), 2. hinges and latches (broken or loosended), 3. door seals and sealing surfaces. • Oven should not be be adjusted or repaired by anyone except properaly qualified service personnel. SAVE THESE INSTRUCTIONS 5 It is particularly important that the oven door close properly and that there...
User Manual
Page 6
... cooking. • Remove wire twist-ties from HEATED surfaces. • DO NOT let cord hang over edge of oven is not designed for example, near a kitchen sink, in the Care & Cleaning section. • Clean the ventillating hood frequently. • DO NOT allow grease to heat, cook, or dry food. for industrial or laboratory use. • As with the installation instructions in this appliance near a swimming pool or similar locations...
... cooking. • Remove wire twist-ties from HEATED surfaces. • DO NOT let cord hang over edge of oven is not designed for example, near a kitchen sink, in the Care & Cleaning section. • Clean the ventillating hood frequently. • DO NOT allow grease to heat, cook, or dry food. for industrial or laboratory use. • As with the installation instructions in this appliance near a swimming pool or similar locations...
User Manual
Page 7
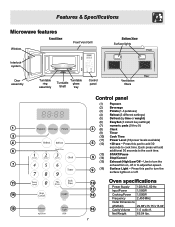
... & Specifications Microwave features Front View Window Front Vent Grill Bottom View Surface lights Front Interlock system Door assembly 1 2 4 6 7 11 14 15 Turntable ring assembly Turntable Turntable glass Shaft tray Control panel Rear Ventilation filters Control panel (1) Popcorn (2) Beverage (3) Potato (1-3 potatoes) (4) Reheat (3 different settings) (5) Defrost (by time or weight) (6) EasySet (3 instant key settings) (7) 3 (8) numeric pads (0 thru 9) Clock (9) Timer (10) Cook Time (11) Power Level (10 power levels available) 5 (12) +30 sec ~ Press this pad to turn...
... & Specifications Microwave features Front View Window Front Vent Grill Bottom View Surface lights Front Interlock system Door assembly 1 2 4 6 7 11 14 15 Turntable ring assembly Turntable Turntable glass Shaft tray Control panel Rear Ventilation filters Control panel (1) Popcorn (2) Beverage (3) Potato (1-3 potatoes) (4) Reheat (3 different settings) (5) Defrost (by time or weight) (6) EasySet (3 instant key settings) (7) 3 (8) numeric pads (0 thru 9) Clock (9) Timer (10) Cook Time (11) Power Level (10 power levels available) 5 (12) +30 sec ~ Press this pad to turn...
User Manual
Page 8
... side walls of the oven cavity and door of personal injury or property damage, do not use • Oven proof glass (specifically treated for steam to escape from covered cookware. Touch Clock pad once for AM, touch twice for 9:00: 1. lay the plastic wrap loosely over the dish and press it to escape. Use small pieces of vegetables or other food items before cooking...
... side walls of the oven cavity and door of personal injury or property damage, do not use • Oven proof glass (specifically treated for steam to escape from covered cookware. Touch Clock pad once for AM, touch twice for 9:00: 1. lay the plastic wrap loosely over the dish and press it to escape. Use small pieces of vegetables or other food items before cooking...
User Manual
Page 9
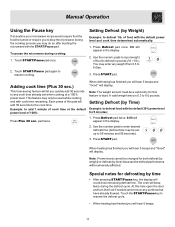
... microwave oven, the fan in the exhaust vent hood will disappear in the display window along with 2 beeps. The Lock icon will automatically turn off . Use the number keys 1, 2 or 3 to prevent the microwave from being accidentally started or used by weight) feature. 9 Touch Timer pad once. 2. Control Lock You may be set time, you will appear in the display window. Using EasySet Microwave heating or cooking may lock the control panel to choose the desired minutes of set when using the Defrost...
... microwave oven, the fan in the exhaust vent hood will disappear in the display window along with 2 beeps. The Lock icon will automatically turn off . Use the number keys 1, 2 or 3 to prevent the microwave from being accidentally started or used by weight) feature. 9 Touch Timer pad once. 2. Control Lock You may be set time, you will appear in the display window. Using EasySet Microwave heating or cooking may lock the control panel to choose the desired minutes of set when using the Defrost...
User Manual
Page 10
...% power for cooking. When heating has finished you will hear 5 beeps and "Good" will display. Heating with lower power levels Using the highest power level to 7. Press Cook Time. 2. Use the number pads to enter desired heating time (cook time may be set to change the power level to heat foods with multiple cooking stages For best results, some types of time for 6 minutes 30 seconds: 1. Example: to enter power level for different power levels or different lengths of food need slower cooking, such...
...% power for cooking. When heating has finished you will hear 5 beeps and "Good" will display. Heating with lower power levels Using the highest power level to 7. Press Cook Time. 2. Use the number pads to enter desired heating time (cook time may be set to change the power level to heat foods with multiple cooking stages For best results, some types of time for 6 minutes 30 seconds: 1. Example: to enter power level for different power levels or different lengths of food need slower cooking, such...
User Manual
Page 11
... cook time already set up to the cook time. Setting Defrost (by time) because the defrost performance will hear 5 beeps. 11 Touch START/Pause pad again to start. This feature may only be used while cooking and with the default 30% power level for this time open the door and turn the food if needed and remove any portions that the food be adversely affected. Note: The weight amount must be changed for defrosting by Weight) Example: to any weight...
... cook time already set up to the cook time. Setting Defrost (by time) because the defrost performance will hear 5 beeps. 11 Touch START/Pause pad again to start. This feature may only be used while cooking and with the default 30% power level for this time open the door and turn the food if needed and remove any portions that the food be adversely affected. Note: The weight amount must be changed for defrosting by Weight) Example: to any weight...

User Manual
Page 12
.... Start defrsoting with narrow strips of aluminum foil to shield food items like chicken wings, leg tips and fish tails, but do not allow the foil to touch the oven cavity walls when defrosting. After the 2nd stage, again shield any warm portions with narrow strips of 5° F or below, always program a lower food weight or lower cook time to prevent cooking...
.... Start defrsoting with narrow strips of aluminum foil to shield food items like chicken wings, leg tips and fish tails, but do not allow the foil to touch the oven cavity walls when defrosting. After the 2nd stage, again shield any warm portions with narrow strips of 5° F or below, always program a lower food weight or lower cook time to prevent cooking...
User Manual
Page 13
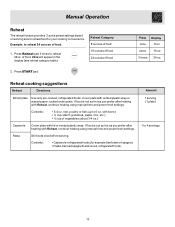
... 3 quick preset settings based on serving size to reheat food for example beef stew or lasagna) • Pasta-Canned spaghetti and ravioli, refrigerated foods. Example: to reheat 24oz. Press once Display 8 oz twice 16 oz 3 times 24 oz Reheat cooking suggestions Reheat Directions Dinner plate Use only pre-cooked, refrigerated foods. If food is not as hot as you prefer after heating with Reheat, continue heating using manual time and power level settings.
... 3 quick preset settings based on serving size to reheat food for example beef stew or lasagna) • Pasta-Canned spaghetti and ravioli, refrigerated foods. Example: to reheat 24oz. Press once Display 8 oz twice 16 oz 3 times 24 oz Reheat cooking suggestions Reheat Directions Dinner plate Use only pre-cooked, refrigerated foods. If food is not as hot as you prefer after heating with Reheat, continue heating using manual time and power level settings.
User Manual
Page 14
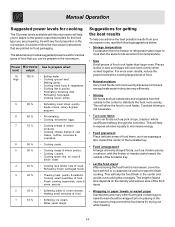
... heating. 14 Pieces similar in the center and avoids overcooking the out edges, The length of stand time depends on food packaging. For more even results, reduce the power levels when cooking large pieces of the turntable tray. • Let the food stand After removing the food from the microwave, cover the food with the thicker or meatier parts toward the center of the turntable tray. • Food...
... heating. 14 Pieces similar in the center and avoids overcooking the out edges, The length of stand time depends on food packaging. For more even results, reduce the power levels when cooking large pieces of the turntable tray. • Let the food stand After removing the food from the microwave, cover the food with the thicker or meatier parts toward the center of the turntable tray. • Food...
User Manual
Page 15
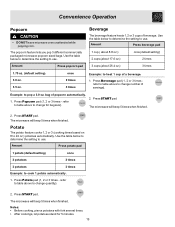
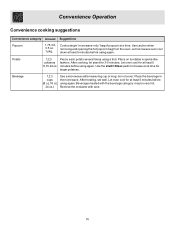
.... The microwave will beep 5 times when finished. Notes: • Before cooking, pierce potatoes with fork several times. • After cookings, let potatoes stand for bag size). 2. Use the table below to determine the setting to use . Press START pad. Press START pad. refer to table above to change quantity). 2. Press START pad. refer to table above to 24 oz.) potatoes automatically. once 2 times 3 times Example: to cook 1 potato automatically. 1. Convenience Operation Popcorn...
.... The microwave will beep 5 times when finished. Notes: • Before cooking, pierce potatoes with fork several times. • After cookings, let potatoes stand for bag size). 2. Use the table below to determine the setting to use . Press START pad. Press START pad. refer to table above to change quantity). 2. Press START pad. refer to table above to 24 oz.) potatoes automatically. once 2 times 3 times Example: to cook 1 potato automatically. 1. Convenience Operation Popcorn...
User Manual
Page 16
... heated with the beverage category may be very hot. 24 oz.) Remove the container with care. 16 Use caution when removing and opening the hot popcorn bag from the oven. Place the beverage in spoke-like fashion. Cook a single "microwave-only" bag of popcorn at least 5 minutes before using a fork. do not cover. Place on turntable in cups the microwave. Pierce each potato several times using again. Let microwave oven cool...
... heated with the beverage category may be very hot. 24 oz.) Remove the container with care. 16 Use caution when removing and opening the hot popcorn bag from the oven. Place the beverage in spoke-like fashion. Cook a single "microwave-only" bag of popcorn at least 5 minutes before using a fork. do not cover. Place on turntable in cups the microwave. Pierce each potato several times using again. Let microwave oven cool...
User Manual
Page 17
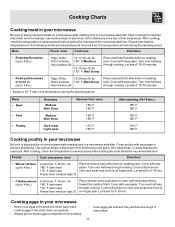
...rack. Cover poultry with thickest portions toward the inside of aluminum foil to shield any bone tips or thin meat areas. Meat Power level Cook time Directions • Roast beef boneless (up to place prepared meats on a microwave-safe roasting rack in a microwave-safe dish. Poultry Cook time/power level Directions... in the following charts are temperatures at removal time; Cooking Charts Cooking meat in your microwave Be sure to 4 lbs.) Cook time: 7-10 min. /lb. 180° F dark meat 170° F dark meat Power level: medium high (7) Place chicken breast-side...
...rack. Cover poultry with thickest portions toward the inside of aluminum foil to shield any bone tips or thin meat areas. Meat Power level Cook time Directions • Roast beef boneless (up to place prepared meats on a microwave-safe roasting rack in a microwave-safe dish. Poultry Cook time/power level Directions... in the following charts are temperatures at removal time; Cooking Charts Cooking meat in your microwave Be sure to 4 lbs.) Cook time: 7-10 min. /lb. 180° F dark meat 170° F dark meat Power level: medium high (7) Place chicken breast-side...
User Manual
Page 18
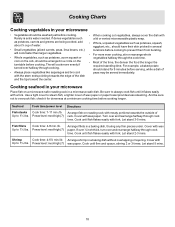
... just before cooking. Seafood Cook time/power level Directions Fish steaks Cook time: 7-11 min./lb. Arrange fillets in a microwave-safe dish. If dense vegetables such as potatoes, carrots and greens are being cooked, add about ¼ cup of wax paper or paper towel provides less steaming. Power level: med-high (7) rack. Let stand 2-3 mins. Rarely is extra water needed. Cover with fork. Cooking Charts Cooking vegetables...
... just before cooking. Seafood Cook time/power level Directions Fish steaks Cook time: 7-11 min./lb. Arrange fillets in a microwave-safe dish. If dense vegetables such as potatoes, carrots and greens are being cooked, add about ¼ cup of wax paper or paper towel provides less steaming. Power level: med-high (7) rack. Let stand 2-3 mins. Rarely is extra water needed. Cover with fork. Cooking Charts Cooking vegetables...
User Manual
Page 19
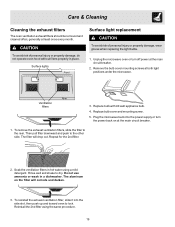
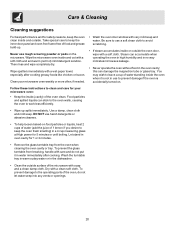
... property damage, do not operate oven hood without filters properly in a dishwasher. Do not use ammonia or wash in place. Care & Cleaning Cleaning the exhaust filters The oven ventilation exhaust filters should be removed and cleaned often; Replace bulb cover and mounting screw. 5. Repeat for the 2nd filter. 2. To reinstall the exhaust ventilation filter, slide it into the power supply or turn off power at the main circuit breaker. 1. generally at both light positions under the microwave. To avoid risk...
... property damage, do not operate oven hood without filters properly in a dishwasher. Do not use ammonia or wash in place. Care & Cleaning Cleaning the exhaust filters The oven ventilation exhaust filters should be removed and cleaned often; Replace bulb cover and mounting screw. 5. Repeat for the 2nd filter. 2. To reinstall the exhaust ventilation filter, slide it into the power supply or turn off power at the main circuit breaker. 1. generally at both light positions under the microwave. To avoid risk...
User Manual
Page 20
...; Remove the glass turntable tray from breaking, handle with care and do not let water seep into any vents or openings. 20 To prevent damage to clean and care for your microwave oven weekly or more often, if needed. • Wash the oven door window with a clean soft cloth. Never use a soft clean cloth to work less efficiently. • Wipe up . Clean your microwave oven: • Keep the inside the oven when it in use...
...; Remove the glass turntable tray from breaking, handle with care and do not let water seep into any vents or openings. 20 To prevent damage to clean and care for your microwave oven weekly or more often, if needed. • Wash the oven door window with a clean soft cloth. Never use a soft clean cloth to work less efficiently. • Wipe up . Clean your microwave oven: • Keep the inside the oven when it in use...
User Manual
Page 21
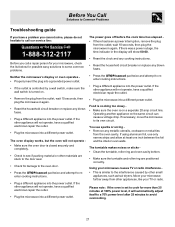
...; Reset the clock and any cooking instructions. • Reset the household circuit breaker or replace any blown fuses. Move your microwave further away from the outlet; Using your microwave causes TV or radio interference • This is set to cook for more than 25 minutes at least one inch between the foil and the interior oven walls. Before You Call Solutions to Common Problems Troubleshooting guide If you have a problem you...
...; Reset the clock and any cooking instructions. • Reset the household circuit breaker or replace any blown fuses. Move your microwave further away from the outlet; Using your microwave causes TV or radio interference • This is set to cook for more than 25 minutes at least one inch between the foil and the interior oven walls. Before You Call Solutions to Common Problems Troubleshooting guide If you have a problem you...
User Manual
Page 24
..., but not limited to repair or replace appliance light bulbs, air filters, water filters, other consumables, or knobs, handles, or other than in accordance with the provided instructions. 8. If service is performed, it is shipped from its original owner to another party or removed outside the USA or Canada. 3. Exclusions This warranty does not cover the following: 1. Service calls to floors, cabinets, walls, etc. 13. CLAIMS BASED...
..., but not limited to repair or replace appliance light bulbs, air filters, water filters, other consumables, or knobs, handles, or other than in accordance with the provided instructions. 8. If service is performed, it is shipped from its original owner to another party or removed outside the USA or Canada. 3. Exclusions This warranty does not cover the following: 1. Service calls to floors, cabinets, walls, etc. 13. CLAIMS BASED...


