User Manual
Page 1
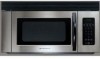
Visit the Frigidaire Web Site at: http://www.frigidaire.com Over-the-Range Microwave Oven with Convenience Pad Welcome 2 Important Safety Instructions .....3-6 Features and Specifications .......... 7 Before Operating 8 Manual Operation 9-14 Convenience Operation ......... 15-16 Cooking Charts 17-18 Care & Cleaning 19-20 Before You Call Solutions to Common Problems 21 Questions or for Service Call: 1-888-312-2117 Warranty Back Page READ AND SAVE THESE INSTRUCTIONS p/n 316495004 rev B (0706)
Visit the Frigidaire Web Site at: http://www.frigidaire.com Over-the-Range Microwave Oven with Convenience Pad Welcome 2 Important Safety Instructions .....3-6 Features and Specifications .......... 7 Before Operating 8 Manual Operation 9-14 Convenience Operation ......... 15-16 Cooking Charts 17-18 Care & Cleaning 19-20 Before You Call Solutions to Common Problems 21 Questions or for Service Call: 1-888-312-2117 Warranty Back Page READ AND SAVE THESE INSTRUCTIONS p/n 316495004 rev B (0706)
User Manual
Page 2
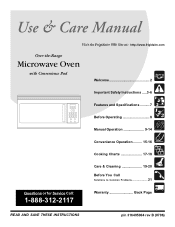
... future purchases. PLEASE CAREFULLY READ AND SAVE THESE INSTRUCTIONS This Use & Care Manual provides specific operating instructions for your model and serial number. Congratulations on your microwave may not have all the described features. The graphics on the back of our...of the microwave oven. Welcome & Congratulations Product Registration Be sure to register your new microwave and Thank You for choosing our product. The self-addressed PRODUCT REGISTRATION CARD should ever require servicing: This Use & Care Manual contains general operating instructions for your microwave only as...
... future purchases. PLEASE CAREFULLY READ AND SAVE THESE INSTRUCTIONS This Use & Care Manual provides specific operating instructions for your model and serial number. Congratulations on your microwave may not have all the described features. The graphics on the back of our...of the microwave oven. Welcome & Congratulations Product Registration Be sure to register your new microwave and Thank You for choosing our product. The self-addressed PRODUCT REGISTRATION CARD should ever require servicing: This Use & Care Manual contains general operating instructions for your microwave only as...
User Manual
Page 6
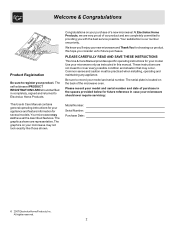
...Manual. are required to excessive microvave energy. • DO NOT overcook food. Do not use corrosive chemicals or vapors in the oven cavity: injury to persons or exposure to service oven. SAVE THESE INSTRUCTIONS 6 Important Safety Instructions When using oven. • READ AND FOLLOW the specific "PRECAUTIONS TO AVOID POSSIBLE EXPOSURE TO EXCESSIVE MICROWAVE...industrial or laboratory use. • As with the installation instructions in this oven. To avoid the risk of fir in this Use & Care Manual. • Some products such as whole eggs and sealed containers - ...
...Manual. are required to excessive microvave energy. • DO NOT overcook food. Do not use corrosive chemicals or vapors in the oven cavity: injury to persons or exposure to service oven. SAVE THESE INSTRUCTIONS 6 Important Safety Instructions When using oven. • READ AND FOLLOW the specific "PRECAUTIONS TO AVOID POSSIBLE EXPOSURE TO EXCESSIVE MICROWAVE...industrial or laboratory use. • As with the installation instructions in this oven. To avoid the risk of fir in this Use & Care Manual. • Some products such as whole eggs and sealed containers - ...
User Manual
Page 9
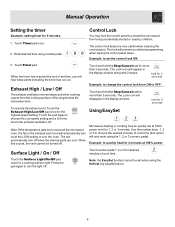
... On / Off Touch the Surface Light/On/Off pad once for desired minutes of the range below the microwave oven. The control lock feature is very useful when cleaning the control panel. When the timer has reached the ... window. The Lock icon will automatically turn off . Note: If the temperature gets too hot around the microwave oven, the fan in the exhaust vent hood will disappear in the display window along with 2 beeps. Control ... the Stop/Cancel pad for the highest speed setting. Manual Operation Setting the timer Example: setting timer for more than 3 seconds.
... On / Off Touch the Surface Light/On/Off pad once for desired minutes of the range below the microwave oven. The control lock feature is very useful when cleaning the control panel. When the timer has reached the ... window. The Lock icon will automatically turn off . Note: If the temperature gets too hot around the microwave oven, the fan in the exhaust vent hood will disappear in the display window along with 2 beeps. Control ... the Stop/Cancel pad for the highest speed setting. Manual Operation Setting the timer Example: setting timer for more than 3 seconds.
User Manual
Page 10
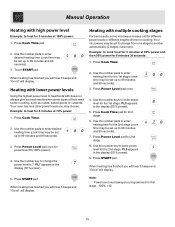
...be set up to heat foods with does not always give the best results when some microwave recipes call for different power levels or different lengths of food need slower cooking, such ... and "Good" will display. When heating has finished you will hear 5 beeps and "Good" will display. Your oven has nine other power levels you will hear 5 beeps and "Good" will display. 5. Press Cook Time. 2. ...for the 1st stage. Example: to heat for 5 minutes at 100% power: 1. Press START pad. Manual Operation Heating with high power level Example: to heat for 4 minutes at 70% power: 1. Press Power...
...be set up to heat foods with does not always give the best results when some microwave recipes call for different power levels or different lengths of food need slower cooking, such ... and "Good" will display. When heating has finished you will hear 5 beeps and "Good" will display. Your oven has nine other power levels you will hear 5 beeps and "Good" will display. 5. Press Cook Time. 2. ...for the 1st stage. Example: to heat for 5 minutes at 100% power: 1. Press START pad. Manual Operation Heating with high power level Example: to heat for 4 minutes at 70% power: 1. Press Power...
User Manual
Page 11
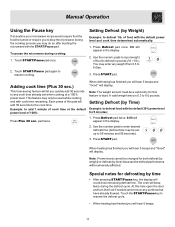
...of this feature to start. Use the number pads to enter desired defrost time (defrost time may do so after starting the microwave with cook time remaining. The oven will appear in the display. 2. Setting Defrost (by time) because the defrost performance will be used while cooking and with the...may enter any portions that the food be turned or require you to stop the microwave during the cooking process you will hear 5 beeps. 11 Manual Operation Using the Pause key If at anytime your microwave recipe would require that have already thawed. Touch the START/Pause key to resume ...
...of this feature to start. Use the number pads to enter desired defrost time (defrost time may do so after starting the microwave with cook time remaining. The oven will appear in the display. 2. Setting Defrost (by time) because the defrost performance will be used while cooking and with the...may enter any portions that the food be turned or require you to stop the microwave during the cooking process you will hear 5 beeps. 11 Manual Operation Using the Pause key If at anytime your microwave recipe would require that have already thawed. Touch the START/Pause key to resume ...
User Manual
Page 14
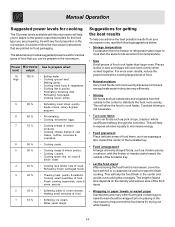
...Sandwiches and many other food types containing prebaked bread should be prepare in the microwave, it stand to finish cooking. The table below ; • Storage temperature Foods taken from your microwave oven, read the following suggestions below provides suggested power levels for various types of stand... the center of food. 1 10 % • Softening ice cream. • Raise yeast dough. Manual Operation Suggested power levels for cooking The 10 power levels available with this microwave will allow the food to cook faster. As with foil or a casserole lid and let it is ...
...Sandwiches and many other food types containing prebaked bread should be prepare in the microwave, it stand to finish cooking. The table below ; • Storage temperature Foods taken from your microwave oven, read the following suggestions below provides suggested power levels for various types of stand... the center of food. 1 10 % • Softening ice cream. • Raise yeast dough. Manual Operation Suggested power levels for cooking The 10 power levels available with this microwave will allow the food to cook faster. As with foil or a casserole lid and let it is ...
Installation Instructions
Page 11
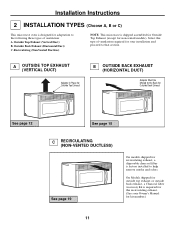
Recirculating (Non-Vented Ductless) NOTE: This microwave is shipped assembled for Outside Top Exhaust (except for recirculating exhaust, a disposable charcoal filter is factory installed to help remove smoke and odors. ...RECIRCULATING (NON-VENTED DUCTLESS) See page 19 On models shipped for non-vented models). Installation Instructions 2 INSTALLATION TYPES (Choose A, B or C) This microwave oven is designed for your Owner's Manual for kit number.) 11 Select the type of ventilation required for adaptation to the following three types of ventilation: A. Outside Top Exhaust (Vertical...
Recirculating (Non-Vented Ductless) NOTE: This microwave is shipped assembled for Outside Top Exhaust (except for recirculating exhaust, a disposable charcoal filter is factory installed to help remove smoke and odors. ...RECIRCULATING (NON-VENTED DUCTLESS) See page 19 On models shipped for non-vented models). Installation Instructions 2 INSTALLATION TYPES (Choose A, B or C) This microwave oven is designed for your Owner's Manual for kit number.) 11 Select the type of ventilation required for adaptation to the following three types of ventilation: A. Outside Top Exhaust (Vertical...
Installation Instructions
Page 14
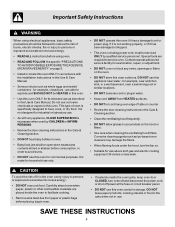
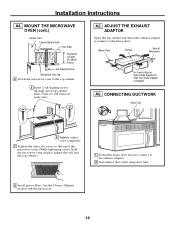
...Manual packed with the microwave. 14 A5. ADJUST THE EXHAUST ADAPTOR Open the top cabinet and adjust the exhaust adaptor to connect to the exhaust adaptor. 2 Seal exhaust duct joints using duct tape. 8 Install grease filters. MOUNT THE MICROWAVE OVEN (cont.) Cabinet Front Cabinet Bottom Shelf Filler Block Equivalent to Depth of Microwave... through outer top cabinet holes. Blower Plate Damper Back of Cabinet Recess Self-Aligning Screw Microwave Oven Top 4 Attach the microwave oven to -Side Adjustment, Slide the Exhaust Adaptor as Needed A6. Installation Instructions A4. Turn...
...Manual packed with the microwave. 14 A5. ADJUST THE EXHAUST ADAPTOR Open the top cabinet and adjust the exhaust adaptor to connect to the exhaust adaptor. 2 Seal exhaust duct joints using duct tape. 8 Install grease filters. MOUNT THE MICROWAVE OVEN (cont.) Cabinet Front Cabinet Bottom Shelf Filler Block Equivalent to Depth of Microwave... through outer top cabinet holes. Blower Plate Damper Back of Cabinet Recess Self-Aligning Screw Microwave Oven Top 4 Attach the microwave oven to -Side Adjustment, Slide the Exhaust Adaptor as Needed A6. Installation Instructions A4. Turn...
Installation Instructions
Page 18
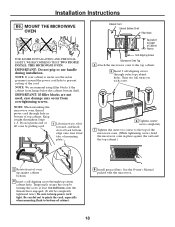
...Cabinet Bottom Shelf Filler Block Equivalent to Depth of Cabinet Recess Self-Aligning Screw Microwave Oven Top 4 Attach the microwave oven to the top of the microwave oven. (While tightening screws, hold the microwave oven in bottom of the cord. Turn two full turns on each screw. 6... of cabinet. 8 Install grease filters. MOUNT THE MICROWAVE OVEN FOR EASIER INSTALLATION AND PERSONAL SAFETY, WE RECOMMEND THAT TWO PEOPLE INSTALL THIS MICROWAVE OVEN. Temporarily secure the oven by pulling cord. 1 Lift microwave, tilt it tight throughout Steps 1-3. See the Owner's Manual packed with the...
...Cabinet Bottom Shelf Filler Block Equivalent to Depth of Cabinet Recess Self-Aligning Screw Microwave Oven Top 4 Attach the microwave oven to the top of the microwave oven. (While tightening screws, hold the microwave oven in bottom of the cord. Turn two full turns on each screw. 6... of cabinet. 8 Install grease filters. MOUNT THE MICROWAVE OVEN FOR EASIER INSTALLATION AND PERSONAL SAFETY, WE RECOMMEND THAT TWO PEOPLE INSTALL THIS MICROWAVE OVEN. Temporarily secure the oven by pulling cord. 1 Lift microwave, tilt it tight throughout Steps 1-3. See the Owner's Manual packed with the...
Installation Instructions
Page 22
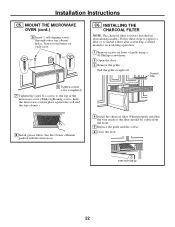
... is factory installed in place against the wall and the top cabinet.) 8 Install grease filters. Installation Instructions C5. See the Owner's Manual packed with the microwave. 4 Install the charcoal filter. MOUNT THE MICROWAVE OVEN (cont.) 5 Insert 2 self-aligning screws through outer top cabinet holes. C6. Insert mesh-side up 22 When properly installed, the...
... is factory installed in place against the wall and the top cabinet.) 8 Install grease filters. Installation Instructions C5. See the Owner's Manual packed with the microwave. 4 Install the charcoal filter. MOUNT THE MICROWAVE OVEN (cont.) 5 Insert 2 self-aligning screws through outer top cabinet holes. C6. Insert mesh-side up 22 When properly installed, the...
Installation Instructions
Page 23
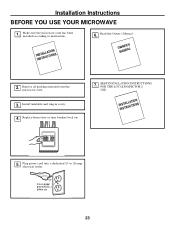
OMWANNEURA'SL 2. Install turntable and ring in cavity. 4. ININSSTTARLULCATTIIOONNS 5. Plug power cord into a dedicated 15- Ensure proper ground exists before use 23 Remove all packing material from the microwave oven. 3. KEEP INSTALLATION INSTRUCTIONS FOR THE LOCAL INSPECTOR'S USE. Installation Instructions BEFORE YOU USE YOUR MICROWAVE 1. Replace house fuse or turn breaker back on. 7. ININSSTTARLULCATTIIOONNS 6. to instructions. Read the Owner's Manual. Make sure the microwave oven has been installed according to 20-amp electrical outlet.
OMWANNEURA'SL 2. Install turntable and ring in cavity. 4. ININSSTTARLULCATTIIOONNS 5. Plug power cord into a dedicated 15- Ensure proper ground exists before use 23 Remove all packing material from the microwave oven. 3. KEEP INSTALLATION INSTRUCTIONS FOR THE LOCAL INSPECTOR'S USE. Installation Instructions BEFORE YOU USE YOUR MICROWAVE 1. Replace house fuse or turn breaker back on. 7. ININSSTTARLULCATTIIOONNS 6. to instructions. Read the Owner's Manual. Make sure the microwave oven has been installed according to 20-amp electrical outlet.


