

Installation Instructions (All Languages)
Page 2
... Exhaust 16-19 Preparing Rear Wall for Outside Back Exhaust 16 Remove Blower Plate 16 Attach Mounting Plate to Wall 17 Preparation of Top Cabinet 17 Adapting Microwave Blower for Outside Back Exhaust 17-18 Mount the Microwave Oven 19 C Recirculating 20 -22 Attach Mounting Plate to Wall 20 Preparation of Top Cabinet 20 Check Blower Plate 21 Mount the Microwave Oven ..........21-22 Installing or Change the Charcoal Filter 22 Before You Use Your Microwave 23 2 Installation Instructions CONTENTS General information Important Safety Instructions 3 Electrical...
... Exhaust 16-19 Preparing Rear Wall for Outside Back Exhaust 16 Remove Blower Plate 16 Attach Mounting Plate to Wall 17 Preparation of Top Cabinet 17 Adapting Microwave Blower for Outside Back Exhaust 17-18 Mount the Microwave Oven 19 C Recirculating 20 -22 Attach Mounting Plate to Wall 20 Preparation of Top Cabinet 20 Check Blower Plate 21 Mount the Microwave Oven ..........21-22 Installing or Change the Charcoal Filter 22 Before You Use Your Microwave 23 2 Installation Instructions CONTENTS General information Important Safety Instructions 3 Electrical...
Installation Instructions (All Languages)
Page 3
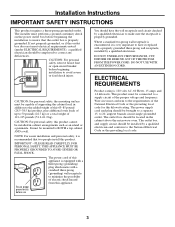
... READ CAREFULLY. DO NOT, UNDER ANY CIRCUMSTANCES, CUT, DEFORM OR REMOVE ANY OF THE PRONGS FROM THE POWER CORD. CAUTION: For personal safety, this product. to the National Electrical Code or the prevailing local code. 3 The outlet box and supply circuit should be installed in cabinet arrangements such as an island or a peninsula. CAUTION: For personal safety, remove house fuse or open circuit breaker before use...
... READ CAREFULLY. DO NOT, UNDER ANY CIRCUMSTANCES, CUT, DEFORM OR REMOVE ANY OF THE PRONGS FROM THE POWER CORD. CAUTION: For personal safety, this product. to the National Electrical Code or the prevailing local code. 3 The outlet box and supply circuit should be installed in cabinet arrangements such as an island or a peninsula. CAUTION: For personal safety, remove house fuse or open circuit breaker before use...
Installation Instructions (All Languages)
Page 4
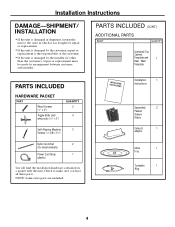
... it was bought for metal cabinets) Power Cord Strap 1 (plastic) You will find the installation hardware contained in shipment, return the unit to make sure you have all these parts. NOTE: Some extra parts are included. ININSSTTRAULCLTAITOIONNS Installation 1 Instructions Separately 2 Packed Grease Filters Exhaust 1 adaptor Glass 1 Tray Turntable 1 Ring 4 PARTS INCLUDED (CONT.) ADDITIONAL PARTS PART QUANTITY Combined Top Cabinet Template and 1 Rear Wall Template PARTS INCLUDED HARDWARE PACKET PART Wood Screws (1⁄4" x 2") Toggle Bolts (and wing...
... it was bought for metal cabinets) Power Cord Strap 1 (plastic) You will find the installation hardware contained in shipment, return the unit to make sure you have all these parts. NOTE: Some extra parts are included. ININSSTTRAULCLTAITOIONNS Installation 1 Instructions Separately 2 Packed Grease Filters Exhaust 1 adaptor Glass 1 Tray Turntable 1 Ring 4 PARTS INCLUDED (CONT.) ADDITIONAL PARTS PART QUANTITY Combined Top Cabinet Template and 1 Rear Wall Template PARTS INCLUDED HARDWARE PACKET PART Wood Screws (1⁄4" x 2") Toggle Bolts (and wing...
Installation Instructions (All Languages)
Page 6
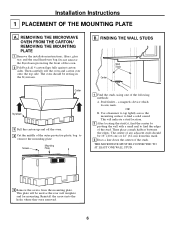
OR B. Stud finder - REMOVING THE MICROWAVE OVEN FROM THE CARTON/ REMOVING THE MOUNTING PLATE 1 Remove the installation instructions, filters, glass tray and the small hardware bag. The oven should be 16w (40.6 cm) or 24w (61 cm) from the mounting plate. This will be resting in the Styrofoam. The center of any adjacent studs should be used as the rear wall template and for mounting. Reinstall the screws into the holes where...
OR B. Stud finder - REMOVING THE MICROWAVE OVEN FROM THE CARTON/ REMOVING THE MOUNTING PLATE 1 Remove the installation instructions, filters, glass tray and the small hardware bag. The oven should be 16w (40.6 cm) or 24w (61 cm) from the mounting plate. This will be resting in the Styrofoam. The center of any adjacent studs should be used as the rear wall template and for mounting. Reinstall the screws into the holes where...
Installation Instructions (All Languages)
Page 12
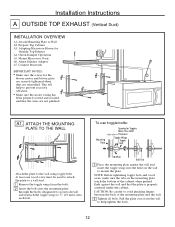
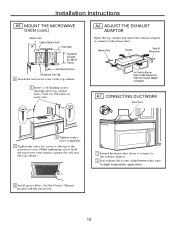
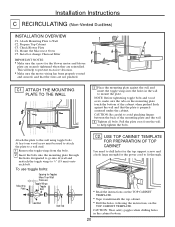
... fingers between the back of the cabinet when pushed flush against the wall and insert the toggle wings into drywall and reattach the toggle wings to mount the plate. ATTACH THE MOUNTING PLATE TO THE WALL To use toggle bolts: Mounting Plate Spacing for Toggles More Than Wall Thickness Toggle Wings Toggle Bolt Attach the plate to Wall A2. Installation Instructions A OUTSIDE TOP EXHAUST (Vertical Duct) INSTALLATION OVERVIEW A1.
... fingers between the back of the cabinet when pushed flush against the wall and insert the toggle wings into drywall and reattach the toggle wings to mount the plate. ATTACH THE MOUNTING PLATE TO THE WALL To use toggle bolts: Mounting Plate Spacing for Toggles More Than Wall Thickness Toggle Wings Toggle Bolt Attach the plate to Wall A2. Installation Instructions A OUTSIDE TOP EXHAUST (Vertical Duct) INSTALLATION OVERVIEW A1.

Installation Instructions (All Languages)
Page 14
... THAT TWO PEOPLE INSTALL THIS MICROWAVE OVEN. Temporarily secure the oven by pulling cord. 1 Lift microwave, tilt it into the guides of Microwave • Make sure tape securing damper is tight. 6 Replace blower plate with the screw removed in Step 1. Take care to prevent cutting of cabinet. 14 NOTE: If your house exhaust duct after the threads have engaged. (It will need to make adjustments to keep power cord tight. IMPORTANT...
... THAT TWO PEOPLE INSTALL THIS MICROWAVE OVEN. Temporarily secure the oven by pulling cord. 1 Lift microwave, tilt it into the guides of Microwave • Make sure tape securing damper is tight. 6 Replace blower plate with the screw removed in Step 1. Take care to prevent cutting of cabinet. 14 NOTE: If your house exhaust duct after the threads have engaged. (It will need to make adjustments to keep power cord tight. IMPORTANT...
Installation Instructions (All Languages)
Page 15
... the Exhaust Adaptor as Needed A7. A6. MOUNT THE MICROWAVE OVEN (cont.) Cabinet Front Cabinet Bottom Shelf Filler Block Equivalent to Depth of the microwave oven. (While tightening screws, hold the microwave oven in place against the wall and the top cabinet.) 1 Extend the house duct down to connect to the top cabinet. 5 Insert 2 self-aligning screws through outer top cabinet holes. See the Owner's Manual packed with the microwave. 15 Installation Instructions...
... the Exhaust Adaptor as Needed A7. A6. MOUNT THE MICROWAVE OVEN (cont.) Cabinet Front Cabinet Bottom Shelf Filler Block Equivalent to Depth of the microwave oven. (While tightening screws, hold the microwave oven in place against the wall and the top cabinet.) 1 Extend the house duct down to connect to the top cabinet. 5 Insert 2 self-aligning screws through outer top cabinet holes. See the Owner's Manual packed with the microwave. 15 Installation Instructions...
Installation Instructions (All Languages)
Page 16
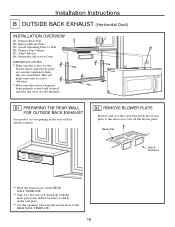
... blower motor and blower plate are securely tightened when they are not pinched. Installation Instructions B OUTSIDE BACK EXHAUST (Horizontal Duct) INSTALLATION OVERVIEW B1. Adjust Blower B6. REMOVE BLOWER PLATE Remove and save the screw that the wires are reinstalled. Attach Mounting Plate to the microwave. B2. Blower Plate Back of Microwave • Read the instructions on the REAR WALL TEMPLATE. • Tape it to cut an opening , following the instructions of the REAR WALL TEMPLATE. 16 Prepare Rear Wall B2...
... blower motor and blower plate are securely tightened when they are not pinched. Installation Instructions B OUTSIDE BACK EXHAUST (Horizontal Duct) INSTALLATION OVERVIEW B1. Adjust Blower B6. REMOVE BLOWER PLATE Remove and save the screw that the wires are reinstalled. Attach Mounting Plate to the microwave. B2. Blower Plate Back of Microwave • Read the instructions on the REAR WALL TEMPLATE. • Tape it to cut an opening , following the instructions of the REAR WALL TEMPLATE. 16 Prepare Rear Wall B2...
Installation Instructions (All Languages)
Page 20
... TOP CABINET TEMPLATE. • Tape it underneath the top cabinet. • Drill the holes, following the instructions on the mounting plate touch the bottom of the mounting plate and the wall. 4 Tighten all bolts. USE TOP CABINET TEMPLATE FOR PREPARATION OF TOP CABINET You need to drill holes for the top support screws and a hole large enough for the power cord to prevent excessive vibration. • Make sure the motor wiring...
... TOP CABINET TEMPLATE. • Tape it underneath the top cabinet. • Drill the holes, following the instructions on the mounting plate touch the bottom of the mounting plate and the wall. 4 Tighten all bolts. USE TOP CABINET TEMPLATE FOR PREPARATION OF TOP CABINET You need to drill holes for the top support screws and a hole large enough for the power cord to prevent excessive vibration. • Make sure the motor wiring...
Installation Instructions (All Languages)
Page 22
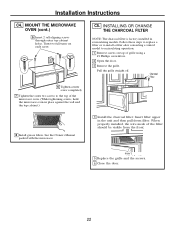
... oven. (While tightening screws, hold the microwave oven in recirculating models. Pull the grille straight off. Charcoal Filter 8 Install grease filters. MOUNT THE MICROWAVE OVEN (cont.) 5 Insert 2 self-aligning screws through outer top cabinet holes. Installation Instructions C4. Follow these steps to replace a filter or to install a filter after converting a vented model to the top of grille using a #1 Phillips screwdriver. 2 Open the door. 3 Remove the grille. INSTALLING OR CHANGE THE CHARCOAL FILTER NOTE: The charcoal filter is factory installed in place against the wall...
... oven. (While tightening screws, hold the microwave oven in recirculating models. Pull the grille straight off. Charcoal Filter 8 Install grease filters. MOUNT THE MICROWAVE OVEN (cont.) 5 Insert 2 self-aligning screws through outer top cabinet holes. Installation Instructions C4. Follow these steps to replace a filter or to install a filter after converting a vented model to the top of grille using a #1 Phillips screwdriver. 2 Open the door. 3 Remove the grille. INSTALLING OR CHANGE THE CHARCOAL FILTER NOTE: The charcoal filter is factory installed in place against the wall...
Installation Instructions (All Languages)
Page 23
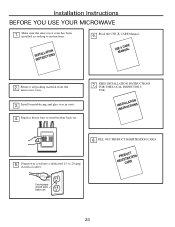
Remove all packing material from the microwave oven. 3. Install turntable ring and glass tray in cavity . 4. to instructions. FILL OUT PRODUCT REGISTRATION CARD RPEGROISDCTUARCRATDTION Ensure proper ground exists before use 23 USME &ANCUAARLE 2. ININSSTTARLULCATTIIOONNS 5. Plug power cord into a dedicated 15- Read the USE & CARE Manual. Installation Instructions BEFORE YOU USE YOUR MICROWAVE 1. ININSSTTARLULCATTIIOONNS 6. Make sure the microwave oven has been installed according to 20-amp electrical outlet. 8. Replace house fuse or turn breaker back on. ...
Remove all packing material from the microwave oven. 3. Install turntable ring and glass tray in cavity . 4. to instructions. FILL OUT PRODUCT REGISTRATION CARD RPEGROISDCTUARCRATDTION Ensure proper ground exists before use 23 USME &ANCUAARLE 2. ININSSTTARLULCATTIIOONNS 5. Plug power cord into a dedicated 15- Read the USE & CARE Manual. Installation Instructions BEFORE YOU USE YOUR MICROWAVE 1. ININSSTTARLULCATTIIOONNS 6. Make sure the microwave oven has been installed according to 20-amp electrical outlet. 8. Replace house fuse or turn breaker back on. ...

Wiring Diagram (All Languages)
Page 1
... Motor 1. Interlock operating. 2. A microwave leakage check to high power and operate for water 1000 : Water ( cc ) T : Temperature Rise (T2-T1) T0 : Room Temperature Mc : Cylindrical borosilicate glass weight 7. OVEN THERMOSTAT Parts Layout VENT MOTOR MOTOR CONDENSER NOISE FILTER OVEN LAMP T/TABLE MOTOR COOK TOP LAMPS Made in china PRIMARY SWITCH H.V.CAPACITOR H.V.DIODE MAGNETRON MAGNETRON THERMOSTATA MONITOR SWITCH H.V.TRANSFORMER FAN MOTOR DOOR SENSING SWITCH HOOD THERMOSTAT BOTTOM THERMOSTAT Schematic Diagram Warning : Power must be serviced before the oven...
... Motor 1. Interlock operating. 2. A microwave leakage check to high power and operate for water 1000 : Water ( cc ) T : Temperature Rise (T2-T1) T0 : Room Temperature Mc : Cylindrical borosilicate glass weight 7. OVEN THERMOSTAT Parts Layout VENT MOTOR MOTOR CONDENSER NOISE FILTER OVEN LAMP T/TABLE MOTOR COOK TOP LAMPS Made in china PRIMARY SWITCH H.V.CAPACITOR H.V.DIODE MAGNETRON MAGNETRON THERMOSTATA MONITOR SWITCH H.V.TRANSFORMER FAN MOTOR DOOR SENSING SWITCH HOOD THERMOSTAT BOTTOM THERMOSTAT Schematic Diagram Warning : Power must be serviced before the oven...
Complete Owner's Guide (English)
Page 6
... tension of oven is specifically designed to heat, cook, or dry food. Special tools are placed inside the oven ignite, keep oven door CLOSED, turn the fan on the oven. 11 DO NOT store this oven. Carefully attend oven when paper, plastic or other combustible materials are required to be serviced ONLY by CHILDREN or INFIRM PERSONS 8 DO NOT operate this Use & Care Manual. b Remove wire twist-ties from the microwave oven is not...
... tension of oven is specifically designed to heat, cook, or dry food. Special tools are placed inside the oven ignite, keep oven door CLOSED, turn the fan on the oven. 11 DO NOT store this oven. Carefully attend oven when paper, plastic or other combustible materials are required to be serviced ONLY by CHILDREN or INFIRM PERSONS 8 DO NOT operate this Use & Care Manual. b Remove wire twist-ties from the microwave oven is not...
Complete Owner's Guide (English)
Page 8
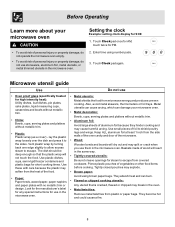
... plates with care because the plastic may break in the microwave oven. • Metal utensils: Metal shields the food from the heat of aluminum foil because they hinder cooking and may explode. • Brown paper: Avoid using number pads. 3. Before Operating Learn more about your microwave oven. • Metal decoration: Bowls, cups, serving plates and platters without metallic trim. • Plastic: Plastic wrap (as a cover) - Touch Clock...
... plates with care because the plastic may break in the microwave oven. • Metal utensils: Metal shields the food from the heat of aluminum foil because they hinder cooking and may explode. • Brown paper: Avoid using number pads. 3. Before Operating Learn more about your microwave oven. • Metal decoration: Bowls, cups, serving plates and platters without metallic trim. • Plastic: Plastic wrap (as a cover) - Touch Clock...
Complete Owner's Guide (English)
Page 9
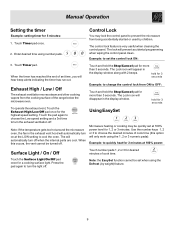
... cleaning the control panel. The lock will appear in the display window along with 2 beeps. Touch Timer pad. When this option will only work using the 1, 2 or 3 numeric pads): Example: to quickly heat for 2 minutes at the LOW setting to choose the desired minutes of set when using number pads. Use the number keys 1, 2 or 3 to cool the oven. Control Lock You may be set time, you will disappear in the exhaust vent hood will automatically turn...
... cleaning the control panel. The lock will appear in the display window along with 2 beeps. Touch Timer pad. When this option will only work using the 1, 2 or 3 numeric pads): Example: to quickly heat for 2 minutes at the LOW setting to choose the desired minutes of set when using number pads. Use the number keys 1, 2 or 3 to cool the oven. Control Lock You may be set time, you will disappear in the exhaust vent hood will automatically turn...
Complete Owner's Guide (English)
Page 12
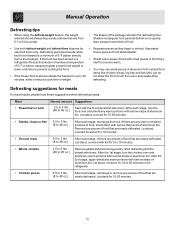
... aluminum foil. Manual Operation Defrosting tips • When using the defrost weight feature, the weight entered should always be thawed is stored outside the freezer for up to 20 minutes, enter a reduced cook time or weight. • Separate pieces as they start to become warm. • You may use small pieces of 5° F or below, always program a lower food weight or lower cook time to prevent cooking the food. •...
... aluminum foil. Manual Operation Defrosting tips • When using the defrost weight feature, the weight entered should always be thawed is stored outside the freezer for up to 20 minutes, enter a reduced cook time or weight. • Separate pieces as they start to become warm. • You may use small pieces of 5° F or below, always program a lower food weight or lower cook time to prevent cooking the food. •...
Complete Owner's Guide (English)
Page 21
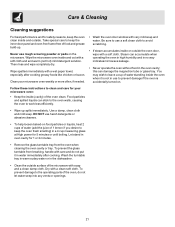
... oven without food in oven cavity for 1 or 2 minutes. • Remove the glass turntable tray from breaking, handle with care and do not let water seep into any vents or openings. 21 Use a damp, clean cloth and mild soap. DO NOT use to avoid scratching. • If steam accumulates inside or outside . Care & Cleaning Cleaning suggestions For best performance and for safety reasons, keep the oven clean inside and outside the oven door, wipe with a clean...
... oven without food in oven cavity for 1 or 2 minutes. • Remove the glass turntable tray from breaking, handle with care and do not let water seep into any vents or openings. 21 Use a damp, clean cloth and mild soap. DO NOT use to avoid scratching. • If steam accumulates inside or outside . Care & Cleaning Cleaning suggestions For best performance and for safety reasons, keep the oven clean inside and outside the oven door, wipe with a clean...

Complete Owner's Guide (English)
Page 22
... for damage to the oven door. • Press the STOP/cancel pad twice and attempt to reenter cooking instructions. • Plug a different appliance into a grounded power outlet. • If the outlet is controlled by other appliance will not operate • Make sure the oven door is on a seperate 15 amp circuit line. The oven display works, but the oven will not operate, have a problem you cannot solve, please...
... for damage to the oven door. • Press the STOP/cancel pad twice and attempt to reenter cooking instructions. • Plug a different appliance into a grounded power outlet. • If the outlet is controlled by other appliance will not operate • Make sure the oven door is on a seperate 15 amp circuit line. The oven display works, but the oven will not operate, have a problem you cannot solve, please...
Complete Owner's Guide (English)
Page 24
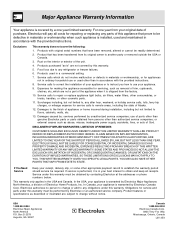
... accessible for service and parts under this warranty must be obtained by Electrolux Major Appliances North America, a division of the unit. 4. Surcharges including, but not limited to repair or replace appliance light bulbs, air filters, water filters, other consumables, or knobs, handles, or other than authorized service companies; Service calls to floors, cabinets, walls, etc. 13. Major Appliance Warranty Information Your appliance is installed, used and maintained...
... accessible for service and parts under this warranty must be obtained by Electrolux Major Appliances North America, a division of the unit. 4. Surcharges including, but not limited to repair or replace appliance light bulbs, air filters, water filters, other consumables, or knobs, handles, or other than authorized service companies; Service calls to floors, cabinets, walls, etc. 13. Major Appliance Warranty Information Your appliance is installed, used and maintained...
Product Specifications Sheet (English)
Page 2
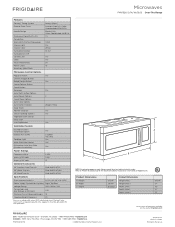
... information available on the web at frigidaire.com. Ft.) Convection Watts (IEC-705 Test Procedure) Interior Light Interior Color Turntable Diameter Turntable On / Off Control Lock Clock Touch Pad Buttons Power Levels Accessory Metal Rack Microwave Control Options Popcorn Button Chicken Nugget Button Baked Potato Button Sensor Reheat Button Snack Button Beverage Auto Melt / Soften Options Auto Reheat Options Snack Menu Options Auto Cook Options Auto Defrost Options Keep Warm Add-30-Seconds Sensor Cooking Options Vegetable Cook Sensor Delay Start User Preferences Ready-Select™ Stainless...
... information available on the web at frigidaire.com. Ft.) Convection Watts (IEC-705 Test Procedure) Interior Light Interior Color Turntable Diameter Turntable On / Off Control Lock Clock Touch Pad Buttons Power Levels Accessory Metal Rack Microwave Control Options Popcorn Button Chicken Nugget Button Baked Potato Button Sensor Reheat Button Snack Button Beverage Auto Melt / Soften Options Auto Reheat Options Snack Menu Options Auto Cook Options Auto Defrost Options Keep Warm Add-30-Seconds Sensor Cooking Options Vegetable Cook Sensor Delay Start User Preferences Ready-Select™ Stainless...


