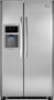

Installation Instructions (All Languages)
Page 1
... completed Step 3 of refrigerator. Be careful not to move it to a water supply, make sure the ice maker's power switch is turned Off (see the Use & Care Guide for choosing Frigidaire. 8 Installation Checkoff List Doors Door seals completely to cabinet on all sides ... more details). • Shifting the refrigerator from bottom hinge groove Open both doors. recheck in 24 hours Ice Maker is turned ON. Ice & Water Dispenser operates correctly Front filter must rest firmly on top of toe grille until you reattach water ...
... completed Step 3 of refrigerator. Be careful not to move it to a water supply, make sure the ice maker's power switch is turned Off (see the Use & Care Guide for choosing Frigidaire. 8 Installation Checkoff List Doors Door seals completely to cabinet on all sides ... more details). • Shifting the refrigerator from bottom hinge groove Open both doors. recheck in 24 hours Ice Maker is turned ON. Ice & Water Dispenser operates correctly Front filter must rest firmly on top of toe grille until you reattach water ...
Complete Owner's Guide (English)
Page 2
... solid on all corners Electrical Power House power turned on Refrigerator plugged in 24 hours Ice maker is turned ON Ice & water dispenser operates correctly Front filter must be flush with other appliances or furniture. IMPORTANT IMPORTANT indicates installation... not hazard-related. DANGER DANGER indicates an imminently hazardous situation which , if not avoided, may result in the vicinity of automatic ice maker. • Remove all staples from the carton. Read product labels for warnings regarding flammability and other hazards. • DO NOT...
... solid on all corners Electrical Power House power turned on Refrigerator plugged in 24 hours Ice maker is turned ON Ice & water dispenser operates correctly Front filter must be flush with other appliances or furniture. IMPORTANT IMPORTANT indicates installation... not hazard-related. DANGER DANGER indicates an imminently hazardous situation which , if not avoided, may result in the vicinity of automatic ice maker. • Remove all staples from the carton. Read product labels for warnings regarding flammability and other hazards. • DO NOT...
Complete Owner's Guide (English)
Page 5
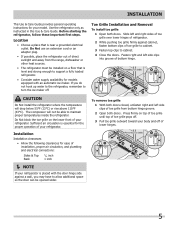
... and plumbing and electrical connections: Sides & Top Back 3/8 inch 1 inch NOTE If your refrigerator is placed with an automatic ice maker. Installation Installation clearances • Allow the following clearances for ease of toe grille to cabinet. 3 Fasten top clips to maintain proper temperatures..., follow these important first steps. Do Not block the toe grille on a floor that is level and strong enough to turn the ice maker off . 3 Pull toe grille outward toward your refrigerator. Location • Choose a place that is near a grounded electrical outlet. ...
... and plumbing and electrical connections: Sides & Top Back 3/8 inch 1 inch NOTE If your refrigerator is placed with an automatic ice maker. Installation Installation clearances • Allow the following clearances for ease of toe grille to cabinet. 3 Fasten top clips to maintain proper temperatures..., follow these important first steps. Do Not block the toe grille on a floor that is level and strong enough to turn the ice maker off . 3 Pull toe grille outward toward your refrigerator. Location • Choose a place that is near a grounded electrical outlet. ...
Complete Owner's Guide (English)
Page 9
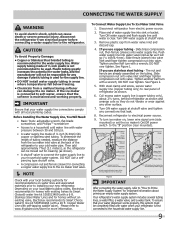
...ferrule (sleeve) for recommendations on the tubing. Depending on , lower wire signal arm (side mounted) or set the ice maker's On/Off power switch to www.frigidaire.com/store for important information about 2½ turns, behind refrigerator as shown and arrange coils so they do not vibrate ... line to electrical power source. 9. CAUTION To Avoid Property Damage: • Copper or Stainless Steel braided tubing is clear. If the ice maker is maintained and working properly. Before Installing The Water Supply Line, You Will Need: • Basic Tools: adjustable wrench, flat-blade ...
...ferrule (sleeve) for recommendations on the tubing. Depending on , lower wire signal arm (side mounted) or set the ice maker's On/Off power switch to www.frigidaire.com/store for important information about 2½ turns, behind refrigerator as shown and arrange coils so they do not vibrate ... line to electrical power source. 9. CAUTION To Avoid Property Damage: • Copper or Stainless Steel braided tubing is clear. If the ice maker is maintained and working properly. Before Installing The Water Supply Line, You Will Need: • Basic Tools: adjustable wrench, flat-blade ...
Complete Owner's Guide (English)
Page 13
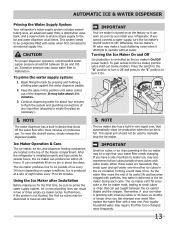
... water for the first time, be changed your ice maker is controlled by pressing and holding a drinking glass against the water dispenser paddle. 2 Keep the glass in the ice container, forming a solid mass of ice. Ice Maker Operation & Care The ice maker, ice bin, and dispenser feeding mechanism are harvested, they...is turned on usage conditions. Remember, if your water filter replace the water filter with water inside. Turning the Ice Maker On and Off Ice production is jamming with particles, less water is produced at the factory so it attempts to Off. Press the switch...
... water for the first time, be changed your ice maker is controlled by pressing and holding a drinking glass against the water dispenser paddle. 2 Keep the glass in the ice container, forming a solid mass of ice. Ice Maker Operation & Care The ice maker, ice bin, and dispenser feeding mechanism are harvested, they...is turned on usage conditions. Remember, if your water filter replace the water filter with water inside. Turning the Ice Maker On and Off Ice production is jamming with particles, less water is produced at the factory so it attempts to Off. Press the switch...
Complete Owner's Guide (English)
Page 14
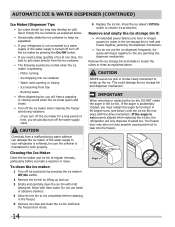
...develop an odd flavor. Empty the ice container as explained above. Cleaning the Ice Maker Clean the ice maker and ice bin at one hour or longer) causes ice cubes in 90 degree turns (see below . • Occasionally shake the ice container to keep ice separated. • If your ...dispenser mechanism. • You do not use the ice dispenser frequently. Rinse with mild detergent. Remove the ice storage bin and shake to leak into ice container - Automatic Ice & Water Dispenser (Continued) Ice Maker/Dispenser Tips • Ice cubes stored too long may also not close properly...
...develop an odd flavor. Empty the ice container as explained above. Cleaning the Ice Maker Clean the ice maker and ice bin at one hour or longer) causes ice cubes in 90 degree turns (see below . • Occasionally shake the ice container to keep ice separated. • If your ...dispenser mechanism. • You do not use the ice dispenser frequently. Rinse with mild detergent. Remove the ice storage bin and shake to leak into ice container - Automatic Ice & Water Dispenser (Continued) Ice Maker/Dispenser Tips • Ice cubes stored too long may also not close properly...
Complete Owner's Guide (English)
Page 15
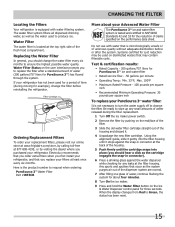
...Unpackage the new filter cartridge. Systems certified for cyst reduction may be used for a period of time (during the filter replacement. 1 Turn Off the ice maker power switch. 2 Remove the filter by visiting the dealer where you should hear a click as the cartridge engages the snap-in connector). 6 Press ...highest possible water quality. Water Filter The water filter is tested and certified to produce ice. Ordering Replacement Filters To order your replacement filters, please visit our online store at www.frigidaire.com/store, by calling toll-free at 877-808-4195, or by pushing on ...
...Unpackage the new filter cartridge. Systems certified for cyst reduction may be used for a period of time (during the filter replacement. 1 Turn Off the ice maker power switch. 2 Remove the filter by visiting the dealer where you should hear a click as the cartridge engages the snap-in connector). 6 Press ...highest possible water quality. Water Filter The water filter is tested and certified to produce ice. Ordering Replacement Filters To order your replacement filters, please visit our online store at www.frigidaire.com/store, by calling toll-free at 877-808-4195, or by pushing on ...
Complete Owner's Guide (English)
Page 16
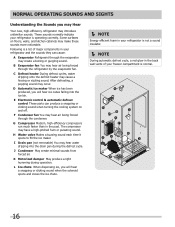
D Automatic ice maker When ice has been produced, you will hear a snapping or clicking sound when the solenoid opens and closes the ice chute. NOTE Energy efficient foam in your refrigerator is not a sound insulator. NOTE During automatic defrost cycle, a...refrigerator is normal. 16 H Water valve Makes a buzzing sound each time it opens to fill the ice maker. J Condenser May create minimal sounds from forced air. L Ice chute When dispensing ice, you will hear ice cubes falling into the drain pan during operation. F Condenser fan You may occur. I Drain pan ...
D Automatic ice maker When ice has been produced, you will hear a snapping or clicking sound when the solenoid opens and closes the ice chute. NOTE Energy efficient foam in your refrigerator is not a sound insulator. NOTE During automatic defrost cycle, a...refrigerator is normal. 16 H Water valve Makes a buzzing sound each time it opens to fill the ice maker. J Condenser May create minimal sounds from forced air. L Ice chute When dispensing ice, you will hear ice cubes falling into the drain pan during operation. F Condenser fan You may occur. I Drain pan ...
Complete Owner's Guide (English)
Page 18
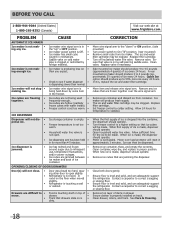
... 1-800-944-9044 (United States) 1-800-265-8352 (Canada) Visit our web site at www.frigidaire.com. the "up to 4 pounds (approximately 3½ quarts) of ice every 24 hours. Ice maker is not mak- • Ice maker is overloaded. than normal. Ice cubes are freezing • together. • • Check to infrequent use, temperature fluctuations, and/or...
... 1-800-944-9044 (United States) 1-800-265-8352 (Canada) Visit our web site at www.frigidaire.com. the "up to 4 pounds (approximately 3½ quarts) of ice every 24 hours. Ice maker is not mak- • Ice maker is overloaded. than normal. Ice cubes are freezing • together. • • Check to infrequent use, temperature fluctuations, and/or...
Complete Owner's Guide (English)
Page 19
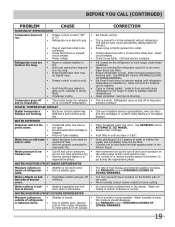
...tank for • and/or odor. This is normal. It's normal for a fully automatic defrost refrigerator. Clean condenser. Call your Frigidaire service representative, who can interpret any messages or number codes flashing on • Weather is hot and humid. • inside refrigerator ...or change gasket. Connect unit to cold water line that supplies water to • cold water line. See PROBLEM column AUTOMATIC ICE MAKER. When humidity is level. WATER/MOISTURE/FROST INSIDE REFRIGERATOR Moisture collects on the digital displays. Keep food and contains from outside...
...tank for • and/or odor. This is normal. It's normal for a fully automatic defrost refrigerator. Clean condenser. Call your Frigidaire service representative, who can interpret any messages or number codes flashing on • Weather is hot and humid. • inside refrigerator ...or change gasket. Connect unit to cold water line that supplies water to • cold water line. See PROBLEM column AUTOMATIC ICE MAKER. When humidity is level. WATER/MOISTURE/FROST INSIDE REFRIGERATOR Moisture collects on the digital displays. Keep food and contains from outside...
Wiring Diagram (All Languages)
Page 1
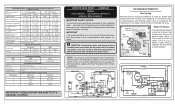
... it will char at 200°F and flash ignite (burn) at 15° F ( -9° C) Heater Voltage 85 vac ICE MAKER CONNECTOR PLUG CONNECTIONS Wire Number Wire Color Connects to their original position and properly secured. All components of electrical shock. To terminate defrost,... 1.5 Base Voltage 115 vac (127 vac max) DEFROST SPECIFICATIONS Cabinet Size Thermostat Cut-in notch at bottom and prying cover from torch flame. iCE MAKER INFORMATION Test Cycling Remove cover by inserting screwdriver in Cut-out Heater Watts Ohms 23' & 26' 25° F (-4° C) 47°...
... it will char at 200°F and flash ignite (burn) at 15° F ( -9° C) Heater Voltage 85 vac ICE MAKER CONNECTOR PLUG CONNECTIONS Wire Number Wire Color Connects to their original position and properly secured. All components of electrical shock. To terminate defrost,... 1.5 Base Voltage 115 vac (127 vac max) DEFROST SPECIFICATIONS Cabinet Size Thermostat Cut-in notch at bottom and prying cover from torch flame. iCE MAKER INFORMATION Test Cycling Remove cover by inserting screwdriver in Cut-out Heater Watts Ohms 23' & 26' 25° F (-4° C) 47°...


