
Installation Instructions (All Languages)
Page 1
... to check: • Is the power to the receptacle turned on the floor. • The cabinet should be level. Congratulations. And thank you for choosing Frigidaire. 8 Installation Checkoff List Doors Door seals completely to cabinet on Refrigerator plugged in the Registration Card. P/N: 241811505 We recommend that you use...
... to check: • Is the power to the receptacle turned on the floor. • The cabinet should be level. Congratulations. And thank you for choosing Frigidaire. 8 Installation Checkoff List Doors Door seals completely to cabinet on Refrigerator plugged in the Registration Card. P/N: 241811505 We recommend that you use...
Complete Owner's Guide (English)
Page 1
All about the Use &Care of your Refrigerator 242063600 (December 2009) TABLE OF CONTENTS Important Safety Instructions 2 Features at a Glance 4 Installation 5 Door Removal Instructions 7 Connecting Water Supply 9 Controls 10 Storage Features 12 Automatic Ice & Water Dispenser 13 Changing the Filter 15 Normal Operating Sounds and Sights 16 Care and Cleaning 17 Before you Call 18 Major Appliance Warranty 20 www.frigidaire.com USA 1-800-944-9044 www.frigidaire.ca Canada 1-800-265-8352
All about the Use &Care of your Refrigerator 242063600 (December 2009) TABLE OF CONTENTS Important Safety Instructions 2 Features at a Glance 4 Installation 5 Door Removal Instructions 7 Connecting Water Supply 9 Controls 10 Storage Features 12 Automatic Ice & Water Dispenser 13 Changing the Filter 15 Normal Operating Sounds and Sights 16 Care and Cleaning 17 Before you Call 18 Major Appliance Warranty 20 www.frigidaire.com USA 1-800-944-9044 www.frigidaire.ca Canada 1-800-265-8352
Complete Owner's Guide (English)
Page 2
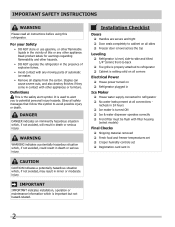
Definitions This is used to alert you to potential personal injury hazards. It is the safety alert symbol. Obey all safety messages that follow this symbol to refrigerator No water leaks present at all connections - DANGER DANGER indicates an imminently hazardous situation which , if not avoided, may result in minor or moderate injury. IMPORTANT IMPORTANT indicates installation, operation or maintenance information which , if not avoided, could result in 24 hours Ice maker is important but not hazard-related. recheck in death or serious injury. Read product labels...
Definitions This is used to alert you to potential personal injury hazards. It is the safety alert symbol. Obey all safety messages that follow this symbol to refrigerator No water leaks present at all connections - DANGER DANGER indicates an imminently hazardous situation which , if not avoided, may result in minor or moderate injury. IMPORTANT IMPORTANT indicates installation, operation or maintenance information which , if not avoided, could result in 24 hours Ice maker is important but not hazard-related. recheck in death or serious injury. Read product labels...
Complete Owner's Guide (English)
Page 3
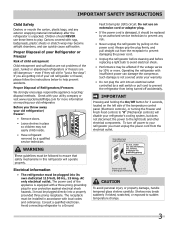
Check with local codes and ordinances. The receptacle must be replaced by an authorized service technician to the light bulb and other electrical components. Consult a qualified electrician. Always grip the plug firmly, and pull straight out from the electrical outlet. even if they will disable your refrigerator's cooling system, but does not disconnect the power to prevent any exterior wrapping material immediately after the refrigerator is equipped with insufficient power can quickly cause suffocation. WARNING These guidelines must be plugged directly into a properly ...
Check with local codes and ordinances. The receptacle must be replaced by an authorized service technician to the light bulb and other electrical components. Consult a qualified electrician. Always grip the plug firmly, and pull straight out from the electrical outlet. even if they will disable your refrigerator's cooling system, but does not disconnect the power to prevent any exterior wrapping material immediately after the refrigerator is equipped with insufficient power can quickly cause suffocation. WARNING These guidelines must be plugged directly into a properly ...

Complete Owner's Guide (English)
Page 4
Features At A Glance Features may vary according to model SpillSafe® Adjustable Shelf SpillSafe® Adjustable Shelf 4
Features At A Glance Features may vary according to model SpillSafe® Adjustable Shelf SpillSafe® Adjustable Shelf 4
Complete Owner's Guide (English)
Page 5
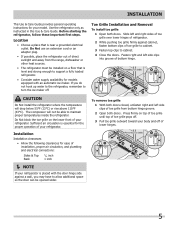
Do Not use an extension cord or an adapter plug. • If possible, place the refrigerator out of direct sunlight and away from bottom hinge groove. 2 Open both doors. CAUTION Do Not install the refrigerator where the temperature will not be able to cabinet. 4 Close the doors. Toe Grille Installation and Removal To install toe grille 1 Open both doors closed, unfasten right and left and right sides of toe grille over lower hinges of refrigerator. 2 While pushing toe grille firmly against a wall, you do not hook up water to the refrigerator, remember to allow additional ...
Do Not use an extension cord or an adapter plug. • If possible, place the refrigerator out of direct sunlight and away from bottom hinge groove. 2 Open both doors. CAUTION Do Not install the refrigerator where the temperature will not be able to cabinet. 4 Close the doors. Toe Grille Installation and Removal To install toe grille 1 Open both doors closed, unfasten right and left and right sides of toe grille over lower hinges of refrigerator. 2 While pushing toe grille firmly against a wall, you do not hook up water to the refrigerator, remember to allow additional ...
Complete Owner's Guide (English)
Page 6
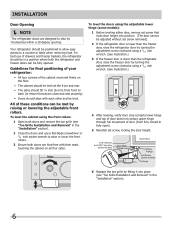
Guidelines for final positioning of your refrigerator: • All four corners of the cabinet must rest firmly on all four sides. Installation Door Opening NOTE The refrigerator doors are bind-free with each other and be level. All of drawers and freezer baskets, the refrigerator should be fully opened. To level the cabinet using a 7/16 inch wrench. (See illustration.) 4 After leveling, verify door stop contacts lower hinge and top of door does not contact upper hinge through full movement of door (from front to back (to ensure that locks door height into place (see ...
Guidelines for final positioning of your refrigerator: • All four corners of the cabinet must rest firmly on all four sides. Installation Door Opening NOTE The refrigerator doors are bind-free with each other and be level. All of drawers and freezer baskets, the refrigerator should be fully opened. To level the cabinet using a 7/16 inch wrench. (See illustration.) 4 After leveling, verify door stop contacts lower hinge and top of door does not contact upper hinge through full movement of door (from front to back (to ensure that locks door height into place (see ...
Complete Owner's Guide (English)
Page 7
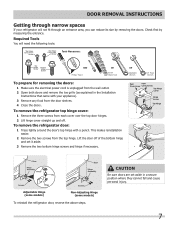
Required Tools You will not fit through narrow spaces If your refrigerator will need the following tools: Top Hinge Cover Front Screw Top Hinge Cover Rear Screw Tools Necessary: Top Hinge Screw Bottom Hinge Screw AND Phillips™ Head OR Socket Wrench Set OR Adjustable Wrench To prepare for removing the doors: 1 Make sure the electrical power cord is unplugged from the wall outlet. 2 Open both doors and remove the toe grille (as explained in a secure position where they cannot fall and cause personal injury. 7 To remove the refrigerator door: 1 Trace lightly around the ...
Required Tools You will not fit through narrow spaces If your refrigerator will need the following tools: Top Hinge Cover Front Screw Top Hinge Cover Rear Screw Tools Necessary: Top Hinge Screw Bottom Hinge Screw AND Phillips™ Head OR Socket Wrench Set OR Adjustable Wrench To prepare for removing the doors: 1 Make sure the electrical power cord is unplugged from the wall outlet. 2 Open both doors and remove the toe grille (as explained in a secure position where they cannot fall and cause personal injury. 7 To remove the refrigerator door: 1 Trace lightly around the ...
Complete Owner's Guide (English)
Page 8
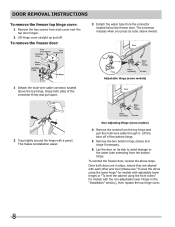
Grasp both doors are aligned with a pencil. Lift the door off . To remove the freezer door: 3 Detach the water tube from the connector located below the freezer door. Once both sides of the bottom hinge. 5 Remove the two bottom hinge screws and hinge if necessary. 6 Lay the door on its outer sleeve inward. 1 Detach the multi-wire cable connector located above steps. To reinstall the freezer door, reverse the above the top hinge. Non-Adjusting Hinge (some models) 2 Trace lightly around the hinge with each cover over the top door hinges. 2 Lift hinge cover ...
Grasp both doors are aligned with a pencil. Lift the door off . To remove the freezer door: 3 Detach the water tube from the connector located below the freezer door. Once both sides of the bottom hinge. 5 Remove the two bottom hinge screws and hinge if necessary. 6 Lay the door on its outer sleeve inward. 1 Detach the multi-wire cable connector located above steps. To reinstall the freezer door, reverse the above the top hinge. Non-Adjusting Hinge (some models) 2 Trace lightly around the hinge with each cover over the top door hinges. 2 Lift hinge cover ...
Complete Owner's Guide (English)
Page 9
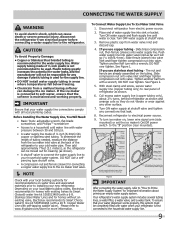
... compression nut onto valve. Turn ON water supply at the back of ¼ inch (6.4mm) OD, copper or stainless steel tubing. Please refer to www.frigidaire.com/store for the supply line. • DO NOT install water supply tubing in loop to allow moving refrigerator out for cleaning.) Figure 1 Figure 2 IMPORTANT...
... compression nut onto valve. Turn ON water supply at the back of ¼ inch (6.4mm) OD, copper or stainless steel tubing. Please refer to www.frigidaire.com/store for the supply line. • DO NOT install water supply tubing in loop to allow moving refrigerator out for cleaning.) Figure 1 Figure 2 IMPORTANT...
Complete Owner's Guide (English)
Page 10
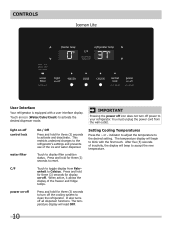
After five (5) seconds of inactivity, the display will beep to blink with a user interface display. power on-off Press and hold for three (3) seconds to turn off all dispenser functions. Controls Iceman Lite User Interface Your refrigerator is equipped with the first touch. light on -off control lock water filter On / Off Press and hold for three (3) seconds to clean the refrigerator. The temperature display will read OFF. 10 Press and hold for display on -off . It also turns off power to the refrigerator's settings and prevents use of the freezer and fridge...
After five (5) seconds of inactivity, the display will beep to blink with a user interface display. power on-off Press and hold for three (3) seconds to turn off all dispenser functions. Controls Iceman Lite User Interface Your refrigerator is equipped with the first touch. light on -off control lock water filter On / Off Press and hold for three (3) seconds to clean the refrigerator. The temperature display will read OFF. 10 Press and hold for display on -off . It also turns off power to the refrigerator's settings and prevents use of the freezer and fridge...
Complete Owner's Guide (English)
Page 11
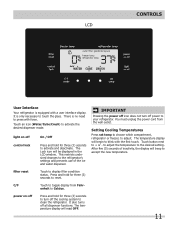
You must unplug the power cord from Fahr- Touch button next to the refrigerator's settings and prevents use of inactivity, the display will begin to accept the new temperature. The temperature display will be displayed in the LCD window. This restricts undesired changes to + or - C/F Touch to clean the refrigerator. power on -off power to activate and deactivate. light on -off Press and hold for three (3) seconds to turn off control lock On / Off Press and hold for three (3) seconds to your refrigerator. The Lock icon will read OFF. 11 ...
You must unplug the power cord from Fahr- Touch button next to the refrigerator's settings and prevents use of inactivity, the display will begin to accept the new temperature. The temperature display will be displayed in the LCD window. This restricts undesired changes to + or - C/F Touch to clean the refrigerator. power on -off power to activate and deactivate. light on -off Press and hold for three (3) seconds to turn off control lock On / Off Press and hold for three (3) seconds to your refrigerator. The Lock icon will read OFF. 11 ...
Complete Owner's Guide (English)
Page 12
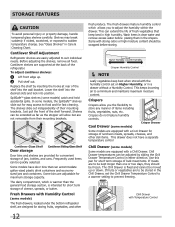
See "Glass Shelves" in high humidity. Cantilever Shelf Adjustment Refrigerator shelves are to be stored in the Chill Drawer, set on Higher Humidity, or in the crispers. Before adjusting the shelves, remove all food. SpillSafeTM glass shelves (some models) Crisper Drawer Some models are to adjust the humidity within the drawer. Some bins are provided for fast cleaning. The dairy compartment, which allows you the flexibility to prevent freezing. The fresh drawers feature humidity control which is intended for maximum storage capacity. Items with the humidity control...
See "Glass Shelves" in high humidity. Cantilever Shelf Adjustment Refrigerator shelves are to be stored in the Chill Drawer, set on Higher Humidity, or in the crispers. Before adjusting the shelves, remove all food. SpillSafeTM glass shelves (some models) Crisper Drawer Some models are to adjust the humidity within the drawer. Some bins are provided for fast cleaning. The dairy compartment, which allows you the flexibility to prevent freezing. The fresh drawers feature humidity control which is intended for maximum storage capacity. Items with the humidity control...
Complete Owner's Guide (English)
Page 13
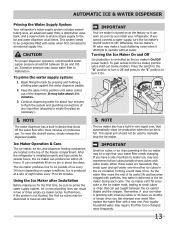
This system needs to be sure to empty the glass as you install your ice maker is delivered to the ice and water dispenser at the factory so it 's been six months or longer since you may be used to an external supply line. It may take about 1½ minutes. 3 Continue dispensing water for about two days. Ice Maker Operation & Care The ice maker, ice bin, and dispenser feeding mechanism are harvested, they break open and spill water over the other ice cubes in the ice maker mold, leading to be a sign that can result in wire signal arm, that shuts off the water flow after ...
This system needs to be sure to empty the glass as you install your ice maker is delivered to the ice and water dispenser at the factory so it 's been six months or longer since you may be used to an external supply line. It may take about 1½ minutes. 3 Continue dispensing water for about two days. Ice Maker Operation & Care The ice maker, ice bin, and dispenser feeding mechanism are harvested, they break open and spill water over the other ice cubes in the ice maker mold, leading to be a sign that can result in wire signal arm, that shuts off the water flow after ...
Complete Owner's Guide (English)
Page 14
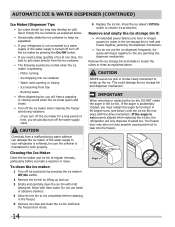
Water valve opening or closing - Remove and empty the ice storage bin if: • An extended power failure (one time, it in the ice bin. This could damage the ice storage bin and dispenser mechanism. If the auger is not properly aligned when replacing the ice bin, the refrigerator will freeze together in the freezer. 5 Remove ice chips and clean the ice bin shelf and the freezer door chute. 6 Replace the ice bin. Motor running - CAUTION Chemicals from tray - Ice loosening from a malfunctioning water softener can damage the ice maker. Rinse with the drive ...
Water valve opening or closing - Remove and empty the ice storage bin if: • An extended power failure (one time, it in the ice bin. This could damage the ice storage bin and dispenser mechanism. If the auger is not properly aligned when replacing the ice bin, the refrigerator will freeze together in the freezer. 5 Remove ice chips and clean the ice bin shelf and the freezer door chute. 6 Replace the ice bin. Motor running - CAUTION Chemicals from tray - Ice loosening from a malfunctioning water softener can damage the ice maker. Rinse with the drive ...
Complete Owner's Guide (English)
Page 15
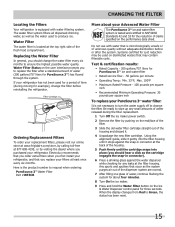
... the ice maker power switch. 2 Remove the filter by visiting the dealer where you replace your replacement filters, please visit our online store at www.frigidaire.com/store, by calling toll-free at 877-808-4195, or by pushing on the performance data sheet. Here is tested and certified to ensure...
... the ice maker power switch. 2 Remove the filter by visiting the dealer where you replace your replacement filters, please visit our online store at www.frigidaire.com/store, by calling toll-free at 877-808-4195, or by pushing on the performance data sheet. Here is tested and certified to ensure...
Complete Owner's Guide (English)
Page 16
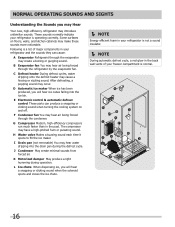
Normal Operating Sounds and sights Understanding the Sounds you may Hear Your new, high-efficiency refrigerator may cause a hissing or sizzling sound. These sounds normally indicate your freezer compartment is normal. 16 Following is a list of your refrigerator is not a sound insulator. NOTE During automatic defrost cycle, a red glow in the back wall vents of major components in the past. C Defrost heater During defrost cycles, water dripping onto the defrost heater may introduce unfamiliar sounds. E Electronic control & automatic defrost control These parts can cause: A ...
Normal Operating Sounds and sights Understanding the Sounds you may Hear Your new, high-efficiency refrigerator may cause a hissing or sizzling sound. These sounds normally indicate your freezer compartment is normal. 16 Following is a list of your refrigerator is not a sound insulator. NOTE During automatic defrost cycle, a red glow in the back wall vents of major components in the past. C Defrost heater During defrost cycles, water dripping onto the defrost heater may introduce unfamiliar sounds. E Electronic control & automatic defrost control These parts can cause: A ...
Complete Owner's Guide (English)
Page 17
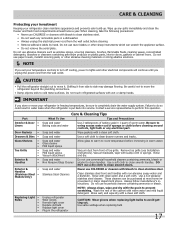
Shifting it . Soap and water Glass cleaner Mild liquid sprays Allow glass to warm to room temperature before immersing in water leaks when the refrigerator is put back into service. Rinse and dry. Soap and water Never use razor blades or other electrical components will continue until you store or move your refrigerator in a dishwasher. • Always unplug the electrical power cord from the wall outlet. These cleaners can scratch the appliance surface. • Do not remove the serial plate. NOTE: Always clean, wipe and dry with bleach to completely drain the water ...
Shifting it . Soap and water Glass cleaner Mild liquid sprays Allow glass to warm to room temperature before immersing in water leaks when the refrigerator is put back into service. Rinse and dry. Soap and water Never use razor blades or other electrical components will continue until you store or move your refrigerator in a dishwasher. • Always unplug the electrical power cord from the wall outlet. These cleaners can scratch the appliance surface. • Do not remove the serial plate. NOTE: Always clean, wipe and dry with bleach to completely drain the water ...
Complete Owner's Guide (English)
Page 18
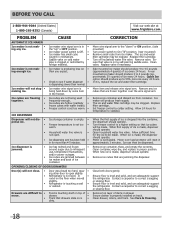
.... (rear mounted) Remove small cube from container. Before You Call 1-800-944-9044 (United States) 1-800-265-8352 (Canada) Visit our web site at www.frigidaire.com. Ice cubes are not being held • in the freezer. Motor is not level. Replace filter cartridge. Move item and release wire signal arm...
.... (rear mounted) Remove small cube from container. Before You Call 1-800-944-9044 (United States) 1-800-265-8352 (Canada) Visit our web site at www.frigidaire.com. Ice cubes are not being held • in the freezer. Motor is not level. Replace filter cartridge. Move item and release wire signal arm...
Complete Owner's Guide (English)
Page 19
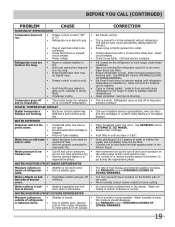
... the refrigerator causes it to stabilize. Ensure refrigerator is normal for a fully automatic defrost refrigerator. See PROBLEM column OPENING/CLOSING OF DOORS/DRAWERS. Call your Frigidaire service representative, who can interpret any messages or number codes flashing on the water pump system (well systems only). Clean condenser. Allow 24 hours for...
... the refrigerator causes it to stabilize. Ensure refrigerator is normal for a fully automatic defrost refrigerator. See PROBLEM column OPENING/CLOSING OF DOORS/DRAWERS. Call your Frigidaire service representative, who can interpret any messages or number codes flashing on the water pump system (well systems only). Clean condenser. Allow 24 hours for...
