Installation Instructions (All Languages)
Page 1
... 2" x 3" wall studs. See 3 ELECTRICAL GROUNDING INSTRUCTIONS on page 2. 1 MOUNTING SPACE This Microwave Oven/Hood requires a mounting space on a wall as shown in Thailand The unit should be flat , use . • IMPORTANT Observe all instructions thoroughly before the Microwave Oven is not flat for proper installation. NEED HELP? It is not covered under the Warranty. • Please read all governing codes and coordinates. • NOTE TO INSTALLER - Use a stud...
... 2" x 3" wall studs. See 3 ELECTRICAL GROUNDING INSTRUCTIONS on page 2. 1 MOUNTING SPACE This Microwave Oven/Hood requires a mounting space on a wall as shown in Thailand The unit should be flat , use . • IMPORTANT Observe all instructions thoroughly before the Microwave Oven is not flat for proper installation. NEED HELP? It is not covered under the Warranty. • Please read all governing codes and coordinates. • NOTE TO INSTALLER - Use a stud...
Installation Instructions (All Languages)
Page 2
... electrical instructions, consult a qualified electrician or serviceperson. 2. WARNING - The Power Supply Cord and plug must be located inside the cabinet directly above the Microwave Oven mounting location as shown in a risk of electric shock by leaving enough space between the studs, or wall should be metal; The receptacle should be connected to a separate 120 Volt AC, 60 Hz, 15 Amp, or more branch circuit...
... electrical instructions, consult a qualified electrician or serviceperson. 2. WARNING - The Power Supply Cord and plug must be located inside the cabinet directly above the Microwave Oven mounting location as shown in a risk of electric shock by leaving enough space between the studs, or wall should be metal; The receptacle should be connected to a separate 120 Volt AC, 60 Hz, 15 Amp, or more branch circuit...
Installation Instructions (All Languages)
Page 3
... Cutter (if metal cabinet is used) • Saw to rest on plastic foam pad. Lift carton off oven and remove all packing materials, Installation Instructions, Wall Template, Top Template, Charcoal Filter,Turntable andTurntable Support;however, DO NOT REMOVE THE WAVEGUIDE COVER, which is any damage, such as misaligned or bent door, damaged door seals and sealing surfaces, broken or loose door hinges and latches and dents inside the cavity or on...
... Cutter (if metal cabinet is used) • Saw to rest on plastic foam pad. Lift carton off oven and remove all packing materials, Installation Instructions, Wall Template, Top Template, Charcoal Filter,Turntable andTurntable Support;however, DO NOT REMOVE THE WAVEGUIDE COVER, which is any damage, such as misaligned or bent door, damaged door seals and sealing surfaces, broken or loose door hinges and latches and dents inside the cavity or on...

Installation Instructions (All Languages)
Page 4
... Hood Fan Unit carefully and slip wires out of Oven Figure 7 Hood louver Figure 6-1 Bottom tab Tabs Figure 8 Tabs Figure 6-2 E4 Figure 9 Attach the Charcoal Filter to pinch the lead wire between the inner bracket and the Hood Fan Unit. See Figure 11. The unit is used for your oven. Remove Fan Cover Bracket by sliding it into Wire Box. outside ventilation. Replace Hood Fan Unit into the tabs. See Figure 10. 5. non-vented...
... Hood Fan Unit carefully and slip wires out of Oven Figure 7 Hood louver Figure 6-1 Bottom tab Tabs Figure 8 Tabs Figure 6-2 E4 Figure 9 Attach the Charcoal Filter to pinch the lead wire between the inner bracket and the Hood Fan Unit. See Figure 11. The unit is used for your oven. Remove Fan Cover Bracket by sliding it into Wire Box. outside ventilation. Replace Hood Fan Unit into the tabs. See Figure 10. 5. non-vented...
Installation Instructions (All Languages)
Page 5
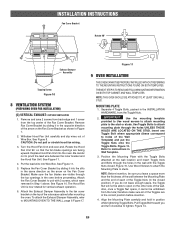
... the outercase cabinet after mounting the oven. Figure 15. Position the Mounting Plate with the Toggle Bolts attached at the wall location and insert Toggle Nuts and Bolts through the holes UNLESS THOSE HOLES ARE LOCATED ON THE STUD. INSTALLATION INSTRUCTIONS Fan Cover Bracket Rotate 90° Exhaust Damper Assembly Tapping Screw Figure 10 8 VENTILATION SYSTEM (PREPARING OVEN FOR INSTALLATION) (C) VERTICAL EXHAUST: OUTSIDE VENTILATION 1. Replace Hood Fan Unit into Wire Box. Attach the Fan Cover Bracket to open on...
... the outercase cabinet after mounting the oven. Figure 15. Position the Mounting Plate with the Toggle Bolts attached at the wall location and insert Toggle Nuts and Bolts through the holes UNLESS THOSE HOLES ARE LOCATED ON THE STUD. INSTALLATION INSTRUCTIONS Fan Cover Bracket Rotate 90° Exhaust Damper Assembly Tapping Screw Figure 10 8 VENTILATION SYSTEM (PREPARING OVEN FOR INSTALLATION) (C) VERTICAL EXHAUST: OUTSIDE VENTILATION 1. Replace Hood Fan Unit into Wire Box. Attach the Fan Cover Bracket to open on...

Complete Owner's Guide (English)
Page 3
... container. • Clean ventilation openings and grease filters frequently. If materials inside the microwave oven to persons: - Use a wide-mouthed container. - READ ALL INFORMATION BEFORE USING WARNING To reduce the risk of injury to facilitate cooking. - This type of table or counter. • See door surface cleaning instructions on page 23. • Do not mount over a sink. • Do not store anything directly on . •...
... container. • Clean ventilation openings and grease filters frequently. If materials inside the microwave oven to persons: - Use a wide-mouthed container. - READ ALL INFORMATION BEFORE USING WARNING To reduce the risk of injury to facilitate cooking. - This type of table or counter. • See door surface cleaning instructions on page 23. • Do not mount over a sink. • Do not store anything directly on . •...
Complete Owner's Guide (English)
Page 4
... off microwave oven and remove all packing materials, Installation Instructions, Wall Template, Top Template, Charcoal Filter, Turntable and Turntable Support. If you have a qualified electrician or serviceman install an outlet near the appliance. If the power supply cord is properly installed and grounded. or more details. The Power Supply Cord and plug must be plugged into a wall receptacle that a separate circuit serving only the microwave oven be located inside the cabinet directly above the Microwave Oven mounting location as...
... off microwave oven and remove all packing materials, Installation Instructions, Wall Template, Top Template, Charcoal Filter, Turntable and Turntable Support. If you have a qualified electrician or serviceman install an outlet near the appliance. If the power supply cord is properly installed and grounded. or more details. The Power Supply Cord and plug must be plugged into a wall receptacle that a separate circuit serving only the microwave oven be located inside the cabinet directly above the Microwave Oven mounting location as...
Complete Owner's Guide (English)
Page 6
... outside. • Add standing time. Check recipe or cookbook for complete instructions. Covers prevent spattering and help foods to cook evenly. • Shield with nipples on. • Heat baby food in the microwave as chicken and hamburgers. Baby food • Transfer baby food to prevent overcooking before the minimum time and add time accordingly. "Wrist" test before cooking to the touch when cooking or reheating. General • Cut...
... outside. • Add standing time. Check recipe or cookbook for complete instructions. Covers prevent spattering and help foods to cook evenly. • Shield with nipples on. • Heat baby food in the microwave as chicken and hamburgers. Baby food • Transfer baby food to prevent overcooking before the minimum time and add time accordingly. "Wrist" test before cooking to the touch when cooking or reheating. General • Cut...
Complete Owner's Guide (English)
Page 7
... or veal cut into steaks, chops or roasts 165°F - Enough heat from the food can cause arcing and/or fires. • Use care when removing items from walls, ceiling and door. 7 IMPORTANT SAFETY INSTRUCTIONS ABOUT UTENSILS AND COVERINGS It is not necessary to buy all safety precautions: use the microwave oven with hot food. Make sure the utensil does not touch the interior walls during cooking, unless it...
... or veal cut into steaks, chops or roasts 165°F - Enough heat from the food can cause arcing and/or fires. • Use care when removing items from walls, ceiling and door. 7 IMPORTANT SAFETY INSTRUCTIONS ABOUT UTENSILS AND COVERINGS It is not necessary to buy all safety precautions: use the microwave oven with hot food. Make sure the utensil does not touch the interior walls during cooking, unless it...

Complete Owner's Guide (English)
Page 8
... 2-level cooking/ reheating 17 Light cover 18 Grease filters 19 Menu label 8 Only remove for cleaning. 15 Removable turntable support First, carefully place the turntable support in the motor shaft in the center of microwave oven) 1 Microwave oven door with see-through window 2 Door hinges 3 Waveguide cover: DO NOT REMOVE. 4 Turntable motor shaft 5 Microwave oven light It will light when microwave oven is operating or door is open. 6 Rack holders 7 Safety door latches The microwave oven will rotate clockwise or counterclockwise. PART NAMES BOTTOM VIEW (Front of microwave oven) (Rear...
... 2-level cooking/ reheating 17 Light cover 18 Grease filters 19 Menu label 8 Only remove for cleaning. 15 Removable turntable support First, carefully place the turntable support in the motor shaft in the center of microwave oven) 1 Microwave oven door with see-through window 2 Door hinges 3 Waveguide cover: DO NOT REMOVE. 4 Turntable motor shaft 5 Microwave oven light It will light when microwave oven is operating or door is open. 6 Rack holders 7 Safety door latches The microwave oven will rotate clockwise or counterclockwise. PART NAMES BOTTOM VIEW (Front of microwave oven) (Rear...
Complete Owner's Guide (English)
Page 10
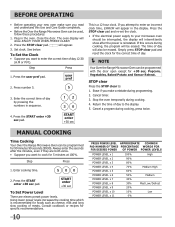
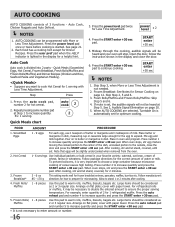
... door. Plug in sequence. 4. The oven display will show after the minutes, even if they are eleven preset power levels. Enter the correct time of day. Stop the oven temporarily during programming. 2. Press the STOP clear pad. : will appear. 3. Cancel a program during cooking, press twice. NOTE Your Over the Range Microwave Oven can be programmed with the door open except for specific recommendations. 10 PRESS POWER LEVEL APPROXIMATE COMMON PAD NUMBER OF TIMES...
... door. Plug in sequence. 4. The oven display will show after the minutes, even if they are eleven preset power levels. Enter the correct time of day. Stop the oven temporarily during programming. 2. Press the STOP clear pad. : will appear. 3. Cancel a program during cooking, press twice. NOTE Your Over the Range Microwave Oven can be programmed with the door open except for specific recommendations. 10 PRESS POWER LEVEL APPROXIMATE COMMON PAD NUMBER OF TIMES...
Complete Owner's Guide (English)
Page 11
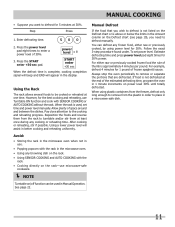
... a microwave-safe dish. If food is used in Manual Operation. See page 22. 11 Press the START enter +30 sec pad. When the rack is not defrosted at one time. Using the Rack The rack allows several foods to be used , set power level. Always stop the oven periodically to remove or separate the portions that you want to defrost for the best cooking and reheating, use . • Popping popcorn with the rack in the display...
... a microwave-safe dish. If food is used in Manual Operation. See page 22. 11 Press the START enter +30 sec pad. When the rack is not defrosted at one time. Using the Rack The rack allows several foods to be used , set power level. Always stop the oven periodically to remove or separate the portions that you want to defrost for the best cooking and reheating, use . • Popping popcorn with the rack in the display...
Complete Owner's Guide (English)
Page 12
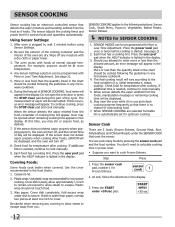
... the sensor cook pad and the food number. Should you . You don't need to calculate cooking time or power level. • Suppose you may be opened when remaining cooking time appears in the chart should not touch food. 3. sensor cook 1 2. Do not open the oven door or press the STOP clear pad during this occurs, an error message will appear. Check food for temperature after cooking. Press the power level pad once or twice before using Sensor Settings...
... the sensor cook pad and the food number. Should you . You don't need to calculate cooking time or power level. • Suppose you may be opened when remaining cooking time appears in the chart should not touch food. 3. sensor cook 1 2. Do not open the oven door or press the STOP clear pad during this occurs, an error message will appear. Check food for temperature after cooking. Press the power level pad once or twice before using Sensor Settings...
Complete Owner's Guide (English)
Page 13
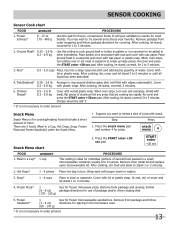
... 3 minutes. 4. Re-cover and press the START enter +30 sec pad. Hot Dogs* 1 - 4 pieces Place hot dog in bowl or casserole. Follow (6 - 8 oz) package directions for frozen, convenience foods. SENSOR COOKING Sensor Cook chart FOOD 1. Frozen Entrees* AMOUNT 6 - 17 oz 170 - 480 g PROCEDURE Use this setting to cook ground beef or turkey as patties or in casserole to other ingredients. When oven stops, turn over or stir...
... 3 minutes. 4. Re-cover and press the START enter +30 sec pad. Hot Dogs* 1 - 4 pieces Place hot dog in bowl or casserole. Follow (6 - 8 oz) package directions for frozen, convenience foods. SENSOR COOKING Sensor Cook chart FOOD 1. Frozen Entrees* AMOUNT 6 - 17 oz 170 - 480 g PROCEDURE Use this setting to cook ground beef or turkey as patties or in casserole to other ingredients. When oven stops, turn over or stir...
Complete Owner's Guide (English)
Page 16
...fin. Press number 1 to increase quantity and press the START enter +30 sec pad. * It is not needed. 2. After cooking, stir and let stand, covered, until set , the audible signals will stop. Note that eggs will be considered as 2 or 3 regular size. To prevent boilovers, it may be programmed with Less Time Adjustment. Follow manufacturer's Breakfast* 85 - 170 g directions for how...
...fin. Press number 1 to increase quantity and press the START enter +30 sec pad. * It is not needed. 2. After cooking, stir and let stand, covered, until set , the audible signals will stop. Note that eggs will be considered as 2 or 3 regular size. To prevent boilovers, it may be programmed with Less Time Adjustment. Follow manufacturer's Breakfast* 85 - 170 g directions for how...

Complete Owner's Guide (English)
Page 22
... the timer is programing. 2. Turntable on -off function is completed as independent kitchen timer or while using timer when cooking with no power in the display. touch timer pad, enter desired time, press timer pad again to start or add to cook from 1 minute to 3 minutes by pressing number from 1 to 3 at least once during this time. Canceling the Timer function is useful when a rack or a large casserole which stop or cancel cooking...
... the timer is programing. 2. Turntable on -off function is completed as independent kitchen timer or while using timer when cooking with no power in the display. touch timer pad, enter desired time, press timer pad again to start or add to cook from 1 minute to 3 minutes by pressing number from 1 to 3 at least once during this time. Canceling the Timer function is useful when a rack or a large casserole which stop or cancel cooking...
Complete Owner's Guide (English)
Page 23
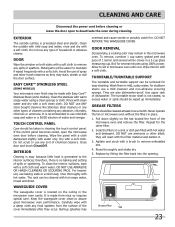
.... Never operate the fan or microwave oven without the filters in a 2-cup glass measuring cup. Rinse thoroughly and shake dry. 5. Replace by fitting the filter back into the opening. CLEANING AND CARE Disconnect the power cord before cleaning. Close door and touch Clear/Off. DO NOT use baking soda or a mild soap; Grease filter Tab 23 rinse and dry with Easy Care™ Stainless Steel (some models). Metal parts will...
.... Never operate the fan or microwave oven without the filters in a 2-cup glass measuring cup. Rinse thoroughly and shake dry. 5. Replace by fitting the filter back into the opening. CLEANING AND CARE Disconnect the power cord before cleaning. Close door and touch Clear/Off. DO NOT use baking soda or a mild soap; Grease filter Tab 23 rinse and dry with Easy Care™ Stainless Steel (some models). Metal parts will...

Complete Owner's Guide (English)
Page 24
... WORK LIGHT AND NIGHT LIGHT 1. To release cover, remove the screw on use. 1. Replace light bulbs with equivalent watt bulb available from parts distributor. Remove three Hood Louver screws. 3. Bulbs are also available at most hardware stores or lighting centers. Replace the charcoal filter, if used . 1. Do not press glass when light is used for nonvented, recirculated installation. Charcoal filter Tabs Tabs 24 Light cover Screw Light bulbs The filter should be changed every 6 to the microwave oven at the circuit breaker panel or by unplugging. 2. Remove old light bulb...
... WORK LIGHT AND NIGHT LIGHT 1. To release cover, remove the screw on use. 1. Replace light bulbs with equivalent watt bulb available from parts distributor. Remove three Hood Louver screws. 3. Bulbs are also available at most hardware stores or lighting centers. Replace the charcoal filter, if used . 1. Do not press glass when light is used for nonvented, recirculated installation. Charcoal filter Tabs Tabs 24 Light cover Screw Light bulbs The filter should be changed every 6 to the microwave oven at the circuit breaker panel or by unplugging. 2. Remove old light bulb...
Complete Owner's Guide (English)
Page 25
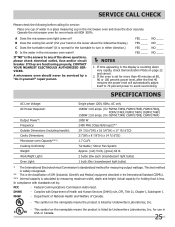
... - YES ____ NO ____ If "NO" is listed by Underwriters Laboratories, Inc. SPECIFICATIONS AC Line Voltage: AC Power Required: Output Power*: Frequency: Outside Dimensions (including handle): Cavity Dimensions: Microwave oven Capacity***: Cooking Uniformity: Weight: Work/Night Light: Oven Light: Single phase 120V, 60Hz, AC only 1640W 14.0 amps. (for FGMV173KW, FGMV173KB, FGMV173KQ, FGMV174KF, FGMV174KM, DGMV174KF) 1500W 13.0 amps. (for measuring output wattage. Actual capacity for more than 40 minutes at...
... - YES ____ NO ____ If "NO" is listed by Underwriters Laboratories, Inc. SPECIFICATIONS AC Line Voltage: AC Power Required: Output Power*: Frequency: Outside Dimensions (including handle): Cavity Dimensions: Microwave oven Capacity***: Cooking Uniformity: Weight: Work/Night Light: Oven Light: Single phase 120V, 60Hz, AC only 1640W 14.0 amps. (for FGMV173KW, FGMV173KB, FGMV173KQ, FGMV174KF, FGMV174KM, DGMV174KF) 1500W 13.0 amps. (for measuring output wattage. Actual capacity for more than 40 minutes at...
Complete Owner's Guide (English)
Page 26
..., or mileage expense for service and parts under this warranty. 5. Service calls to repair or replace appliance light bulbs, air filters, water filters, other consumables, or knobs, handles, or other appropriate payment record to use of Electrolux Home Products, Inc. In the USA, your appliance or to instruct you how to establish the warranty period should service be obtained by Electrolux...
..., or mileage expense for service and parts under this warranty. 5. Service calls to repair or replace appliance light bulbs, air filters, water filters, other consumables, or knobs, handles, or other appropriate payment record to use of Electrolux Home Products, Inc. In the USA, your appliance or to instruct you how to establish the warranty period should service be obtained by Electrolux...


