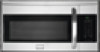
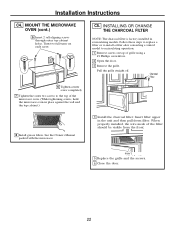
Installation Instructions (All Languages)
Page 2
... Attach Mounting Plate to Wall 20 Preparation of Top Cabinet 20 Check Blower Plate 21 Mount the Microwave Oven ..........21-22 Installing or Change the Charcoal Filter 22 Before You Use Your Microwave 23 2
Installation Instructions (All Languages)
Page 9
... 20 9 Recirculating (Non-Vented Ductless) NOTE: This microwave is shipped assembled for adaptation to the following three types of ventilation required for recirculating exhaust, a disposable charcoal filter is factory installed to that section. A OUTSIDE TOP EXHAUST (VERTICAL DUCT) Adaptor in Place for Outside Top Exhaust B OUTSIDE BACK EXHAUST (HORIZONTAL DUCT) Adaptor Must...
Installation Instructions (All Languages)
Page 20
.... To use toggle bolts: Mounting Plate Spacing for the blower motor and blower plate are securely tightened when they are not pinched. Install or change Charcoal Filter IMPORTANT NOTES: • Make sure the screws for Toggles More Than Wall Thickness Toggle Wings Toggle Bolt Wall Bolt End C2. Attach Mounting Plate to...
Installation Instructions (All Languages)
Page 22
.... 2 Open the door. 3 Remove the grille. MOUNT THE MICROWAVE OVEN (cont.) 5 Insert 2 self-aligning screws through outer top cabinet holes. Pull the grille straight off. Charcoal Filter 8 Install grease filters. See the Owner's Manual packed with the microwave. )NSTALLTHECHARCOALFILTER)NSERTFILTERUPPER INTHEUNITANDTHENPULLDOWNFILTER7HEN PROPERLYINSTALLED THEWIREMESHOFTHEFILTER SHOULDBEVISIBLEFROMTHEFRONT )NSERT 2EPLACETHEGRILLEANDTHESCREWS #LOSETHEDOOR 22
Complete Owner's Guide (English)
Page 5
... oven be connected to rest on the door. The electrical requirements are Installation Instructions, Wall Template, Top Template and Charcoal Filter, which is properly installed and grounded in a risk of electric shock by providing an escape wire for more protected ... 3-prong grounding plug. Lift carton off microwave oven and remove all packing materials, Installation Instructions, Wall Template, Top Template, Charcoal Filter, Turntable and Turntable Support. Electrical Requirements Check Installation Instructions for proper location for Power Cord 5 It is chosen. DO NOT ...