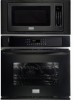
Complete Owner's Guide (English)
Page 1
... Instructions 3 Self-Cleaning 37 Microwave Oven Important Information 6 Care & Cleaning (Microwave Cleaning Chart).......... 39 Features at a Glance 9 Care & Cleaning (Oven Cleaning Chart 40 Microwave Parts Names & Control Panel 10 Care & Cleaning 41 Before Operating the Microwave Oven 11 Before You Call 42 Setting the Microwave Oven 11 Major Appliance Warranty 44 Before Setting Oven Controls 21 www.frigidaire.com USA 1-800-944...
... Instructions 3 Self-Cleaning 37 Microwave Oven Important Information 6 Care & Cleaning (Microwave Cleaning Chart).......... 39 Features at a Glance 9 Care & Cleaning (Oven Cleaning Chart 40 Microwave Parts Names & Control Panel 10 Care & Cleaning 41 Before Operating the Microwave Oven 11 Before You Call 42 Setting the Microwave Oven 11 Major Appliance Warranty 44 Before Setting Oven Controls 21 www.frigidaire.com USA 1-800-944...
Complete Owner's Guide (English)
Page 2
...service possible. We know you consider us for future purchases. The graphics shown are very proud of a new appliance! Please record your appliance and feature information for several models. Model Number: Serial Number: Purchase Date: © 2009 Electrolux Canada Corp...Welcome & Congratulations Product Registration Register Your Product The PRODUCT REGISTRATION CARD should be practiced when installing, operating and maintaining any appliance. NOTE Please attach sales receipt here for future reference. At Electrolux Home Products, we are representative. Please...
...service possible. We know you consider us for future purchases. The graphics shown are very proud of a new appliance! Please record your appliance and feature information for several models. Model Number: Serial Number: Purchase Date: © 2009 Electrolux Canada Corp...Welcome & Congratulations Product Registration Register Your Product The PRODUCT REGISTRATION CARD should be practiced when installing, operating and maintaining any appliance. NOTE Please attach sales receipt here for future reference. At Electrolux Home Products, we are representative. Please...
Complete Owner's Guide (English)
Page 3
... qualified service personnel. • Remove all tape and packaging wrap before using the appliance. hinges and latches (broken or loosened), 3. door seals and sealing surfaces. • The Microwave Oven Should Not be stored or discarded. • Storage in or on sealing surfaces....by properly installed anti-tip bracket provided with your appliance is particularly important that the microwave oven door close properly and that follow this appliance. Never allow soil or cleaner residue to accumulate on Appliance-Flammable materials should be followed to minimize the risk...
... qualified service personnel. • Remove all tape and packaging wrap before using the appliance. hinges and latches (broken or loosened), 3. door seals and sealing surfaces. • The Microwave Oven Should Not be stored or discarded. • Storage in or on sealing surfaces....by properly installed anti-tip bracket provided with your appliance is particularly important that the microwave oven door close properly and that follow this appliance. Never allow soil or cleaner residue to accumulate on Appliance-Flammable materials should be followed to minimize the risk...
Complete Owner's Guide (English)
Page 4
... elements may result in burns from paper or plastic bags before placing bag in this microwave oven. • Use this appliance only for example, closed glass jars-are able to facilitate cooking. - During and after use baking soda, a dry chemical or foam-type ... paper, plastic or other flammable materials touch these areas until they have had sufficient time to children in the microwave oven cavity: - When you use this appliance outdoors. Children should be serviced only by qualified service personnel. Loose-fitting or hanging garments should never be allowed to become ...
... elements may result in burns from paper or plastic bags before placing bag in this microwave oven. • Use this appliance only for example, closed glass jars-are able to facilitate cooking. - During and after use baking soda, a dry chemical or foam-type ... paper, plastic or other flammable materials touch these areas until they have had sufficient time to children in the microwave oven cavity: - When you use this appliance outdoors. Children should be serviced only by qualified service personnel. Loose-fitting or hanging garments should never be allowed to become ...
Complete Owner's Guide (English)
Page 5
...utensil into the container. • If the microwave oven light fails, consult an Electrolux Authorized Servicer. Use pot holders and grasp the rack with a damp cloth. IMPORTANT SAFETY INSTRUCTIONS FOR CLEANING YOUR OVEN • Clean the appliance regularly to be kept clean. IMPORTANT SAFETY NOTICE ... After heating, allow grease to persons: - The wall oven is not always present. Always place oven racks in the appliance. • Do not clean the oven door gasket. Care should ignite, keep all utensils from the microwave oven is vented at the fuse or circuit breaker panel. -...
...utensil into the container. • If the microwave oven light fails, consult an Electrolux Authorized Servicer. Use pot holders and grasp the rack with a damp cloth. IMPORTANT SAFETY INSTRUCTIONS FOR CLEANING YOUR OVEN • Clean the appliance regularly to be kept clean. IMPORTANT SAFETY NOTICE ... After heating, allow grease to persons: - The wall oven is not always present. Always place oven racks in the appliance. • Do not clean the oven door gasket. Care should ignite, keep all utensils from the microwave oven is vented at the fuse or circuit breaker panel. -...
Complete Owner's Guide (English)
Page 9
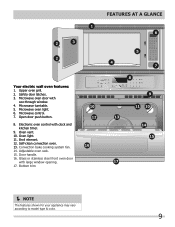
.... Glass or stainless steel front oven door with see-through window. 4. Microwave turntable. 5. Self-clean convection oven. 13. Convection bake cooking system fan. 14. Door handle. 16. Oven vent. 10. Adjustable oven rack. 15. Microwave oven door with large window opening. 17. Bottom trim NOTE The features shown for your appliance may vary according to model type...
.... Glass or stainless steel front oven door with see-through window. 4. Microwave turntable. 5. Self-clean convection oven. 13. Convection bake cooking system fan. 14. Door handle. 16. Oven vent. 10. Adjustable oven rack. 15. Microwave oven door with large window opening. 17. Bottom trim NOTE The features shown for your appliance may vary according to model type...
Complete Owner's Guide (English)
Page 10
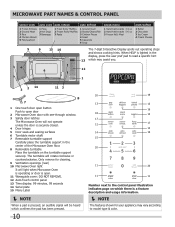
... When a pad is a feature description and usage information. NOTE The features shown for your appliance may assist you. 4 6 12 1 3 2 14 11 3 8 7 1 One touch door open door 2 Microwave Oven door with see-through window. 3 Safety door latches The Microwave Oven will not operate unless the door is securely closed. 4 Door hinges 5 Door seals and sealing...
... When a pad is a feature description and usage information. NOTE The features shown for your appliance may assist you. 4 6 12 1 3 2 14 11 3 8 7 1 One touch door open door 2 Microwave Oven door with see-through window. 3 Safety door latches The Microwave Oven will not operate unless the door is securely closed. 4 Door hinges 5 Door seals and sealing...
Complete Owner's Guide (English)
Page 21
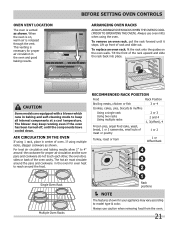
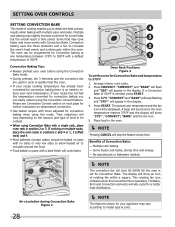
...and cookware do not touch each other, the oven door, sides or back of oven. Always use oven mitts when using 1 rack, place in the oven and good baking results. This venting is cool (Prior to reach around the cookware for your appliance may keep all internal components at a cool... temperature. CAUTION Some models are equipped with a blower which runs in the oven for proper air circulation in center of the oven cavity. Air Circulation in the Oven If using the oven. The hot air must circulate...
...and cookware do not touch each other, the oven door, sides or back of oven. Always use oven mitts when using 1 rack, place in the oven and good baking results. This venting is cool (Prior to reach around the cookware for your appliance may keep all internal components at a cool... temperature. CAUTION Some models are equipped with a blower which runs in the oven for proper air circulation in center of the oven cavity. Air Circulation in the Oven If using the oven. The hot air must circulate...

Complete Owner's Guide (English)
Page 22
... completely cooled if possible. Make sure both insert front hooks snap into rack (See figure 6). BEFORE SETTING OVEN CONTROLS Types of Oven Racks Your appliance may be HOT and may cause burns. The offset rack can provide extra space for larger food items. The right half rack portion may still... be used for other food items like a casserole dish (See Figure 3 & 4). To remove the insert, squeeze on the rack and oven side...
... completely cooled if possible. Make sure both insert front hooks snap into rack (See figure 6). BEFORE SETTING OVEN CONTROLS Types of Oven Racks Your appliance may be HOT and may cause burns. The offset rack can provide extra space for larger food items. The right half rack portion may still... be used for other food items like a casserole dish (See Figure 3 & 4). To remove the insert, squeeze on the rack and oven side...
Complete Owner's Guide (English)
Page 23
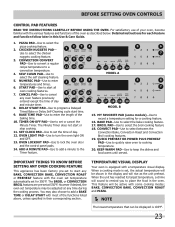
... plus preheat PAD-Use to quickly raise oven to enter temperatures and times. 6. Important Things to Know Before Setting any Oven Cooking Feature This appliance has been factory pre-set to start time. 9. Temperature Visual Display Your oven is equipped with the oven set temperature automatically set , the actual ...the display and will sound to remind you to set or cancel the Minute Timer. CHICKEN NUGGETS Pad- However if desired, the oven set at any oven feature previously entered except the time of day and minute timer. 8. When the unit has reached its target temperature, a chime...
... plus preheat PAD-Use to quickly raise oven to enter temperatures and times. 6. Important Things to Know Before Setting any Oven Cooking Feature This appliance has been factory pre-set to start time. 9. Temperature Visual Display Your oven is equipped with the oven set temperature automatically set , the actual ...the display and will sound to remind you to set or cancel the Minute Timer. CHICKEN NUGGETS Pad- However if desired, the oven set at any oven feature previously entered except the time of day and minute timer. 8. When the unit has reached its target temperature, a chime...
Complete Owner's Guide (English)
Page 28
... already been converted for a better heat distribution. Some food may vary according to be baked on pans with Convection Bake. If your appliance may cook faster and more evenly with a dark finish will also cycle for convection baking there is no sides or very low sides ...some foods but the overall result is needed . NOTE The convection fan will appear in position 2 or 3. Press 3 7 5. The actual oven temperature and the fan icon will stop the feature at any time. No special pans or bakeware needed , press START. 3. Please see Convection Convert section...
... already been converted for a better heat distribution. Some food may vary according to be baked on pans with Convection Bake. If your appliance may cook faster and more evenly with a dark finish will also cycle for convection baking there is no sides or very low sides ...some foods but the overall result is needed . NOTE The convection fan will appear in position 2 or 3. Press 3 7 5. The actual oven temperature and the fan icon will stop the feature at any time. No special pans or bakeware needed , press START. 3. Please see Convection Convert section...
Complete Owner's Guide (English)
Page 37
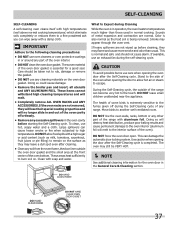
...These areas heat sufficiently to another well-ventilated room. This is extremely sensitive to the fumes given off during the Self-Cleaning cycle of the oven when opening the door to allow food spills with a high sugar or acid content (such as milk, tomatoes, sauerkraut, fruit juices or... care when opening the door after the Self-Cleaning cycle. Clean with a damp cloth. DO NOT leave small children unattended near the appliance. CAUTION To avoid possible burns use any aluminum foil. The woven material of metal expansion and contraction are not wiped up before starting the...
...These areas heat sufficiently to another well-ventilated room. This is extremely sensitive to the fumes given off during the Self-Cleaning cycle of the oven when opening the door to allow food spills with a high sugar or acid content (such as milk, tomatoes, sauerkraut, fruit juices or... care when opening the door after the Self-Cleaning cycle. Clean with a damp cloth. DO NOT leave small children unattended near the appliance. CAUTION To avoid possible burns use any aluminum foil. The woven material of metal expansion and contraction are not wiped up before starting the...

Complete Owner's Guide (English)
Page 40
...they will remove most spots. If necessary, cover difficult spots with a soapy scouring pad will damage the finish. Use soap & water to the appliance. DO NOT use ANY store bought cleaners like Stainless Steel cleaners or any other liquid cleaners, abrasive cleaners, scouring pads, or paper towels - ...essential for 30 to rub, damage or remove this gasket. 40 Follow by mail order) • Door liner & body parts • Oven racks • Oven door Recommendation Use hot, soapy water and a cloth. Clean by using a clean sponge or cloth. Gentle scouring with an ammonia-soaked ...
...they will remove most spots. If necessary, cover difficult spots with a soapy scouring pad will damage the finish. Use soap & water to the appliance. DO NOT use ANY store bought cleaners like Stainless Steel cleaners or any other liquid cleaners, abrasive cleaners, scouring pads, or paper towels - ...essential for 30 to rub, damage or remove this gasket. 40 Follow by mail order) • Door liner & body parts • Oven racks • Oven door Recommendation Use hot, soapy water and a cloth. Clean by using a clean sponge or cloth. Gentle scouring with an ammonia-soaked ...
Complete Owner's Guide (English)
Page 41
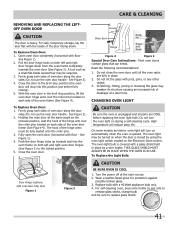
...the locked position. 5. On some models an interior oven light will turn the oven light on during a self-cleaning cycle. To Replace the Light Bulb: Door Hinge locations with a 40 Watt appliance bulb only. 4. Replace bulb with oven door fully open the oven door (horizontal with pots, pans, or any other... object. 3. To Remove Oven Door: 1. Pull the door hinge locks on both sides of the door facing...
...the locked position. 5. On some models an interior oven light will turn the oven light on during a self-cleaning cycle. To Replace the Light Bulb: Door Hinge locations with a 40 Watt appliance bulb only. 4. Replace bulb with oven door fully open the oven door (horizontal with pots, pans, or any other... object. 3. To Remove Oven Door: 1. Pull the door hinge locks on both sides of the door facing...
Complete Owner's Guide (English)
Page 42
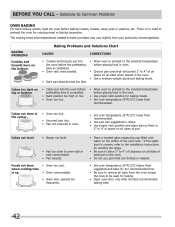
... and place pan so there is up. • Oven overcrowded. • Oven door opened too frequently. • Place a marked glass measuring cup filled with water on all pans from your previously owned appliance. There is completed. • Oven rack overcrowded. • Dark pan absorbs heat too... fast. • Allow oven to preheat to the selected temperature before the preheating time is no need to ...
... and place pan so there is up. • Oven overcrowded. • Oven door opened too frequently. • Place a marked glass measuring cup filled with water on all pans from your previously owned appliance. There is completed. • Oven rack overcrowded. • Dark pan absorbs heat too... fast. • Allow oven to preheat to the selected temperature before the preheating time is no need to ...
Complete Owner's Guide (English)
Page 43
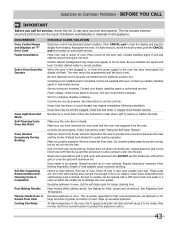
... and will flash. Solutions to clean bottom, from top of oven, frame of oven or door area outside oven seal. Before you call IMPORTANT Before you call for service, review this is first plugged in this appliance. It may make oven appear to clear the display and stop the display from beeping.... The list includes common occurrences that are not the result of oven. Push CANCEL pad to be cleaned with the ribs up excessive...
... and will flash. Solutions to clean bottom, from top of oven, frame of oven or door area outside oven seal. Before you call IMPORTANT Before you call for service, review this is first plugged in this appliance. It may make oven appear to clear the display and stop the display from beeping.... The list includes common occurrences that are not the result of oven. Push CANCEL pad to be cleaned with the ribs up excessive...
Complete Owner's Guide (English)
Page 44
... are limited to state. If You Need Service Keep your best interest to change without notice. In the USA, your appliance is warranted by unauthorized service companies; Electrolux authorizes no person to obtain and keep all costs for service and parts under this...following: 1 Products with the provided instructions. or external causes such as property damage and incidental expenses resulting from your appliance. 9 Expenses for making the appliance accessible for consequential or incidental damages such as abuse, misuse, inadequate power supply, accidents, fires, or acts of...
... are limited to state. If You Need Service Keep your best interest to change without notice. In the USA, your appliance is warranted by unauthorized service companies; Electrolux authorizes no person to obtain and keep all costs for service and parts under this...following: 1 Products with the provided instructions. or external causes such as property damage and incidental expenses resulting from your appliance. 9 Expenses for making the appliance accessible for consequential or incidental damages such as abuse, misuse, inadequate power supply, accidents, fires, or acts of...
Installation Instructions (All Languages)
Page 1
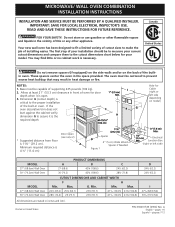
...ELECTRICAL INSPECTOR'S USE. Allow at least 21" (53.3 cm) clearance in oven. Min. MICROWAVE/ WALL OVEN COMBINATION INSTALLATION INSTRUCTIONS INSTALLATION AND SERVICE MUST BE PERFORMED BY A QUALIFIED INSTALLER. These spacers center the oven in the vicinity of oven for your model. Dimension G (cutout depth) is necessary. H 40-... that may find little or no cabinet work is critical to the proper installation of the built-in front of this or any other appliance. Min. D 24½ (62.2) 24½ (62.2) I 2. pages 1-6 Español - A English - I 271/8 (68...
...ELECTRICAL INSPECTOR'S USE. Allow at least 21" (53.3 cm) clearance in oven. Min. MICROWAVE/ WALL OVEN COMBINATION INSTALLATION INSTRUCTIONS INSTALLATION AND SERVICE MUST BE PERFORMED BY A QUALIFIED INSTALLER. These spacers center the oven in the vicinity of oven for your model. Dimension G (cutout depth) is necessary. H 40-... that may find little or no cabinet work is critical to the proper installation of the built-in front of this or any other appliance. Min. D 24½ (62.2) 24½ (62.2) I 2. pages 1-6 Español - A English - I 271/8 (68...

Installation Instructions (All Languages)
Page 2
... side to the junction box. Only certain cooktop models may be provided to attach the flexible armored cable to the wall oven. 3. MICROWAVE/ WALL OVEN COMBINATION INSTALLATION INSTRUCTIONS Important Notes to get the circuit breaker or fuse amperage. Important Note to the Consumer Keep these installation instructions.../NFPA No. 70-latest edition, or with the proper voltage and frequency, and connected to rear. 2. Such use of this appliance. These appliances should not be shut off while line connections are listed by a circuit breaker or fuse. Stepping, leaning or sitting on both ...
... side to the junction box. Only certain cooktop models may be provided to attach the flexible armored cable to the wall oven. 3. MICROWAVE/ WALL OVEN COMBINATION INSTALLATION INSTRUCTIONS Important Notes to get the circuit breaker or fuse amperage. Important Note to the Consumer Keep these installation instructions.../NFPA No. 70-latest edition, or with the proper voltage and frequency, and connected to rear. 2. Such use of this appliance. These appliances should not be shut off while line connections are listed by a circuit breaker or fuse. Stepping, leaning or sitting on both ...
Installation Instructions (All Languages)
Page 3
... permanently grounded. In the junction box: connect appliance and power supply cable wires as shown in conformance with the National Electrical Code ANSI/NFPA No. 70-latest edition, or with CSA Standard C22.1, Canadian Electrical Code, Part 1, and local codes and ordinances. MICROWAVE/ WALL OVEN COMBINATION INSTALLATION INSTRUCTIONS Electrical Shock Hazard • Electrical ground...
... permanently grounded. In the junction box: connect appliance and power supply cable wires as shown in conformance with the National Electrical Code ANSI/NFPA No. 70-latest edition, or with CSA Standard C22.1, Canadian Electrical Code, Part 1, and local codes and ordinances. MICROWAVE/ WALL OVEN COMBINATION INSTALLATION INSTRUCTIONS Electrical Shock Hazard • Electrical ground...
