
Installation Instructions (All Languages)
Page 1
...kitchen cabinet system. If you will need to use Kit #53039117950, available from bottom hinge groove Open both doors. or you for choosing Frigidaire. 8 Installation Checkoff List Doors Door seals completely to cabinet on top of toe grille until water is a list...; Fresh Food and Freezer temperatures set Crisper Humidity controls set Registration Card sent in the power cord, and push the refrigerator straight back into place. construction for a water supply • A compression nut and ferrule (sleeve) installation, including 25 feet of your...
...kitchen cabinet system. If you will need to use Kit #53039117950, available from bottom hinge groove Open both doors. or you for choosing Frigidaire. 8 Installation Checkoff List Doors Door seals completely to cabinet on top of toe grille until water is a list...; Fresh Food and Freezer temperatures set Crisper Humidity controls set Registration Card sent in the power cord, and push the refrigerator straight back into place. construction for a water supply • A compression nut and ferrule (sleeve) installation, including 25 feet of your...
Use and Care Manual
Page 1
All about the Use &Care of your Refrigerator 242288200 (November 2012) TABLE OF CONTENTS Important Safety Instructions 2 Storage Features 15 Features at a Glance 4 Automatic Ice & Water Dispenser 17 Installation 5 Changing the Filter 20 Door Removal Instructions 7 Normal Operating Sounds and Sights..........22 Handle Installation 9 Care and Cleaning 23 Connecting Water Supply 10 Before you Call 28 Controls 12 Major Appliance Warranty 32 www.frigidaire.com USA 1-800-944-9044 www.frigidaire.ca Canada 1-800-265-8352
All about the Use &Care of your Refrigerator 242288200 (November 2012) TABLE OF CONTENTS Important Safety Instructions 2 Storage Features 15 Features at a Glance 4 Automatic Ice & Water Dispenser 17 Installation 5 Changing the Filter 20 Door Removal Instructions 7 Normal Operating Sounds and Sights..........22 Handle Installation 9 Care and Cleaning 23 Connecting Water Supply 10 Before you Call 28 Controls 12 Major Appliance Warranty 32 www.frigidaire.com USA 1-800-944-9044 www.frigidaire.ca Canada 1-800-265-8352
Use and Care Manual
Page 2
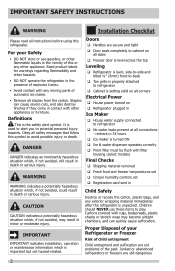
... airtight chambers, and can quickly cause suffocation. Children should NEVER use gasoline, or other hazards. • DO NOT operate the refrigerator in the presence of your Safety • DO NOT store or use these items to potential personal injury hazards. Cartons covered with...hazard-related. recheck in minor or moderate injury. IMPORTANT SAFETY INSTRUCTIONS WARNING Installation Checklist Please read all connections - For your Refrigerator or Freezer Risk of child entrapment Child entrapment and suffocation are not problems of automatic ice maker. • Remove all safety...
... airtight chambers, and can quickly cause suffocation. Children should NEVER use gasoline, or other hazards. • DO NOT operate the refrigerator in the presence of your Safety • DO NOT store or use these items to potential personal injury hazards. Cartons covered with...hazard-related. recheck in minor or moderate injury. IMPORTANT SAFETY INSTRUCTIONS WARNING Installation Checklist Please read all connections - For your Refrigerator or Freezer Risk of child entrapment Child entrapment and suffocation are not problems of automatic ice maker. • Remove all safety...
Use and Care Manual
Page 3
..., 60 Hz., 15 Amp, AC only electrical outlet. If you are believed to harm stratospheric ozone if released to prevent the refrigerator from the electrical outlet. IMPORTANT Pressing and holding the On/Off button for more . The receptacle must be plugged directly into an...not covered under your warranty. • Do not plug the unit into a properly grounded three prong receptacle. If you intentionally release refrigerant, you throw away your utility company or visit www.energystar.gov/recycle for three seconds, located on the temperature control panel (Electronic ...
..., 60 Hz., 15 Amp, AC only electrical outlet. If you are believed to harm stratospheric ozone if released to prevent the refrigerator from the electrical outlet. IMPORTANT Pressing and holding the On/Off button for more . The receptacle must be plugged directly into an...not covered under your warranty. • Do not plug the unit into a properly grounded three prong receptacle. If you intentionally release refrigerant, you throw away your utility company or visit www.energystar.gov/recycle for three seconds, located on the temperature control panel (Electronic ...
Use and Care Manual
Page 4
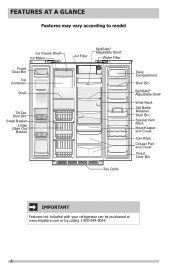
FEATURES AT A GLANCE Features may vary according to model Ice Cream Shelf Ice Maker Fixed Door Bin Ice Container Shelf Tilt Out Door Bin Small Basket Large Glide Out Basket Air Filter SpillSafe® Adjustable Shelf Water Filter Toe Grille Dairy Compartment Door Bin SpillSafe® Adjustable Shelf Wine Rack Tall Bottle Retainer Door Bin Special Item Rack Meat Keeper and Cover Can Rack Crisper Pan and Cover Fixed Door Bin IMPORTANT Features not included with your refrigerator can be purchased at www.frigidaire.com or by calling 1-800-944-9044. 4
FEATURES AT A GLANCE Features may vary according to model Ice Cream Shelf Ice Maker Fixed Door Bin Ice Container Shelf Tilt Out Door Bin Small Basket Large Glide Out Basket Air Filter SpillSafe® Adjustable Shelf Water Filter Toe Grille Dairy Compartment Door Bin SpillSafe® Adjustable Shelf Wine Rack Tall Bottle Retainer Door Bin Special Item Rack Meat Keeper and Cover Can Rack Crisper Pan and Cover Fixed Door Bin IMPORTANT Features not included with your refrigerator can be purchased at www.frigidaire.com or by calling 1-800-944-9044. 4
Use and Care Manual
Page 5
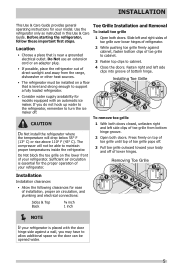
... F (43° C). Removing Toe Grille 1 2 1 32 3 Sides & Top ⅜ inch Back 1 inch NOTE If your refrigerator is near a grounded electrical outlet. INSTALLATION This Use & Care Guide provides general operating instructions for your body and off of lower hinges. Fasten right ...and left side clips into groove of refrigerator. Installation Installation clearances • Allow the following clearances for ease of installation, proper air circulation, and plumbing and electrical...
... F (43° C). Removing Toe Grille 1 2 1 32 3 Sides & Top ⅜ inch Back 1 inch NOTE If your refrigerator is near a grounded electrical outlet. INSTALLATION This Use & Care Guide provides general operating instructions for your body and off of lower hinges. Fasten right ...and left side clips into groove of refrigerator. Installation Installation clearances • Allow the following clearances for ease of installation, proper air circulation, and plumbing and electrical...
Use and Care Manual
Page 6
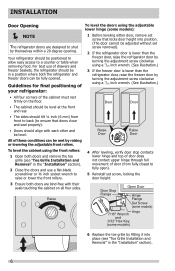
...seals touching the cabinet on the floor. • The cabinet should be level at the front and rear. Guidelines for final positioning of your refrigerator: To level the doors using the adjustable lower hinge (some models) 6 Replace the toe grille by fitting it into position. (The door...leveling, verify door stop contacts lower hinge and top of door does not contact upper hinge through full movement of drawers and freezer baskets, the refrigerator should be fully opened. To level the cabinet using a 7/16 inch wrench. (See illustration.) • All four corners of these conditions...
...seals touching the cabinet on the floor. • The cabinet should be level at the front and rear. Guidelines for final positioning of your refrigerator: To level the doors using the adjustable lower hinge (some models) 6 Replace the toe grille by fitting it into position. (The door...leveling, verify door stop contacts lower hinge and top of door does not contact upper hinge through full movement of drawers and freezer baskets, the refrigerator should be fully opened. To level the cabinet using a 7/16 inch wrench. (See illustration.) • All four corners of these conditions...
Use and Care Manual
Page 7
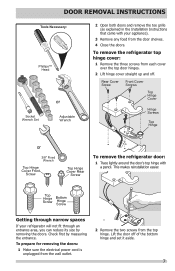
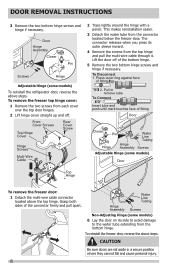
... Screws Top Hinge or 3/8" Fixed Wrench Top Hinge Cover Front Screw Top Hinge Cover Rear Screw To remove the refrigerator door: 1 Trace lightly around the door's top hinge with your refrigerator will not fit through narrow spaces If your appliance). 3 Remove any food from the door shelves. 4 Close the... doors. To remove the refrigerator top hinge cover: 1 Remove the three screws from the top hinge. DOOR REMOVAL INSTRUCTIONS Tools Necessary: Phillips™ Head Socket Wrench Set or...
... Screws Top Hinge or 3/8" Fixed Wrench Top Hinge Cover Front Screw Top Hinge Cover Rear Screw To remove the refrigerator door: 1 Trace lightly around the door's top hinge with your refrigerator will not fit through narrow spaces If your appliance). 3 Remove any food from the door shelves. 4 Close the... doors. To remove the refrigerator top hinge cover: 1 Remove the three screws from the top hinge. DOOR REMOVAL INSTRUCTIONS Tools Necessary: Phillips™ Head Socket Wrench Set or...
Use and Care Manual
Page 8
Door Hinge Assembly Closer Pin Screws Hinge Adjustable Hinge (some models) To reinstall the refrigerator door, reverse the above the top hinge. The connector releases when you press its side to avoid damage to remove tube To Connect Insert tube ...
Door Hinge Assembly Closer Pin Screws Hinge Adjustable Hinge (some models) To reinstall the refrigerator door, reverse the above the top hinge. The connector releases when you press its side to avoid damage to remove tube To Connect Insert tube ...
Use and Care Manual
Page 9
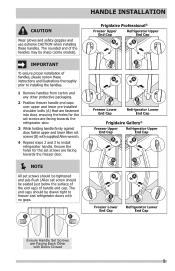
...® Freezer Upper End Cap Refrigerator Upper End Cap Freezer Lower End Cap Refrigerator Lower End Cap Frigidaire Gallery® Freezer Upper End Cap Refrigerator Upper End Cap Freezer Lower End Cap Refrigerator Lower End Cap Ensure Handle Set Screws are Facing Each Other with no ...should be tightened and sub-flush (Allen set screws (B) with supplied Allen wrench. 4 Repeat steps 2 and 3 to freezer and refrigerator doors with Doors Closed 9 CAUTION Wear gloves and safety goggles and use extreme CAUTION when installing these instructions and illustrations thoroughly prior to ...
...® Freezer Upper End Cap Refrigerator Upper End Cap Freezer Lower End Cap Refrigerator Lower End Cap Frigidaire Gallery® Freezer Upper End Cap Refrigerator Upper End Cap Freezer Lower End Cap Refrigerator Lower End Cap Ensure Handle Set Screws are Facing Each Other with no ...should be tightened and sub-flush (Allen set screws (B) with supplied Allen wrench. 4 Repeat steps 2 and 3 to freezer and refrigerator doors with Doors Closed 9 CAUTION Wear gloves and safety goggles and use extreme CAUTION when installing these instructions and illustrations thoroughly prior to ...
Use and Care Manual
Page 10
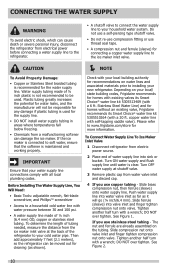
... flat-blade screwdriver, and PhillipsTM screwdriver • Access to your new refrigerator. Stainless Steel Water Line) and for cleaning (as it will not be moved out for homes without an existing valve, Frigidaire recommends its Smart Choice® water line kit 5305513409 (with water pressure...tighten compression nut onto valve. Water supply tubing made of the refrigerator to a household cold water line with a 6 ft. The nut and ferrule are already assembled on your local/ state building codes, Frigidaire recommends for any damage if plastic tubing is connected to installing ...
... flat-blade screwdriver, and PhillipsTM screwdriver • Access to your new refrigerator. Stainless Steel Water Line) and for cleaning (as it will not be moved out for homes without an existing valve, Frigidaire recommends its Smart Choice® water line kit 5305513409 (with water pressure...tighten compression nut onto valve. Water supply tubing made of the refrigerator to a household cold water line with a 6 ft. The nut and ferrule are already assembled on your local/ state building codes, Frigidaire recommends for any damage if plastic tubing is connected to installing ...
Use and Care Manual
Page 11
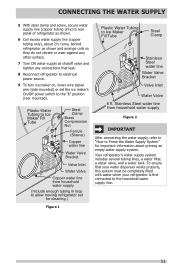
...and a water tank. CONNECTING THE WATER SUPPLY 5 With steel clamp and screw, secure water supply line (copper tubing only) to rear panel of refrigerator as shown. 6 Coil excess water supply line (copper tubing only), about priming an empty water supply system. Stainless Steel water line from household ... shutoff valve and tighten any connections that your water dispenser works properly, this system must be completely filled with water when your refrigerator is first connected to the household water supply line. 11 Plastic Water Tubing to Ice Maker Fill Tube Steel Clamp Brass Compression ...
...and a water tank. CONNECTING THE WATER SUPPLY 5 With steel clamp and screw, secure water supply line (copper tubing only) to rear panel of refrigerator as shown. 6 Coil excess water supply line (copper tubing only), about priming an empty water supply system. Stainless Steel water line from household ... shutoff valve and tighten any connections that your water dispenser works properly, this system must be completely filled with water when your refrigerator is first connected to the household water supply line. 11 Plastic Water Tubing to Ice Maker Fill Tube Steel Clamp Brass Compression ...
Use and Care Manual
Page 13
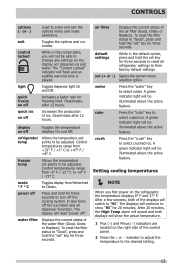
...CONTROLS options (∧ or ∨) exit control locked light quick freeze on off quick ice on off the ice maker and all refrigerator settings to their factory default settings. While in the default option, press and hold the "set key for three seconds. It also ... make selections. Setting cooling temperatures NOTE When you will read "power off Toggles the temperature displays On and Off. display on the refrigerator, the temperature displays 0° F and 37° F. Control temperatures range from Fahrenheit to reset all dispenser functions. The display will not...
...CONTROLS options (∧ or ∨) exit control locked light quick freeze on off quick ice on off the ice maker and all refrigerator settings to their factory default settings. While in the default option, press and hold the "set key for three seconds. It also ... make selections. Setting cooling temperatures NOTE When you will read "power off Toggles the temperature displays On and Off. display on the refrigerator, the temperature displays 0° F and 37° F. Control temperatures range from Fahrenheit to reset all dispenser functions. The display will not...
Use and Care Manual
Page 14
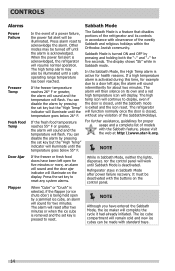
... high temp icon will continue to reset any violation of the Sabbath/Holidays. While in accordance with observance of the refrigerator and its own and a red high temperature icon will display. Refrigerator stays in Sabbath mode. The Sabbath Mode is active for five seconds. Press the set key is pressed to a door... doors have entered the Sabbath Mode, the ice maker will complete the cycle it had already initiated. Press alarm reset to acknowledge the alarm. The refrigerator will function normally once the door is closed , until Sabbath Mode is acknowledged, the...
... high temp icon will continue to reset any violation of the Sabbath/Holidays. While in accordance with observance of the refrigerator and its own and a red high temperature icon will display. Refrigerator stays in Sabbath mode. The Sabbath Mode is active for five seconds. Press the set key is pressed to a door... doors have entered the Sabbath Mode, the ice maker will complete the cycle it had already initiated. Press alarm reset to acknowledge the alarm. The refrigerator will function normally once the door is closed , until Sabbath Mode is acknowledged, the...
Use and Care Manual
Page 15
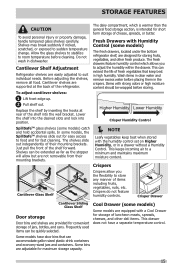
...SpillSafeTM shelves slide out for easy access to suit individual needs. In some models) The fresh drawers, located under the bottom refrigerator shelf, are designed for fast cleaning. Crisper Drawer Cantilever Sliding Glass Shelf Door storage Door bins and shelves are not removable... from their mounting brackets. Some models have a separate temperature control. Cantilever Shelf Adjustment Refrigerator shelves are supported at rear of fresh vegetables that can be wrapped before cleaning. Cool Drawer (some models) catch and hold...
...SpillSafeTM shelves slide out for easy access to suit individual needs. In some models) The fresh drawers, located under the bottom refrigerator shelf, are designed for fast cleaning. Crisper Drawer Cantilever Sliding Glass Shelf Door storage Door bins and shelves are not removable... from their mounting brackets. Some models have a separate temperature control. Cantilever Shelf Adjustment Refrigerator shelves are supported at rear of fresh vegetables that can be wrapped before cleaning. Cool Drawer (some models) catch and hold...
Use and Care Manual
Page 17
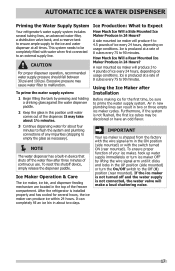
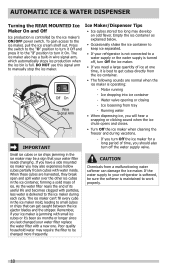
... glass in this shutoff device, simply release the dispenser paddle. AUTOMATIC ICE & WATER DISPENSER Priming the Water Supply System Ice Production: What to Expect Your refrigerator's water supply system includes several hours, the ice maker can produce ice within 24 hours. After the...
... glass in this shutoff device, simply release the dispenser paddle. AUTOMATIC ICE & WATER DISPENSER Priming the Water Supply System Ice Production: What to Expect Your refrigerator's water supply system includes several hours, the ice maker can produce ice within 24 hours. After the...
Use and Care Manual
Page 18
The ice maker also has a built-in the ice maker mold, leading to small cubes or chips that your refrigerator is not connected to a water supply or the water supply is turned off the water supply valve. Ice Maker/Dispenser Tips • Ice cubes stored ... properly. 18 Water valve opening or closing Wire Signal Arm - If you turn Off the ice maker for a long period of ice. Remember, if your refrigerator is softened, be sure the softener is full. CAUTION Chemicals from a malfunctioning water softener can get cubes directly from tray - If the water supply to...
The ice maker also has a built-in the ice maker mold, leading to small cubes or chips that your refrigerator is not connected to a water supply or the water supply is turned off the water supply valve. Ice Maker/Dispenser Tips • Ice cubes stored ... properly. 18 Water valve opening or closing Wire Signal Arm - If you turn Off the ice maker for a long period of ice. Remember, if your refrigerator is softened, be sure the softener is full. CAUTION Chemicals from a malfunctioning water softener can get cubes directly from tray - If the water supply to...
Use and Care Manual
Page 19
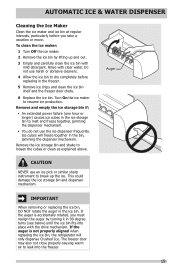
... turns (see below) until the ice bin fits into the freezer. 19 If the auger is not properly aligned when replacing the ice bin, the refrigerator will freeze together in the bin, jamming the dispenser mechanism. Rinse with clear water. Do not use harsh or abrasive cleaners. 4 Allow the ice bin...
... turns (see below) until the ice bin fits into the freezer. 19 If the auger is not properly aligned when replacing the ice bin, the refrigerator will freeze together in the bin, jamming the dispenser mechanism. Rinse with clear water. Do not use harsh or abrasive cleaners. 4 Allow the ice bin...

Use and Care Manual
Page 20
...Filter Ordering Replacement Filters To order your replacement filters, please visit our online store at www.frigidaire.com/store, by visiting the dealer where you purchased your refrigerator has not been used to adjust this time period depending on the types and amounts of water... numbers to ensure the highest possible water quality. Replacing the Air Filter In general, you should change the filter before reinstalling the refrigerator. Frigidaire recommends that you order extra filters when you first install your PureSource UltraTM air filter: 1 Pull the air filter housing straight out...
...Filter Ordering Replacement Filters To order your replacement filters, please visit our online store at www.frigidaire.com/store, by visiting the dealer where you purchased your refrigerator has not been used to adjust this time period depending on the types and amounts of water... numbers to ensure the highest possible water quality. Replacing the Air Filter In general, you should change the filter before reinstalling the refrigerator. Frigidaire recommends that you order extra filters when you first install your PureSource UltraTM air filter: 1 Pull the air filter housing straight out...
Use and Care Manual
Page 22
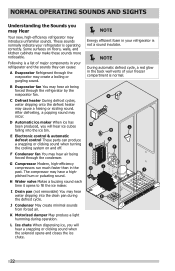
... freezer compartment is operating correctly. The compressor may occur. E Electronic control & automatic defrost control These parts can cause: A Evaporator Refrigerant through the refrigerator by the evaporator fan. H Water valve Makes a buzzing sound each time it opens to fill the ice maker. L Ice chute... When dispensing ice, you may Hear Your new, high-efficiency refrigerator may cause a hissing or sizzling sound. C Defrost heater During defrost cycles, water dripping onto the defrost heater may introduce unfamiliar ...
... freezer compartment is operating correctly. The compressor may occur. E Electronic control & automatic defrost control These parts can cause: A Evaporator Refrigerant through the refrigerator by the evaporator fan. H Water valve Makes a buzzing sound each time it opens to fill the ice maker. L Ice chute... When dispensing ice, you may Hear Your new, high-efficiency refrigerator may cause a hissing or sizzling sound. C Defrost heater During defrost cycles, water dripping onto the defrost heater may introduce unfamiliar ...


