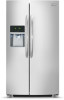

Installation Instructions (All Languages)
Page 1
... tubing is shut off valve for the water supply connection at the door hinges? (See the Use & Care Guide for details)? Do not over lower hinges of toe grille from fully closed to fully open. Plug in the power cord, and push the refrigerator straight back into position. (The door cannot be flush with filter housing (some models) Final Checks Shipping material removed Fresh Food and Freezer temperatures set Crisper Humidity controls set...
... tubing is shut off valve for the water supply connection at the door hinges? (See the Use & Care Guide for details)? Do not over lower hinges of toe grille from fully closed to fully open. Plug in the power cord, and push the refrigerator straight back into position. (The door cannot be flush with filter housing (some models) Final Checks Shipping material removed Fresh Food and Freezer temperatures set Crisper Humidity controls set...
Use and Care Manual
Page 2
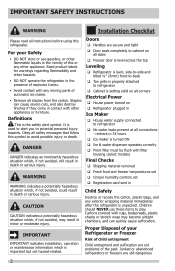
... indicates a potentially hazardous situation which , if not avoided, will result in Ice Maker House water supply connected to refrigerator No water leaks present at all staples from the carton. Junked or abandoned refrigerators or freezers are not problems of automatic ice maker. • Remove all connections - Doors Handles are secure and tight Door seals completely to cabinet on all sides Freezer door is level across the top Leveling...
... indicates a potentially hazardous situation which , if not avoided, will result in Ice Maker House water supply connected to refrigerator No water leaks present at all staples from the carton. Junked or abandoned refrigerators or freezers are not problems of automatic ice maker. • Remove all connections - Doors Handles are secure and tight Door seals completely to cabinet on all sides Freezer door is level across the top Leveling...
Use and Care Manual
Page 3
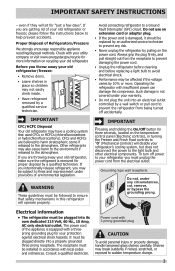
... connecting refrigerator to sudden temperature change. 3 Grounding type wall receptacle Do not, under provisions of the appliance is removed for proper disposal by pulling on the temperature control panel (Electronic controls), or turning the Freezer and Fresh Food controls to "0" (Mechanical controls) will sit for more . Electrical information • The refrigerator must be replaced by a qualified service technician. Do not use an extension cord or adapter plug. • If the power...
... connecting refrigerator to sudden temperature change. 3 Grounding type wall receptacle Do not, under provisions of the appliance is removed for proper disposal by pulling on the temperature control panel (Electronic controls), or turning the Freezer and Fresh Food controls to "0" (Mechanical controls) will sit for more . Electrical information • The refrigerator must be replaced by a qualified service technician. Do not use an extension cord or adapter plug. • If the power...
Use and Care Manual
Page 4
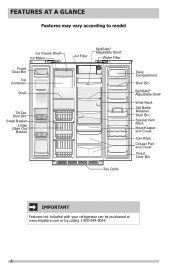
FEATURES AT A GLANCE Features may vary according to model Ice Cream Shelf Ice Maker Fixed Door Bin Ice Container Shelf Tilt Out Door Bin Small Basket Large Glide Out Basket Air Filter SpillSafe® Adjustable Shelf Water Filter Toe Grille Dairy Compartment Door Bin SpillSafe® Adjustable Shelf Wine Rack Tall Bottle Retainer Door Bin Special Item Rack Meat Keeper and Cover Can Rack Crisper Pan and Cover Fixed Door Bin IMPORTANT Features not included with your refrigerator can be purchased at www.frigidaire.com or by calling 1-800-944-9044. 4
FEATURES AT A GLANCE Features may vary according to model Ice Cream Shelf Ice Maker Fixed Door Bin Ice Container Shelf Tilt Out Door Bin Small Basket Large Glide Out Basket Air Filter SpillSafe® Adjustable Shelf Water Filter Toe Grille Dairy Compartment Door Bin SpillSafe® Adjustable Shelf Wine Rack Tall Bottle Retainer Door Bin Special Item Rack Meat Keeper and Cover Can Rack Crisper Pan and Cover Fixed Door Bin IMPORTANT Features not included with your refrigerator can be purchased at www.frigidaire.com or by calling 1-800-944-9044. 4
Use and Care Manual
Page 5
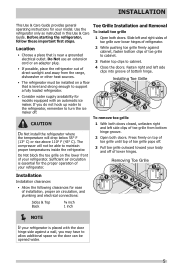
... off. 3 Pull toe grille outward toward your refrigerator. Removing Toe Grille 1 2 1 32 3 Sides & Top ⅜ inch Back 1 inch NOTE If your refrigerator is essential for your refrigerator. Slide left side clips of your model. Sufficient air circulation is placed with an automatic ice maker. INSTALLATION This Use & Care Guide provides general operating instructions for the proper operation of direct sunlight and away from bottom hinge groove. 2 Open both doors.
... off. 3 Pull toe grille outward toward your refrigerator. Removing Toe Grille 1 2 1 32 3 Sides & Top ⅜ inch Back 1 inch NOTE If your refrigerator is essential for your refrigerator. Slide left side clips of your model. Sufficient air circulation is placed with an automatic ice maker. INSTALLATION This Use & Care Guide provides general operating instructions for the proper operation of direct sunlight and away from bottom hinge groove. 2 Open both doors.
Use and Care Manual
Page 6
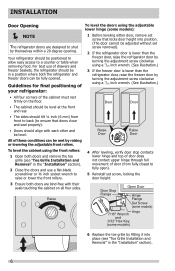
... freezer door by turning the adjustment screw clockwise using a 7/16 inch wrench. (See illustration.) • All four corners of your refrigerator: To level the doors using the front rollers: 1 Open both doors and remove the toe grille (see "Toe Grille Installation and Removal" in the "Installation" section). 2 Close the doors and use of these conditions can be level at the front and rear. Raise Door Stop Flange Open Door Hinge Flange Set Screw (some models...
... freezer door by turning the adjustment screw clockwise using a 7/16 inch wrench. (See illustration.) • All four corners of your refrigerator: To level the doors using the front rollers: 1 Open both doors and remove the toe grille (see "Toe Grille Installation and Removal" in the "Installation" section). 2 Close the doors and use of these conditions can be level at the front and rear. Raise Door Stop Flange Open Door Hinge Flange Set Screw (some models...
Use and Care Manual
Page 11
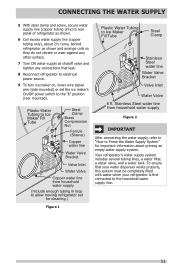
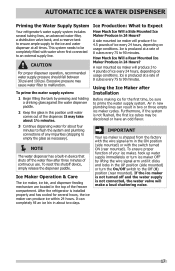
... To turn ice maker on, lower wire signal arm (side mounted) or set the ice maker's On/Off power switch to Prime the Water Supply System" for cleaning.) Figure 1 Plastic Water Tubing to the household water supply line. 11 Your refrigerator's water supply system includes several tubing lines, a water filter, a water valve, and a water tank. Plastic Water Tubing to Ice Maker Fill Tube Steel Clamp Brass Compression Nut Ferrule (Sleeve) Copper water line Water Valve Bracket Valve Inlet Water Valve Copper water line from household water supply Figure 2 IMPORTANT After connecting the water...
... To turn ice maker on, lower wire signal arm (side mounted) or set the ice maker's On/Off power switch to Prime the Water Supply System" for cleaning.) Figure 1 Plastic Water Tubing to the household water supply line. 11 Your refrigerator's water supply system includes several tubing lines, a water filter, a water valve, and a water tank. Plastic Water Tubing to Ice Maker Fill Tube Steel Clamp Brass Compression Nut Ferrule (Sleeve) Copper water line Water Valve Bracket Valve Inlet Water Valve Copper water line from household water supply Figure 2 IMPORTANT After connecting the water...
Use and Care Manual
Page 13
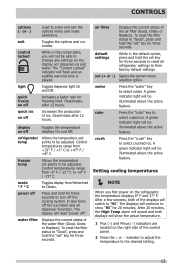
.... Control temperatures range from +33° F / +1° C to "HI". water filter Displays the current status of the air filter (Good, Order, or Replace). The displays will switch to +47° F / +8° C. indicator to adjust the temperature to select cubed ice. Toggles the options and run modes. While in the default option, press and hold the "set key for three seconds. Activates a faster rate for three seconds. freezer temp Allows the temperature set...
.... Control temperatures range from +33° F / +1° C to "HI". water filter Displays the current status of the air filter (Good, Order, or Replace). The displays will switch to +47° F / +8° C. indicator to adjust the temperature to select cubed ice. Toggles the options and run modes. While in the default option, press and hold the "set key for three seconds. Activates a faster rate for three seconds. freezer temp Allows the temperature set...
Use and Care Manual
Page 17
... prime the water supply system. Ice Maker Operation & Care The ice maker, ice bin, and dispenser feeding mechanism are located in the ON position (side mounted) or with water when first connected to an external supply line. IMPORTANT Your ice maker is not turned off the water flow after Installation 1 Begin filling the tank by lifting the wire signal arm until water comes out of the dispenser. A rear mounted ice maker will make a loud chattering noise. 17 To...
... prime the water supply system. Ice Maker Operation & Care The ice maker, ice bin, and dispenser feeding mechanism are located in the ON position (side mounted) or with water when first connected to an external supply line. IMPORTANT Your ice maker is not turned off the water flow after Installation 1 Begin filling the tank by lifting the wire signal arm until water comes out of the dispenser. A rear mounted ice maker will make a loud chattering noise. 17 To...
Use and Care Manual
Page 18
... turn Off the ice maker for a long period of ice at one . Empty the ice container as explained below. • Occasionally shake the ice container to keep ice separated. • If your refrigerator is not connected to your water filter needs changing. If you may develop an odd flavor. Water valve opening or closing Wire Signal Arm - If the water supply to a water supply or the water supply is turned off the water supply valve. Motor running - Press the switch...
... turn Off the ice maker for a long period of ice at one . Empty the ice container as explained below. • Occasionally shake the ice container to keep ice separated. • If your refrigerator is not connected to your water filter needs changing. If you may develop an odd flavor. Water valve opening or closing Wire Signal Arm - If the water supply to a water supply or the water supply is turned off the water supply valve. Motor running - Press the switch...

Use and Care Manual
Page 20
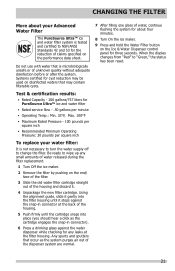
...), change the water filter every six months to replace the filter after six months) to the water filter. Water Filter The water filter is located at least once every six months. Replacing the Air Filter In general, you should change the air filter every six months (the filter status light on the control panel prompts you should change the filter before reinstalling the refrigerator. Filter Cartridge Air Filter Ordering Replacement Filters To order your replacement filters, please visit our online store at www.frigidaire.com...
...), change the water filter every six months to replace the filter after six months) to the water filter. Water Filter The water filter is located at least once every six months. Replacing the Air Filter In general, you should change the air filter every six months (the filter status light on the control panel prompts you should change the filter before reinstalling the refrigerator. Filter Cartridge Air Filter Ordering Replacement Filters To order your replacement filters, please visit our online store at www.frigidaire.com...
Use and Care Manual
Page 21
... to turn the water supply off to change the filter. Using the alignment guide, slide it gently into place (you should hear a click as the system purges air out of the dispenser system are normal. 7 After filling one glass of the housing and discard it stops against the water dispenser while checking for any small amounts of water released during the filter replacement. 1 Turn Off the ice maker. 2 Remove the filter...
... to turn the water supply off to change the filter. Using the alignment guide, slide it gently into place (you should hear a click as the system purges air out of the dispenser system are normal. 7 After filling one glass of the housing and discard it stops against the water dispenser while checking for any small amounts of water released during the filter replacement. 1 Turn Off the ice maker. 2 Remove the filter...
Use and Care Manual
Page 24
... cleaning around controls, light bulb or any electrical part. • Wipe gaskets with a clean soft cloth. • Use a soft cloth to clean drawer runners and tracks. • Do not wash any removable items (bins, drawers, etc.) in dishwasher. • Allow glass to warm to room temperature before immersing in warm water. • Remove toe grille (see Installation Instructions). • Vacuum both sides and wipe with a clean soft cloth. Use same wattage when replacing bulb. 24 Rinse with warm water...
... cleaning around controls, light bulb or any electrical part. • Wipe gaskets with a clean soft cloth. • Use a soft cloth to clean drawer runners and tracks. • Do not wash any removable items (bins, drawers, etc.) in dishwasher. • Allow glass to warm to room temperature before immersing in warm water. • Remove toe grille (see Installation Instructions). • Vacuum both sides and wipe with a clean soft cloth. Use same wattage when replacing bulb. 24 Rinse with warm water...
Use and Care Manual
Page 28
...; Freezer ice maker wire signal arm is being in manual. • The fresh food and freezer ice makers will each produce approximately 2.5 pounds of the ice maker (freezer ice maker). Replace valve if necessary. • Press Fast Freeze to temporarily increase ice production rate. • Set freezer control to colder setting to push the filter firmly so that valve is set too warm (freezer ice maker). For the fresh food ice maker, press and hold the "Ice Off" button for temperature to water line or water valve is...
...; Freezer ice maker wire signal arm is being in manual. • The fresh food and freezer ice makers will each produce approximately 2.5 pounds of the ice maker (freezer ice maker). Replace valve if necessary. • Press Fast Freeze to temporarily increase ice production rate. • Set freezer control to colder setting to push the filter firmly so that valve is set too warm (freezer ice maker). For the fresh food ice maker, press and hold the "Ice Off" button for temperature to water line or water valve is...

Use and Care Manual
Page 29
... infrequent use, temperature fluctuations, and/or power outages. • Ice cubes are completely closed . The hollow cubes break open . Ice dispenser is not making ice (select by a package in proper position. Ice should operate. • Remove ice cubes that has fallen models). against ice maker. Replace the water filter and if the condition still occurs check for a Saddle Valve, water valve not turned on all the way or kinked water supply line. • Press and hold control...
... infrequent use, temperature fluctuations, and/or power outages. • Ice cubes are completely closed . The hollow cubes break open . Ice dispenser is not making ice (select by a package in proper position. Ice should operate. • Remove ice cubes that has fallen models). against ice maker. Replace the water filter and if the condition still occurs check for a Saddle Valve, water valve not turned on all the way or kinked water supply line. • Press and hold control...

Use and Care Manual
Page 30
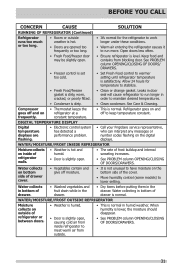
...; Close both doors gently. • Ensure floor is level and solid, and can adequately support the refrigerator. See Care & Cleaning. The defrost cycle occurs periodically, lasting about 30 minutes. • Ensure plug is tightly pushed into outlet. • Check/replace fuse with a 15 amp time-delay fuse. Call local electric company. 30 RUNNING OF REFRIGERATOR Compressor does not run. • Freezer control is set to the dispenser. Reset circuit breaker...
...; Close both doors gently. • Ensure floor is level and solid, and can adequately support the refrigerator. See Care & Cleaning. The defrost cycle occurs periodically, lasting about 30 minutes. • Ensure plug is tightly pushed into outlet. • Check/replace fuse with a 15 amp time-delay fuse. Call local electric company. 30 RUNNING OF REFRIGERATOR Compressor does not run. • Freezer control is set to the dispenser. Reset circuit breaker...
Use and Care Manual
Page 31
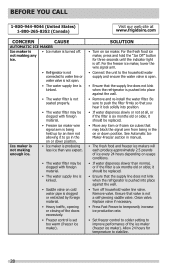
.../freezer door may be slightly open . • The rate of frost buildup and internal sweating increases. • See PROBLEM column OPENING/CLOSING OF DOORS/DRAWERS. See PROBLEM column OPENING/CLOSING OF DOORS/ DRAWERS. • Freezer control is set too cold. • Set Fresh Food control to warmer setting until refrigerator temperature is dirty, worn, cracked, or poorly fitted. • Clean or change gasket. Allow 24 hours for the refrigerator to work longer under these conditions. • Warm air...
.../freezer door may be slightly open . • The rate of frost buildup and internal sweating increases. • See PROBLEM column OPENING/CLOSING OF DOORS/DRAWERS. See PROBLEM column OPENING/CLOSING OF DOORS/ DRAWERS. • Freezer control is set too cold. • Set Fresh Food control to warmer setting until refrigerator temperature is dirty, worn, cracked, or poorly fitted. • Clean or change gasket. Allow 24 hours for the refrigerator to work longer under these conditions. • Warm air...
Use and Care Manual
Page 32
... appropriate payment record to repair or replace appliance light bulbs, air filters, water filters, other consumables, or knobs, handles, or other cosmetic parts. 11. Rust on the interior or exterior of purchase, Electrolux will pay all receipts. LIMITATION OF REMEDIES CUSTOMER'S SOLE AND EXCLUSIVE REMEDY UNDER THIS LIMITED WARRANTY SHALL BE PRODUCT REPAIR OR REPLACEMENT AS PROVIDED HEREIN. USA 1.800.944.9044 Frigidaire 10200 David Taylor...
... appropriate payment record to repair or replace appliance light bulbs, air filters, water filters, other consumables, or knobs, handles, or other cosmetic parts. 11. Rust on the interior or exterior of purchase, Electrolux will pay all receipts. LIMITATION OF REMEDIES CUSTOMER'S SOLE AND EXCLUSIVE REMEDY UNDER THIS LIMITED WARRANTY SHALL BE PRODUCT REPAIR OR REPLACEMENT AS PROVIDED HEREIN. USA 1.800.944.9044 Frigidaire 10200 David Taylor...

Service Data Sheet
Page 1
...FAN MOTOR Watts RPM Amps 3.1 1100 CW Opposite Shaft 0.03 Running DEFROST HEATER DEFROST SENSE LINE J2- 1 NEUTRAL DEFROST THERM. "OP-" if open ; FF +5V NTC 2 - stopped when "off ". "SH" if short 0- Untrained persons should not attempt to make repairs due to 10 sec. SENSE REFRIGERATOR LIGHTS J3- 3 FREEZER LIGHT S LED POWER BOARD J3- 4 NEUTRAL J3- 1 NEUTRAL (SERVICE CORD) NEUTRAL (CONDENSER FAN) NEUTRAL (WATER VALVE 1) NEUTRAL (NOT USED) NEUTRAL (COMPRESSOR) NEUTRAL (LED POWER SUPPLY) NEUTRAL (DISPENSER & ICE MAKER VALVE) LINE (SERVICE CORD ) LINE...
...FAN MOTOR Watts RPM Amps 3.1 1100 CW Opposite Shaft 0.03 Running DEFROST HEATER DEFROST SENSE LINE J2- 1 NEUTRAL DEFROST THERM. "OP-" if open ; FF +5V NTC 2 - stopped when "off ". "SH" if short 0- Untrained persons should not attempt to make repairs due to 10 sec. SENSE REFRIGERATOR LIGHTS J3- 3 FREEZER LIGHT S LED POWER BOARD J3- 4 NEUTRAL J3- 1 NEUTRAL (SERVICE CORD) NEUTRAL (CONDENSER FAN) NEUTRAL (WATER VALVE 1) NEUTRAL (NOT USED) NEUTRAL (COMPRESSOR) NEUTRAL (LED POWER SUPPLY) NEUTRAL (DISPENSER & ICE MAKER VALVE) LINE (SERVICE CORD ) LINE...

Service Data Sheet
Page 2
... : 1 Green/Yellow Ground 2 Yellow Water Valve 3 Black Line 4 Light Blue Neutral LE D TOP LEFT LE D UPPER LEFT TYPICAL LED CONNECTOR LE D LED MIDDLE LOWER LEFT LEFT FREEZER LEDS 1 turn equals approx 20cc (0.68 oz). HARNESS Electrical FF LED HARNESS ICE MAKER SPECIFICATIONS 115 vac (127 vac max) Thermostat Opens at 48° F ( 9° C), Closes at 9° F ( -13° C) Heater Wattage 112 watts ICE MAKER CONNECTOR PLUG CONNECTIONS Wire Number Wire Color Connects to the On/Off Switch.
... : 1 Green/Yellow Ground 2 Yellow Water Valve 3 Black Line 4 Light Blue Neutral LE D TOP LEFT LE D UPPER LEFT TYPICAL LED CONNECTOR LE D LED MIDDLE LOWER LEFT LEFT FREEZER LEDS 1 turn equals approx 20cc (0.68 oz). HARNESS Electrical FF LED HARNESS ICE MAKER SPECIFICATIONS 115 vac (127 vac max) Thermostat Opens at 48° F ( 9° C), Closes at 9° F ( -13° C) Heater Wattage 112 watts ICE MAKER CONNECTOR PLUG CONNECTIONS Wire Number Wire Color Connects to the On/Off Switch.


