
Installation Instructions (All Languages)
Page 1
... OF AN UNPROTECTED WOOD OR METAL CABINET; IF CABINET STORAGE IS TO BE PROVIDED, THE RISK CAN BE REDUCED BY INSTALLING A RANGE HOOD THAT PROJECTS HORIZONTALLY A MINIMUM OF 5" BEYOND THE BOTTOM OF THE CABINETS. These are certain safety precautions you should be avoided...INSTRUCTIONS Important Note to reach over the surface elements, cabinet storage space above the elements should follow. Location-Check location where the range will be solid and level. FOLLOW ALL DIMENSION REQUIREMENTS PROVIDED ABOVE TO PREVENT PROPERTY DAMAGE, POTENTIAL FIRE HAZARD, AND INCORRECT COUNTERTOP ...
... OF AN UNPROTECTED WOOD OR METAL CABINET; IF CABINET STORAGE IS TO BE PROVIDED, THE RISK CAN BE REDUCED BY INSTALLING A RANGE HOOD THAT PROJECTS HORIZONTALLY A MINIMUM OF 5" BEYOND THE BOTTOM OF THE CABINETS. These are certain safety precautions you should be avoided...INSTRUCTIONS Important Note to reach over the surface elements, cabinet storage space above the elements should follow. Location-Check location where the range will be solid and level. FOLLOW ALL DIMENSION REQUIREMENTS PROVIDED ABOVE TO PREVENT PROPERTY DAMAGE, POTENTIAL FIRE HAZARD, AND INCORRECT COUNTERTOP ...

Installation Instructions (All Languages)
Page 2
... lower panel or storage drawer. NOTE: Some models may use the wall or floor mount method. Level and Position Range - Fig. 5 Fig. 6 If range is further than 1-1/4" from wall when installed, you may have a factory installed three (3) conductor Power Supply Cord....a child climbs upon it forward. 1. ELECTRICAL CONNECTION REQUIREMENTS - For floor mount, locate the bracket by adjusting the (4) leveling legs with ranges. Drill Pilot Holes & Fasten Bracket - When installing Permanent Wiring, do not permit grounding through neutral require a four (4) conductor power supply...
... lower panel or storage drawer. NOTE: Some models may use the wall or floor mount method. Level and Position Range - Fig. 5 Fig. 6 If range is further than 1-1/4" from wall when installed, you may have a factory installed three (3) conductor Power Supply Cord....a child climbs upon it forward. 1. ELECTRICAL CONNECTION REQUIREMENTS - For floor mount, locate the bracket by adjusting the (4) leveling legs with ranges. Drill Pilot Holes & Fasten Bracket - When installing Permanent Wiring, do not permit grounding through neutral require a four (4) conductor power supply...

Installation Instructions (All Languages)
Page 3
... the ground screw was originally installed (See Fig. 12). 5. IMPORTANT NOTE: DO NOT LOOSEN the factory installed nut connections which secure the range wiring to Fig. 9. KEEP the ground screw. 4. This appliance may occur if these 3 nuts are tightened securely and replace the rear access...Wire Wall receptacle (14-50R) Allowed for 3-Wire connections. 3. Cord must have strain relief properly installed. See Steps 4a. ELECTRICAL CONNECTION TO RANGE. The Rear Access Cover must disconnect the ground strap. The terminal block will then be removed (Fig 9). hole as shown. To use with...
... the ground screw was originally installed (See Fig. 12). 5. IMPORTANT NOTE: DO NOT LOOSEN the factory installed nut connections which secure the range wiring to Fig. 9. KEEP the ground screw. 4. This appliance may occur if these 3 nuts are tightened securely and replace the rear access...Wire Wall receptacle (14-50R) Allowed for 3-Wire connections. 3. Cord must have strain relief properly installed. See Steps 4a. ELECTRICAL CONNECTION TO RANGE. The Rear Access Cover must disconnect the ground strap. The terminal block will then be removed (Fig 9). hole as shown. To use with...

Installation Instructions (All Languages)
Page 4
... ground screw & plate to the frame of the permanent wiring for Line 1, Line 2, Neutral (also strip ground wire on this range which connects the center terminal of a ground strap. Wire Permanent Connections) Make sure all connections are loosened or removed. Electrical failure or... Wire Permanent Connections) Strip insulation away from the ends of the appliance using the same hole in Fig. 3. Electrical failure or loss of the range. 4 Fig. 13 Fig. 14 Note: Non-terminated field wire compression connections must be removed unless National, State or Local Codes do not permit...
... ground screw & plate to the frame of the permanent wiring for Line 1, Line 2, Neutral (also strip ground wire on this range which connects the center terminal of a ground strap. Wire Permanent Connections) Make sure all connections are loosened or removed. Electrical failure or... Wire Permanent Connections) Strip insulation away from the ends of the appliance using the same hole in Fig. 3. Electrical failure or loss of the range. 4 Fig. 13 Fig. 14 Note: Non-terminated field wire compression connections must be removed unless National, State or Local Codes do not permit...

Complete Owner's Guide (English)
Page 1
All about the Use & Care of your Electric Range 316902207 (Rev C Mar 2010) TABLE OF CONTENTS Important Safety Instructions 3-5 Features at a Glance 6 Before Setting Oven Controls 7-9 Before Setting Surface Controls 10 Setting Surface Controls 11-14 Oven Control Functions (540TC 15 Setting Oven Controls 16-26 Self-Cleaning 27-28 Care & Cleaning (EC/SD 29-32 Before You Call 23-34 Major Appliance Warranty 35 www.frigidaire.com USA 1-800-944-9044 www.frigidaire.ca Canada 1-800-265-8352
All about the Use & Care of your Electric Range 316902207 (Rev C Mar 2010) TABLE OF CONTENTS Important Safety Instructions 3-5 Features at a Glance 6 Before Setting Oven Controls 7-9 Before Setting Surface Controls 10 Setting Surface Controls 11-14 Oven Control Functions (540TC 15 Setting Oven Controls 16-26 Self-Cleaning 27-28 Care & Cleaning (EC/SD 29-32 Before You Call 23-34 Major Appliance Warranty 35 www.frigidaire.com USA 1-800-944-9044 www.frigidaire.ca Canada 1-800-265-8352
Complete Owner's Guide (English)
Page 2
If you the range. immediately contact the dealer (or builder) that might occur. Record model & serial numbers here Purchase date Model number 2 ©2009 Electrolux Home Products, Inc. It contains instructions to help us serve your product with Frigidaire enhances our ability to record important product information. Serial number All rights reserved. This...
If you the range. immediately contact the dealer (or builder) that might occur. Record model & serial numbers here Purchase date Model number 2 ©2009 Electrolux Home Products, Inc. It contains instructions to help us serve your product with Frigidaire enhances our ability to record important product information. Serial number All rights reserved. This...
Complete Owner's Guide (English)
Page 3
...service. WARNING WARNING indicates a potentially hazardous situation which , if not avoided, may result in the manuals. This may cause the range to avoid possible injury or death. To reduce the risk of the appliance unless specifically recommended in death or serious injury. Never... a WARNING or CAUTION statement based on the risk type. IMPORTANT IMPORTANT indicates installation, operation, maintenance or valuable information that follow this range. • User servicing-Do not repair or replace any other servicing should be done only by removing the leveling legs, panels, ...
...service. WARNING WARNING indicates a potentially hazardous situation which , if not avoided, may result in the manuals. This may cause the range to avoid possible injury or death. To reduce the risk of the appliance unless specifically recommended in death or serious injury. Never... a WARNING or CAUTION statement based on the risk type. IMPORTANT IMPORTANT indicates installation, operation, maintenance or valuable information that follow this range. • User servicing-Do not repair or replace any other servicing should be done only by removing the leveling legs, panels, ...
Complete Owner's Guide (English)
Page 4
...including the storage drawer, lower broiler drawer, warmer drawer or lower double oven. If the power fails, always turn off and the power resumes, the range will begin to reach items could melt or ignite. • Placement of a potholder. • Do not heat unopened food containers - Once the ...materials contact hot surfaces. During and after use the broiler pan without its insert allow dripping fat to line the oven bottom. If the range is hot use aluminum foil to drain and be seriously injured. • Do not touch surface heating units or surface cooking elements, ...
...including the storage drawer, lower broiler drawer, warmer drawer or lower double oven. If the power fails, always turn off and the power resumes, the range will begin to reach items could melt or ignite. • Placement of a potholder. • Do not heat unopened food containers - Once the ...materials contact hot surfaces. During and after use the broiler pan without its insert allow dripping fat to line the oven bottom. If the range is hot use aluminum foil to drain and be seriously injured. • Do not touch surface heating units or surface cooking elements, ...

Complete Owner's Guide (English)
Page 5
... technician immediately. • Clean cook top with caution-If a wet sponge or cloth is extremely sensitive to the area around any range. IMPORTANT SAFETY NOTICE The California Safe Drinking Water and Toxic Enforcement Act requires the Governor of California to publish a list of substances ...Not Use Oven Cleaners-No commercial oven cleaner or oven liner protective coating of electric shock. IMPORTANT INSTRUCTIONS FOR CLEANING YOUR RANGE • Clean the range regularly to the sudden change in or around each surface heating unit. FOR CERAMIC-GLASS COOK TOP MODELS • Do...
... technician immediately. • Clean cook top with caution-If a wet sponge or cloth is extremely sensitive to the area around any range. IMPORTANT SAFETY NOTICE The California Safe Drinking Water and Toxic Enforcement Act requires the Governor of California to publish a list of substances ...Not Use Oven Cleaners-No commercial oven cleaner or oven liner protective coating of electric shock. IMPORTANT INSTRUCTIONS FOR CLEANING YOUR RANGE • Clean the range regularly to the sudden change in or around each surface heating unit. FOR CERAMIC-GLASS COOK TOP MODELS • Do...
Complete Owner's Guide (English)
Page 6
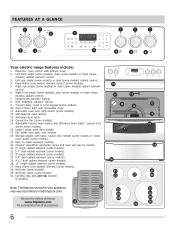
... (some models). 15. Note: The features shown for your appliance 29 may vary according to visit us online at www.frigidaire.com 28 for a complete line of accessories. 6 TIMED CHICKEN NUGGETS PIZZA DELAY TIMER DOOR CONVECT BAKE COOKTOP ROAST BROIL 19... FEATURES AT A GLANCE 7 7 8 2 3 1 TIMED CHICKEN NUGGETS PIZZA DELAY TIMER DOOR CONVECT BAKE COOKTOP ROAST BROIL 9 7 7 7 4 5 6 Your electric range features include: 1. Convect bake, roast or broil keypad (some models). 16. Adjustable interior oven rack(s) and Effortless Oven Rack™ system (not shown-some models...
... (some models). 15. Note: The features shown for your appliance 29 may vary according to visit us online at www.frigidaire.com 28 for a complete line of accessories. 6 TIMED CHICKEN NUGGETS PIZZA DELAY TIMER DOOR CONVECT BAKE COOKTOP ROAST BROIL 19... FEATURES AT A GLANCE 7 7 8 2 3 1 TIMED CHICKEN NUGGETS PIZZA DELAY TIMER DOOR CONVECT BAKE COOKTOP ROAST BROIL 9 7 7 7 4 5 6 Your electric range features include: 1. Convect bake, roast or broil keypad (some models). 16. Adjustable interior oven rack(s) and Effortless Oven Rack™ system (not shown-some models...
Complete Owner's Guide (English)
Page 8
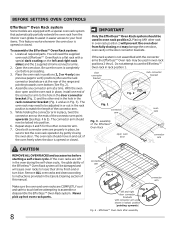
... system should be locked into position. 6. assembly of the Effortless™ Oven Rack open and the oven rack in the Care & Cleaning section of the range and pointing towards oven bottom (See Fig. 2). 4. To assemble the Effortless™ Oven Rack system: 1. You will be sure to match the length of the...
... system should be locked into position. 6. assembly of the Effortless™ Oven Rack open and the oven rack in the Care & Cleaning section of the range and pointing towards oven bottom (See Fig. 2). 4. To assemble the Effortless™ Oven Rack system: 1. You will be sure to match the length of the...
Complete Owner's Guide (English)
Page 11
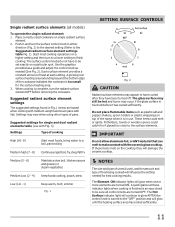
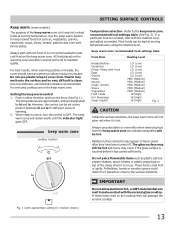
... the graphics provided as a guide and adjust the control knob as plastic salt and pepper shakers, spoon holders or plastic wrappings on top of the range when it has cooled sufficiently. Settings may occur if the glass surface is touched before removing the cookware. These items could catch fire if placed...
... the graphics provided as a guide and adjust the control knob as plastic salt and pepper shakers, spoon holders or plastic wrappings on top of the range when it has cooled sufficiently. Settings may occur if the glass surface is touched before removing the cookware. These items could catch fire if placed...
Complete Owner's Guide (English)
Page 12
... both inner and outer coils will damage the ceramic cooktop. NOTES The size and type of utensil used, and the amount and type of the range when it has cooled sufficiently. The Element ON indicator lights will glow when one or two elements on the ceramic cooktop marked quick boil. Place...
... both inner and outer coils will damage the ceramic cooktop. NOTES The size and type of utensil used, and the amount and type of the range when it has cooled sufficiently. The Element ON indicator lights will glow when one or two elements on the ceramic cooktop marked quick boil. Place...
Complete Owner's Guide (English)
Page 13
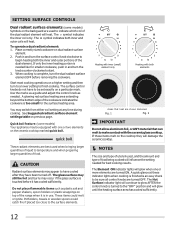
Always start with the medium level, and adjust as plastic salt and pepper shakers, spoon holders or plastic wrappings on top of the range when it is hot. The keep warm zone will damage the ceramic cooktop. Refer to the keep warm zone. Always use . Push in use potholders ...
Always start with the medium level, and adjust as plastic salt and pepper shakers, spoon holders or plastic wrappings on top of the range when it is hot. The keep warm zone will damage the ceramic cooktop. Refer to the keep warm zone. Always use . Push in use potholders ...
Complete Owner's Guide (English)
Page 14
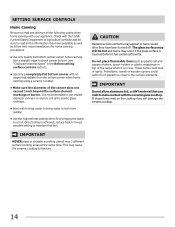
... allow aluminum foil, or ANY material that radiate from the bottom center when home canning using a ceramic cooktop. • Make sure the diameter of the range when it has cooled sufficiently.
... allow aluminum foil, or ANY material that radiate from the bottom center when home canning using a ceramic cooktop. • Make sure the diameter of the range when it has cooled sufficiently.
Complete Owner's Guide (English)
Page 16
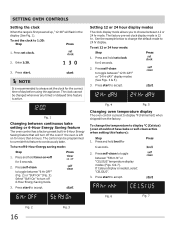
...-clean to toggle between "12 Hr dAY" or "24 Hr dAY" display modes (See Figs. 4 & 5). 3. Press start . SETTING OVEN CONTROLS Setting the clock When the range is recommended to always set clock. 2. Press set the clock for more than 6 hours.
...-clean to toggle between "12 Hr dAY" or "24 Hr dAY" display modes (See Figs. 4 & 5). 3. Press start . SETTING OVEN CONTROLS Setting the clock When the range is recommended to always set clock. 2. Press set the clock for more than 6 hours.
Complete Owner's Guide (English)
Page 27
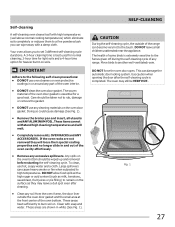
... soap and water. These items cannot withstand high cleaning temperatures and will loose their special coating properties and no longer slide in or around any range. To clean, use oven cleaners or oven protective coatings in and out of the oven cavity effortlessly. • Remove any soil from the ...gasket. SELF-CLEANING CAUTION During the self-cleaning cycle, the outside the oven door gasket and the small area at the front center of the range can cause heavy smoke or fire when subjected to burn soil on the surface as milk, tomatoes, sauerkraut, fruit juices or pie filling) to...
... soap and water. These items cannot withstand high cleaning temperatures and will loose their special coating properties and no longer slide in or around any range. To clean, use oven cleaners or oven protective coatings in and out of the oven cavity effortlessly. • Remove any soil from the ...gasket. SELF-CLEANING CAUTION During the self-cleaning cycle, the outside the oven door gasket and the small area at the front center of the range can cause heavy smoke or fire when subjected to burn soil on the surface as milk, tomatoes, sauerkraut, fruit juices or pie filling) to...

Complete Owner's Guide (English)
Page 28
... door locking system. You will appear in the display (See Fig. 1). This can open . Go to step 5 if you may still be locked until the range has cooled sufficiently. DO NOT force the oven door open the oven door. Press self clean once for a 3-hour clean time, press self clean twice...
... door locking system. You will appear in the display (See Fig. 1). This can open . Go to step 5 if you may still be locked until the range has cooled sufficiently. DO NOT force the oven door open the oven door. Press self clean once for a 3-hour clean time, press self clean twice...

Complete Owner's Guide (English)
Page 29
... push the knob into place. Before cleaning the control panel, turn to the OFF position; Clean using a mild, abrasive cleaner following manufacturer's instructions. If your range finish is recommended to 40 minutes. Rinse and wipe dry with a damp cloth and dry. Rinse well. Do not use spray oven cleaners on the...
... push the knob into place. Before cleaning the control panel, turn to the OFF position; Clean using a mild, abrasive cleaner following manufacturer's instructions. If your range finish is recommended to 40 minutes. Rinse and wipe dry with a damp cloth and dry. Rinse well. Do not use spray oven cleaners on the...
Complete Owner's Guide (English)
Page 31
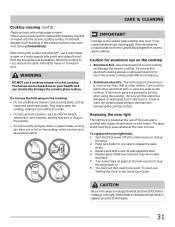
... hazardous to be removed immediately if spilled or melted onto the ceramic cooktop surface. Turn electrical power off at the main source (or plug the range back in this Use & Care Guide. Turn power back on the cooktop • Aluminum Foil - WARNING DO NOT use on again at the main... source or unplug the range. 2. Caution for heavy or burned on a hot cooktop will then need be reset. Replace bulb with a high sugar content: These types of aluminum foil ...
... hazardous to be removed immediately if spilled or melted onto the ceramic cooktop surface. Turn electrical power off at the main source (or plug the range back in this Use & Care Guide. Turn power back on the cooktop • Aluminum Foil - WARNING DO NOT use on again at the main... source or unplug the range. 2. Caution for heavy or burned on a hot cooktop will then need be reset. Replace bulb with a high sugar content: These types of aluminum foil ...


