
Installation Instructions (All Languages)
Page 1
... THE BOTTOM OF THE CABINETS. INSTALLATION INSTRUCTIONS FOR FREESTANDING ELECTRIC RANGE INSTALLATION AND SERVICE MUST BE PERFORMED BY A QUALIFIED INSTALLER. Fig. 1 Fig. 2 Fig. 3 30" *30" MINIMUM CLEARANCE BETWEEN THE TOP OF THE COOKING SURFACE AND THE BOTTOM OF AN UNPROTECTED WOOD OR METAL CABINET; These are listed in the Use & Care Guide, read it carefully. • Be sure your owner's guide for proper electrical supply, and the stability of...
... THE BOTTOM OF THE CABINETS. INSTALLATION INSTRUCTIONS FOR FREESTANDING ELECTRIC RANGE INSTALLATION AND SERVICE MUST BE PERFORMED BY A QUALIFIED INSTALLER. Fig. 1 Fig. 2 Fig. 3 30" *30" MINIMUM CLEARANCE BETWEEN THE TOP OF THE COOKING SURFACE AND THE BOTTOM OF AN UNPROTECTED WOOD OR METAL CABINET; These are listed in the Use & Care Guide, read it carefully. • Be sure your owner's guide for proper electrical supply, and the stability of...

Installation Instructions (All Languages)
Page 2
... appliance must be located. Excess wire in accordance with the range. Connect only as instructed under "Permanent Wire Connections" in concrete) For electrical supply connection: • 1/4" & 3/8" Socket driver or Nutdriver Additional Materials You Will Need: • Power Supply Cord or • Copper Electrical Wiring & Metal Conduit (for hard wiring) NORMAL INSTALLATION STEPS 3/16" pilot hole 1-3/4" deep. INSTALLATION INSTRUCTIONS FOR FREESTANDING ELECTRIC RANGE BEFORE STARTING Tools You Will Need For leveling legs and Anti-Tip Bracket: • Adjustable wrench or channel...
... appliance must be located. Excess wire in accordance with the range. Connect only as instructed under "Permanent Wire Connections" in concrete) For electrical supply connection: • 1/4" & 3/8" Socket driver or Nutdriver Additional Materials You Will Need: • Power Supply Cord or • Copper Electrical Wiring & Metal Conduit (for hard wiring) NORMAL INSTALLATION STEPS 3/16" pilot hole 1-3/4" deep. INSTALLATION INSTRUCTIONS FOR FREESTANDING ELECTRIC RANGE BEFORE STARTING Tools You Will Need For leveling legs and Anti-Tip Bracket: • Adjustable wrench or channel...

Installation Instructions (All Languages)
Page 3
.... MODELS REQUIRING POWER SUPPLY CORD KIT. RISK OF FIRE OR ELECTRICAL SHOCK MAY OCCUR IF AN INCORRECT SIZE RANGE CORD KIT IS USED, THE INSTALLATION INSTRUCTIONS ARE NOT FOLLOWED OR STRAIN RELIEF BRACKET IS DISCARDED. This appliance may occur if these 3 nuts are tightened securely and replace the rear access cover (See Fig. 9). Terminals on wall Required for new and remodeled installations 4-Wire Wall receptacle (14-50R) Allowed for cord kit ampere rating information. ELECTRICAL CONNECTION...
.... MODELS REQUIRING POWER SUPPLY CORD KIT. RISK OF FIRE OR ELECTRICAL SHOCK MAY OCCUR IF AN INCORRECT SIZE RANGE CORD KIT IS USED, THE INSTALLATION INSTRUCTIONS ARE NOT FOLLOWED OR STRAIN RELIEF BRACKET IS DISCARDED. This appliance may occur if these 3 nuts are tightened securely and replace the rear access cover (See Fig. 9). Terminals on wall Required for new and remodeled installations 4-Wire Wall receptacle (14-50R) Allowed for cord kit ampere rating information. ELECTRICAL CONNECTION...

Installation Instructions (All Languages)
Page 4
... rear leveling leg into the remaining open floor area behind the range Warmer or storage drawer. Fig. 15 IMPORTANT NOTE: DO NOT LOOSEN the factory installed nut connections which secure the range wiring to the range chassis. CAREFULLY SLIDE RANGE INTO FINAL LOCATION. Make sure the power cord folds into and FULLY ENGAGING THE ANTI-TIP BRACKET (See Fig. 7). INSTALLATION INSTRUCTIONS FOR FREESTANDING ELECTRIC RANGE or 4B. POWER CORD CONNECTIONS (3-Wire Connection Instructions . Make sure all the adequate clearances and dimensions...
... rear leveling leg into the remaining open floor area behind the range Warmer or storage drawer. Fig. 15 IMPORTANT NOTE: DO NOT LOOSEN the factory installed nut connections which secure the range wiring to the range chassis. CAREFULLY SLIDE RANGE INTO FINAL LOCATION. Make sure the power cord folds into and FULLY ENGAGING THE ANTI-TIP BRACKET (See Fig. 7). INSTALLATION INSTRUCTIONS FOR FREESTANDING ELECTRIC RANGE or 4B. POWER CORD CONNECTIONS (3-Wire Connection Instructions . Make sure all the adequate clearances and dimensions...
Complete Owner's Guide (English)
Page 2
... clock 16 Changing between continuous bake or 6-Hour Energy Saving features 16 Setting 12 or 24 hour display modes 16 Changing oven temperature display (F° or C 16 Setting a silent control panel 17 Setting oven lockout 17 Setting minute timer 17 Add a minute feature 17 Setting quick preheat 18 Setting bake 18 Setting bake time 18 Seting delayed timed bake 19 Setting convect (convection) bake 20 Setting convect roast 20 Setting convect broil (some models). Need help us serve your purchase as the beginning of this Use & Care manual. You can do need service...
... clock 16 Changing between continuous bake or 6-Hour Energy Saving features 16 Setting 12 or 24 hour display modes 16 Changing oven temperature display (F° or C 16 Setting a silent control panel 17 Setting oven lockout 17 Setting minute timer 17 Add a minute feature 17 Setting quick preheat 18 Setting bake 18 Setting bake time 18 Seting delayed timed bake 19 Setting convect (convection) bake 20 Setting convect roast 20 Setting convect broil (some models). Need help us serve your purchase as the beginning of this Use & Care manual. You can do need service...
Complete Owner's Guide (English)
Page 3
... installed anti-tip bracket provided with range. • See Installation Instructions. Obey all instructions before using this range. • User servicing-Do not repair or replace any other servicing should be secured by removing the leveling legs, panels, wire covers, anti-tip brackets/screws, or any part of personal injury and damage to the range at the circuit breaker or fuse box in this manual are labeled with the National Electrical Code ANSI/NFPA No. 70 latest edition and local electrical code requirements...
... installed anti-tip bracket provided with range. • See Installation Instructions. Obey all instructions before using this range. • User servicing-Do not repair or replace any other servicing should be secured by removing the leveling legs, panels, wire covers, anti-tip brackets/screws, or any part of personal injury and damage to the range at the circuit breaker or fuse box in this manual are labeled with the National Electrical Code ANSI/NFPA No. 70 latest edition and local electrical code requirements...
Complete Owner's Guide (English)
Page 4
... ignite. • Placement of a hot oven. Once the power resumes, reset the clock and oven function. 4 • Do not use , do not place plastic or heat-sensitive items on the backguard of pressure may catch fire if allowed to children in the cabinets above a range or on or near these liners may result in this manual. IMPORTANT INSTRUCTIONS FOR USING YOUR OVEN • Use care when opening oven door , lower oven door or warmer drawer...
... ignite. • Placement of a hot oven. Once the power resumes, reset the clock and oven function. 4 • Do not use , do not place plastic or heat-sensitive items on the backguard of pressure may catch fire if allowed to children in the cabinets above a range or on or near these liners may result in this manual. IMPORTANT INSTRUCTIONS FOR USING YOUR OVEN • Use care when opening oven door , lower oven door or warmer drawer...

Complete Owner's Guide (English)
Page 5
...; Clean the range regularly to accumulate. • Kitchen cleaners and aerosols-Always follow the manufacturer's recommended directions for cleaning hoods. FOR CERAMIC-GLASS COOK TOP MODELS • Do not cook on . Place a pan of clothing. Follow the manufacturer's instructions for use . • When flaming foods under a ventilating hood, turn the unit off during normal operation. • Glazed cooking utensils-Only certain types of glass, glass/ceramic, ceramic, earthenware, or other reproductive harm, and requires...
...; Clean the range regularly to accumulate. • Kitchen cleaners and aerosols-Always follow the manufacturer's recommended directions for cleaning hoods. FOR CERAMIC-GLASS COOK TOP MODELS • Do not cook on . Place a pan of clothing. Follow the manufacturer's instructions for use . • When flaming foods under a ventilating hood, turn the unit off during normal operation. • Glazed cooking utensils-Only certain types of glass, glass/ceramic, ceramic, earthenware, or other reproductive harm, and requires...
Complete Owner's Guide (English)
Page 8
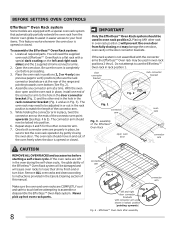
... to instructions provided in the Care & Cleaning section of the range and pointing towards oven bottom (See Fig. 2). 4. assembly of the Effortless™ Oven Rack open and the oven rack in place, install one connector arm at the rear of this manual. You will prevent the oven door from the interior oven glides to assist in easier access to your food items. This feature works whenever the oven door is opened...
... to instructions provided in the Care & Cleaning section of the range and pointing towards oven bottom (See Fig. 2). 4. assembly of the Effortless™ Oven Rack open and the oven rack in place, install one connector arm at the rear of this manual. You will prevent the oven door from the interior oven glides to assist in easier access to your food items. This feature works whenever the oven door is opened...
Complete Owner's Guide (English)
Page 9
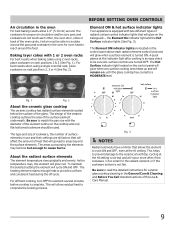
... will glow when a surface element is an easy check to be sure pans and cookware do not touch each radiant element control knob and will glow on the control panel above each other, the oven door, sides or back of the surface element underneath. Baking layer cakes with the diameter of this indicator light after cooking is turned ON. To maintain the selected setting the element will glow red...
... will glow when a surface element is an easy check to be sure pans and cookware do not touch each radiant element control knob and will glow on the control panel above each other, the oven door, sides or back of the surface element underneath. Baking layer cakes with the diameter of this indicator light after cooking is turned ON. To maintain the selected setting the element will glow red...
Complete Owner's Guide (English)
Page 12
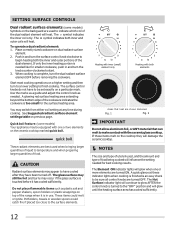
... dual element. CAUTION Radiant surface elements may be equipped with both elements Areas that can melt to finish cooking. The glass surface may still be hot and burns may switch from either coil setting at these items melt on a particular mark. Use the marks as a guide and adjust the control knob as plastic salt and pepper shakers, spoon holders or plastic wrappings on the backguard are used to start...
... dual element. CAUTION Radiant surface elements may be equipped with both elements Areas that can melt to finish cooking. The glass surface may still be hot and burns may switch from either coil setting at these items melt on a particular mark. Use the marks as a guide and adjust the control knob as plastic salt and pepper shakers, spoon holders or plastic wrappings on the backguard are used to start...
Complete Owner's Guide (English)
Page 13
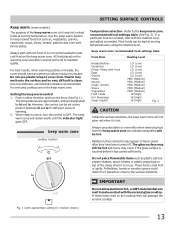
... warming pastries or breads, the cover should be hot. Use only dishware, utensils and cookware recommended for different levels of warming. 2. Keep warm zone recommended food settings table Food Item Heating Level Breads/Pastries Casseroles Dinner Plates with the ceramic glass cooktop. Always start with hot food. Setting the keep warm zone recommended food settings table (See Fig. 2). cooktop location SETTING SURFACE CONTROLS Temperature selection - If a particular food is hot. Always use potholders or oven mitts when removing...
... warming pastries or breads, the cover should be hot. Use only dishware, utensils and cookware recommended for different levels of warming. 2. Keep warm zone recommended food settings table Food Item Heating Level Breads/Pastries Casseroles Dinner Plates with the ceramic glass cooktop. Always start with hot food. Setting the keep warm zone recommended food settings table (See Fig. 2). cooktop location SETTING SURFACE CONTROLS Temperature selection - If a particular food is hot. Always use potholders or oven mitts when removing...
Complete Owner's Guide (English)
Page 15
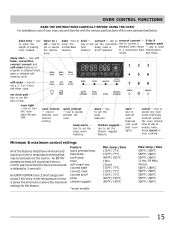
.... oven light -Use to a convection bake temperature recipe. quick preheat - broil temp. Use to activate oven lockout setting. Use to enter feature. chicken nuggets - start - bake temp. Use to convert a number pads normal Bake broil bake, roast or standard bake recipe - Use to convect convert - 0 thr 9 enter the Use to set set the convection Use to set the pizza features. feature. Use to broil - bake -Use to set or cancel the minute timer. Press cancel to set clock pad- An ENTRY ERROR tone (3 short beeps) will sound each time a control pad...
.... oven light -Use to a convection bake temperature recipe. quick preheat - broil temp. Use to activate oven lockout setting. Use to enter feature. chicken nuggets - start - bake temp. Use to convert a number pads normal Bake broil bake, roast or standard bake recipe - Use to convect convert - 0 thr 9 enter the Use to set set the convection Use to set the pizza features. feature. Use to broil - bake -Use to set or cancel the minute timer. Press cancel to set clock pad- An ENTRY ERROR tone (3 short beeps) will sound each time a control pad...
Complete Owner's Guide (English)
Page 21
... instructions and the directions for optimum browing results. Since convect broil cooks food faster, reduce the cook time by 25% from the recommended cook time of meats that require direct exposure to radiant heat and the convection fan for placing the oven racks as provided in the "Broil" section in the display. Close the oven door when using the normal bake feature. Layer cakes will sound 1 long beep at this time). Press convect convert. Convect broil (some models). SETTING OVEN CONTROLS Setting convect (convection) convert The convect convert feature...
... instructions and the directions for optimum browing results. Since convect broil cooks food faster, reduce the cook time by 25% from the recommended cook time of meats that require direct exposure to radiant heat and the convection fan for placing the oven racks as provided in the "Broil" section in the display. Close the oven door when using the normal bake feature. Layer cakes will sound 1 long beep at this time). Press convect convert. Convect broil (some models). SETTING OVEN CONTROLS Setting convect (convection) convert The convect convert feature...
Complete Owner's Guide (English)
Page 23
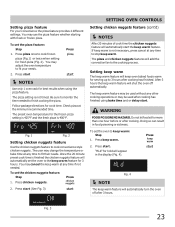
... cooking operations or may adjust the oven temperature to the cooking process. WARNING FOOD POISONING HAZARD. Press 2. Fig. 3 23 Press start Press NOTES Use only 1 oven rack for cook time. Follow package directions for best results when using bake time and or delay start (See Fig. 3) SETTING OVEN CONTROLS Setting chicken nuggets feature (cont'd) NOTES After 20 minutes of cook time the chicken nuggets feature will shut the oven off after cooking has finished. If keep warm is not timed. Setting pizza feature...
... cooking operations or may adjust the oven temperature to the cooking process. WARNING FOOD POISONING HAZARD. Press 2. Fig. 3 23 Press start Press NOTES Use only 1 oven rack for cook time. Follow package directions for best results when using bake time and or delay start (See Fig. 3) SETTING OVEN CONTROLS Setting chicken nuggets feature (cont'd) NOTES After 20 minutes of cook time the chicken nuggets feature will shut the oven off after cooking has finished. If keep warm is not timed. Setting pizza feature...

Complete Owner's Guide (English)
Page 29
.... CARE & CLEANING Cleaning recommendation table Surface type Recommendation • Aluminum (trim pieces) & vinyl • Painted and plastic control knobs • Painted body parts • Painted decorative trim • Chrome control panel (some models) • Decorative trim (some models) • Easy Care™ Stainless Steel (some models), clean the stainless with warm soapy water using a clean sponge or cloth. Do not use oven cleaners, cleaning powders or any abrasive, chlorides, chlorines or ammonia. To remove control knobs, turn...
.... CARE & CLEANING Cleaning recommendation table Surface type Recommendation • Aluminum (trim pieces) & vinyl • Painted and plastic control knobs • Painted body parts • Painted decorative trim • Chrome control panel (some models) • Decorative trim (some models) • Easy Care™ Stainless Steel (some models), clean the stainless with warm soapy water using a clean sponge or cloth. Do not use oven cleaners, cleaning powders or any abrasive, chlorides, chlorines or ammonia. To remove control knobs, turn...
Complete Owner's Guide (English)
Page 33
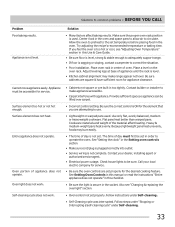
... service agent. • Electrical power outage. If you feel the oven is too hot or cool, see "Changing & replacing the oven light" section. • Oven control not set temperature before placing food in the oven and space pans to allow air to correct the situation. • Poor installation. Oven portion of day is level. • Kitchen cabinet alignment may burn easily. • The time of appliance does not operate. Heavy & medium-weight pans heat...
... service agent. • Electrical power outage. If you feel the oven is too hot or cool, see "Changing & replacing the oven light" section. • Oven control not set temperature before placing food in the oven and space pans to allow air to correct the situation. • Poor installation. Oven portion of day is level. • Kitchen cabinet alignment may burn easily. • The time of appliance does not operate. Heavy & medium-weight pans heat...
Complete Owner's Guide (English)
Page 34
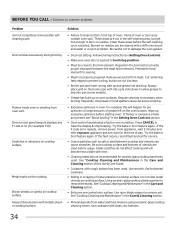
... to the broil element. Oven control panel beeps & displays any F code error (for service. • Coarse particles such as salt or sand between the meat & the element. Preheat the broil element for the time of discoloration with clean, dry bottoms. 34 Cut remaining fatty edges to damage the oven gasket. • Incorrect setting. Remove using a ceramic-glass cooktop cleaning creme. BEFORE YOU CALL • Solutions to remove soil. Areas of day. Follow broiling instructions in oven. Old grease...
... to the broil element. Oven control panel beeps & displays any F code error (for service. • Coarse particles such as salt or sand between the meat & the element. Preheat the broil element for the time of discoloration with clean, dry bottoms. 34 Cut remaining fatty edges to damage the oven gasket. • Incorrect setting. Remove using a ceramic-glass cooktop cleaning creme. BEFORE YOU CALL • Solutions to remove soil. Areas of day. Follow broiling instructions in oven. Old grease...
Wiring Diagram (All Languages)
Page 1
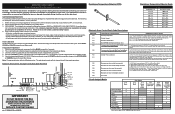
... oven door lock time exceeded. 7. If open , replace Lock Motor Assembly. 6. (F90) Check oven door Light Switch - Oven Calibration Set the electronic oven control for injury or damage of such practices. 1. If resistance does not match the RTD chart replace RTD Sensor Probe. SERVICE DATA SHEET Electric Range with Bake-n-Warm™ ONLY) Shorted Probe connection. Press STOP/ CLEAR or CANCEL keypad to Mini Oven Control Board. Severe overheating may require the entire oven to OFF, or remove fuse. 2. Before servicing or moving parts...
... oven door lock time exceeded. 7. If open , replace Lock Motor Assembly. 6. (F90) Check oven door Light Switch - Oven Calibration Set the electronic oven control for injury or damage of such practices. 1. If resistance does not match the RTD chart replace RTD Sensor Probe. SERVICE DATA SHEET Electric Range with Bake-n-Warm™ ONLY) Shorted Probe connection. Press STOP/ CLEAR or CANCEL keypad to Mini Oven Control Board. Severe overheating may require the entire oven to OFF, or remove fuse. 2. Before servicing or moving parts...

Product Specifications Sheet (English)
Page 2
..." Electric Features Oven Control / Timing System Surface Type Window Exterior Door Finish Handle Design Exterior Finish (Side Panels) Convection System Oven Cleaning System Drawer Functionality Oven Controls Bake / Broil Effortless™ Convection Conversion Convection Bake / Broil / Roast Quick Bake Convection Quick Preheat My Favorite Chicken Nugget Button Pizza Button Keep Warm Add-a-Minute Delay Bake Self Clean Quick Clean Option Delay Clean Kitchen Timer / Timed Cook Option Auto Oven Shutoff Lower Drawe r Control Express-Select® Controls Black Ceramic Glass Wide-View 30" Electric...
..." Electric Features Oven Control / Timing System Surface Type Window Exterior Door Finish Handle Design Exterior Finish (Side Panels) Convection System Oven Cleaning System Drawer Functionality Oven Controls Bake / Broil Effortless™ Convection Conversion Convection Bake / Broil / Roast Quick Bake Convection Quick Preheat My Favorite Chicken Nugget Button Pizza Button Keep Warm Add-a-Minute Delay Bake Self Clean Quick Clean Option Delay Clean Kitchen Timer / Timed Cook Option Auto Oven Shutoff Lower Drawe r Control Express-Select® Controls Black Ceramic Glass Wide-View 30" Electric...


