Installation Instructions (All Languages)
Page 1
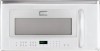
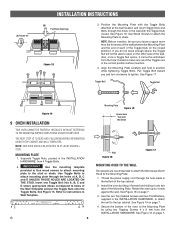
...Printed in the gaps. Two people are recommended to a minimum of one of all instructions thoroughly before the Over the Range Microwave Oven is required, its installation should be attached to install this mark. It is not covered under the Warranty. • Please... above the unit. The center of this product. • If a new electrical outlet is installed. INSTALLATION INSTRUCTIONS Over The Range Microwave Oven BEFORE YOU BEGIN Read these instructions completely and carefully. • IMPORTANT Save these instructions for future reference. • SKILL LEVEL -...
...Printed in the gaps. Two people are recommended to a minimum of one of all instructions thoroughly before the Over the Range Microwave Oven is required, its installation should be attached to install this mark. It is not covered under the Warranty. • Please... above the unit. The center of this product. • If a new electrical outlet is installed. INSTALLATION INSTRUCTIONS Over The Range Microwave Oven BEFORE YOU BEGIN Read these instructions completely and carefully. • IMPORTANT Save these instructions for future reference. • SKILL LEVEL -...
Installation Instructions (All Languages)
Page 2
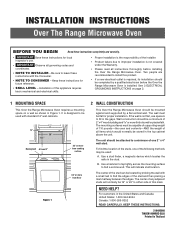
INSTALLATION INSTRUCTIONS 3 ELECTRICAL GROUNDING INSTRUCTIONS This appliance must be located inside the cabinet directly above the Microwave Oven mounting location as shown in Figure 2. In the event of an electrical short circuit, grounding reduces risk of electric shock. WARNING - DO ...flow and are made securely. Check that is too short, have any liability for Power Cord 90° Elbow (25 ft.) 45° Elbow (5 ft.) Wall cap (40 ft.) Roof cap (24 ft.) Figure 3 Figure 2 E 2 It must be plugged into a wall receptacle that all straight duct sections. If the power ...
INSTALLATION INSTRUCTIONS 3 ELECTRICAL GROUNDING INSTRUCTIONS This appliance must be located inside the cabinet directly above the Microwave Oven mounting location as shown in Figure 2. In the event of an electrical short circuit, grounding reduces risk of electric shock. WARNING - DO ...flow and are made securely. Check that is too short, have any liability for Power Cord 90° Elbow (25 ft.) 45° Elbow (5 ft.) Wall cap (40 ft.) Roof cap (24 ft.) Figure 3 Figure 2 E 2 It must be plugged into a wall receptacle that all straight duct sections. If the power ...
Installation Instructions (All Languages)
Page 4
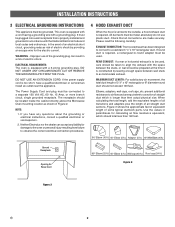
... OVEN FOR INSTALLATION) This Over the Range Microwave Oven is designed for adaptation to three types of the Charcoal Filters, which have already been installed in the oven. RECIRCULATING - Recirculating requires the use of hood ventilation systems. Select the type required for further procedures. Oven Light Cover Oven Light...VENTED, DUCTLESS OPERATION The unit is not required for recirculating. Save 3 screws to the Fan Cover Bracket by sliding it into the oven. Rotate the Hood Fan Unit 180˚ so that the Fan Blade Openings are facing the back of cavity. See Figure 9C ...
... OVEN FOR INSTALLATION) This Over the Range Microwave Oven is designed for adaptation to three types of the Charcoal Filters, which have already been installed in the oven. RECIRCULATING - Recirculating requires the use of hood ventilation systems. Select the type required for further procedures. Oven Light Cover Oven Light...VENTED, DUCTLESS OPERATION The unit is not required for recirculating. Save 3 screws to the Fan Cover Bracket by sliding it into the oven. Rotate the Hood Fan Unit 180˚ so that the Fan Blade Openings are facing the back of cavity. See Figure 9C ...
Installation Instructions (All Languages)
Page 6
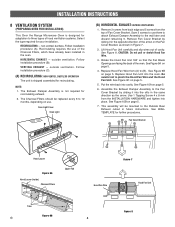
...). See Figure 19 on the other side of the wall. therefore make sure all of the oven to the Mounting Plate. 1. Secure the bottom of the Toggles are recommended to attach the Microwave Oven/ Hood to the Mounting Plate by tilting it forward and sliding it onto two tabs of the... top cabinet. 2. NOTE: THIS OVEN SHOULD BE ATTACHED TO AT LEAST ONE WALL STUD. Separate Toggle Nuts, packed in...
...). See Figure 19 on the other side of the wall. therefore make sure all of the oven to the Mounting Plate. 1. Secure the bottom of the Toggles are recommended to attach the Microwave Oven/ Hood to the Mounting Plate by tilting it forward and sliding it onto two tabs of the... top cabinet. 2. NOTE: THIS OVEN SHOULD BE ATTACHED TO AT LEAST ONE WALL STUD. Separate Toggle Nuts, packed in...
Complete Owner's Guide (English)
Page 1
All about the Use &Care of your Microwave Oven 316495054 (January 2009) TABLE OF CONTENTS WELCOME & CONGRATULATION 2 IMPORTANT SAFETY INSTRUCTIONS 2 PART NAMES 8 BEFORE OPERATING 10 MANUAL COOKING 11 SENSOR COOKING 12 AUTO COOKING 16 CONVENIENT FEATURES 23 CLEANING AND CARE 26 SERVICE CALL CHECK 28 SPECIFICATIONS 28 WARRANTY 29 www.frigidaire.com USA 1-800-944-9044 www.frigidaire.ca Canada 1-800-265-8352
All about the Use &Care of your Microwave Oven 316495054 (January 2009) TABLE OF CONTENTS WELCOME & CONGRATULATION 2 IMPORTANT SAFETY INSTRUCTIONS 2 PART NAMES 8 BEFORE OPERATING 10 MANUAL COOKING 11 SENSOR COOKING 12 AUTO COOKING 16 CONVENIENT FEATURES 23 CLEANING AND CARE 26 SERVICE CALL CHECK 28 SPECIFICATIONS 28 WARRANTY 29 www.frigidaire.com USA 1-800-944-9044 www.frigidaire.ca Canada 1-800-265-8352
Complete Owner's Guide (English)
Page 2
... qualified service personnel. 2 immediately contact the dealer (or builder) that sold you solve common problems that might occur. Visit the Frigidaire Web Site at 1-800-944-9044, 24 hours a day, 7 days a week. Save time and money. Check the section titled "...IMPORTANT SAFETY INSTRUCTIONS For your safety the information in the back of a new microwave oven! It is particularly important that the oven door close properly and that may occur. If you 'll enjoy your microwave oven properly. These instructions are a few things you better. At Electrolux Home Products...
... qualified service personnel. 2 immediately contact the dealer (or builder) that sold you solve common problems that might occur. Visit the Frigidaire Web Site at 1-800-944-9044, 24 hours a day, 7 days a week. Save time and money. Check the section titled "...IMPORTANT SAFETY INSTRUCTIONS For your safety the information in the back of a new microwave oven! It is particularly important that the oven door close properly and that may occur. If you 'll enjoy your microwave oven properly. These instructions are a few things you better. At Electrolux Home Products...
Complete Owner's Guide (English)
Page 3
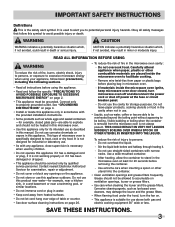
... electric shock, injury to persons, or exposure to stand in a wet basement or near water-for storage purposes. If materials inside the microwave oven to properly grounded outlet. THIS COULD RESULT IN VERY HOT LIQUIDS SUDDENLY BOILING OVER WHEN A SPOON OR OTHER UTENSIL IS INSERTED INTO THE...edge of table or counter. • See door surface cleaning instructions on page 4. • Install or locate this appliance only in microwave oven. - IMPORTANT SAFETY INSTRUCTIONS Definitions This is necessary when used to alert you to avoid possible injury or death. Obey all instructions...
... electric shock, injury to persons, or exposure to stand in a wet basement or near water-for storage purposes. If materials inside the microwave oven to properly grounded outlet. THIS COULD RESULT IN VERY HOT LIQUIDS SUDDENLY BOILING OVER WHEN A SPOON OR OTHER UTENSIL IS INSERTED INTO THE...edge of table or counter. • See door surface cleaning instructions on page 4. • Install or locate this appliance only in microwave oven. - IMPORTANT SAFETY INSTRUCTIONS Definitions This is necessary when used to alert you to avoid possible injury or death. Obey all instructions...
Complete Owner's Guide (English)
Page 4
...Installation Instructions for the power supply. The Power Supply Cord and plug must be located inside the cabinet directly above the Microwave Oven mounting location as misaligned or bent door, damaged door seals and sealing surfaces, broken or loose door hinges and latches and... or electrical instructions, consult a qualified electrician or service person. 2. It is recommended that a separate circuit serving only the microwave oven be plugged into a wall receptacle that is located on plastic foam pad. The receptacle should be plugged into a wall receptacle that there...
...Installation Instructions for the power supply. The Power Supply Cord and plug must be located inside the cabinet directly above the Microwave Oven mounting location as misaligned or bent door, damaged door seals and sealing surfaces, broken or loose door hinges and latches and... or electrical instructions, consult a qualified electrician or service person. 2. It is recommended that a separate circuit serving only the microwave oven be plugged into a wall receptacle that is located on plastic foam pad. The receptacle should be plugged into a wall receptacle that there...
Complete Owner's Guide (English)
Page 5
...or more of the following: • Reorient the receiving antenna of the radio or television. • Relocate the microwave oven with the manufacturer's instructions, may cause interference to correct such interference. 5 The manufacturer is encouraged to try to ...correct the interference by unauthorized modification to this microwave oven. IMPORTANT SAFETY INSTRUCTIONS Federal Communications Commission Radio Frequency Interference Statement (U.S.A. It is in a particular installation. However, there is...
...or more of the following: • Reorient the receiving antenna of the radio or television. • Relocate the microwave oven with the manufacturer's instructions, may cause interference to correct such interference. 5 The manufacturer is encouraged to try to ...correct the interference by unauthorized modification to this microwave oven. IMPORTANT SAFETY INSTRUCTIONS Federal Communications Commission Radio Frequency Interference Statement (U.S.A. It is in a particular installation. However, there is...
Complete Owner's Guide (English)
Page 6
... to prevent boilovers. • Heat or cook in closed glass jars or air tight containers. • Can in the microwave oven. In using the microwave oven at pieces of aluminum foil any thin areas of meat or poultry to prevent overcooking before and after heating to avoid "eruption... the food to release steam and avoid burns. • Stir liquids briskly before dense, thick areas are cooked thoroughly. • Stir foods from microwave oven and stir, if possible. Doneness signs include: - FOOD Eggs, sausages, nuts, seeds, fruits & vegetables DO • Puncture egg yolks before ...
... to prevent boilovers. • Heat or cook in closed glass jars or air tight containers. • Can in the microwave oven. In using the microwave oven at pieces of aluminum foil any thin areas of meat or poultry to prevent overcooking before and after heating to avoid "eruption... the food to release steam and avoid burns. • Stir liquids briskly before dense, thick areas are cooked thoroughly. • Stir foods from microwave oven and stir, if possible. Doneness signs include: - FOOD Eggs, sausages, nuts, seeds, fruits & vegetables DO • Puncture egg yolks before ...
Complete Owner's Guide (English)
Page 7
...utensils to them : • wood, straw, wicker DO NOT USE • metal pans and bakeware • dishes with any damage to the microwave oven when accessories are cooked to the United States Department of overcooking food. • NEVER use potholders to use can cause arcing and/or fi...res. • Use care when removing items from walls, ceiling and door. 7 Enough heat from the face. • Stay near the microwave oven while it is kept near to cause skin burns. • Avoid steam burns by an adult is no time should use metal twist ties. DO...
...utensils to them : • wood, straw, wicker DO NOT USE • metal pans and bakeware • dishes with any damage to the microwave oven when accessories are cooked to the United States Department of overcooking food. • NEVER use potholders to use can cause arcing and/or fi...res. • Use care when removing items from walls, ceiling and door. 7 Enough heat from the face. • Stay near the microwave oven while it is kept near to cause skin burns. • Avoid steam burns by an adult is no time should use metal twist ties. DO...
Complete Owner's Guide (English)
Page 8
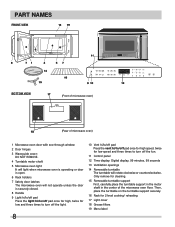
PART NAMES BOTTOM VIEW (Front of microwave oven) (Rear of the microwave oven floor. Only remove for low speed and three times to turn off the light. 8 10 Vent hi/lo/off pad Press the vent hi/lo/... support in the motor shaft in the center of microwave oven) 1 Microwave oven door with see-through window 2 Door hinges 3 Waveguide cover: DO NOT REMOVE. 4 Turntable motor shaft 5 Microwave oven light It will light when microwave oven is operating or door is open. 6 Rack holders 7 Safety door latches The microwave oven will not operate unless the door is securely closed...
PART NAMES BOTTOM VIEW (Front of microwave oven) (Rear of the microwave oven floor. Only remove for low speed and three times to turn off the light. 8 10 Vent hi/lo/off pad Press the vent hi/lo/... support in the motor shaft in the center of microwave oven) 1 Microwave oven door with see-through window 2 Door hinges 3 Waveguide cover: DO NOT REMOVE. 4 Turntable motor shaft 5 Microwave oven light It will light when microwave oven is operating or door is open. 6 Rack holders 7 Safety door latches The microwave oven will not operate unless the door is securely closed...
Complete Owner's Guide (English)
Page 10
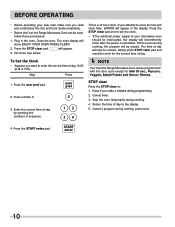
...during programming. 2. If you want to your new oven make a mistake during cooking, the program will intermittently show ENJOY YOUR OVEN PRESS CLEAR. 2. If this Use and Care Guide completely. • Before the Over the Range Microwave Oven can be interrupted, the display will be erased....30 (A.M or P.M.). Cancel timer. 3. See below. Press the user pref pad. 2. START enter 10 BEFORE OPERATING • Before operating your microwave oven should be programmed with the door open except for the correct time of day to the display. 5. Close the door. Cancel a program during ...
...during programming. 2. If you want to your new oven make a mistake during cooking, the program will intermittently show ENJOY YOUR OVEN PRESS CLEAR. 2. If this Use and Care Guide completely. • Before the Over the Range Microwave Oven can be interrupted, the display will be erased....30 (A.M or P.M.). Cancel timer. 3. See below. Press the user pref pad. 2. START enter 10 BEFORE OPERATING • Before operating your microwave oven should be programmed with the door open except for the correct time of day to the display. 5. Close the door. Cancel a program during ...
Complete Owner's Guide (English)
Page 11
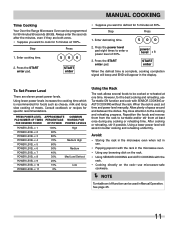
... the defrost time is used in better cooking and reheating uniformity. Press the START enter pad. Avoid: • Storing the rack in the microwave oven when not in the microwave oven. • Using any cooking or reheating time. After cooking or reheating, stir if possible. Allow plenty of space around and between the dishes... rack. • Using SENSOR COOKING and AUTO COOKING with SENSOR COOKING or AUTO COOKING without the rack. MANUAL COOKING Time Cooking Your Over the Range Microwave Oven can be programmed for 99 minutes 99 seconds (99.99).
... the defrost time is used in better cooking and reheating uniformity. Press the START enter pad. Avoid: • Storing the rack in the microwave oven when not in the microwave oven. • Using any cooking or reheating time. After cooking or reheating, stir if possible. Allow plenty of space around and between the dishes... rack. • Using SENSOR COOKING and AUTO COOKING with SENSOR COOKING or AUTO COOKING without the rack. MANUAL COOKING Time Cooking Your Over the Range Microwave Oven can be programmed for 99 minutes 99 seconds (99.99).
Complete Owner's Guide (English)
Page 12
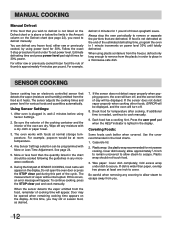
...Sensor cooking has an electronic controlled sensor that detects the vapor (moisture and humidity) emitted from the plastic in order to place in a microwave-safe dish. The oven works with a dry cloth or paper towel. 3. For example, popcorn would be programmed with More or Less Time Adjustment. Do not ...needed, continue to cook manually. 9. If this time, you may be displayed, and the oven will appear. If food is not defrosted at least one inch to cover. Be careful when removing any microwave cookbook. 6. MANUAL COOKING Manual Defrost If the food that you wish to defrost is not ...
...Sensor cooking has an electronic controlled sensor that detects the vapor (moisture and humidity) emitted from the plastic in order to place in a microwave-safe dish. The oven works with a dry cloth or paper towel. 3. For example, popcorn would be programmed with More or Less Time Adjustment. Do not ...needed, continue to cook manually. 9. If this time, you may be displayed, and the oven will appear. If food is not defrosted at least one inch to cover. Be careful when removing any microwave cookbook. 6. MANUAL COOKING Manual Defrost If the food that you wish to defrost is not ...
Complete Owner's Guide (English)
Page 23
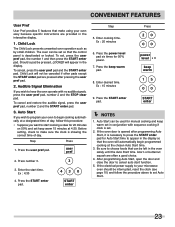
...day, follow the procedure above to set , press the user pref pad, the number 1 and then press the START enter pad. The oven can be canceled if other pads except the START enter pad are pressed after programming Auto Start, it is deactivated or locked. Audible Signal... To cancel and restore the audible signal, press the user pref pad, number 2 and the START enter pad. 3. Before setting, check to program your microwave oven should be pressed, LOCKED will automatically begin cooking automatically at a designated time of day. Step Press 1. Ex : 20 minutes 6. Be sure to cancel ...
...day, follow the procedure above to set , press the user pref pad, the number 1 and then press the START enter pad. The oven can be canceled if other pads except the START enter pad are pressed after programming Auto Start, it is deactivated or locked. Audible Signal... To cancel and restore the audible signal, press the user pref pad, number 2 and the START enter pad. 3. Before setting, check to program your microwave oven should be pressed, LOCKED will automatically begin cooking automatically at a designated time of day. Step Press 1. Ex : 20 minutes 6. Be sure to cancel ...
Complete Owner's Guide (English)
Page 25
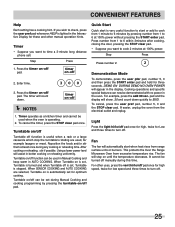
... the turntable's rotating are selected, Turntable on -off is set for Low and three times to turn off. 25 Turntable on is lighted in the oven. Step Press Press number 2. 2 Demonstration Mode To demonstrate, press the user pfer pad, number 5, 0 and then press the START enter pad and hold for ... will show .30 and count down . For example, press the add 30 sec. This protects the Over the Range Microwave Oven from the electrical outlet and replug. timer on /off function can now be turned off manually during Manual Cooking and cooking programming by pressing number ...
... the turntable's rotating are selected, Turntable on -off is set for Low and three times to turn off. 25 Turntable on is lighted in the oven. Step Press Press number 2. 2 Demonstration Mode To demonstrate, press the user pfer pad, number 5, 0 and then press the START enter pad and hold for ... will show .30 and count down . For example, press the add 30 sec. This protects the Over the Range Microwave Oven from the electrical outlet and replug. timer on /off function can now be turned off manually during Manual Cooking and cooking programming by pressing number ...
Complete Owner's Guide (English)
Page 26
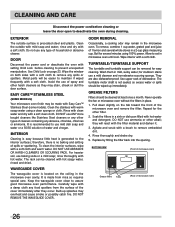
... after they will be made from the surface of spray and other filter. 2. therefore, there is no baking and setting of microwave oven) 26 WAVEGUIDE COVER The waveguide cover is made with a soft cloth to remove any abrasive, chlorides, chlorines or ammonia. Carefully ...REMOVE THE WAVEGUIDE COVER. Boil for the other harsh cleaners as they may remain in the microwave oven cavity. Never operate the fan or microwave oven without the filters in microwave oven until cool. CLEANING AND CARE Disconnect the power cord before cleaning to prevent unexpected manipulation. ...
... after they will be made from the surface of spray and other filter. 2. therefore, there is no baking and setting of microwave oven) 26 WAVEGUIDE COVER The waveguide cover is made with a soft cloth to remove any abrasive, chlorides, chlorines or ammonia. Carefully ...REMOVE THE WAVEGUIDE COVER. Boil for the other harsh cleaners as they may remain in the microwave oven cavity. Never operate the fan or microwave oven without the filters in microwave oven until cool. CLEANING AND CARE Disconnect the power cord before cleaning to prevent unexpected manipulation. ...
Complete Owner's Guide (English)
Page 27
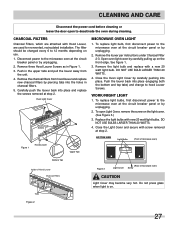
...To replace light bulbs, first disconnect power to the microwave oven at the circuit breaker panel or by unplugging. 2. BOTTOM VIEW Light Bulbs (Front of microwave oven) Bottom Tab Inside of Hood Louver Charcoal Filters Tabs Figure 3 (Rear of microwave oven) Light Cover Screw CAUTION Light Cover may become very...bottom and top tabs) and change to deactivate the oven during cleaning. Remove the light bulb and replace with screw removed at step 2. WORK/NIGHT LIGHT 1. The filter should be changed every 6 to the microwave oven at the circuit breaker panel or by piercing tabs ...
...To replace light bulbs, first disconnect power to the microwave oven at the circuit breaker panel or by unplugging. 2. BOTTOM VIEW Light Bulbs (Front of microwave oven) Bottom Tab Inside of Hood Louver Charcoal Filters Tabs Figure 3 (Rear of microwave oven) Light Cover Screw CAUTION Light Cover may become very...bottom and top tabs) and change to deactivate the oven during cleaning. Remove the light bulb and replace with screw removed at step 2. WORK/NIGHT LIGHT 1. The filter should be changed every 6 to the microwave oven at the circuit breaker panel or by piercing tabs ...
Complete Owner's Guide (English)
Page 28
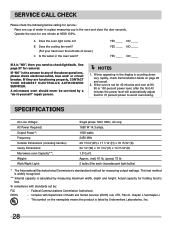
... (including handle): Cavity Dimensions: Microwave oven Capacity**: Weight: Work/Night Light: Single phase 120V, 60Hz, AC only 1650 W 14.3 amps. 1000 watts 2450 MHz 29 15/16"(W) x 17 1/16"(H) x 18 15/32"(D) 22 1/2"(W) x 10 1/16"(H) x 14 31/32"(D) 1.8 Cu.Ft. Actual capacity for holding food is...25 and cancel. 2. DHHS - See page 27 for measuring output wattage. Federal Communications Commission Authorized. A microwave oven should never be serviced by : FCC - If the oven is listed by measuring maximum width, depth and height. This test method is widely recognized. ** Internal capacity ...
... (including handle): Cavity Dimensions: Microwave oven Capacity**: Weight: Work/Night Light: Single phase 120V, 60Hz, AC only 1650 W 14.3 amps. 1000 watts 2450 MHz 29 15/16"(W) x 17 1/16"(H) x 18 15/32"(D) 22 1/2"(W) x 10 1/16"(H) x 14 31/32"(D) 1.8 Cu.Ft. Actual capacity for holding food is...25 and cancel. 2. DHHS - See page 27 for measuring output wattage. Federal Communications Commission Authorized. A microwave oven should never be serviced by : FCC - If the oven is listed by measuring maximum width, depth and height. This test method is widely recognized. ** Internal capacity ...


