Complete Owner's Guide (English)
Page 1
All about the Use &Care of your Microwave Oven 316495054 (January 2009) TABLE OF CONTENTS WELCOME & CONGRATULATION 2 IMPORTANT SAFETY INSTRUCTIONS 2 PART NAMES 8 BEFORE OPERATING 10 MANUAL COOKING 11 SENSOR COOKING 12 AUTO COOKING 16 CONVENIENT FEATURES 23 CLEANING AND CARE 26 SERVICE CALL CHECK 28 SPECIFICATIONS 28 WARRANTY 29 www.frigidaire.com USA 1-800-944-9044 www.frigidaire.ca Canada 1-800-265-8352
All about the Use &Care of your Microwave Oven 316495054 (January 2009) TABLE OF CONTENTS WELCOME & CONGRATULATION 2 IMPORTANT SAFETY INSTRUCTIONS 2 PART NAMES 8 BEFORE OPERATING 10 MANUAL COOKING 11 SENSOR COOKING 12 AUTO COOKING 16 CONVENIENT FEATURES 23 CLEANING AND CARE 26 SERVICE CALL CHECK 28 SPECIFICATIONS 28 WARRANTY 29 www.frigidaire.com USA 1-800-944-9044 www.frigidaire.ca Canada 1-800-265-8352
Complete Owner's Guide (English)
Page 2
... satisfaction is damaged. PLEASE CAREFULLY READ AND SAVE THESE INSTRUCTIONS This Use & Care Manual provides specific operating instructions for service, there are not meant to accumulate on your microwave oven properly. Model Number Serial Number Purchase Date NEED HELP? It contains instructions to... numbers is included in this manual. Or call for your new microwave oven and Thank You for future purchases. It is important not to microwave energy. If you do to providing you call Frigidaire Customer Services at : http://www.frigidaire.com Before you with the best...
... satisfaction is damaged. PLEASE CAREFULLY READ AND SAVE THESE INSTRUCTIONS This Use & Care Manual provides specific operating instructions for service, there are not meant to accumulate on your microwave oven properly. Model Number Serial Number Purchase Date NEED HELP? It contains instructions to... numbers is included in this manual. Or call for your new microwave oven and Thank You for future purchases. It is important not to microwave energy. If you do to providing you call Frigidaire Customer Services at : http://www.frigidaire.com Before you with the best...
Complete Owner's Guide (English)
Page 3
... containers -for example, closed , turn the fan on page 4. • Install or locate this manual. Connect only to persons: - Remove wire twist-ties from the microwave oven is removed from paper or plastic bags before and halfway through heating it has been damaged or ...precautions, including the following sections. • Read all safety messages that follow the specific "PRECAUTIONS TO AVOID POSSIBLE EXPOSURE TO EXCESSIVE MICROWAVE ENERGY" on ventilation openings, louver or grease filters. • Use care when cleaning the louver and the grease filters...
... containers -for example, closed , turn the fan on page 4. • Install or locate this manual. Connect only to persons: - Remove wire twist-ties from the microwave oven is removed from paper or plastic bags before and halfway through heating it has been damaged or ...precautions, including the following sections. • Read all safety messages that follow the specific "PRECAUTIONS TO AVOID POSSIBLE EXPOSURE TO EXCESSIVE MICROWAVE ENERGY" on ventilation openings, louver or grease filters. • Use care when cleaning the louver and the grease filters...
Complete Owner's Guide (English)
Page 4
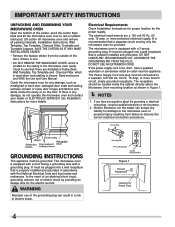
...CUT OR REMOVE THE GROUNDING PIN FROM THE PLUG. Read enclosures and SAVE the Use and Care Manual. If the power supply cord is recommended that a separate circuit serving only the microwave oven be plugged into a wall receptacle that there are a 120 volt 60 Hz, AC ..., which is properly installed and grounded. The receptacle should be plugged into a wall receptacle that is properly installed and grounded in the microwave oven cavity. GROUNDING INSTRUCTIONS This appliance must be located inside the cavity or on the ceiling in accordance with a grounding plug. If...
...CUT OR REMOVE THE GROUNDING PIN FROM THE PLUG. Read enclosures and SAVE the Use and Care Manual. If the power supply cord is recommended that a separate circuit serving only the microwave oven be plugged into a wall receptacle that there are a 120 volt 60 Hz, AC ..., which is properly installed and grounded. The receptacle should be plugged into a wall receptacle that is properly installed and grounded in the microwave oven cavity. GROUNDING INSTRUCTIONS This appliance must be located inside the cavity or on the ceiling in accordance with a grounding plug. If...
Complete Owner's Guide (English)
Page 6
... dish could be blocked. Doneness signs include: - Meat and poultry show no pinkness. - Popcorn • Use specially bagged popcorn for microwave cooking. • Listen while popping corn for doneness. Check temperature before feeding. • Heat disposable bottles. • Heat bottles with... from the center of moisture that steam escapes. IMPORTANT SAFETY INSTRUCTIONS ABOUT YOUR MICROWAVE OVEN This Use and Care Manual is opaque and flakes easily with a fork. Check it for microwave cooking principles, techniques, hints and recipes. ALWAYS have been reached.
... dish could be blocked. Doneness signs include: - Meat and poultry show no pinkness. - Popcorn • Use specially bagged popcorn for microwave cooking. • Listen while popping corn for doneness. Check temperature before feeding. • Heat disposable bottles. • Heat bottles with... from the center of moisture that steam escapes. IMPORTANT SAFETY INSTRUCTIONS ABOUT YOUR MICROWAVE OVEN This Use and Care Manual is opaque and flakes easily with a fork. Check it for microwave cooking principles, techniques, hints and recipes. ALWAYS have been reached.
Complete Owner's Guide (English)
Page 11
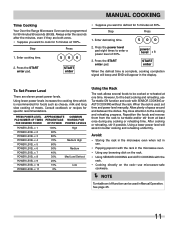
MANUAL COOKING Time Cooking Your Over the Range Microwave Oven can be programmed for specific recommendations. Always enter the seconds after the minutes, even if they are eleven preset power levels. START enter • ... AUTO COOKING with the rack. • Cooking directly on /off function can be used , set time and power level manually. Using lower power levels increases the cooking time which is used in the microwave oven. • Using any cooking or reheating time. Step Press 1. PRESS POWER LEVEL APPROXIMATE COMMON PAD NUMBER OF...
MANUAL COOKING Time Cooking Your Over the Range Microwave Oven can be programmed for specific recommendations. Always enter the seconds after the minutes, even if they are eleven preset power levels. START enter • ... AUTO COOKING with the rack. • Cooking directly on /off function can be used , set time and power level manually. Using lower power levels increases the cooking time which is used in the microwave oven. • Using any cooking or reheating time. Step Press 1. PRESS POWER LEVEL APPROXIMATE COMMON PAD NUMBER OF...
Complete Owner's Guide (English)
Page 12
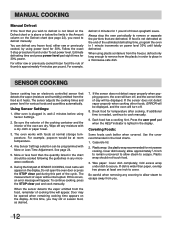
...wrap should be cooked following the guidelines in a microwave-safe dish. Be careful when removing any microwave cookbook. 6. Always stop the oven periodically to defrost manually. To continue cooking, press the STOP clear pad and cook manually. If the sensor does not detect vapor properly when...the estimated defrosting time, program the oven in the chart should not touch food. 3. For example, defrost 4 minutes for microwave cooking. For either raw or previously cooked, by using power level for various foods and quantities automatically. Any Sensor Settings ...
...wrap should be cooked following the guidelines in a microwave-safe dish. Be careful when removing any microwave cookbook. 6. Always stop the oven periodically to defrost manually. To continue cooking, press the STOP clear pad and cook manually. If the sensor does not detect vapor properly when...the estimated defrosting time, program the oven in the chart should not touch food. 3. For example, defrost 4 minutes for microwave cooking. For either raw or previously cooked, by using power level for various foods and quantities automatically. Any Sensor Settings ...
Complete Owner's Guide (English)
Page 13
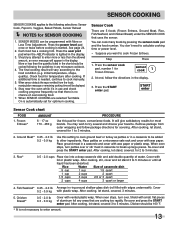
...vapor emitted from outer wrapping and follow the directions in the display. 3. Sensor Cook There are selected Turntable On is needed, continue to cook manually. 5. Press the sensor cook pad, number 1 for temperature after cooking. After cooking, let stand, covered for 1 to 5 minutes or ...underneath). sensor cook 1 2. START enter Sensor Cook chart FOOD 1. It will be 160˚F. * It is no chance of aluminum foil any microwave cookbook. 4. Place ground meat in ring around shallow glass dish (roll fillet with More or Less Time Adjustment. After cooking, let stand...
...vapor emitted from outer wrapping and follow the directions in the display. 3. Sensor Cook There are selected Turntable On is needed, continue to cook manually. 5. Press the sensor cook pad, number 1 for temperature after cooking. After cooking, let stand, covered for 1 to 5 minutes or ...underneath). sensor cook 1 2. START enter Sensor Cook chart FOOD 1. It will be 160˚F. * It is no chance of aluminum foil any microwave cookbook. 4. Place ground meat in ring around shallow glass dish (roll fillet with More or Less Time Adjustment. After cooking, let stand...
Complete Owner's Guide (English)
Page 19
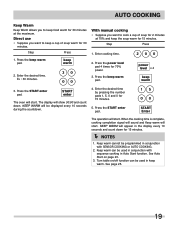
... every 10 seconds and count down . Press the START enter pad. 1 5 0 0 START Enter The operation will appear in Auto Start function. Ex : 30 minutes. 3 0 0 0 With manual cooking • Suppose you want to keep warm. power level x 4 keep warm 2. See Auto Start on /off function can be used in keep a cup of...
... every 10 seconds and count down . Press the START enter pad. 1 5 0 0 START Enter The operation will appear in Auto Start function. Ex : 30 minutes. 3 0 0 0 With manual cooking • Suppose you want to keep warm. power level x 4 keep warm 2. See Auto Start on /off function can be used in keep a cup of...
Complete Owner's Guide (English)
Page 20
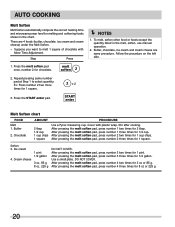
... number 2 two times for 2 tbsp. Soften 3. AUTO COOKING Melt Soften Melt Soften automatically compute the correct heating time and microwave power level for melting and softening foods shown in the melt, soften, use manual operation. 2. There are same procedure. After pressing the melt soften pad, press number 3 two times for 1/2 gallon. Follow...
... number 2 two times for 2 tbsp. Soften 3. AUTO COOKING Melt Soften Melt Soften automatically compute the correct heating time and microwave power level for melting and softening foods shown in the melt, soften, use manual operation. 2. There are same procedure. After pressing the melt soften pad, press number 3 two times for 1/2 gallon. Follow...

Complete Owner's Guide (English)
Page 22
... stand, covered, for 10 to 20 minutes. After each stage. Let stand, covered, for 5 to 60 minutes. AUTO COOKING Auto Defrost There are thawed. 4. See Manual defrost on the Defrost chart, use time and 30% power. At end, stir well and let stand, covered, for 30 to 10 minutes. After audible...
... stand, covered, for 10 to 20 minutes. After each stage. Let stand, covered, for 5 to 60 minutes. AUTO COOKING Auto Defrost There are thawed. 4. See Manual defrost on the Defrost chart, use time and 30% power. At end, stir well and let stand, covered, for 30 to 10 minutes. After audible...
Complete Owner's Guide (English)
Page 23
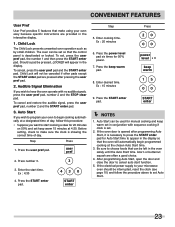
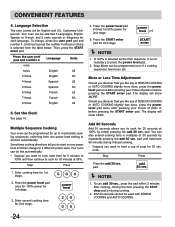
... : 15 minutes 9. If the oven door is opened after pressing the user pref pad. 2. If the electrical power supply to your oven to program your microwave oven should be used for 20 minutes on 50% and set keep warm set in the interactive display. 1. Child Lock will not be pressed, LOCKED...: 4:30 4. Press the START enter pad. 4 3 0 START enter Step 5. After programming Auto Start, open the door and close the door to start cooking a stew for manual cooking and keep warm 15 minutes at the chosen Auto Start time. 3. The oven can be left in the oven safely until the Auto Start...
... : 15 minutes 9. If the oven door is opened after pressing the user pref pad. 2. If the electrical power supply to your oven to program your microwave oven should be used for 20 minutes on 50% and set keep warm set in the interactive display. 1. Child Lock will not be pressed, LOCKED...: 4:30 4. Press the START enter pad. 4 3 0 START enter Step 5. After programming Auto Start, open the door and close the door to start cooking a stew for manual cooking and keep warm 15 minutes at the chosen Auto Start time. 3. The oven can be left in the oven safely until the Auto Start...
Complete Owner's Guide (English)
Page 24
... COOKING or AUTO COOKING slightly more done, press the power level pad once after cooking, closing the door, pressing the STOP clear pad or during manual cooking. • Suppose you to start on one power level setting to cook for up to press the power level pad. 2. Step Press 1. Should you...
... COOKING or AUTO COOKING slightly more done, press the power level pad once after cooking, closing the door, pressing the STOP clear pad or during manual cooking. • Suppose you to start on one power level setting to cook for up to press the power level pad. 2. Step Press 1. Should you...
Complete Owner's Guide (English)
Page 25
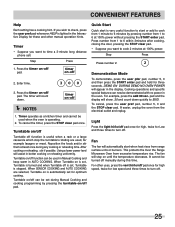
... and count down . It cannot be used , for optimum cooking. Timer operates as a kitchen timer and cannot be turned off manually during Manual Cooking and cooking programming by pressing number from range surface units or burners. Turntable on /off pad. After cooking or reheating, stir... casserole which stop the turntable's rotating are selected, Turntable on -off pad. This protects the Over the Range Microwave Oven from excessive temperature rise. For other manual operation hints. If you want to turn off pad once for high, twice for three seconds. Cooking operations and...
... and count down . It cannot be used , for optimum cooking. Timer operates as a kitchen timer and cannot be turned off manually during Manual Cooking and cooking programming by pressing number from range surface units or burners. Turntable on /off pad. After cooking or reheating, stir... casserole which stop the turntable's rotating are selected, Turntable on -off pad. This protects the Over the Range Microwave Oven from excessive temperature rise. For other manual operation hints. If you want to turn off pad once for high, twice for three seconds. Cooking operations and...


