
Complete Owner's Guide (English)
Page 1
All about the Use &Care of your Refrigerator 242063800 (November 2009) TABLE OF CONTENTS Important Safety Instructions 2 Installation 4 Door Removal Instructions 5 Handle Installation 6 Connecting Water Supply 8 Ice Service 9 Controls 9 Normal Operating Sounds and Sights 10 Care and Cleaning 11 Before you Call 12 Major Appliance Warranty 13 www.frigidaire.com USA 1-800-944-9044 www.frigidaire.ca Canada 1-800-265-8352
All about the Use &Care of your Refrigerator 242063800 (November 2009) TABLE OF CONTENTS Important Safety Instructions 2 Installation 4 Door Removal Instructions 5 Handle Installation 6 Connecting Water Supply 8 Ice Service 9 Controls 9 Normal Operating Sounds and Sights 10 Care and Cleaning 11 Before you Call 12 Major Appliance Warranty 13 www.frigidaire.com USA 1-800-944-9044 www.frigidaire.ca Canada 1-800-265-8352

Complete Owner's Guide (English)
Page 2
...destroy finishes if they come in 2 Obey all corners Electrical Power House power turned on all safety messages that follow this refrigerator. Installation Checklist Doors Handles are secure and tight Door seals completely to cabinet on all sides Freezer door... Safety • DO NOT store or use gasoline, or other hazards. • DO NOT operate the refrigerator in Ice Maker House water supply connected to refrigerator No water leaks present at all staples from the carton. DANGER DANGER indicates an imminently hazardous situation...
...destroy finishes if they come in 2 Obey all corners Electrical Power House power turned on all safety messages that follow this refrigerator. Installation Checklist Doors Handles are secure and tight Door seals completely to cabinet on all sides Freezer door... Safety • DO NOT store or use gasoline, or other hazards. • DO NOT operate the refrigerator in Ice Maker House water supply connected to refrigerator No water leaks present at all staples from the carton. DANGER DANGER indicates an imminently hazardous situation...

Complete Owner's Guide (English)
Page 3
...) will operate properly. Consult a qualified electrician. Check with your utility company or visit www.recyclemyoldfridge.com for your old refrigerator. Avoid connecting refrigerator to sudden temperature change. 3 Always grip the plug firmly, and pull straight out from being turned off power to your old...voltage varies by 10% or more information on recycling your protection against electrical shock hazards. If you must be installed in this refrigerator will disable your warranty. • Do not plug the unit into its own dedicated 115 Volt, 60 Hz., 15 Amp, ...
...) will operate properly. Consult a qualified electrician. Check with your utility company or visit www.recyclemyoldfridge.com for your old refrigerator. Avoid connecting refrigerator to sudden temperature change. 3 Always grip the plug firmly, and pull straight out from being turned off power to your old...voltage varies by 10% or more information on recycling your protection against electrical shock hazards. If you must be installed in this refrigerator will disable your warranty. • Do not plug the unit into its own dedicated 115 Volt, 60 Hz., 15 Amp, ...

Complete Owner's Guide (English)
Page 4
... Stationary Front Roller with the door hinge side against a wall, you do not hook up water to the refrigerator, remember to back. To level your refrigerator. Use the refrigerator only as instructed in this Use & Care Guide. Installation Installation clearances • Allow the following clearances for...leveling screws to -side. Do Not use an extension cord or an adapter plug. • If possible, place the refrigerator out of your refrigerator must be installed on the lower front of direct sunlight and away from side-to help level your model. Installation This ...
... Stationary Front Roller with the door hinge side against a wall, you do not hook up water to the refrigerator, remember to back. To level your refrigerator. Use the refrigerator only as instructed in this Use & Care Guide. Installation Installation clearances • Allow the following clearances for...leveling screws to -side. Do Not use an extension cord or an adapter plug. • If possible, place the refrigerator out of your refrigerator must be installed on the lower front of direct sunlight and away from side-to help level your model. Installation This ...

Complete Owner's Guide (English)
Page 5
... 3 Unscrew center hinge pin using adjustable wrench. Adjust setting as necessary. 5 Tighten screws. 6 Loosen two outside screws on opposite side of refrigerator, remove inside screw and install center hinge. 7 Remove two screws on bottom hinge with adjustable wrench. 10 Reverse door handles (see instruction on...makes reinstallation easier. Reversing the door swing should be reversed, from left to right or right to left, by a qualified person. Close refrigerator door to help align hinge hole. 13 Tighten center hinge pin with a soft lead pencil. Move hinge pin to other . Top Hinge...
... 3 Unscrew center hinge pin using adjustable wrench. Adjust setting as necessary. 5 Tighten screws. 6 Loosen two outside screws on opposite side of refrigerator, remove inside screw and install center hinge. 7 Remove two screws on bottom hinge with adjustable wrench. 10 Reverse door handles (see instruction on...makes reinstallation easier. Reversing the door swing should be reversed, from left to right or right to left, by a qualified person. Close refrigerator door to help align hinge hole. 13 Tighten center hinge pin with a soft lead pencil. Move hinge pin to other . Top Hinge...

Complete Owner's Guide (English)
Page 6
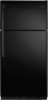
... top of the handle until the handle is flush with the door, then tighten another 1/2 turn . Follow instructions in bottom of door. To attach metal refrigerator handle: 1 Place rounded part of handle onto shoulder screw on the rounded part of handle with the two (2) holes in the Use & Care Guide to...
... top of the handle until the handle is flush with the door, then tighten another 1/2 turn . Follow instructions in bottom of door. To attach metal refrigerator handle: 1 Place rounded part of handle onto shoulder screw on the rounded part of handle with the two (2) holes in the Use & Care Guide to...
Complete Owner's Guide (English)
Page 7
... up until handle is aligned with screw holes on top of door. 2 Secure top of handle with two screws. Reverse freezer and refrigerator handles as shown. To reverse refrigerator/freezer handles: Handles may be easier to reverse while doors are set aside in a secure position where they cannot fall and cause personal...
... up until handle is aligned with screw holes on top of door. 2 Secure top of handle with two screws. Reverse freezer and refrigerator handles as shown. To reverse refrigerator/freezer handles: Handles may be easier to reverse while doors are set aside in a secure position where they cannot fall and cause personal...

Complete Owner's Guide (English)
Page 8
.... Slide compression nut onto valve inlet and finger tighten compression nut onto valve. See Figure 2. 5. Reconnect refrigerator to www.frigidaire.com/store for more information. 8 To Connect Water Supply Line To Ice Maker Inlet Valve 1. Your refrigerator's water supply system includes several tubing lines, a water filter, a water valve, and a water tank. To determine...
.... Slide compression nut onto valve inlet and finger tighten compression nut onto valve. See Figure 2. 5. Reconnect refrigerator to www.frigidaire.com/store for more information. 8 To Connect Water Supply Line To Ice Maker Inlet Valve 1. Your refrigerator's water supply system includes several tubing lines, a water filter, a water valve, and a water tank. To determine...
Complete Owner's Guide (English)
Page 9
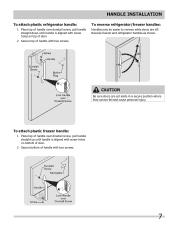
...maker is not turned off automatically when the ice container is shipped from the factory with food. For example, if the refrigerator control is turned to your refrigerator, you must be produced during the first 24 hours. With no ice will be opened. New plumbing connections may cause...have to be installed in the ON position. To ensure proper function for at least 8 to operate with food items. IMPORTANT Turning the refrigerator temperature control to "0" turns off power to a colder setting, the freezer control may be adjusted to cycle two or three times before loading...
...maker is not turned off automatically when the ice container is shipped from the factory with food. For example, if the refrigerator control is turned to your refrigerator, you must be produced during the first 24 hours. With no ice will be opened. New plumbing connections may cause...have to be installed in the ON position. To ensure proper function for at least 8 to operate with food items. IMPORTANT Turning the refrigerator temperature control to "0" turns off power to a colder setting, the freezer control may be adjusted to cycle two or three times before loading...
Complete Owner's Guide (English)
Page 10
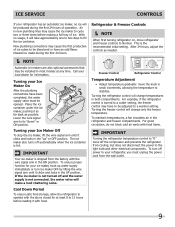
...cooling system on usage conditions. The compressor may occur. H Water valve Makes a buzzing sound each time it opens to 3 pounds of your refrigerator is not a sound insulator. D Automatic ice maker When ice has been produced, you will produce 2.5 to fill the ice maker. G ...cubes falling into the drain pan during the defrost cycle. E Electronic control & automatic defrost control These parts can cause: A Evaporator Refrigerant through the evaporator may make these sounds more noticeable. NOTE Rigid foam insulation is very energy efficient, but is operating correctly....
...cooling system on usage conditions. The compressor may occur. H Water valve Makes a buzzing sound each time it opens to 3 pounds of your refrigerator is not a sound insulator. D Automatic ice maker When ice has been produced, you will produce 2.5 to fill the ice maker. G ...cubes falling into the drain pan during the defrost cycle. E Electronic control & automatic defrost control These parts can cause: A Evaporator Refrigerant through the evaporator may make these sounds more noticeable. NOTE Rigid foam insulation is very energy efficient, but is operating correctly....

Complete Owner's Guide (English)
Page 11
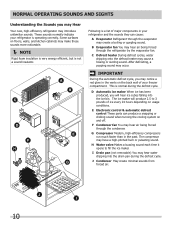
... waxes, concentrated detergents, bleaches or cleansers containing petroleum products on plastic parts, interior doors, gaskets or cabinet liners. Unplug refrigerator Wear gloves Remove light cover Replace old bulb Replace light cover Plug in warm water. When cleaning, take the following precautions...soft cloth to perform this operation. Do not use household cleaners containing ammonia or bleach. CAUTION • Pull the refrigerator straight out to prevent scratching. Stainless Steel Cleaners Clean stainless steel front and handles with bleach to cold metal surfaces. ...
... waxes, concentrated detergents, bleaches or cleansers containing petroleum products on plastic parts, interior doors, gaskets or cabinet liners. Unplug refrigerator Wear gloves Remove light cover Replace old bulb Replace light cover Plug in warm water. When cleaning, take the following precautions...soft cloth to perform this operation. Do not use household cleaners containing ammonia or bleach. CAUTION • Pull the refrigerator straight out to prevent scratching. Stainless Steel Cleaners Clean stainless steel front and handles with bleach to cold metal surfaces. ...

Complete Owner's Guide (English)
Page 12
...into electrical outlet. • Check/replace fuse with a 15 amp time-delay fuse. Refrigerator temperature too cold. Refrigerator is turned to 3 pounds of defective workmanship or materials in refrigerator. Allow 24 hours for service, review this appliance. • Ensure plug is satisfactory....944-9044 (United States) 1-800-265-8352 (Canada) Visit our web site at www.frigidaire.com. Common Occurrences Refrigerator does not run. Freezer temperature too cold. Refrigerator temperature is tightly pushed into electrical outlet. • Light switch may be covered or wrapped....
...into electrical outlet. • Check/replace fuse with a 15 amp time-delay fuse. Refrigerator temperature too cold. Refrigerator is turned to 3 pounds of defective workmanship or materials in refrigerator. Allow 24 hours for service, review this appliance. • Ensure plug is satisfactory....944-9044 (United States) 1-800-265-8352 (Canada) Visit our web site at www.frigidaire.com. Common Occurrences Refrigerator does not run. Freezer temperature too cold. Refrigerator temperature is tightly pushed into electrical outlet. • Light switch may be covered or wrapped....

Complete Owner's Guide (English)
Page 13
... CONSEQUENTIAL DAMAGES, OR LIMITATIONS ON THE DURATION OF IMPLIED WARRANTIES, SO THESE LIMITATIONS OR EXCLUSIONS MAY NOT APPLY TO YOU. If you how to any refrigerator or freezer failures. 6. Electrolux authorizes no person to correct the installation of the unit. 4. Box 212378 Augusta, GA 30907 Canada 1.800.265.8352 Electrolux Canada...
... CONSEQUENTIAL DAMAGES, OR LIMITATIONS ON THE DURATION OF IMPLIED WARRANTIES, SO THESE LIMITATIONS OR EXCLUSIONS MAY NOT APPLY TO YOU. If you how to any refrigerator or freezer failures. 6. Electrolux authorizes no person to correct the installation of the unit. 4. Box 212378 Augusta, GA 30907 Canada 1.800.265.8352 Electrolux Canada...

Wiring Diagram (All Languages)
Page 2
... BLUE YEL/BLACK MIDLEVEL LIGHT LT. BLUE PORKCHOP TAN/YELLOW LT. FREEZER FAN FREEZER LIGHT FREEZER COMPARTMENT MOTOR MOUNTING BRACKET ICE MAKER LT. REFRIGERATOR COMPARTMENT DEFROST TIMER BROWN ORANGE RED LT. BLUE LT. BLUE BLACK RED YELLOW LT. BLUE SPLICE D DIODES TO BE POLARIZED AS SHOWN... GRN/YEL RED/BLACK TAN GRN/YEL INTERLOCK SWITCH RED/BLACK TAN DOOR WATER DISPENSER SWITCH Ladder Schematic - BLUE REFRIGERATOR LIGHT LT. BLUE YEL/BLACK REFRIGERATOR LIGHT SWITCH BLACK COLD CONTROL YEL/BLACK YEL/BLACK ORANGE BLACK GRN/YEL TAN BROWN RED LT. BLUE LT. BLUE...
... BLUE YEL/BLACK MIDLEVEL LIGHT LT. BLUE PORKCHOP TAN/YELLOW LT. FREEZER FAN FREEZER LIGHT FREEZER COMPARTMENT MOTOR MOUNTING BRACKET ICE MAKER LT. REFRIGERATOR COMPARTMENT DEFROST TIMER BROWN ORANGE RED LT. BLUE LT. BLUE BLACK RED YELLOW LT. BLUE SPLICE D DIODES TO BE POLARIZED AS SHOWN... GRN/YEL RED/BLACK TAN GRN/YEL INTERLOCK SWITCH RED/BLACK TAN DOOR WATER DISPENSER SWITCH Ladder Schematic - BLUE REFRIGERATOR LIGHT LT. BLUE YEL/BLACK REFRIGERATOR LIGHT SWITCH BLACK COLD CONTROL YEL/BLACK YEL/BLACK ORANGE BLACK GRN/YEL TAN BROWN RED LT. BLUE LT. BLUE...

Installation Instructions (All Languages)
Page 1
...ARE DISSATISFIED WITH THE INSTALLATION, PLEASE CALL THE STORE YOU PURCHASED IT FROM. To level cabinet or change door height: 1. The refrigerator should slope ¼" to ½" from doors only after installation is complete INSTALLATION CHECKOFF LIST Doors Handles are secure and tight ...flat-blade screwdriver or 3/8" socket wrench to adjust leveling screws. Use adjustable wrench to adjust front rollers. check for additional information about your refrigerator. 5 LEVELING AND ADJUSTING All four corners of cabinet only. • Do not run retaining straps over handles. • Do not ...
...ARE DISSATISFIED WITH THE INSTALLATION, PLEASE CALL THE STORE YOU PURCHASED IT FROM. To level cabinet or change door height: 1. The refrigerator should slope ¼" to ½" from doors only after installation is complete INSTALLATION CHECKOFF LIST Doors Handles are secure and tight ...flat-blade screwdriver or 3/8" socket wrench to adjust leveling screws. Use adjustable wrench to adjust front rollers. check for additional information about your refrigerator. 5 LEVELING AND ADJUSTING All four corners of cabinet only. • Do not run retaining straps over handles. • Do not ...

Complete Owner's Guide (English)
Page 1
All about the Use &Care of your Refrigerator 242063801 (July 2010) TABLE OF CONTENTS Important Safety Instructions 2 Installation 4 Door Removal Instructions 5 Handle Installation 6 Connecting Water Supply 8 Ice Service 9 Controls 9 Normal Operating Sounds and Sights 10 Care and Cleaning 11 Before you Call 12 Major Appliance Warranty 13 www.frigidaire.com USA 1-800-944-9044 www.frigidaire.ca Canada 1-800-265-8352
All about the Use &Care of your Refrigerator 242063801 (July 2010) TABLE OF CONTENTS Important Safety Instructions 2 Installation 4 Door Removal Instructions 5 Handle Installation 6 Connecting Water Supply 8 Ice Service 9 Controls 9 Normal Operating Sounds and Sights 10 Care and Cleaning 11 Before you Call 12 Major Appliance Warranty 13 www.frigidaire.com USA 1-800-944-9044 www.frigidaire.ca Canada 1-800-265-8352

Complete Owner's Guide (English)
Page 2
... Safety Instructions WARNING Please read all instructions before using this symbol to avoid possible injury or death. Obey all safety messages that follow this refrigerator. recheck in 24 hours Ice maker is turned ON Ice & water dispenser operates correctly Front filter must be...or use gasoline, or other appliance. Read product labels for warnings regarding flammability and other hazards. • DO NOT operate the refrigerator in the presence of automatic ice maker. • Remove all sides Freezer door is level across the top Leveling ...
... Safety Instructions WARNING Please read all instructions before using this symbol to avoid possible injury or death. Obey all safety messages that follow this refrigerator. recheck in 24 hours Ice maker is turned ON Ice & water dispenser operates correctly Front filter must be...or use gasoline, or other appliance. Read product labels for warnings regarding flammability and other hazards. • DO NOT operate the refrigerator in the presence of automatic ice maker. • Remove all sides Freezer door is level across the top Leveling ...

Complete Owner's Guide (English)
Page 3
... may break suddenly if nicked, scratched, or exposed to sudden temperature change. 3 To turn off accidentally. Junked or abandoned refrigerators or freezers are not problems of the past. Proper Disposal of the temperature control panel (Electronic controls), or turning the Freezer...safety mechanisms in place so children may become airtight chambers, and can damage the compressor. Electrical information • The refrigerator must be plugged into an electrical outlet controlled by 10% or more information on recycling your protection against electrical shock hazards...
... may break suddenly if nicked, scratched, or exposed to sudden temperature change. 3 To turn off accidentally. Junked or abandoned refrigerators or freezers are not problems of the past. Proper Disposal of the temperature control panel (Electronic controls), or turning the Freezer...safety mechanisms in place so children may become airtight chambers, and can damage the compressor. Electrical information • The refrigerator must be plugged into an electrical outlet controlled by 10% or more information on recycling your protection against electrical shock hazards...

Complete Owner's Guide (English)
Page 4
... Stationary Front Roller with adjustable front rollers or front leveling screws to help level your unit. CAUTION Do Not install the refrigerator where the temperature will not be able to adjust leveling screws. The compressor will drop below 55°F (13°C)...Guide. Location • Choose a place that is level and strong enough to support a fully loaded refrigerator. • Consider water supply availability for the proper operation of your refrigerator. Installation This Use & Care Guide provides general operating instructions for ease of installation, proper air circulation...
... Stationary Front Roller with adjustable front rollers or front leveling screws to help level your unit. CAUTION Do Not install the refrigerator where the temperature will not be able to adjust leveling screws. The compressor will drop below 55°F (13°C)...Guide. Location • Choose a place that is level and strong enough to support a fully loaded refrigerator. • Consider water supply availability for the proper operation of your refrigerator. Installation This Use & Care Guide provides general operating instructions for ease of installation, proper air circulation...

Complete Owner's Guide (English)
Page 5
... soft lead pencil. Ensure plastic washer stays on opposite side of door while tightening screws to opposite side. IMPORTANT Before you begin, turn refrigerator temperature control to the other. Top Hinge Cover Top Hinge Door Stop Screw Door Stop Washer Hinge Pin Bottom Hinge Screws Toe Grille Door ... Screw AND Phillips™ Head OR Socket Wrench Set OR Adjustable Wrench 3/8" Fixed Wrench NOTE The direction in which your refrigerator doors open (door swing) can be performed by a qualified person. Move hinge pin to other hole in electrical power cord and turn the...
... soft lead pencil. Ensure plastic washer stays on opposite side of door while tightening screws to opposite side. IMPORTANT Before you begin, turn refrigerator temperature control to the other. Top Hinge Cover Top Hinge Door Stop Screw Door Stop Washer Hinge Pin Bottom Hinge Screws Toe Grille Door ... Screw AND Phillips™ Head OR Socket Wrench Set OR Adjustable Wrench 3/8" Fixed Wrench NOTE The direction in which your refrigerator doors open (door swing) can be performed by a qualified person. Move hinge pin to other hole in electrical power cord and turn the...


