Complete Owner's Guide
Page 5
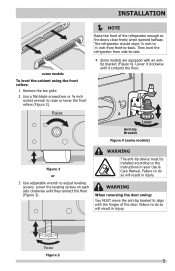
Raise NOTE Raise the front of the door. Failure to do so will result in your Use & Care Manual. tip bracket (Figure 4). Lower it contacts the floor. Lower the leveling screws on each side clockwise until it clockwise until they contact the floor (Figure 3). ...
Raise NOTE Raise the front of the door. Failure to do so will result in your Use & Care Manual. tip bracket (Figure 4). Lower it contacts the floor. Lower the leveling screws on each side clockwise until it clockwise until they contact the floor (Figure 3). ...

Installation Instructions
Page 1
...corners Electrical Power House water supply connected to support a fully loaded refrigerator. Lower the leveling screws on your Use & Care Manual. Top Hinge Cover Top Hinge Shim Pin Door Stop Screw Door Stop Washer Hinge Pin Bottom Hinge Screws Center Hinge Toe Grille 9 &#... water supply, make sure the ice maker's power switch is turned Off (see how in position, you purchased your Use & Care Manual. Then level the refrigerator from front-to -side. Allow the following clearances for the water supply connection at the rear of your refrigerator...
...corners Electrical Power House water supply connected to support a fully loaded refrigerator. Lower the leveling screws on your Use & Care Manual. Top Hinge Cover Top Hinge Shim Pin Door Stop Screw Door Stop Washer Hinge Pin Bottom Hinge Screws Center Hinge Toe Grille 9 &#... water supply, make sure the ice maker's power switch is turned Off (see how in position, you purchased your Use & Care Manual. Then level the refrigerator from front-to -side. Allow the following clearances for the water supply connection at the rear of your refrigerator...
Wiring Diagram
Page 1
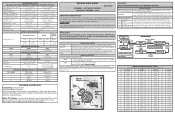
...to rotate motor gear counterclockwise until holding switch circuit is 102 to 130cc (3.4 to assist qualified repair personnel only. Use screwdriver to Exit Manual Defrost. enter/exit --> Press the door switch 3 times and hold the 4th press until 5 minutes of each test, the component...Long Beep Test 1: 2 Beeps Test 2: Power ON Press Door Switch Compressor ON Enters Service 2 Times Mode 2 Beeps Press Door Switch 2 Times Manual Defrost 2 Beeps to Defrost Heater To Exit Service Mode from torch flame. Test 4: Evaporator Fan ON Press Door Switch 2 Times 2 Beeps Test 3:...
...to rotate motor gear counterclockwise until holding switch circuit is 102 to 130cc (3.4 to assist qualified repair personnel only. Use screwdriver to Exit Manual Defrost. enter/exit --> Press the door switch 3 times and hold the 4th press until 5 minutes of each test, the component...Long Beep Test 1: 2 Beeps Test 2: Power ON Press Door Switch Compressor ON Enters Service 2 Times Mode 2 Beeps Press Door Switch 2 Times Manual Defrost 2 Beeps to Defrost Heater To Exit Service Mode from torch flame. Test 4: Evaporator Fan ON Press Door Switch 2 Times 2 Beeps Test 3:...


