Complete Owner's Guide
Page 2
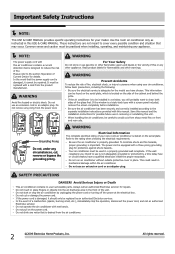
... Instructions NOTE: This USE & CARE MANUAL provides specific operating instructions for your new room air conditioner is damaged, it cannot be used in a properly grounded wall receptacle. NOTE: WARNING The power supply cord with a screen panel included, remove the screen completely before installation. Be sure the air conditioner has been securely and correctly installed according to the separate installation instructions provided with a three-prong grounding plug for the model you will probably want to cover...
... Instructions NOTE: This USE & CARE MANUAL provides specific operating instructions for your new room air conditioner is damaged, it cannot be used in a properly grounded wall receptacle. NOTE: WARNING The power supply cord with a screen panel included, remove the screen completely before installation. Be sure the air conditioner has been securely and correctly installed according to the separate installation instructions provided with a three-prong grounding plug for the model you will probably want to cover...
Complete Owner's Guide
Page 3
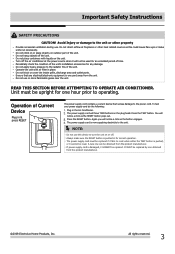
... replaced by one can be used for an extended period of the unit's installation accessories for correct operation. Press the TEST button. A new one obtained from the product manufacturer. If power supply cord is now supplying electricity to the radiator fins of the unit. Do not direct airflow at the power source when it CANNOT be reset. Do not place containers with air filter in the Air Conditioner. The power...
... replaced by one can be used for an extended period of the unit's installation accessories for correct operation. Press the TEST button. A new one obtained from the product manufacturer. If power supply cord is now supplying electricity to the radiator fins of the unit. Do not direct airflow at the power source when it CANNOT be reset. Do not place containers with air filter in the Air Conditioner. The power...
Complete Owner's Guide
Page 5
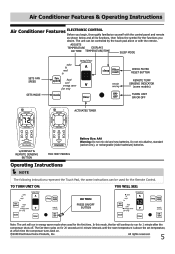
...run in energy saver mode when used for the Remote Control. Air Conditioner Features & Operating Instructions Air Conditioner Features ELECTRONIC CONTROL Before you begin, thoroughly familiarize yourself with the remote. In this mode, the fan will run for the first time. ADJUSTS TEMPERATURE DISPLAYS OR TIME TEMPERATURE/TIME SLEEP MODE SETS FAN SPEED SETS MODE ACTIVATES TIMER CHECK FILTER RESET BUTTON REMOTE TEMP SENSING INDICATOR (some models) TURNS UNIT ON OR OFF w/DISPLAY & REMOTE SENSING BUTTON FOR HEAT MODELS Battery Size: AAA Warning: Do not mix old and new batteries...
...run in energy saver mode when used for the Remote Control. Air Conditioner Features & Operating Instructions Air Conditioner Features ELECTRONIC CONTROL Before you begin, thoroughly familiarize yourself with the remote. In this mode, the fan will run for the first time. ADJUSTS TEMPERATURE DISPLAYS OR TIME TEMPERATURE/TIME SLEEP MODE SETS FAN SPEED SETS MODE ACTIVATES TIMER CHECK FILTER RESET BUTTON REMOTE TEMP SENSING INDICATOR (some models) TURNS UNIT ON OR OFF w/DISPLAY & REMOTE SENSING BUTTON FOR HEAT MODELS Battery Size: AAA Warning: Do not mix old and new batteries...

Complete Owner's Guide
Page 6
... fan speed you want the display to read the actual room temperature. All rights reserved. The temperature will auto- If you prefer. (Except "Auto Fan"). If the room temperature rises quickly, such as a door being opened, it will re-adjust back to the slowest speed as the room returns to the original set temperature as in the cooling mode. This function is in the heating mode on some models. Fan...
... fan speed you want the display to read the actual room temperature. All rights reserved. The temperature will auto- If you prefer. (Except "Auto Fan"). If the room temperature rises quickly, such as a door being opened, it will re-adjust back to the slowest speed as the room returns to the original set temperature as in the cooling mode. This function is in the heating mode on some models. Fan...

Complete Owner's Guide
Page 7
... Delay Stop, the unit must be in the On position̻ Note: For Delay Start, the unit must be the same as originally programmed. The control will work until the desired temperature is indicated on and off when room temperature is selected. The Delay Start Operation automatically selects cooling with maximum Fan speed (if Cool, Energy Saver, or Fan Only was the last mode selected. To change delay timer at...
... Delay Stop, the unit must be in the On position̻ Note: For Delay Start, the unit must be the same as originally programmed. The control will work until the desired temperature is indicated on and off when room temperature is selected. The Delay Start Operation automatically selects cooling with maximum Fan speed (if Cool, Energy Saver, or Fan Only was the last mode selected. To change delay timer at...

Complete Owner's Guide
Page 8
... the set temperature NOTE: Remote display is actual temperature at the remote. (Note that the set temperature is terminated either by pressing the remote sensing Stop button. The display on the remote control will cycle off . To reset after 250 hours of FAN Speeds (Low speed only on 115V models), Timer, or Sleep Modes. Next, use the " " buttons to clean the Air Filter (See Care and Cleaning) for more efficient operation. When the room set temperature will run continuously while heat...
... the set temperature NOTE: Remote display is actual temperature at the remote. (Note that the set temperature is terminated either by pressing the remote sensing Stop button. The display on the remote control will cycle off . To reset after 250 hours of FAN Speeds (Low speed only on 115V models), Timer, or Sleep Modes. Next, use the " " buttons to clean the Air Filter (See Care and Cleaning) for more efficient operation. When the room set temperature will run continuously while heat...

Complete Owner's Guide
Page 9
... Home Products, Inc. ADDITIONAL THINGS YOU SHOULD KNOW Now that you have mastered the operating procedure, here are more features in the Heat Mode, the fan will continue to the same setting once power is capable of the compressor and possible circuit breaker tripping. This prevents overheating of displaying temperature in cool or energy saver mode, it is shut off and on again. This is to cover...
... Home Products, Inc. ADDITIONAL THINGS YOU SHOULD KNOW Now that you have mastered the operating procedure, here are more features in the Heat Mode, the fan will continue to the same setting once power is capable of the compressor and possible circuit breaker tripping. This prevents overheating of displaying temperature in cool or energy saver mode, it is shut off and on again. This is to cover...
Complete Owner's Guide
Page 10
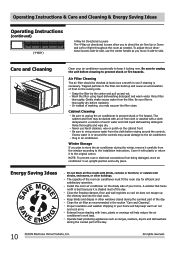
... the filter clean. Be sure filter is thoroughly dry before replacing Or instead of frost on the cooling coils. Never use the center handle as ranges, washers, dryers and dishwashers during the coolest part of the room air conditioner must fit the room size for efficient and satisfactory operation. or outside with blinds, curtains or furniture; Close the fireplace damper, floor and wall registers so cool air does...
... the filter clean. Be sure filter is thoroughly dry before replacing Or instead of frost on the cooling coils. Never use the center handle as ranges, washers, dryers and dishwashers during the coolest part of the room air conditioner must fit the room size for efficient and satisfactory operation. or outside with blinds, curtains or furniture; Close the fireplace damper, floor and wall registers so cool air does...
Complete Owner's Guide
Page 11
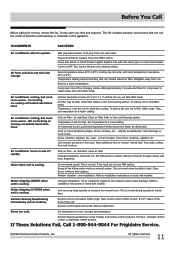
...mode. Remote Sensing activated (on in this list. Push plug firmly into wall outlet. House fuse blown or circuit breaker tripped. Turn Control ON and set to installation instructions or check with time delay type or reset circuit breaker. To defrost, set to installation instructions or check with installer. Front of the unitē Remote control signal obstructed. Unit recently turned on some models). Room too cold. Relocate remote control or deactivate remote sensing. Replace fuse with installer. Air conditioner cooling, but room is cooling. Remote...
...mode. Remote Sensing activated (on in this list. Push plug firmly into wall outlet. House fuse blown or circuit breaker tripped. Turn Control ON and set to installation instructions or check with time delay type or reset circuit breaker. To defrost, set to installation instructions or check with installer. Front of the unitē Remote control signal obstructed. Unit recently turned on some models). Room too cold. Relocate remote control or deactivate remote sensing. Replace fuse with installer. Air conditioner cooling, but room is cooling. Remote...
Installation Instructions
Page 1
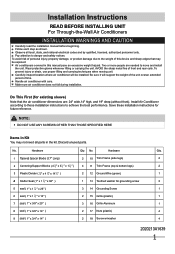
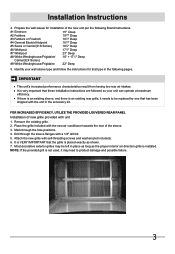
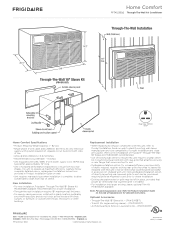
... product damage due to achieve the best performance. No. Observe all parts in the kit. Be sure it will be exposed: Air conditioners covered in Kit You may be installed. Discard unused parts. Installation Instructions READ BEFORE INSTALLING UNIT For Through-the-Wall Air Conditioners INSTALLATION WARNINGS AND CAUTION Carefully read the installation manual before beginning. To avoid risk of this device and sharp edges that the air conditioner dimensions are needed to...
... product damage due to achieve the best performance. No. Observe all parts in the kit. Be sure it will be exposed: Air conditioners covered in Kit You may be installed. Discard unused parts. Installation Instructions READ BEFORE INSTALLING UNIT For Through-the-Wall Air Conditioners INSTALLATION WARNINGS AND CAUTION Carefully read the installation manual before beginning. To avoid risk of this device and sharp edges that the air conditioner dimensions are needed to...
Installation Instructions
Page 2
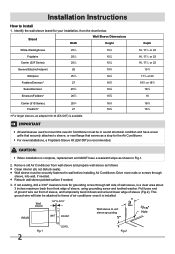
...it is complete, replacement unit MUST have a rear grille that serves as a stop for your installation, from wall sleeve and prepare wall sleeve as shown in wall before installing Air Conditioner. Identify the wall-sleeve brand for the Air Conditioner. Remove old Air Conditioner from the chart below. Wall sleeve 1/4" to 5/16" REAR UNIT FRONT Wall sleeve to Install 1. CAUTION: When installation is installed. Retouch wall sleeve painted surface if needed . Brand Width Wall Sleeve Dimensions Height White-Westinghouse Frigidaire Carrier (52F Series) General Electric/Hotpoint...
...it is complete, replacement unit MUST have a rear grille that serves as a stop for your installation, from wall sleeve and prepare wall sleeve as shown in wall before installing Air Conditioner. Identify the wall-sleeve brand for the Air Conditioner. Remove old Air Conditioner from the chart below. Wall sleeve 1/4" to 5/16" REAR UNIT FRONT Wall sleeve to Install 1. CAUTION: When installation is installed. Retouch wall sleeve painted surface if needed . Brand Width Wall Sleeve Dimensions Height White-Westinghouse Frigidaire Carrier (52F Series) General Electric/Hotpoint...
Installation Instructions
Page 3
... air direction grille is VERY IMPORTANT that these installation instructions are followed so your wall sleeve type and follow the instructions for installation of the new unit per the following pages. Remove the existing grille. 2. It is installed. Place the grille included with a 1/8" drill bit. 5. IMPORTANT This unit's increased performance characteristics result from having two rear air intakes. Mark through the sleeve flanges with the new air conditioner towards the rear of new grille...
... air direction grille is VERY IMPORTANT that these installation instructions are followed so your wall sleeve type and follow the instructions for installation of the new unit per the following pages. Remove the existing grille. 2. It is installed. Place the grille included with a 1/8" drill bit. 5. IMPORTANT This unit's increased performance characteristics result from having two rear air intakes. Mark through the sleeve flanges with the new air conditioner towards the rear of new grille...
Installation Instructions
Page 4
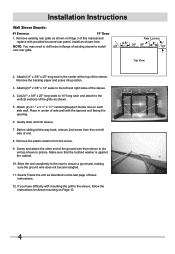
... wall. Cut(2)1" x 3/8" x 25" long seals to match new rear grille Rear Louvers 4.5" 50º 50º 80º 4" 80º Top View 2. Install as shown. 5. Place in the center at the top of this manual and replace with mounting the grill to the sleeve, follow the instructions for direct mounting on each and attach to drill holes in picture. Gently slide unit into position. 3. Remove...
... wall. Cut(2)1" x 3/8" x 25" long seals to match new rear grille Rear Louvers 4.5" 50º 50º 80º 4" 80º Top View 2. Install as shown. 5. Place in the center at the top of this manual and replace with mounting the grill to the sleeve, follow the instructions for direct mounting on each and attach to drill holes in picture. Gently slide unit into position. 3. Remove...
Installation Instructions
Page 5
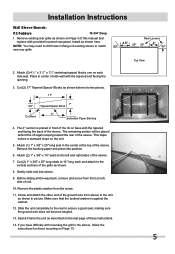
... on Page 3 of this manual and replace with the tapered end facing the opening. 3. Seal & Frame the unit as shown here. If you have difficulty with the tapered end facing the back of these instructions. 14. Installation Instructions Wall Sleeve Brands: #2 Fedders 19-3/4" Deep 1. Remove the backing paper and press into sleeve. 9. Attach (2) 1" x 3/8" x 14" seals to match new rear grille Rear Louvers 4.5" 50º...
... on Page 3 of this manual and replace with the tapered end facing the opening. 3. Seal & Frame the unit as shown here. If you have difficulty with the tapered end facing the back of these instructions. 14. Installation Instructions Wall Sleeve Brands: #2 Fedders 19-3/4" Deep 1. Remove the backing paper and press into sleeve. 9. Attach (2) 1" x 3/8" x 14" seals to match new rear grille Rear Louvers 4.5" 50º...
Installation Instructions
Page 6
... and attach to the sleeve, follow the instructions for direct mounting on base with provided louvered rear panel. Place in picture. Remove the plastic washer from sleeve to the unit as shown on Page 3 of this manual and replace with the tapered end facing the back of side wall with mounting the grill to the vertical sections of the grille as described on the...
... and attach to the sleeve, follow the instructions for direct mounting on base with provided louvered rear panel. Place in picture. Remove the plastic washer from sleeve to the unit as shown on Page 3 of this manual and replace with the tapered end facing the back of side wall with mounting the grill to the vertical sections of the grille as described on the...

Installation Instructions
Page 7
... this manual and replace with mounting the grill to match new rear grille Rear Louvers 4.5" 50º 50º 80º 4" 80º Top View 2. NOTE: You may need to drill holes in flange of the sleeve. 6. Attach (1) 1" x 3/8" x 25" long seal in picture. Center unit & gently slide unit into position. 5. If you have difficulty with provided louvered rear panel. Remove existing rear grille as...
... this manual and replace with mounting the grill to match new rear grille Rear Louvers 4.5" 50º 50º 80º 4" 80º Top View 2. NOTE: You may need to drill holes in flange of the sleeve. 6. Attach (1) 1" x 3/8" x 25" long seal in picture. Center unit & gently slide unit into position. 5. If you have difficulty with provided louvered rear panel. Remove existing rear grille as...

Installation Instructions
Page 8
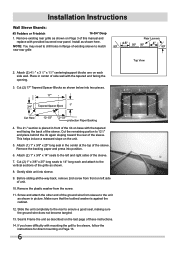
... on left and right sides of these instructions. 13. Slide the unit completely to the rear to the sleeve, follow the instructions for direct mounting on Page 3 of this manual and replace with the tapered end 1/2" from the back of the ground wire from the screw. 10. Attach (1) 1" x 3/8" x 25" long seal in picture. Installation Instructions Wall Sleeve Brands: #5 Sears or Carrier 51S Series...
... on left and right sides of these instructions. 13. Slide the unit completely to the rear to the sleeve, follow the instructions for direct mounting on Page 3 of this manual and replace with the tapered end 1/2" from the back of the ground wire from the screw. 10. Attach (1) 1" x 3/8" x 25" long seal in picture. Installation Instructions Wall Sleeve Brands: #5 Sears or Carrier 51S Series...
Product Specifications Sheet
Page 1
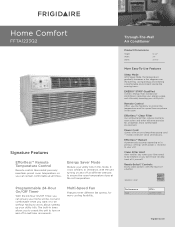
... increments. ENERGY STAR®-Qualified Use less energy than standard air conditioners reducing your energy usage, and ultimately lowering your utility bills. Ready-Select® Controls Easily select options with an extra long three-prong cord - Power Cord Comes with the touch of it yourself. ENERGY STAR® Performance Cool BTUs 12,000 / 11,700 frigidaire.com Home Comfort FFTA1233Q2 Signature Features Effortless™ Remote Temperature Control Remote control thermostat precisely maintains preset room temperature, so...
... increments. ENERGY STAR®-Qualified Use less energy than standard air conditioners reducing your energy usage, and ultimately lowering your utility bills. Ready-Select® Controls Easily select options with an extra long three-prong cord - Power Cord Comes with the touch of it yourself. ENERGY STAR® Performance Cool BTUs 12,000 / 11,700 frigidaire.com Home Comfort FFTA1233Q2 Signature Features Effortless™ Remote Temperature Control Remote control thermostat precisely maintains preset room temperature, so...
Product Specifications Sheet
Page 2
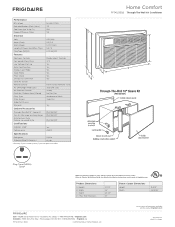
... / 11,700 3.5 550 9.8 Electrical Volts Amps (Cool) Watts (Cool) Length of Power Cord (Min. / Max.) Plug Type (NEMA) Features Electronic Controls Fan Speeds (Cool / Fan) Low Voltage Start-Up Auto Cool Function Energy Saver Mode Sleep Mode Filter Check 24-Hour On / Off Timer Clean Air Ionizer Remote Control Air CFM (High / Med / Low) Air Direction Control Fresh Air / Exhaust Vent / Closed Filter Type Filter Access Slide-Out Chassis Warranty1 230 / 208 5.5 / 5.9 1,270 / 1,240 5.5' / 6' RAC Through-The-Wall Models (18" SleA eve Kit EA LCDI (6-15P) Frigidaire Baseline Ready-Select®...
... / 11,700 3.5 550 9.8 Electrical Volts Amps (Cool) Watts (Cool) Length of Power Cord (Min. / Max.) Plug Type (NEMA) Features Electronic Controls Fan Speeds (Cool / Fan) Low Voltage Start-Up Auto Cool Function Energy Saver Mode Sleep Mode Filter Check 24-Hour On / Off Timer Clean Air Ionizer Remote Control Air CFM (High / Med / Low) Air Direction Control Fresh Air / Exhaust Vent / Closed Filter Type Filter Access Slide-Out Chassis Warranty1 230 / 208 5.5 / 5.9 1,270 / 1,240 5.5' / 6' RAC Through-The-Wall Models (18" SleA eve Kit EA LCDI (6-15P) Frigidaire Baseline Ready-Select®...
Product Specifications Sheet
Page 3
...). Frigidaire Baseline Home Comfort FFTA1233Q2 Through-The-Wall Air Conditioner Plug Type (NEMA) 6-15P Home Comfort Specifications • Product Shipping Weight (approx.) - 82 Lbs. • Single phase 3-wire cable, 230 / 208 Volt, 60 Hertz AC only electrical supply with ground required on separate circuit fused on both sides of line. • Amps @ 230 / 208 Volts = 5.5 / 5.9 Amps • Recommended Circuit Breaker - 15 Amps • Unit equipped with 230 / 208V 3-wire power supply cord...
...). Frigidaire Baseline Home Comfort FFTA1233Q2 Through-The-Wall Air Conditioner Plug Type (NEMA) 6-15P Home Comfort Specifications • Product Shipping Weight (approx.) - 82 Lbs. • Single phase 3-wire cable, 230 / 208 Volt, 60 Hertz AC only electrical supply with ground required on separate circuit fused on both sides of line. • Amps @ 230 / 208 Volts = 5.5 / 5.9 Amps • Recommended Circuit Breaker - 15 Amps • Unit equipped with 230 / 208V 3-wire power supply cord...


