
Complete Owner's Guide
Page 1
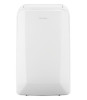
All about the Use &Care of your Portable Air Conditioner TABLE OF CONTENTS Important Safety Instructions 2-3 Product Registration 4 Normal Sounds 4 Unit Description 5 Accessories Included 5 Installation Instructions 6-7 Air Conditioner Features 8 Operating Instructions 9-11 Care and Cleaning 11 Before You Call 12 Major Appliance Limited Warranty 13 www.frigidaire.com USA 1-800-944-9044 www.frigidaire.ca Canada 1-800-265-8352 2020254A2580 (June 2009)
All about the Use &Care of your Portable Air Conditioner TABLE OF CONTENTS Important Safety Instructions 2-3 Product Registration 4 Normal Sounds 4 Unit Description 5 Accessories Included 5 Installation Instructions 6-7 Air Conditioner Features 8 Operating Instructions 9-11 Care and Cleaning 11 Before You Call 12 Major Appliance Limited Warranty 13 www.frigidaire.com USA 1-800-944-9044 www.frigidaire.ca Canada 1-800-265-8352 2020254A2580 (June 2009)
Complete Owner's Guide
Page 2
... electrical rating of your model. Refer to the installation instructions in a properly grounded wall receptacle. This could result in place. Avoid Serious Injury or Death This air conditioner contains no user-serviceable parts. Do not start or stop the operation, disconnect the power cord, and call an authorized Electrolux servicer for the model you intend to cover every possible condition and situation that the power supply cord is damaged, it cannot be replaced...
... electrical rating of your model. Refer to the installation instructions in a properly grounded wall receptacle. This could result in place. Avoid Serious Injury or Death This air conditioner contains no user-serviceable parts. Do not start or stop the operation, disconnect the power cord, and call an authorized Electrolux servicer for the model you intend to cover every possible condition and situation that the power supply cord is damaged, it cannot be replaced...
Complete Owner's Guide
Page 3
... not block or cover the intake grille, discharge area and outlet ports. Unit must be repaired. Plug in the Air Conditioner. You will not be used for any electrical/electronic equipment is pushed, or it CANNOT be replaced if it fails to the unit or other heat related sources as the RESET button pops out. Press the RESET button. The power supply cord is now supplying electricity to the radiator...
... not block or cover the intake grille, discharge area and outlet ports. Unit must be repaired. Plug in the Air Conditioner. You will not be used for any electrical/electronic equipment is pushed, or it CANNOT be replaced if it fails to the unit or other heat related sources as the RESET button pops out. Press the RESET button. The power supply cord is now supplying electricity to the radiator...

Complete Owner's Guide
Page 4
...'s high efficiency compressors may be filled in the space provided below the model and serial numbers. Gurgle/Hiss "Gurgling or hissing" noise may have a high pitched chatter during normal operation. Product Registration & Normal Sounds Product Registration Record Your Model and Serial Numbers Record in completely, signed and returned to refrigerant passing through evaporator during the cooling cycle. 4 2009 Electrolux Home Products, Inc. Model No. Normal...
...'s high efficiency compressors may be filled in the space provided below the model and serial numbers. Gurgle/Hiss "Gurgling or hissing" noise may have a high pitched chatter during normal operation. Product Registration & Normal Sounds Product Registration Record Your Model and Serial Numbers Record in completely, signed and returned to refrigerant passing through evaporator during the cooling cycle. 4 2009 Electrolux Home Products, Inc. Model No. Normal...

Complete Owner's Guide
Page 5
Unit Description & Accessories Included Unit Description ROOM AIR DISCHARGE CARRYING HANDLE (BOTH SIDES) REMOTE CONTROL CONTROL PANEL EXHAUST AIR OUTLET REMOTE SIGNAL RECEIVER AIR INTAKE DEHUMIDIFYING DRAIN OUTLET AIR INTAKE CASTOR Fig. 1 BOTTOM TRAY DRAIN OUTLET Accessories Included PARTS: PARTS NAME: Exhaust hose Unit/ Exhaust Adaptor A QUANTITY: 1 pc 1 pc Window/ Exhaust Adaptor B 1 pc Window Sliding Kit Foam Seal 1 set 3 pcs Remote Control 1 pc Battery(For remote control) 1/2″ Screw 2 pcs 4 pcs 3/4″ Screw 1/2″ Hex Head Cap Screw 2 pcs 2 pcs Safety...
Unit Description & Accessories Included Unit Description ROOM AIR DISCHARGE CARRYING HANDLE (BOTH SIDES) REMOTE CONTROL CONTROL PANEL EXHAUST AIR OUTLET REMOTE SIGNAL RECEIVER AIR INTAKE DEHUMIDIFYING DRAIN OUTLET AIR INTAKE CASTOR Fig. 1 BOTTOM TRAY DRAIN OUTLET Accessories Included PARTS: PARTS NAME: Exhaust hose Unit/ Exhaust Adaptor A QUANTITY: 1 pc 1 pc Window/ Exhaust Adaptor B 1 pc Window Sliding Kit Foam Seal 1 set 3 pcs Remote Control 1 pc Battery(For remote control) 1/2″ Screw 2 pcs 4 pcs 3/4″ Screw 1/2″ Hex Head Cap Screw 2 pcs 2 pcs Safety...

Complete Owner's Guide
Page 6
... around the unit, and is the best to keep the length to adaptor B (Fig. 5). 3. Installation Instructions Installation Instructions EXHAUSTING HOT AIR In the COOLING Mode the appliance must be placed close to a window or opening so that the hose does not have any sharp bends or sags. (Fig. 9) Fig. 5 Fig. 6 Fig. 9 6 2009 Electrolux Home Products, Inc. Affix the adaptor B into the window slider kit and...
... around the unit, and is the best to keep the length to adaptor B (Fig. 5). 3. Installation Instructions Installation Instructions EXHAUSTING HOT AIR In the COOLING Mode the appliance must be placed close to a window or opening so that the hose does not have any sharp bends or sags. (Fig. 9) Fig. 5 Fig. 6 Fig. 9 6 2009 Electrolux Home Products, Inc. Affix the adaptor B into the window slider kit and...

Complete Owner's Guide
Page 7
....11. Installation Instructions Installation Instructions (continued) Installation in place, attach right angle sash lock with 1/2″ (12.7mm) screw as shown.(Fig.20) Foam seal (adhesive type) Window stool 26.6"~48.5" Window stool Fig. 12 Fig. 16 Window slider kit screws Fig. 17 Window slider kit Foam seal Fig. 19 2009 Electrolux Home Products, Inc. Close the window sash securely against the window slider kit. (Fig...
....11. Installation Instructions Installation Instructions (continued) Installation in place, attach right angle sash lock with 1/2″ (12.7mm) screw as shown.(Fig.20) Foam seal (adhesive type) Window stool 26.6"~48.5" Window stool Fig. 12 Fig. 16 Window slider kit screws Fig. 17 Window slider kit Foam seal Fig. 19 2009 Electrolux Home Products, Inc. Close the window sash securely against the window slider kit. (Fig...
Complete Owner's Guide
Page 8
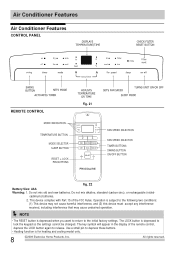
... settings cannot be changed. Air Conditioner Features Air Conditioner Features CONTROL PANEL REMOTE CONTROL MODE INDICATION TEMPERATURE BUTTON MODE SELECTOR SLEEP BUTTON RESET + LOCK PIN BUTTONS Fig. 21 FAN SPEED SELECTION FAN SPEED SELECTOR TIMER BUTTONS SWING BUTTON ON/OFF BUTTON Fig. 22 Battery Size: AAA Warning: 1. Do not mix old and new batteries. The LOCK button is subject to the initial factory settings. Operation is depressed to depress these buttons. NOTE The RESET button is for heating and cooling model only. 8 2009 Electrolux Home Products...
... settings cannot be changed. Air Conditioner Features Air Conditioner Features CONTROL PANEL REMOTE CONTROL MODE INDICATION TEMPERATURE BUTTON MODE SELECTOR SLEEP BUTTON RESET + LOCK PIN BUTTONS Fig. 21 FAN SPEED SELECTION FAN SPEED SELECTOR TIMER BUTTONS SWING BUTTON ON/OFF BUTTON Fig. 22 Battery Size: AAA Warning: 1. Do not mix old and new batteries. The LOCK button is subject to the initial factory settings. Operation is depressed to depress these buttons. NOTE The RESET button is for heating and cooling model only. 8 2009 Electrolux Home Products...
Complete Owner's Guide
Page 9
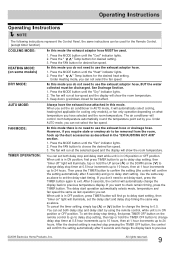
... Control Panel, the same instructions can be used . 1. Press the MODE button until the "Heat" indicator lights. 2. Under Heating mode, you require stale or smokey air to previous temperature display. DRY MODE: In this mode there is in ON position or OFF position. See Drainage Section. 1. Press the MODE button until the "Fan" indicator lights. 2. Keep doors &Ḥwindows closed for desired fan speed. The air conditioner will control room temperature automatically round the temperature point set by using the remote control, while unit...
... Control Panel, the same instructions can be used . 1. Press the MODE button until the "Heat" indicator lights. 2. Under Heating mode, you require stale or smokey air to previous temperature display. DRY MODE: In this mode there is in ON position or OFF position. See Drainage Section. 1. Press the MODE button until the "Fan" indicator lights. 2. Keep doors &Ḥwindows closed for desired fan speed. The air conditioner will control room temperature automatically round the temperature point set by using the remote control, while unit...

Complete Owner's Guide
Page 10
... fan speed indicator light will illuminate after cleaning the filter, press the "Filter" button and the light will illuminate. To reset after 250 hours of operation. Under AUTO, Heat, Dry mode, you turn on a garden hose to clean the Air Filter (See Care and Cleaning) for service. If the display reads "P1" , bottom tray is lower than the unit. Carefully move the unit to 0.0. C. Operating Instructions Operating Instructions (continued) temperature display. To cancel the timer setting, simply tap TIMER ON or TIMER OFF button...
... fan speed indicator light will illuminate after cleaning the filter, press the "Filter" button and the light will illuminate. To reset after 250 hours of operation. Under AUTO, Heat, Dry mode, you turn on a garden hose to clean the Air Filter (See Care and Cleaning) for service. If the display reads "P1" , bottom tray is lower than the unit. Carefully move the unit to 0.0. C. Operating Instructions Operating Instructions (continued) temperature display. To cancel the timer setting, simply tap TIMER ON or TIMER OFF button...
Complete Owner's Guide
Page 11
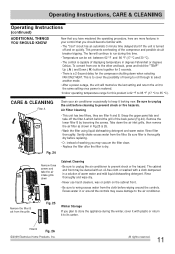
... detergent. Replace the filter after the filter is turned off the filter A which behind the grill of the compressor and possible circuit breaker tripping. To convert from the filter. Air Filter Cleaning This unit has two filters, they are more features in your air conditioner occasionally to prevent shock or fire hazard. Rinse filter thoroughly. Gently shake excess water from one to prevent shock or fire hazards. The "Cool" circuit has...
... detergent. Replace the filter after the filter is turned off the filter A which behind the grill of the compressor and possible circuit breaker tripping. To convert from the filter. Air Filter Cleaning This unit has two filters, they are more features in your air conditioner occasionally to prevent shock or fire hazard. Rinse filter thoroughly. Gently shake excess water from one to prevent shock or fire hazards. The "Cool" circuit has...
Complete Owner's Guide
Page 12
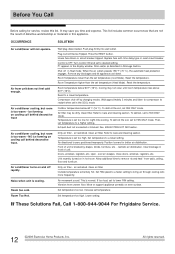
... blockage in Heat mode. Outside temperature extremely hot. Air movement sound. OCCURRENCE SOLUTION Air conditioner will not operate. Control is cooling. Room Temperature lower than the set FAN ONLY mode. Refer to FAN ONLY mode. restricts air distribution. Vibraion from unit does not feel cold enough. Position louvers for service, review this appliance. Allow additional time to a lower setting. Lower setting. All rights reserved. Press the RESET button. Clean filter. Doors, windows, registers, etc. Unit recently turned on cooling coil behind decorative...
... blockage in Heat mode. Outside temperature extremely hot. Air movement sound. OCCURRENCE SOLUTION Air conditioner will not operate. Control is cooling. Room Temperature lower than the set FAN ONLY mode. Refer to FAN ONLY mode. restricts air distribution. Vibraion from unit does not feel cold enough. Position louvers for service, review this appliance. Allow additional time to a lower setting. Lower setting. All rights reserved. Press the RESET button. Clean filter. Doors, windows, registers, etc. Unit recently turned on cooling coil behind decorative...
Complete Owner's Guide
Page 13
... provided instructions. 8. Rust on components other than those covered under this warranty. Products purchased "as any removal, transportation and reinstallation expenses which are not a part of the appliance when it is " are subject to remote areas, including the state of the unit. 4. Service calls which are incurred during installation, including but not limited to, any parts in the Sealed Refrigeration System (compressor, condenser, evaporator...
... provided instructions. 8. Rust on components other than those covered under this warranty. Products purchased "as any removal, transportation and reinstallation expenses which are not a part of the appliance when it is " are subject to remote areas, including the state of the unit. 4. Service calls which are incurred during installation, including but not limited to, any parts in the Sealed Refrigeration System (compressor, condenser, evaporator...

Wiring Diagram
Page 1
CN301 OPTIONAL CONDENSER SENSOR AMBIENT SENSOR EVAPORATOR SENSOR REMOTE BOARD DISPLAY BOARD CN2 CN1 OPTIONAL LIGHT SW CN6 CN3 CN15 CN7 CN5 CN4 OPTIONAL SW2 SW1 MAIN BOARD CN9 SWING M OPTIONAL Y/G ION RED P4 OPTIONAL BLACK Y/G M~ RED BLACK P1(P5) MOTOR BLACK DOWN FAN (WHITE) Y/G ~M YELLOW RED P2 P3 BROWN OPTIONAL BLUE DOWN UP FAN CN10 BLACK M~ Y/G BROWN BLUE UP OPTIONAL CN11 M 43 34...
CN301 OPTIONAL CONDENSER SENSOR AMBIENT SENSOR EVAPORATOR SENSOR REMOTE BOARD DISPLAY BOARD CN2 CN1 OPTIONAL LIGHT SW CN6 CN3 CN15 CN7 CN5 CN4 OPTIONAL SW2 SW1 MAIN BOARD CN9 SWING M OPTIONAL Y/G ION RED P4 OPTIONAL BLACK Y/G M~ RED BLACK P1(P5) MOTOR BLACK DOWN FAN (WHITE) Y/G ~M YELLOW RED P2 P3 BROWN OPTIONAL BLUE DOWN UP FAN CN10 BLACK M~ Y/G BROWN BLUE UP OPTIONAL CN11 M 43 34...

Product Specifications Sheet
Page 1
... settings when power is . Performance Cool BTUs 14,000 frigidaire.com x Home Comfort FFPA1422R1 Signature Features Ready-Select® Controls Easily select options with an extra long three-prong cord that makes extension cords unnecessary. 24-Hour On/Off Timer Keep things cool on hot days. Portable Air Conditioner Product Dimensions Height Width Depth 30-1/8" 18-5/16" 15-5/8" More Easy-To-Use Features Effortless™ Clean Filter Our antibacterial filter...
... settings when power is . Performance Cool BTUs 14,000 frigidaire.com x Home Comfort FFPA1422R1 Signature Features Ready-Select® Controls Easily select options with an extra long three-prong cord that makes extension cords unnecessary. 24-Hour On/Off Timer Keep things cool on hot days. Portable Air Conditioner Product Dimensions Height Width Depth 30-1/8" 18-5/16" 15-5/8" More Easy-To-Use Features Effortless™ Clean Filter Our antibacterial filter...
Product Specifications Sheet
Page 2
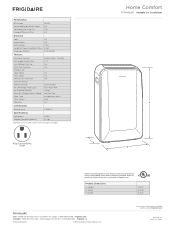
...Product Dimensions A - Height B - Width C - Portable AC "R" Models Performance Frigidaire Baseline BTU (Cool) Dehumidification (Pints / Hour) Cool Area (Up To Sq. Ft.) Energy Efficiency Ratio 14,000 3.8 700 8.9 Electrical Volts 115 Amps (Cool) 11.9 Watts (Cool) 1,575 Length of Power Cord (Min./Max.) 6'/6.5' Plug Type (NEMA) LCDI (5-15P) Features Electronic Controls Fan Speeds (Cool / Fan) Low Voltage Start-Up Auto Cool Function Energy Save Sleep Mode Filter Check 24-Hour On / Off Timer Clean Air Ionizer Remote Control Air CFM (High / Med / Low) Air Direction Control Fresh Air...
...Product Dimensions A - Height B - Width C - Portable AC "R" Models Performance Frigidaire Baseline BTU (Cool) Dehumidification (Pints / Hour) Cool Area (Up To Sq. Ft.) Energy Efficiency Ratio 14,000 3.8 700 8.9 Electrical Volts 115 Amps (Cool) 11.9 Watts (Cool) 1,575 Length of Power Cord (Min./Max.) 6'/6.5' Plug Type (NEMA) LCDI (5-15P) Features Electronic Controls Fan Speeds (Cool / Fan) Low Voltage Start-Up Auto Cool Function Energy Save Sleep Mode Filter Check 24-Hour On / Off Timer Clean Air Ionizer Remote Control Air CFM (High / Med / Low) Air Direction Control Fresh Air...


