

Complete Owner s Guide
Page 1
Important Safety Instructions 2-3 Product Registration 4 Normal Sounds 4 Unit Description 5 Accessories Included 5 Installation Instructions 6-7 Air Conditioner Features 8 Operating Instruction 8-16 Care and Cleaning 17 Before You Call 18 Major Appliance Limited Warranty 19
Important Safety Instructions 2-3 Product Registration 4 Normal Sounds 4 Unit Description 5 Accessories Included 5 Installation Instructions 6-7 Air Conditioner Features 8 Operating Instruction 8-16 Care and Cleaning 17 Before You Call 18 Major Appliance Limited Warranty 19

Complete Owner s Guide
Page 2
Important Safety Instructions NOTE: NOTE: WARNING WARNING WARNING WARNING SAFETY PRECAUTIONS
Important Safety Instructions NOTE: NOTE: WARNING WARNING WARNING WARNING SAFETY PRECAUTIONS

Complete Owner s Guide
Page 4
... below the mode and serial numbers. Normal Sounds Sound of Rushing Air At the top of the unit, you may vibrate and make noise because of the cabinet. Model No. Serial No. On all models, the serial plate is located on the side of uneven floor. Product Registration & Normal Sounds Product Registration Record Your Model and Serial Numbers Record in completely, signed and returned to refrigerant passing...
... below the mode and serial numbers. Normal Sounds Sound of Rushing Air At the top of the unit, you may vibrate and make noise because of the cabinet. Model No. Serial No. On all models, the serial plate is located on the side of uneven floor. Product Registration & Normal Sounds Product Registration Record Your Model and Serial Numbers Record in completely, signed and returned to refrigerant passing...

Complete Owner s Guide
Page 5
... Included Unit Description Air Outlet Grill Control Panel Signal Receiver Remote Control Carrying Handle Air Exhaust Continuous Drain Outlet Air Intake Power Cord Continuous Drain Outlet Air Intake Castor Power cord Bottom Drain Outlet (FFPA1222T1、FFPH1222T1 FFPA1422T1、FFPH1422T1) Bottom Drain Outlet (FFPA0822T1、FFPA1022T1) Accessories Included PARTS: PARTS NAME: Window Kit Connector A Exhaust hose connector B (FFPA1222T1、FFPH1222T1 FFPA1422T1、FFPH1422T1) Exhaust hose connector B (FFPA0822T1、FFPA1022T1) Window Kit Exhaust Hose Screws...
... Included Unit Description Air Outlet Grill Control Panel Signal Receiver Remote Control Carrying Handle Air Exhaust Continuous Drain Outlet Air Intake Power Cord Continuous Drain Outlet Air Intake Castor Power cord Bottom Drain Outlet (FFPA1222T1、FFPH1222T1 FFPA1422T1、FFPH1422T1) Bottom Drain Outlet (FFPA0822T1、FFPA1022T1) Accessories Included PARTS: PARTS NAME: Window Kit Connector A Exhaust hose connector B (FFPA1222T1、FFPH1222T1 FFPA1422T1、FFPH1422T1) Exhaust hose connector B (FFPA0822T1、FFPA1022T1) Window Kit Exhaust Hose Screws...
Complete Owner s Guide
Page 6
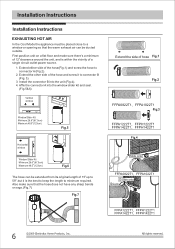
...window Window Slider Kit Minimum:26.6″(67.5cm) Maxmum:48.5″(123cm) Fig.6 The hose can be ducted outside. Extend either side of the hose and screw it is within the vicinity of a single circuit outlet power source. 1. Installation Instructions Installation Instructions EXHAUSTING HOT AIR In the Cool Mode the appliance must be placed close to a window or opening so that the hose... the other side of the hose(Fig.1) and screw the hose to connector A (Fig.2). 2. First position unit on a flat floor and make sure that the warm exhaust air can be extended from its original...
...window Window Slider Kit Minimum:26.6″(67.5cm) Maxmum:48.5″(123cm) Fig.6 The hose can be ducted outside. Extend either side of the hose and screw it is within the vicinity of a single circuit outlet power source. 1. Installation Instructions Installation Instructions EXHAUSTING HOT AIR In the Cool Mode the appliance must be placed close to a window or opening so that the hose... the other side of the hose(Fig.1) and screw the hose to connector A (Fig.2). 2. First position unit on a flat floor and make sure that the warm exhaust air can be extended from its original...

Complete Owner s Guide
Page 7
... A (adhesive type) Window stool Fig.14 Window slider kit screws Fig.15 Window stool Window slider kit screws screws Fig.16 Foam seal B Fig.17 Fig.18 Installation Instructions Installation Instructions(continued) Installation in a double-hung sash window 1.Cut the foam seals A(adhesive type) to the proper lengths and attach them to the window frame. Attach the window slider kit to an appropriate length and seal the open gap...
... A (adhesive type) Window stool Fig.14 Window slider kit screws Fig.15 Window stool Window slider kit screws screws Fig.16 Foam seal B Fig.17 Fig.18 Installation Instructions Installation Instructions(continued) Installation in a double-hung sash window 1.Cut the foam seals A(adhesive type) to the proper lengths and attach them to the window frame. Attach the window slider kit to an appropriate length and seal the open gap...
Complete Owner s Guide
Page 8
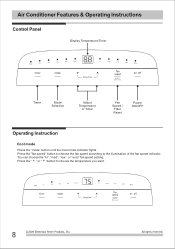
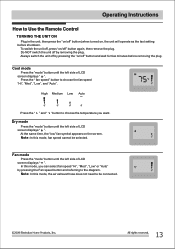
Press the " " or " "button to the illumination of the fan speed indicator. You can choose the "hi", "med", "low", or "auto" fan speed setting. Press the "fan speed" button to choose the fan speed according to choose the temperature you want. Air Conditioner Features & Operating Instructions Control Panel Display Temperature/Timer Timer Mode Selection Adjust Temperature or Timer Fan Speed / Filter Reset Power ON/OFF Operating Instruction Cool mode Press the "mode" button until the Cool mode indicator lights.
Press the " " or " "button to the illumination of the fan speed indicator. You can choose the "hi", "med", "low", or "auto" fan speed setting. Press the "fan speed" button to choose the fan speed according to choose the temperature you want. Air Conditioner Features & Operating Instructions Control Panel Display Temperature/Timer Timer Mode Selection Adjust Temperature or Timer Fan Speed / Filter Reset Power ON/OFF Operating Instruction Cool mode Press the "mode" button until the Cool mode indicator lights.

Complete Owner s Guide
Page 9
... mode, fan speed cannot be connected. When this mode, fan speed cannot be selected. Note: In this mode initiates, the fan may not operate for the first 2 minutes to choose the temperature you can select fan speed "hi", "med", "low" or "auto" . Fan mode Press the "mode" button until the Heat mode indicator lights. Press the " " or " "button to avoid blowing out cool air. Operating Instructions Dry mode Press the "mode" button until the Dry mode indicator lights. The screen displays room temperature...
... mode, fan speed cannot be connected. When this mode, fan speed cannot be selected. Note: In this mode initiates, the fan may not operate for the first 2 minutes to choose the temperature you can select fan speed "hi", "med", "low" or "auto" . Fan mode Press the "mode" button until the Heat mode indicator lights. Press the " " or " "button to avoid blowing out cool air. Operating Instructions Dry mode Press the "mode" button until the Dry mode indicator lights. The screen displays room temperature...

Complete Owner s Guide
Page 10
... the mode as previously set the temperature, the screen will count down the time remaining until the ECO mode indicator lights. Note: The unit will flash. Tap or hold the UP arrow ( ) or the DOWN arrow ( ) to change delay start up to delay the unit startup or shutdown. The control will display the room temperature. The unit will start timer at 0.5 hour increments up in energy saver(ECO) mode when used...
... the mode as previously set the temperature, the screen will count down the time remaining until the ECO mode indicator lights. Note: The unit will flash. Tap or hold the UP arrow ( ) or the DOWN arrow ( ) to change delay start up to delay the unit startup or shutdown. The control will display the room temperature. The unit will start timer at 0.5 hour increments up in energy saver(ECO) mode when used...
Complete Owner s Guide
Page 11
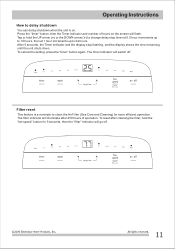
The timer indicator will flash. Press the "timer" button, then the Timer indicator and number of operation. Filter reset This feature is a reminder to clean the Air Filter (See Care and Cleaning) for 5 seconds, then the "filter" indicator will illuminate after cleaning the filter, hold the UP arrow ( ) or the DOWN arrow ( ) to change delay stop flashing, and the display shows the time remaining until the unit shuts down. Operating Instructions How to 24...
The timer indicator will flash. Press the "timer" button, then the Timer indicator and number of operation. Filter reset This feature is a reminder to clean the Air Filter (See Care and Cleaning) for 5 seconds, then the "filter" indicator will illuminate after cleaning the filter, hold the UP arrow ( ) or the DOWN arrow ( ) to change delay stop flashing, and the display shows the time remaining until the unit shuts down. Operating Instructions How to 24...
Complete Owner s Guide
Page 12
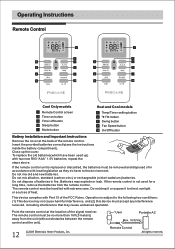
... the remote control. The remote control must accept any interference received, including interference that may explode or leak. Close up ) with local legislation as they do harm to the environment. If the remote control is subject to direct sunlight or sources of heat. Operating Instructions Remote Control Cool Only models Remote Control screen Timer on button Timer off button Sleep button Mode button Heat and Cool models Temp/Timer setting button Swing button Fan Speed button On/Off button Battery Installation and Important Instructions Remove the cover at the location of...
... the remote control. The remote control must accept any interference received, including interference that may explode or leak. Close up ) with local legislation as they do harm to the environment. If the remote control is subject to direct sunlight or sources of heat. Operating Instructions Remote Control Cool Only models Remote Control screen Timer on button Timer off button Sleep button Mode button Heat and Cool models Temp/Timer setting button Swing button Fan Speed button On/Off button Battery Installation and Important Instructions Remove the cover at the location of...
Complete Owner s Guide
Page 13
... button and referring to choose the fan speed "Hi", "Med", "Low", and "Auto". Note: In this mode, the air exhaust hose does not need to be selected. Note: In this mode, fan speed cannot be connected. Operating Instructions How to Use the Remote Control TURNING THE UNIT ON Plug in the unit, then press the "on/off" button (when turned on, the unit will operate as the last setting before removing the plug. Always switch the unit off " button...
... button and referring to choose the fan speed "Hi", "Med", "Low", and "Auto". Note: In this mode, the air exhaust hose does not need to be selected. Note: In this mode, fan speed cannot be connected. Operating Instructions How to Use the Remote Control TURNING THE UNIT ON Plug in the unit, then press the "on/off" button (when turned on, the unit will operate as the last setting before removing the plug. Always switch the unit off " button...

Complete Owner s Guide
Page 14
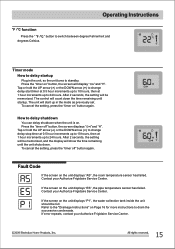
... "low" fan indicator lights. Note: In Fan or Dry mode, Sleep mode cannot be set temperature will display " ". Operating Instructions Heat mode(For Heat & Cool models only) Press the "mode" button until the left side of LCD screen displays " ". The louver on . In Cool or ECO mode the selected temperature will be set temperature, at any time during operation by 1 °F 60 minutes after the compressor shuts off. Press the " " and " " button to the originally selected temperature. This new temperature will...
... "low" fan indicator lights. Note: In Fan or Dry mode, Sleep mode cannot be set temperature will display " ". Operating Instructions Heat mode(For Heat & Cool models only) Press the "mode" button until the left side of LCD screen displays " ". The louver on . In Cool or ECO mode the selected temperature will be set temperature, at any time during operation by 1 °F 60 minutes after the compressor shuts off. Press the " " and " " button to the originally selected temperature. This new temperature will...
Complete Owner s Guide
Page 15
... the screen on the unit displays "P1", the water collection tank inside the unit should be memorized. To cancel the setting, press the "timer on " button, the screen will start timer at 0.5 hour increments up to 10 hours, then at 1 hour increments up to the "Drainage Instructions" on the unit displays "ES", the pipe temperature sensor has failed. Press the "timer on " button again. The unit will display " "and "H". How to...
... the screen on the unit displays "P1", the water collection tank inside the unit should be memorized. To cancel the setting, press the "timer on " button, the screen will start timer at 0.5 hour increments up to 10 hours, then at 1 hour increments up to the "Drainage Instructions" on the unit displays "ES", the pipe temperature sensor has failed. Press the "timer on " button again. The unit will display " "and "H". How to...

Complete Owner s Guide
Page 16
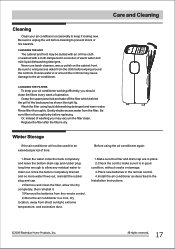
... 23 Emptying the condensate residue inside the unit during winter storage. Replace the drain cap to reach the maximum performance. Drip tray Bottom Drain Outlet Put the drip tray under the continuous drain outlet, then unscrew the drain cap to allow the condensate to drain the condensate from the drain outlet. Operating Instructions Drainage Instructions Continuous Drainage During the DRY mode, you want to remove the garden hose, prepare a drip tray...
... 23 Emptying the condensate residue inside the unit during winter storage. Replace the drain cap to reach the maximum performance. Drip tray Bottom Drain Outlet Put the drip tray under the continuous drain outlet, then unscrew the drain cap to allow the condensate to drain the condensate from the drain outlet. Operating Instructions Drainage Instructions Continuous Drainage During the DRY mode, you want to remove the garden hose, prepare a drip tray...
Complete Owner s Guide
Page 17
... washing you should clean the filters every week of operation. CLEANING THE FILTERS To keep it is thoroughly dry before cleaning to dry completely, then reinstall it. 3.Remove the batteries from the remote control. 4.Store the air conditioner in a cool, dry location, away from the filter. Gently shake excess water from direct sunlight, extreme temperature, and excessive dust. 1.Make sure the filter and drain cap are in the Installation Instructions. Replace the filter after the filter is dry.
... washing you should clean the filters every week of operation. CLEANING THE FILTERS To keep it is thoroughly dry before cleaning to dry completely, then reinstall it. 3.Remove the batteries from the remote control. 4.Store the air conditioner in a cool, dry location, away from the filter. Gently shake excess water from direct sunlight, extreme temperature, and excessive dust. 1.Make sure the filter and drain cap are in the Installation Instructions. Replace the filter after the filter is dry.

Complete Owner s Guide
Page 19
Major Appliance Limited Warranty
Major Appliance Limited Warranty

Wiring Diagram
Page 1
BLITE/WHI NILI CAN POWER SUPPLY BLUE 11 BROWN/BLACK K1 N.0. M FIB PADDLE-2 MAIN CONTROL PCB FM2 CORD IM I LE SEEP MOTOR J2 r- L____ J Pvk IFT J7 Rater Reed Sin DISPLAY XS 132 LN RECEI PCB i r CAPS C RED EIVCRN SM CAPA 1- - WIRING DIAGRAM 811303436 FMI 06 L GAPS N-
BLITE/WHI NILI CAN POWER SUPPLY BLUE 11 BROWN/BLACK K1 N.0. M FIB PADDLE-2 MAIN CONTROL PCB FM2 CORD IM I LE SEEP MOTOR J2 r- L____ J Pvk IFT J7 Rater Reed Sin DISPLAY XS 132 LN RECEI PCB i r CAPS C RED EIVCRN SM CAPA 1- - WIRING DIAGRAM 811303436 FMI 06 L GAPS N-
Product Specifications Sheet
Page 1
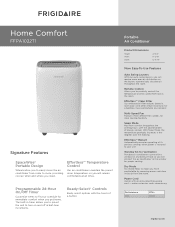
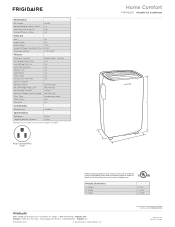
.... Power Cord Comes with the touch of energy savings. Home Comfort FFPA1022T1 Signature Features SpaceWise® Portable Design Wheels allow you to easily move the air conditioner from across the room. Performance Cool BTUs 10,000 frigidaire.com The built-in timer allows you to preset the unit to make you to precisely control the temperature and fan speed from room to your schedule for proper venting. Dry Mode Dry mode helps to turn on...
.... Power Cord Comes with the touch of energy savings. Home Comfort FFPA1022T1 Signature Features SpaceWise® Portable Design Wheels allow you to easily move the air conditioner from across the room. Performance Cool BTUs 10,000 frigidaire.com The built-in timer allows you to preset the unit to make you to precisely control the temperature and fan speed from room to your schedule for proper venting. Dry Mode Dry mode helps to turn on...
Product Specifications Sheet
Page 2
...2017 Electrolux Home Products, Inc. Refer to change. Ft.) Energy Efficiency Ratio 10,000 2.8 450 8.9 Electrical Volts 115 Amps (Cool) 10.2 Watts (Cool) 1,120 Length of Power Cord (Min./Max.) 6'/6.5' Plug Type (NEMA) LCDI (5-15P) Portable AC (T1) Models Frigidaire Baseline Features Electronic Controls Fan Speeds (Cool / Fan) Low Voltage Start-Up Auto Cool Function Energy Save Sleep Mode Filter Check 24-Hour On / Off Timer Clean Air Ionizer Remote Control Air CFM (High / Med / Low) Air Direction Control Fresh Air / Exhaust Vent / Closed Filter Type Filter Access Warranty1 Ready...
...2017 Electrolux Home Products, Inc. Refer to change. Ft.) Energy Efficiency Ratio 10,000 2.8 450 8.9 Electrical Volts 115 Amps (Cool) 10.2 Watts (Cool) 1,120 Length of Power Cord (Min./Max.) 6'/6.5' Plug Type (NEMA) LCDI (5-15P) Portable AC (T1) Models Frigidaire Baseline Features Electronic Controls Fan Speeds (Cool / Fan) Low Voltage Start-Up Auto Cool Function Energy Save Sleep Mode Filter Check 24-Hour On / Off Timer Clean Air Ionizer Remote Control Air CFM (High / Med / Low) Air Direction Control Fresh Air / Exhaust Vent / Closed Filter Type Filter Access Warranty1 Ready...


