
Complete Owners Guide
Page 1
All about the Use &Care of your Microwave Oven A06823420 (January, 2020) TABLE OF CONTENTS WELCOME & CONGRATULATIONS 2 IMPORTANT SAFETY INSTRUCTIONS 2 PART NAMES 8 CONTROL PANEL 9 BEFORE OPERATING 10 MANUAL COOKING 11 AUTO COOKING 17 COOKING CHARTS 19 CONVENIENT FEATURES 21 CLEANING AND CARE 23 SERVICE CALL CHECK 27 SPECIFICATIONS 27 WARRANTY 28 www.frigidaire.com USA 1-800-374-4432 www.frigidaire.ca Canada 1-800-265-8352
All about the Use &Care of your Microwave Oven A06823420 (January, 2020) TABLE OF CONTENTS WELCOME & CONGRATULATIONS 2 IMPORTANT SAFETY INSTRUCTIONS 2 PART NAMES 8 CONTROL PANEL 9 BEFORE OPERATING 10 MANUAL COOKING 11 AUTO COOKING 17 COOKING CHARTS 19 CONVENIENT FEATURES 21 CLEANING AND CARE 23 SERVICE CALL CHECK 27 SPECIFICATIONS 27 WARRANTY 28 www.frigidaire.com USA 1-800-374-4432 www.frigidaire.ca Canada 1-800-265-8352

Complete Owners Guide
Page 2
...numbers is no damage to help is damaged. Or call Frigidaire Customer Services at : http://www.frigidaire.com Before you call away. It is particularly important that the oven door close properly and that sold you use and maintain your microwave oven properly. We know you solve common problems that ...section titled "Service Call Check". If you do to prevent property damage, personal injury or loss of our product and are not meant to microwave energy. Visit the Frigidaire Web Site at 1-800-374-4432, 24 hours a day, 7 days a week. It is important not to defeat or tamper with ...
...numbers is no damage to help is damaged. Or call Frigidaire Customer Services at : http://www.frigidaire.com Before you call away. It is particularly important that the oven door close properly and that sold you use and maintain your microwave oven properly. We know you solve common problems that ...section titled "Service Call Check". If you do to prevent property damage, personal injury or loss of our product and are not meant to microwave energy. Visit the Frigidaire Web Site at 1-800-374-4432, 24 hours a day, 7 days a week. It is important not to defeat or tamper with ...
Complete Owners Guide
Page 3
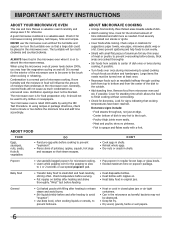
... bags before removing the container. - Use extreme care when inserting a spoon or other combustible materials are placed inside the microwave oven ignite, keep microwave oven door closed glass jars-are able to be boiling. Use a wide-mouthed container. - It is specifically..., including the following sections. • Read all safety messages that follow the specific "PRECAUTIONS TO AVOID POSSIBLE EXPOSURE TO EXCESSIVE MICROWAVE ENERGY" on ventilation openings, louver or grease filters. • Use care when cleaning the louver and the grease filters...
... bags before removing the container. - Use extreme care when inserting a spoon or other combustible materials are placed inside the microwave oven ignite, keep microwave oven door closed glass jars-are able to be boiling. Use a wide-mouthed container. - It is specifically..., including the following sections. • Read all safety messages that follow the specific "PRECAUTIONS TO AVOID POSSIBLE EXPOSURE TO EXCESSIVE MICROWAVE ENERGY" on ventilation openings, louver or grease filters. • Use care when cleaning the louver and the grease filters...
Complete Owners Guide
Page 4
...and uses ISM frequency energy and if not installed and used in strict accordance with metal scouring pads. However, there is the microwave term for sparks in a particular installation. The manufacturer is caused by unauthorized modification to this equipment does cause interference ...• Reorient the receiving antenna of the radio or television. • Relocate the microwave oven with respect to the receiver. • Move the microwave oven away from the receiver. • Plug the microwave oven into a different outlet so that is the responsibility of the user to correct ...
...and uses ISM frequency energy and if not installed and used in strict accordance with metal scouring pads. However, there is the microwave term for sparks in a particular installation. The manufacturer is caused by unauthorized modification to this equipment does cause interference ...• Reorient the receiving antenna of the radio or television. • Relocate the microwave oven with respect to the receiver. • Move the microwave oven away from the receiver. • Plug the microwave oven into a different outlet so that is the responsibility of the user to correct ...
Complete Owners Guide
Page 5
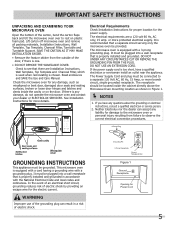
... Instructions for proper location for Power Cord 5 If you have a qualified electrician or serviceman install an outlet near the appliance. This microwave oven is recommended that there are a 120 volt 60 Hz, AC only, 15 amp. Figure 1 Ground Receptacle Opening for the power supply.... door, damaged door seals and sealing surfaces, broken or loose door hinges and latches and dents inside the cabinet directly above the Microwave Oven mounting location as shown in accordance with the National Electrical Code and local codes and ordinances. In the event of an electrical...
... Instructions for proper location for Power Cord 5 If you have a qualified electrician or serviceman install an outlet near the appliance. This microwave oven is recommended that there are a 120 volt 60 Hz, AC only, 15 amp. Figure 1 Ground Receptacle Opening for the power supply.... door, damaged door seals and sealing surfaces, broken or loose door hinges and latches and dents inside the cabinet directly above the Microwave Oven mounting location as shown in accordance with the National Electrical Code and local codes and ordinances. In the event of an electrical...
Complete Owners Guide
Page 6
...bacteria may hear the magnetron cycling on and off. Poultry thigh joints move easily. - Popcorn • Use specially bagged popcorn for microwave cooking. • Listen while popping corn for doneness. Room humidity and the moisture in shells. Check recipe or cookbook for reference...time accordingly. ALWAYS have been reached. When using recipes or package directions, check food a minute or two before cooking to absorb the microwave energy. Food severely overcooked can smoke or ignite. • Cover foods while cooking. General • Cut baked goods with a fork....
...bacteria may hear the magnetron cycling on and off. Poultry thigh joints move easily. - Popcorn • Use specially bagged popcorn for microwave cooking. • Listen while popping corn for doneness. Room humidity and the moisture in shells. Check recipe or cookbook for reference...time accordingly. ALWAYS have been reached. When using recipes or package directions, check food a minute or two before cooking to absorb the microwave energy. Food severely overcooked can smoke or ignite. • Cover foods while cooking. General • Cut baked goods with a fork....
Complete Owners Guide
Page 7
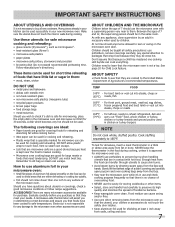
...removing items from the food can escape. Food residue can cook everything. As with metallic trim • non-heat-resistant glass • non-microwave-safe plastics (margarine tubs) • recycled paper products • brown paper bags • food storage bags • metal twist-ties ...Should you that foods have questions about utensils or coverings, check a good microwave cookbook or follow recipe suggestions. For fresh pork, ground meat, seafood, egg dishes, (71°C) frozen prepared food and beef, lamb or...
...removing items from the food can escape. Food residue can cook everything. As with metallic trim • non-heat-resistant glass • non-microwave-safe plastics (margarine tubs) • recycled paper products • brown paper bags • food storage bags • metal twist-ties ...Should you that foods have questions about utensils or coverings, check a good microwave cookbook or follow recipe suggestions. For fresh pork, ground meat, seafood, egg dishes, (71°C) frozen prepared food and beef, lamb or...

Complete Owners Guide
Page 8
PART NAMES Microwave features Front View 8 1 2 3 4 6 5 11 7 Bottom View 9 1 Window 2 Interlock system 3 Door assembly 4 Turntable ring assembly 5 Turntable Shaft 6 Turntable glass tray 7 Control panel 8 Ventilation openings (on top) 9 Surface lights 10 Ventilation filters 11 Waveguide cover: DO NOT REMOVE 10 8
PART NAMES Microwave features Front View 8 1 2 3 4 6 5 11 7 Bottom View 9 1 Window 2 Interlock system 3 Door assembly 4 Turntable ring assembly 5 Turntable Shaft 6 Turntable glass tray 7 Control panel 8 Ventilation openings (on top) 9 Surface lights 10 Ventilation filters 11 Waveguide cover: DO NOT REMOVE 10 8
Complete Owners Guide
Page 10
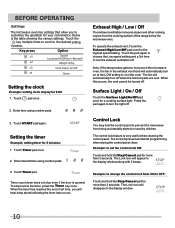
...once. 2. When this occurs, the vent cannot be turned off when the internal parts are cool. Press the pad again to prevent the microwave from being accidentally started or used by children. Timer count down does not stop /cancel the timer, press the Timer key once . Enter desired... the exhaust vent, Touch the Exhaust High/Low/Off pad once for a cooking surface light. Note: If the temperature gets too hot around the microwave oven, the fan in the display window along with 2 beeps. 3. Touch Timer pad. Setting the timer Example: setting timer for your convenience. ...
...once. 2. When this occurs, the vent cannot be turned off when the internal parts are cool. Press the pad again to prevent the microwave from being accidentally started or used by children. Timer count down does not stop /cancel the timer, press the Timer key once . Enter desired... the exhaust vent, Touch the Exhaust High/Low/Off pad once for a cooking surface light. Note: If the temperature gets too hot around the microwave oven, the fan in the display window along with 2 beeps. 3. Touch Timer pad. Setting the timer Example: setting timer for your convenience. ...
Complete Owners Guide
Page 11
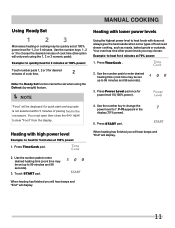
... you will hear beeps and "End" will display. 11 Press Time Cook pad. When heating has finished you may choose. P-70a ppears in the microwave. Use the number pads to enter desired heating time (cook time may be set up to 99 minutes and 99 seconds). 3. You must open then... of cook time (this option will be set up to 99 minutes and 99 seconds). 3. MANUAL COOKING Using Ready Set Heating with lower power levels Microwave heating or cooking may be quickly set at 100% power: Touch number pads 1, 2 or 3 for desired minutes of cook time. 2 Note: the Ready Set ...
... you will hear beeps and "End" will display. 11 Press Time Cook pad. When heating has finished you may choose. P-70a ppears in the microwave. Use the number pads to enter desired heating time (cook time may be set up to 99 minutes and 99 seconds). 3. You must open then... of cook time (this option will be set up to 99 minutes and 99 seconds). 3. MANUAL COOKING Using Ready Set Heating with lower power levels Microwave heating or cooking may be quickly set at 100% power: Touch number pads 1, 2 or 3 for desired minutes of cook time. 2 Note: the Ready Set ...

Complete Owners Guide
Page 12
...P-50 appears in the display (80 % power). 5. MANUAL COOKING Heating with multiple cooking stages Using the Stop/Cancel key For best results, some microwave recipes call for different power levels or different lengths of 10 seconds/30 seconds each time this pad is completed. 4. Press Power Level pad for...10 seconds/30 seconds at 80% power and then 50% power for first stage. 12 Press Power Level pad once. 1. Cancel a program during 80% microwave cooking : Press +30 sec pad twice. Note: Power level must always be set up to enter power level for 3 minutes at 100% power level...
...P-50 appears in the display (80 % power). 5. MANUAL COOKING Heating with multiple cooking stages Using the Stop/Cancel key For best results, some microwave recipes call for different power levels or different lengths of 10 seconds/30 seconds each time this pad is completed. 4. Press Power Level pad for...10 seconds/30 seconds at 80% power and then 50% power for first stage. 12 Press Power Level pad once. 1. Cancel a program during 80% microwave cooking : Press +30 sec pad twice. Note: Power level must always be set up to enter power level for 3 minutes at 100% power level...

Complete Owners Guide
Page 16
... food items. • Wrapping in paper towels or waxed paper Sandwiches and many other food types containing prebaked bread should be prepare in the microwave. For more even results, reduce the power levels when cooking large pieces of food. • Natural moisture Very moist foods cook more evenly because... shaped foods, such as casseroles and vegetable from the outside of the turntable tray. • Let the food stand After removing the food from the microwave, cover the food with foil or a casserole lid and let it is not necessary. • Turn over items Turn over foods such as pork ...
... food items. • Wrapping in paper towels or waxed paper Sandwiches and many other food types containing prebaked bread should be prepare in the microwave. For more even results, reduce the power levels when cooking large pieces of food. • Natural moisture Very moist foods cook more evenly because... shaped foods, such as casseroles and vegetable from the outside of the turntable tray. • Let the food stand After removing the food from the microwave, cover the food with foil or a casserole lid and let it is not necessary. • Turn over items Turn over foods such as pork ...
Complete Owners Guide
Page 17
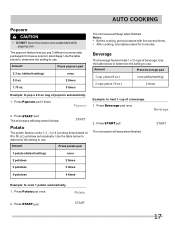
The popcorn feature lets you pop 3 different commercially packaged microwave popcorn sized bags. Beverage The beverage feature heats 1 or 2 cups of a beverage. 1. Amount Press beverage pad 1 cup ( about 8 oz.) once (...After cooking, let potatoes stand for 5 minutes. Press Beverage pad once. 2. The microwave will beep when finished. The microwave will beep when finished. Press START pad. AUTO COOKING Popcorn • DO NOT leave microwave oven unattended while popping corn. The microwave will beep when finished. 1 potato (default setting) 2 potatoes 3 potatoes once ...
The popcorn feature lets you pop 3 different commercially packaged microwave popcorn sized bags. Beverage The beverage feature heats 1 or 2 cups of a beverage. 1. Amount Press beverage pad 1 cup ( about 8 oz.) once (...After cooking, let potatoes stand for 5 minutes. Press Beverage pad once. 2. The microwave will beep when finished. The microwave will beep when finished. Press START pad. AUTO COOKING Popcorn • DO NOT leave microwave oven unattended while popping corn. The microwave will beep when finished. 1 potato (default setting) 2 potatoes 3 potatoes once ...
Complete Owners Guide
Page 18
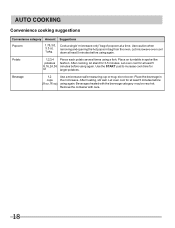
... beverage category may be very hot. AUTO COOKING Convenience cooking suggestions Convenience category Amount Suggestions Popcorn 1.75,3.0, 3.3 oz. 1 pkg. Let microwave oven cool down at least 5 minutes before using again. Place the beverage in spoke-like fashion. After cooking, let stand for larger ... do not cover. Beverages heated with care. 18 Place on turntable in the microwave. After heating, stir well. Let oven cool for at least 5 minutes before using again. Cook a single "microwave-only" bag of popcorn at least 5 m. Use caution when removing and opening...
... beverage category may be very hot. AUTO COOKING Convenience cooking suggestions Convenience category Amount Suggestions Popcorn 1.75,3.0, 3.3 oz. 1 pkg. Let microwave oven cool down at least 5 minutes before using again. Place the beverage in spoke-like fashion. After cooking, let stand for larger ... do not cover. Beverages heated with care. 18 Place on turntable in the microwave. After heating, stir well. Let oven cool for at least 5 minutes before using again. Cook a single "microwave-only" bag of popcorn at least 5 m. Use caution when removing and opening...
Complete Owners Guide
Page 21
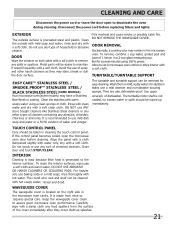
... possibly catch fire. TURNTABLE/TURNTABLE SUPPORT EASY CARE™ STAINLESS STEEL / SMUDGE_PROOF™ STAINLESS STEEL / BLACK STAINLESS STEEL (SOME MODELS) Your microwave oven(some models) may stain, streak or dull the door surface. Use upper wirerack of 1 lemon in mild, sudsy water; The turntable... scouring sponge. for several minutes using a clean sponge or cloth. TOUCH CONTROL PANEL Care should be easier to set in the microwave oven cavity. If the control panel becomes soiled, open to use ANY store bought cleaners like Stainless Steel cleaners or any abrasive,...
... possibly catch fire. TURNTABLE/TURNTABLE SUPPORT EASY CARE™ STAINLESS STEEL / SMUDGE_PROOF™ STAINLESS STEEL / BLACK STAINLESS STEEL (SOME MODELS) Your microwave oven(some models) may stain, streak or dull the door surface. Use upper wirerack of 1 lemon in mild, sudsy water; The turntable... scouring sponge. for several minutes using a clean sponge or cloth. TOUCH CONTROL PANEL Care should be easier to set in the microwave oven cavity. If the control panel becomes soiled, open to use ANY store bought cleaners like Stainless Steel cleaners or any abrasive,...
Complete Owners Guide
Page 22
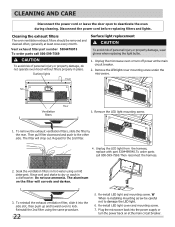
...filter part number 5304478913 To order parts call 800-599-7569.Then reconnect the harness. 2. Remove the LED light cover mounting screw under the microwave. The filter will corrode and darken. 3. The aluminum on at the main circuit breaker. generally at the main circuit breaker. 2. To ... property damage, wear gloves when replacing the light bulbs. W When re-installing mounting screw be removed and cleaned often; P lug the microwave back into the side slot, then push up and toward oven to deactivate the oven during cleaning. CLEANING AND CARE Disconnect the power cord...
...filter part number 5304478913 To order parts call 800-599-7569.Then reconnect the harness. 2. Remove the LED light cover mounting screw under the microwave. The filter will corrode and darken. 3. The aluminum on at the main circuit breaker. generally at the main circuit breaker. 2. To ... property damage, wear gloves when replacing the light bulbs. W When re-installing mounting screw be removed and cleaned often; P lug the microwave back into the side slot, then push up and toward oven to deactivate the oven during cleaning. CLEANING AND CARE Disconnect the power cord...
Complete Owners Guide
Page 23
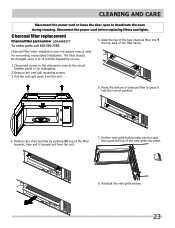
... To order parts call 800-599-7569 5. P ull the vent grill away from the unit. 7. Press the bottom of charcoal filter to the microwave oven at the circuit breaker panel or by pushing t?he top of the vent grille into the correct position. 4. Reinstall the vent grille screws. ...23 Charcoal Filter when installed in your microwave oven,is used for nonvented, recirculated Installation. Put the vent grille bottom tabs into the slots then push the top of the filter inwards, ...
... To order parts call 800-599-7569 5. P ull the vent grill away from the unit. 7. Press the bottom of charcoal filter to the microwave oven at the circuit breaker panel or by pushing t?he top of the vent grille into the correct position. 4. Reinstall the vent grille screws. ...23 Charcoal Filter when installed in your microwave oven,is used for nonvented, recirculated Installation. Put the vent grille bottom tabs into the slots then push the top of the filter inwards, ...
Complete Owners Guide
Page 24
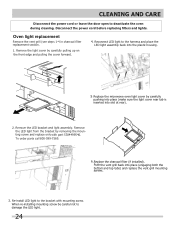
... LED bracket and light assembly. Re-install LED light to the harness and place the LED light assembly back into the plastic housing. 5 Replace the microwave oven light cover by carefully pulling up on the front edge and pulling the cover forward. 4. Remove the LED light from the bracket by removing...
... LED bracket and light assembly. Re-install LED light to the harness and place the LED light assembly back into the plastic housing. 5 Replace the microwave oven light cover by carefully pulling up on the front edge and pulling the cover forward. 4. Remove the LED light from the bracket by removing...

Complete Owners Guide
Page 25
... Mode on the nameplate means the product is calculated by measuring maximum width, depth and height. A Does the microwave oven light come on the nameplate means the product is less. If they are functioning properly, CONTACT YOUR NEAREST ... by Underwriters Laboratories, Inc. Federal Communications Commission Authorized. If the oven is set by a "do-it-yourself" repair person. 2. A microwave oven should never be serviced by : FCC - for FFMV1846VS,FFMV1846VW FFMV1846VB, FFMV1846VD) 1000 W 2450 MHz (Class B/Group2)** 29 .88 "(W) x 15.04 "(D) x 16.41 "(H) 20.94 ...
... Mode on the nameplate means the product is calculated by measuring maximum width, depth and height. A Does the microwave oven light come on the nameplate means the product is less. If they are functioning properly, CONTACT YOUR NEAREST ... by Underwriters Laboratories, Inc. Federal Communications Commission Authorized. If the oven is set by a "do-it-yourself" repair person. 2. A microwave oven should never be serviced by : FCC - for FFMV1846VS,FFMV1846VW FFMV1846VB, FFMV1846VD) 1000 W 2450 MHz (Class B/Group2)** 29 .88 "(W) x 15.04 "(D) x 16.41 "(H) 20.94 ...
Installation Instructions
Page 1
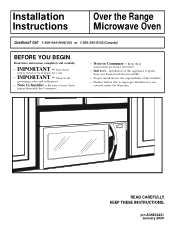
.... KEEP THESE INSTRUCTIONS. Be sure to Consumer - Installation of the installer. • Product failure due to Installer - p/n A06823421 January 2020 Installation Instructions Over the Range Microwave Oven Questions? Save these instructions for local inspector's use. • IMPORTANT - Keep these instructions for future reference. • Skill level -
.... KEEP THESE INSTRUCTIONS. Be sure to Consumer - Installation of the installer. • Product failure due to Installer - p/n A06823421 January 2020 Installation Instructions Over the Range Microwave Oven Questions? Save these instructions for local inspector's use. • IMPORTANT - Keep these instructions for future reference. • Skill level -


