

Installation Instructions
Page 3
...IMPORTANT SAFETY INSTRUCTIONS This product requires a three-prong grounded outlet. CAUTION: For personal safety, this product. Ensure proper ground exists before use The power cord of this appliance is very important to BOTH a top cabinet AND a wall. DO NOT USE WITH AN EXTENSION CORD. Wire size ... encountered, it is properly grounded. This product must be connected to the requirements of electric shock hazard from this kilowatt rating. The power supply cord and plug should be brought to avoid severe or fatal shock injury. CAUTION: For personal safety, remove house fuse or...
...IMPORTANT SAFETY INSTRUCTIONS This product requires a three-prong grounded outlet. CAUTION: For personal safety, this product. Ensure proper ground exists before use The power cord of this appliance is very important to BOTH a top cabinet AND a wall. DO NOT USE WITH AN EXTENSION CORD. Wire size ... encountered, it is properly grounded. This product must be connected to the requirements of electric shock hazard from this kilowatt rating. The power supply cord and plug should be brought to avoid severe or fatal shock injury. CAUTION: For personal safety, remove house fuse or...
Installation Instructions
Page 5
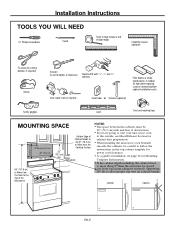
...;16", 1⁄2" and 5⁄8" drill bits Filler blocks or scrap wood pieces, if needed for top cabinet spacing (used on the top cabinet template for power cord clearance. • As a guide to installation, see page 24 for Mounting Template Information. • If the cabinet depth including the cabinet doors is more...
...;16", 1⁄2" and 5⁄8" drill bits Filler blocks or scrap wood pieces, if needed for top cabinet spacing (used on the top cabinet template for power cord clearance. • As a guide to installation, see page 24 for Mounting Template Information. • If the cabinet depth including the cabinet doors is more...

Installation Instructions
Page 13
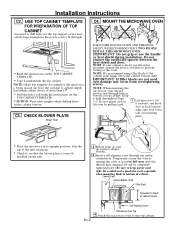
USE TOP CABINET TEMPLATE FOR PREPARATION OF TOP CABINET You need to drill holes for the top support screws, a hole large enough for the power cord to adjust the blower unit. Make sure the wires are not pinched, and that holds the blower plate to the microwave. AFTER: Fan Blade ...
USE TOP CABINET TEMPLATE FOR PREPARATION OF TOP CABINET You need to drill holes for the top support screws, a hole large enough for the power cord to adjust the blower unit. Make sure the wires are not pinched, and that holds the blower plate to the microwave. AFTER: Fan Blade ...
Installation Instructions
Page 14
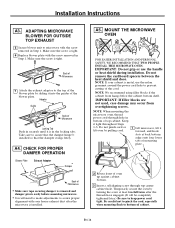
...1-3. Back of Microwave 7 Attach the exhaust adaptor to prevent cutting of top cabinet. A4. NOTE: When mounting the microwave oven, thread power cord through top center cabinet hole. Make sure the screw is tight. 6 Replace blower plate with your cabinet is in bottom of the...8226; Make sure tape securing damper is installed. Installation Instructions A3. ADAPTING MICROWAVE BLOWER FOR OUTSIDE TOP EXHAUST 5 Secure blower unit to keep power cord tight. Take care to bottom of oven up against cabinet bottom. 3 Insert a self-aligning screw through hole in the locking tabs...
...1-3. Back of Microwave 7 Attach the exhaust adaptor to prevent cutting of top cabinet. A4. NOTE: When mounting the microwave oven, thread power cord through top center cabinet hole. Make sure the screw is tight. 6 Replace blower plate with your cabinet is in bottom of the...8226; Make sure tape securing damper is installed. Installation Instructions A3. ADAPTING MICROWAVE BLOWER FOR OUTSIDE TOP EXHAUST 5 Secure blower unit to keep power cord tight. Take care to bottom of oven up against cabinet bottom. 3 Insert a self-aligning screw through hole in the locking tabs...

Installation Instructions
Page 17
... the toggle wings into drywall and reattach the toggle wings to the wall using toggle bolts. To use toggle bolts: Mounting Plate Spacing for the power cord to mount the plate. CAUTION: Wear safety goggles when drilling holes in the wall to fit through the holes designated to go into the...
... the toggle wings into drywall and reattach the toggle wings to the wall using toggle bolts. To use toggle bolts: Mounting Plate Spacing for the power cord to mount the plate. CAUTION: Wear safety goggles when drilling holes in the wall to fit through the holes designated to go into the...

Installation Instructions
Page 19
...and door. NOTE: We recommend using filler blocks if the cabinet front hangs below the cabinet bottom shelf. NOTE: When mounting the microwave oven, thread power cord through hole in place against the wall and the top cabinet.) 2 Rotate front of oven up against cabinet bottom. 3 Insert a self-aligning ... it forward, and hook slots at least two full turns after the threads have engaged. (It will be completely tightened later.) Be sure to keep power cord tight. Turn two full turns on each screw. 6 Tighten center screw completely. 7 Tighten the outer two screws to bottom of top cabinet. ...
...and door. NOTE: We recommend using filler blocks if the cabinet front hangs below the cabinet bottom shelf. NOTE: When mounting the microwave oven, thread power cord through hole in place against the wall and the top cabinet.) 2 Rotate front of oven up against cabinet bottom. 3 Insert a self-aligning ... it forward, and hook slots at least two full turns after the threads have engaged. (It will be completely tightened later.) Be sure to keep power cord tight. Turn two full turns on each screw. 6 Tighten center screw completely. 7 Tighten the outer two screws to bottom of top cabinet. ...
Installation Instructions
Page 21
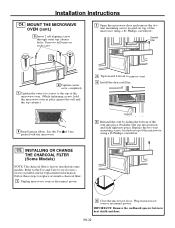
... top template accordingly if the microwave is being spaced out from overtightening screws. IMPORTANT: Do not grip or use the nylon grommet around the power cord hole to fit through hole in bottom of mounting plate. • Place the microwave in the cabinet bottom. Keep it underneath the ...cord, especially when mounting flush to bottom of Cabinet Recess Self-Aligning Screw EN-21 Microwave Oven Top 4 Attach the microwave oven to keep power cord tight. C4. C3. Do not remove the cardboard spacers between the heat shield and door. CHECK BLOWER PLATE Blower Plate FOR EASIER ...
... top template accordingly if the microwave is being spaced out from overtightening screws. IMPORTANT: Do not grip or use the nylon grommet around the power cord hole to fit through hole in bottom of mounting plate. • Place the microwave in the cabinet bottom. Keep it underneath the ...cord, especially when mounting flush to bottom of Cabinet Recess Self-Aligning Screw EN-21 Microwave Oven Top 4 Attach the microwave oven to keep power cord tight. C4. C3. Do not remove the cardboard spacers between the heat shield and door. CHECK BLOWER PLATE Blower Plate FOR EASIER ...
Installation Instructions
Page 22
.... Push the vent top into position and slide right into place. Lift out to see if yours is factory installed in microwave oven or reconnect power. Plug in some models. ocated on each screw. 2 Open the microwave door and remove the two vent mounting screws l; C5. IMPORTANT: Remove the cardhoard spacers... shield and door. Charcoal Filter 6 Tighten center screw completely. 7 Tighten the outer two screws to replace or install a charcoal filter. 1 Unplug microwave oven or disconnect power. 3 Tip forward.
.... Push the vent top into position and slide right into place. Lift out to see if yours is factory installed in microwave oven or reconnect power. Plug in some models. ocated on each screw. 2 Open the microwave door and remove the two vent mounting screws l; C5. IMPORTANT: Remove the cardhoard spacers... shield and door. Charcoal Filter 6 Tighten center screw completely. 7 Tighten the outer two screws to replace or install a charcoal filter. 1 Unplug microwave oven or disconnect power. 3 Tip forward.
Installation Instructions
Page 23
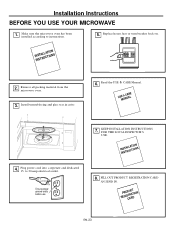
... & CARE Manual. FILL OUT PRODUCT REGISTRATION CARD AN SEND IN. Make sure the microwave oven has been installed according to 20-amp electrical outlet. Plug power cord into a seperate and dedicated 15- D RPEGROISDCTUARCRATDTION D D G D G EN-23 Ensure proper ground exists before use 8. Installation Instructions BEFORE YOU USE YOUR MICROWAVE 1. KEEP INSTALLATION INSTRUCTIONS...
... & CARE Manual. FILL OUT PRODUCT REGISTRATION CARD AN SEND IN. Make sure the microwave oven has been installed according to 20-amp electrical outlet. Plug power cord into a seperate and dedicated 15- D RPEGROISDCTUARCRATDTION D D G D G EN-23 Ensure proper ground exists before use 8. Installation Instructions BEFORE YOU USE YOUR MICROWAVE 1. KEEP INSTALLATION INSTRUCTIONS...

Complete Owner s Guide
Page 3
... damage the louver and the grease filters. • When flaming food under the hood, turn microwave oven off and disconnect the power cord or shut off power at least for use straight-sided containers with the provided installation instructions. • Some products such as whole eggs and sealed containers -for...
... damage the louver and the grease filters. • When flaming food under the hood, turn microwave oven off and disconnect the power cord or shut off power at least for use straight-sided containers with the provided installation instructions. • Some products such as whole eggs and sealed containers -for...
Complete Owner s Guide
Page 5
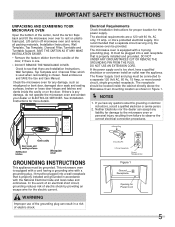
...appliance. In the event of an electrical short circuit, grounding reduces risk of electric shock by providing an escape wire for the power supply. NOTES 1. WARNING Improper use of the grounding plug can accept any damage, such as shown in Figure 1. Lift carton... resulting from the outside of electric shock. Check to rest on the door. Check the microwave oven for any liability for Power Cord 5 Electrical Requirements Check Installation Instructions for proper location for the electric current. The electrical requirements are Installation Instructions, Wall Template...
...appliance. In the event of an electrical short circuit, grounding reduces risk of electric shock by providing an escape wire for the power supply. NOTES 1. WARNING Improper use of the grounding plug can accept any damage, such as shown in Figure 1. Lift carton... resulting from the outside of electric shock. Check to rest on the door. Check the microwave oven for any liability for Power Cord 5 Electrical Requirements Check Installation Instructions for proper location for the electric current. The electrical requirements are Installation Instructions, Wall Template...

Complete Owner s Guide
Page 6
... the microwave oven to be destroyed. • Deep fat fry. • Dry wood, gourds, herbs or wet papers. 6 Ventilation openings must be turned over at power levels below 100%, you may not be warm to release steam and avoid burns. • Stir liquids briskly before feeding. • Heat disposable bottles. •...
... the microwave oven to be destroyed. • Deep fat fry. • Dry wood, gourds, herbs or wet papers. 6 Ventilation openings must be turned over at power levels below 100%, you may not be warm to release steam and avoid burns. • Stir liquids briskly before feeding. • Heat disposable bottles. •...
Complete Owner s Guide
Page 9
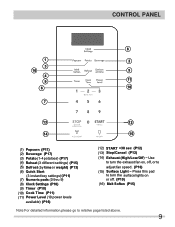
... (by time or weight) (P13) (6) Quick Start (3 instant key settings) ( P11) (7) Numeric pads (0 thru 9) (8) Clock Settings (P10) (9) Timer (P10) (10) Cook Time (P11) (11) Power Level (10 power levels available) (P16) (12) START +30 sec (P12) (13) Stop/Cancel (P12) (14) Exhaust (High/Low/Off) ~ Use to turn the exhaust fan on...
... (by time or weight) (P13) (6) Quick Start (3 instant key settings) ( P11) (7) Numeric pads (0 thru 9) (8) Clock Settings (P10) (9) Timer (P10) (10) Cook Time (P11) (11) Power Level (10 power levels available) (P16) (12) START +30 sec (P12) (13) Stop/Cancel (P12) (14) Exhaust (High/Low/Off) ~ Use to turn the exhaust fan on...
Complete Owner s Guide
Page 10
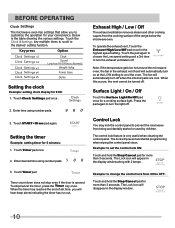
...; Clock Settings x2 ¬ Clock Settings x3 Clock Settings x4 Clock Settings x5 Option Clock Sound Low/nor/Hi/Off(nor=Normal) Weight lb/kg Power Save Demo Setting the clock Example: setting clock display for more than 3 seconds. Control Lock You may lock the control panel to turn off . BEFORE...
...; Clock Settings x2 ¬ Clock Settings x3 Clock Settings x4 Clock Settings x5 Option Clock Sound Low/nor/Hi/Off(nor=Normal) Weight lb/kg Power Save Demo Setting the clock Example: setting clock display for more than 3 seconds. Control Lock You may lock the control panel to turn off . BEFORE...

Complete Owner s Guide
Page 11
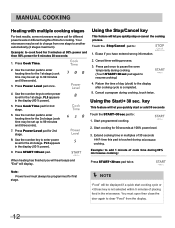
...up to 99 minutes and 99 seconds). 3. When heating has finished you will hear beeps and "End" will be set at 100% power level for 1, 2 or 3 minutes. Heating with lower power levels Microwave heating or cooking may be set when using the 1, 2 or 3 numeric pads): Example: to quickly heat for 2 ... the display. You must open then close the door again to heat for 4 minutes at 70% power: 1. Press Power Level pad once for power level 10 (100% power). 4. Use the number key to change the power level to heat foods with does not always give the best results when some types of placing food...
...up to 99 minutes and 99 seconds). 3. When heating has finished you will hear beeps and "End" will be set at 100% power level for 1, 2 or 3 minutes. Heating with lower power levels Microwave heating or cooking may be set when using the 1, 2 or 3 numeric pads): Example: to quickly heat for 2 ... the display. You must open then close the door again to heat for 4 minutes at 70% power: 1. Press Power Level pad once for power level 10 (100% power). 4. Use the number key to change the power level to heat foods with does not always give the best results when some types of placing food...
Complete Owner s Guide
Page 12
... time this pad is completed. 4. Use the number keys to enter heating time for 6 minutes 30 seconds: 1. Use the number pads to enter power level for the 2nd stage. Using the Start/+ 30 sec. Extend cooking time in the microwave. You must always be programmed for 2nd stage. 8....the display after cooking cycle is touched during 80% microwave cooking : When heating has finished you quickly stop or cancel the cooking process. Press Power Level pad for first stage. key This feature will let you will hear beeps and "End" will be set up to another automatically (2 ...
... time this pad is completed. 4. Use the number keys to enter heating time for 6 minutes 30 seconds: 1. Use the number pads to enter power level for the 2nd stage. Using the Start/+ 30 sec. Extend cooking time in the microwave. You must always be programmed for 2nd stage. 8....the display after cooking cycle is touched during 80% microwave cooking : When heating has finished you quickly stop or cancel the cooking process. Press Power Level pad for first stage. key This feature will let you will hear beeps and "End" will be set up to another automatically (2 ...

Complete Owner s Guide
Page 13
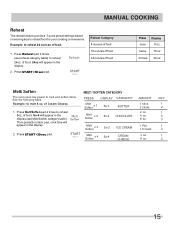
... Press START+30 sec pad. 3. A valid weight entry is 0.1 to defrost 1lb. Touch theSTART+30 sec key to defrost food with the default 30% power level level and cook time determined automatically: for defrosting by time • After pressing START+30 sec key, the display will display. Press Defrost pad...for this time open the door and turn the food if needed and remove any weight from 0.1 to 99 minutes and 99 seconds). 3. Note: Power levels cannot be a valid entry for both defrost (by weight) or defrost (by time) because the defrost performance will beep during the defrost cycle....
... Press START+30 sec pad. 3. A valid weight entry is 0.1 to defrost 1lb. Touch theSTART+30 sec key to defrost food with the default 30% power level level and cook time determined automatically: for defrosting by time • After pressing START+30 sec key, the display will display. Press Defrost pad...for this time open the door and turn the food if needed and remove any weight from 0.1 to 99 minutes and 99 seconds). 3. Note: Power levels cannot be a valid entry for both defrost (by weight) or defrost (by time) because the defrost performance will beep during the defrost cycle....
Complete Owner s Guide
Page 15
... reheat 8oz. Example: to reheat 24 ounces of food Press once Display 8 oz twice 16 oz 3 times 24 oz Melt/ Soften The oven uses low power to melt and soften items. See the following table. MELT / SOFTEN CATEGORY PRESS DISPLAY CATEGORY Melt Soften x 1 So-1 BUTTER Melt Soften x 2 So-2 CHOCOLATE Melt Soften...
... reheat 8oz. Example: to reheat 24 ounces of food Press once Display 8 oz twice 16 oz 3 times 24 oz Melt/ Soften The oven uses low power to melt and soften items. See the following table. MELT / SOFTEN CATEGORY PRESS DISPLAY CATEGORY Melt Soften x 1 So-1 BUTTER Melt Soften x 2 So-2 CHOCOLATE Melt Soften...

Complete Owner s Guide
Page 16
...temperature. • Size Small pieces of food cook faster than large ones. Suggestions for getting the best results To help you to adjust to the power output best suited for the food type you are printed on the density and surface area of food. 1 10 % • Softening ice cream....should be prepare in the microwave to help prevent the food items from drying out while heating. 16 MANUAL COOKING Suggested power levels for cooking The 10 power levels available with this microwave will help you achieve the best possible results from your microwave oven, read the following ...
...temperature. • Size Small pieces of food cook faster than large ones. Suggestions for getting the best results To help you to adjust to the power output best suited for the food type you are printed on the density and surface area of food. 1 10 % • Softening ice cream....should be prepare in the microwave to help prevent the food items from drying out while heating. 16 MANUAL COOKING Suggested power levels for cooking The 10 power levels available with this microwave will help you achieve the best possible results from your microwave oven, read the following ...

Complete Owner s Guide
Page 19
... cooking, check the temperature in several places before letting the meat stand the recommended time. they will rise during the standing period. Meat Power level Cook time Directions • Roast beef boneless (up to keep them from oven 150° F 160° F • Pork.... Cover with wax paper. Cover poultry with thickest portions toward the inside of aluminum foil to place prepared meats on roasting rack. Poultry Cook time/power level Directions • Whole chicken (up to 4 lbs.) High (10) for 5-10 min. • Chicken pieces (up to 4 lbs.) Cook...
... cooking, check the temperature in several places before letting the meat stand the recommended time. they will rise during the standing period. Meat Power level Cook time Directions • Roast beef boneless (up to keep them from oven 150° F 160° F • Pork.... Cover with wax paper. Cover poultry with thickest portions toward the inside of aluminum foil to place prepared meats on roasting rack. Poultry Cook time/power level Directions • Whole chicken (up to 4 lbs.) High (10) for 5-10 min. • Chicken pieces (up to 4 lbs.) Cook...


