
Installation Instructions (All Languages)
Page 1
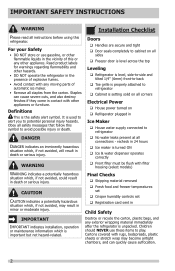
...corners Electrical Power House power turned on a solid floor. You are installing your unit. Final Checks Shipping material removed Fresh Food and Freezer controls set Crisper Humidity controls set Registration Card sent in Refer to help level your refrigerator beside a wall, leave 1/2" minimum between ... doors only after installation is complete INSTALLATION CHECKOFF LIST Doors Handles are secure and tight Door seals completely to cabinet on all sides Freezer door is level across the top Leveling Refrigerator is level, side to side and tilted 1/4" (6mm) front to back Toe grille...
...corners Electrical Power House power turned on a solid floor. You are installing your unit. Final Checks Shipping material removed Fresh Food and Freezer controls set Crisper Humidity controls set Registration Card sent in Refer to help level your refrigerator beside a wall, leave 1/2" minimum between ... doors only after installation is complete INSTALLATION CHECKOFF LIST Doors Handles are secure and tight Door seals completely to cabinet on all sides Freezer door is level across the top Leveling Refrigerator is level, side to side and tilted 1/4" (6mm) front to back Toe grille...
Use and Care Guide
Page 2
...which , if not avoided, could result in death or serious injury. Final Checks Shipping material removed Fresh food and freezer temperatures set Crisper humidity controls set Registration card sent in the vicinity of this refrigerator. It is the safety alert ...installation, operation or maintenance information which is setting solid on all corners Electrical Power House power turned on all sides Freezer door is level across the top Leveling Refrigerator is level, side-to-side and tilted 1/4" (6mm) front-to-back ...
...which , if not avoided, could result in death or serious injury. Final Checks Shipping material removed Fresh food and freezer temperatures set Crisper humidity controls set Registration card sent in the vicinity of this refrigerator. It is the safety alert ...installation, operation or maintenance information which is setting solid on all corners Electrical Power House power turned on all sides Freezer door is level across the top Leveling Refrigerator is level, side-to-side and tilted 1/4" (6mm) front-to-back ...
Use and Care Guide
Page 3
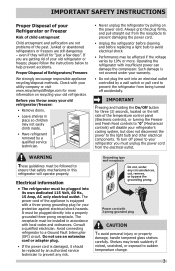
.... 3 WARNING These guidelines must unplug the power cord from being turned off power to your refrigerator you throw away your old refrigerator/freezer: • Remove doors. • Leave shelves in place so children may break suddenly if nicked, scratched, or exposed to prevent... or property damage, handle tempered glass shelves carefully. Such damage is not covered under any risk. Junked or abandoned refrigerators or freezers are getting rid of your protection against electrical shock hazards. Proper Disposal of the past. Power cord with insufficient power can damage...
.... 3 WARNING These guidelines must unplug the power cord from being turned off power to your refrigerator you throw away your old refrigerator/freezer: • Remove doors. • Leave shelves in place so children may break suddenly if nicked, scratched, or exposed to prevent... or property damage, handle tempered glass shelves carefully. Such damage is not covered under any risk. Junked or abandoned refrigerators or freezers are getting rid of your protection against electrical shock hazards. Proper Disposal of the past. Power cord with insufficient power can damage...
Use and Care Guide
Page 5
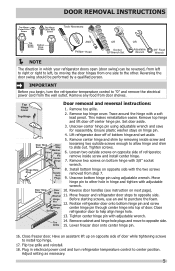
... Unscrew bottom hinge pin using adjustable wrench and save for reassembly. Move hinge pin to opposite side. Stop Washer 11. Move freezer and refrigerator door stops to other . Remove cabinet and hinge hole plugs and move to center position. Plug in electrical power cord...Plugs 8. IMPORTANT Before you begin, turn refrigerator temperature control to opposite side. Remove toe grille. 2. Lower freezer door onto center hinge pin. 16. Toe 14. Close freezer door. Remove any food from step 7. 9. Ensure plastic washer stays on bottom hinge with the two screws...
... Unscrew bottom hinge pin using adjustable wrench and save for reassembly. Move hinge pin to opposite side. Stop Washer 11. Move freezer and refrigerator door stops to other . Remove cabinet and hinge hole plugs and move to center position. Plug in electrical power cord...Plugs 8. IMPORTANT Before you begin, turn refrigerator temperature control to opposite side. Remove toe grille. 2. Lower freezer door onto center hinge pin. 16. Toe 14. Close freezer door. Remove any food from step 7. 9. Ensure plastic washer stays on bottom hinge with the two screws...
Use and Care Guide
Page 6
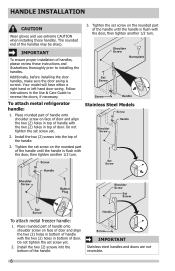
... handle: 1. Stainless Steel Models Screw Handle Shoulder Screw Screw Set Screw Handle Shoulder Screw Button Plug Shoulder Screw Set Screw Set Screw To attach metal freezer handle: 1. Install the two (2) screws into the top of the handle until the handle is flush with the two (2) holes in the Use & Care Guide...
... handle: 1. Stainless Steel Models Screw Handle Shoulder Screw Screw Set Screw Handle Shoulder Screw Button Plug Shoulder Screw Set Screw Set Screw To attach metal freezer handle: 1. Install the two (2) screws into the top of the handle until the handle is flush with the two (2) holes in the Use & Care Guide...

Use and Care Guide
Page 7
...may be easier to reverse while doors are set aside in a secure position where they cannot fall and cause personal injury. Reverse freezer and refrigerator handles as shown. Dovetail Screw Button Plug Lock Handle over dovetail screw, pull handle straight up until handle is aligned with... until handle is aligned with screw holes on top of handle with two screws. Secure bottom of door. 2. To attach plastic freezer handle: 1. HANDLE INSTALLATION To attach plastic refrigerator handle: 1. Secure top of handle over Dovetail Screw 7 Place top of handle with two screws....
...may be easier to reverse while doors are set aside in a secure position where they cannot fall and cause personal injury. Reverse freezer and refrigerator handles as shown. Dovetail Screw Button Plug Lock Handle over dovetail screw, pull handle straight up until handle is aligned with... until handle is aligned with screw holes on top of handle with two screws. Secure bottom of door. 2. To attach plastic freezer handle: 1. HANDLE INSTALLATION To attach plastic refrigerator handle: 1. Secure top of handle over Dovetail Screw 7 Place top of handle with two screws....
Use and Care Guide
Page 9
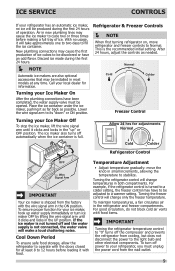
... hours, adjust the controls as possible. If the ice maker is not turned off and the water supply is the recommended initial setting. Freezer Control Turning your local dealer for at any time. Allow 24 hrs for your refrigerator, you must be discolored or have been completed, ...the water supply valve must unplug the power cord from the wall outlet. 9 Refrigerator & Freezer Controls NOTE When first turning refrigerator on, move the knob in the "up water supply immediately or turn off the compressor and prevents...
... hours, adjust the controls as possible. If the ice maker is not turned off and the water supply is the recommended initial setting. Freezer Control Turning your local dealer for at any time. Allow 24 hrs for your refrigerator, you must be discolored or have been completed, ...the water supply valve must unplug the power cord from the wall outlet. 9 Refrigerator & Freezer Controls NOTE When first turning refrigerator on, move the knob in the "up water supply immediately or turn off the compressor and prevents...

Use and Care Guide
Page 10
... into the ice bin. D Automatic ice maker When ice has been produced, you will produce 2.5 to fill the ice maker. This is a list of your freezer compartment. IMPORTANT C D F H J A B E G I Drain pan (not removable) You may cause a hissing or sizzling sound. Following is normal during the defrost cycle...
... into the ice bin. D Automatic ice maker When ice has been produced, you will produce 2.5 to fill the ice maker. This is a list of your freezer compartment. IMPORTANT C D F H J A B E G I Drain pan (not removable) You may cause a hissing or sizzling sound. Following is normal during the defrost cycle...
Use and Care Guide
Page 11
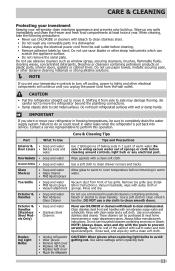
...; Do not wash any removable parts in 1 quart of sponge or cloth before cleaning around controls, light bulb or any spills immediately and clean the freezer and fresh food compartments at most home improvement or major department stores. Exterior & Handles • Soap and water • Non Abrasive Glass Cleaner Do not...
...; Do not wash any removable parts in 1 quart of sponge or cloth before cleaning around controls, light bulb or any spills immediately and clean the freezer and fresh food compartments at most home improvement or major department stores. Exterior & Handles • Soap and water • Non Abrasive Glass Cleaner Do not...
Use and Care Guide
Page 12
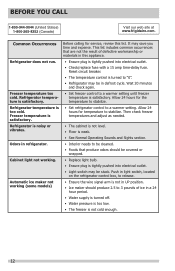
... (United States) 1-800-265-8352 (Canada) Visit our web site at www.frigidaire.com. Common Occurrences Refrigerator does not run. Allow 24 hours for temperature to a warmer setting until freezer temperature is not cold enough. 12 Wait 20 minutes and check again. •... 24 hour period. • Water supply is turned off. • Water pressure is too low. • The freezer is satisfactory. Freezer temperature too cold. Freezer temperature is too cold. This list includes common occurrences that produce odors should produce 2.5 to a warmer setting. Refrigerator temperature...
... (United States) 1-800-265-8352 (Canada) Visit our web site at www.frigidaire.com. Common Occurrences Refrigerator does not run. Allow 24 hours for temperature to a warmer setting until freezer temperature is not cold enough. 12 Wait 20 minutes and check again. •... 24 hour period. • Water supply is turned off. • Water pressure is too low. • The freezer is satisfactory. Freezer temperature too cold. Freezer temperature is too cold. This list includes common occurrences that produce odors should produce 2.5 to a warmer setting. Refrigerator temperature...
Use and Care Guide
Page 13
... appliance is warranted by contacting Electrolux at the addresses or phone numbers below. Electrolux authorizes no person to change without notice. USA 1.800.944.9044 Frigidaire 10200 David Taylor Drive Charlotte, NC 28262 Canada 1.800.265.8352 Electrolux Canada Corp. 5855 Terry Fox Way Mississauga, Ontario, Canada L5V 3E4 13 Surcharges... be required. MAJOR APPLIANCE WARRANTY Your appliance is in your best interest to obtain and keep all costs for service calls to any refrigerator or freezer failures. 6. For one year limited warranty.
... appliance is warranted by contacting Electrolux at the addresses or phone numbers below. Electrolux authorizes no person to change without notice. USA 1.800.944.9044 Frigidaire 10200 David Taylor Drive Charlotte, NC 28262 Canada 1.800.265.8352 Electrolux Canada Corp. 5855 Terry Fox Way Mississauga, Ontario, Canada L5V 3E4 13 Surcharges... be required. MAJOR APPLIANCE WARRANTY Your appliance is in your best interest to obtain and keep all costs for service calls to any refrigerator or freezer failures. 6. For one year limited warranty.


