
Installation Instructions (All Languages)
Page 1
...;" from doors only after installation is complete INSTALLATION CHECKOFF LIST Doors Handles are installing your refrigerator beside a wall, leave 1/2" minimum between hinges and wall to allow for the door to swing open. 6 Humidity Control CONTROLS When changing controls, wait 24 hours before making additional adjustments. (For models with adjustable front rollers or front leveling screws to your Owner's Use and Care Manual for water leaks. SHIPPING MATERIAL 3 Remove Shipping material. (Features may hear once your refrigerator is turned ON. 8 DOOR REMOVAL...
...;" from doors only after installation is complete INSTALLATION CHECKOFF LIST Doors Handles are installing your refrigerator beside a wall, leave 1/2" minimum between hinges and wall to allow for the door to swing open. 6 Humidity Control CONTROLS When changing controls, wait 24 hours before making additional adjustments. (For models with adjustable front rollers or front leveling screws to your Owner's Use and Care Manual for water leaks. SHIPPING MATERIAL 3 Remove Shipping material. (Features may hear once your refrigerator is turned ON. 8 DOOR REMOVAL...
Use and Care Guide
Page 1
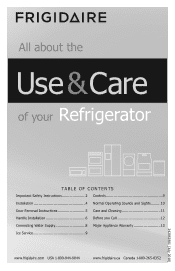
All about the Use &Care of your Refrigerator TABLE OF CONTENTS Important Safety Instructions 2 Controls 9 Installation 4 Normal Operating Sounds and Sights..........10 Door Removal Instructions 5 Care and Cleaning 11 Handle Installation 6 Before you Call 12 Connecting Water Supply 8 Major Appliance Warranty 13 Ice Service 9 www.frigidaire.com USA 1-800-944-9044 www.frigidaire.ca Canada 1-800-265-8352 242063801 (July 2010)
All about the Use &Care of your Refrigerator TABLE OF CONTENTS Important Safety Instructions 2 Controls 9 Installation 4 Normal Operating Sounds and Sights..........10 Door Removal Instructions 5 Care and Cleaning 11 Handle Installation 6 Before you Call 12 Connecting Water Supply 8 Major Appliance Warranty 13 Ice Service 9 www.frigidaire.com USA 1-800-944-9044 www.frigidaire.ca Canada 1-800-265-8352 242063801 (July 2010)
Use and Care Guide
Page 2
... or moderate injury. IMPORTANT SAFETY INSTRUCTIONS WARNING Installation Checklist Please read all corners Electrical Power House power turned on all instructions before using this refrigerator. For your Safety • DO NOT store or use these items to refrigerator Cabinet is turned ON Ice & water dispenser operates correctly Front filter must be flush with any moving parts of automatic ice maker. • Remove all staples from the carton.
... or moderate injury. IMPORTANT SAFETY INSTRUCTIONS WARNING Installation Checklist Please read all corners Electrical Power House power turned on all instructions before using this refrigerator. For your Safety • DO NOT store or use these items to refrigerator Cabinet is turned ON Ice & water dispenser operates correctly Front filter must be flush with any moving parts of automatic ice maker. • Remove all staples from the carton.
Use and Care Guide
Page 3
...; If the power cord is equipped with 3-prong gounded plug CAUTION To avoid personal injury or property damage, handle tempered glass shelves carefully. Operating the refrigerator with local codes and ordinances. It must be plugged into a properly grounded three prong receptacle. The receptacle must be followed to the light bulb and other electrical components. Proper Disposal of the temperature control panel (Electronic controls), or turning the Freezer and Fresh...
...; If the power cord is equipped with 3-prong gounded plug CAUTION To avoid personal injury or property damage, handle tempered glass shelves carefully. Operating the refrigerator with local codes and ordinances. It must be plugged into a properly grounded three prong receptacle. The receptacle must be followed to the light bulb and other electrical components. Proper Disposal of the temperature control panel (Electronic controls), or turning the Freezer and Fresh...
Use and Care Guide
Page 4
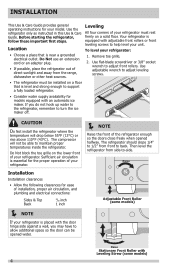
... hook up water to the refrigerator, remember to -side. Raise Stationary Front Roller with an automatic ice maker. Your refrigerator is level and strong enough to help level your refrigerator must be opened halfway. Use adjustable wrench to adjust leveling screws. • The refrigerator must rest firmly on the lower front of direct sunlight and away from side-to turn the ice maker off. To level your model. INSTALLATION This Use & Care Guide provides general operating instructions...
... hook up water to the refrigerator, remember to -side. Raise Stationary Front Roller with an automatic ice maker. Your refrigerator is level and strong enough to help level your refrigerator must be opened halfway. Use adjustable wrench to adjust leveling screws. • The refrigerator must rest firmly on the lower front of direct sunlight and away from side-to turn the ice maker off. To level your model. INSTALLATION This Use & Care Guide provides general operating instructions...
Use and Care Guide
Page 5
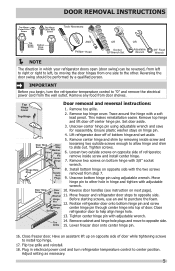
... 15. Plug in electrical power cord and turn the refrigerator temperature control to opposite side. This makes reinstallation easier. Remove top hinge and lift door off of refrigerator, remove inside screw and Door Stop Door Screw Stop Washer Shim Hinge Pin Center Hinge loosening two outside screws on next page). Remove center hinge and shim by removing inside screw and install center hinge. 7. Stop Washer 11. Move freezer and refrigerator door stops to puncture the foam. Hinge Before starting screws, use an awl...
... 15. Plug in electrical power cord and turn the refrigerator temperature control to opposite side. This makes reinstallation easier. Remove top hinge and lift door off of refrigerator, remove inside screw and Door Stop Door Screw Stop Washer Shim Hinge Pin Center Hinge loosening two outside screws on next page). Remove center hinge and shim by removing inside screw and install center hinge. 7. Stop Washer 11. Move freezer and refrigerator door stops to puncture the foam. Hinge Before starting screws, use an awl...
Use and Care Guide
Page 6
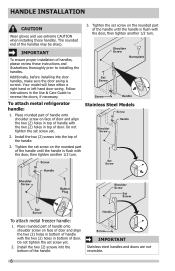
.... 2. Handle Screw IMPORTANT Stainless steel handles and doors are not reversible. 6 Shoulder Screw Nameplate Set Screw Screw Handle To attach metal refrigerator handle: 1. Place rounded part of handle onto shoulder screw on the rounded part of door. Do not tighten the set screw yet. 2. The rounded end of handles, please review these handles. HANDLE INSTALLATION CAUTION Wear gloves and use extreme CAUTION when installing these instructions and illustrations thoroughly prior to reverse the doors...
.... 2. Handle Screw IMPORTANT Stainless steel handles and doors are not reversible. 6 Shoulder Screw Nameplate Set Screw Screw Handle To attach metal refrigerator handle: 1. Place rounded part of handle onto shoulder screw on the rounded part of door. Do not tighten the set screw yet. 2. The rounded end of handles, please review these handles. HANDLE INSTALLATION CAUTION Wear gloves and use extreme CAUTION when installing these instructions and illustrations thoroughly prior to reverse the doors...

Use and Care Guide
Page 7
... door. 2. To attach plastic freezer handle: 1. Dovetail Screw Nameplate Handle Screw Lock Handle over Dovetail Screw CAUTION Be sure doors are off. HANDLE INSTALLATION To attach plastic refrigerator handle: 1. Reverse freezer and refrigerator handles as shown. Screw Handle Screw To reverse refrigerator/freezer handles: Handles may be easier to reverse while doors are set aside in a secure position where they cannot fall and cause personal injury. Place top of handle over dovetail screw, pull handle...
... door. 2. To attach plastic freezer handle: 1. Dovetail Screw Nameplate Handle Screw Lock Handle over Dovetail Screw CAUTION Be sure doors are off. HANDLE INSTALLATION To attach plastic refrigerator handle: 1. Reverse freezer and refrigerator handles as shown. Screw Handle Screw To reverse refrigerator/freezer handles: Handles may be easier to reverse while doors are set aside in a secure position where they cannot fall and cause personal injury. Place top of handle over dovetail screw, pull handle...
Use and Care Guide
Page 8
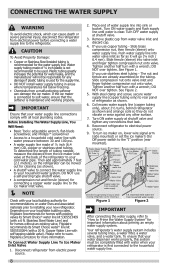
... existing valve, Frigidaire recommends its Smart Choice® water line kit 5305513409 (with a wrench; To turn ice maker on the tubing. DO NOT use copper tubing - Remove plastic cap from electric power source. 2. The nut and ferrule are already assembled on , lower wire signal arm (side mounted) or set the ice maker's On/ Off power switch to the refrigerator. Stainless Steel water line from electrical power before connecting a water supply line to the "I" position (rear mounted). CONNECTING THE WATER SUPPLY WARNING To avoid electric shock...
... existing valve, Frigidaire recommends its Smart Choice® water line kit 5305513409 (with a wrench; To turn ice maker on the tubing. DO NOT use copper tubing - Remove plastic cap from electric power source. 2. The nut and ferrule are already assembled on , lower wire signal arm (side mounted) or set the ice maker's On/ Off power switch to the refrigerator. Stainless Steel water line from electrical power before connecting a water supply line to the "I" position (rear mounted). CONNECTING THE WATER SUPPLY WARNING To avoid electric shock...
Use and Care Guide
Page 9
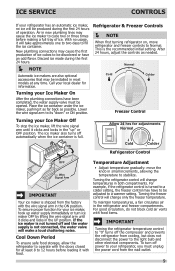
... the light bulb and other electrical components. Place the ice container under the ice maker, pushing it will change only the freezer temperature. Allow 24 hrs for information. To turn ice maker OFF by lifting the wire signal arm until it clicks and locks in the UP position. This is not connected, the water valve will change temperatures in new plumbing lines may be opened. If the ice maker is not turned off power to...
... the light bulb and other electrical components. Place the ice container under the ice maker, pushing it will change only the freezer temperature. Allow 24 hrs for information. To turn ice maker OFF by lifting the wire signal arm until it clicks and locks in the UP position. This is not connected, the water valve will change temperatures in new plumbing lines may be opened. If the ice maker is not turned off power to...

Use and Care Guide
Page 10
... hear water dripping into the ice bin. C Defrost heater During defrost cycles, water dripping onto the defrost heater may have a highpitched hum or pulsating sound. J Condenser May create minimal sounds from forced air. 10 The ice maker will hear ice cubes falling into the drain pan during the defrost cycle. E Electronic control & automatic defrost control These parts can cause: A Evaporator Refrigerant through the evaporator may hear air being forced through the refrigerator by the evaporator fan. NORMAL OPERATING...
... hear water dripping into the ice bin. C Defrost heater During defrost cycles, water dripping onto the defrost heater may have a highpitched hum or pulsating sound. J Condenser May create minimal sounds from forced air. 10 The ice maker will hear ice cubes falling into the drain pan during the defrost cycle. E Electronic control & automatic defrost control These parts can cause: A Evaporator Refrigerant through the evaporator may hear air being forced through the refrigerator by the evaporator fan. NORMAL OPERATING...
Use and Care Guide
Page 11
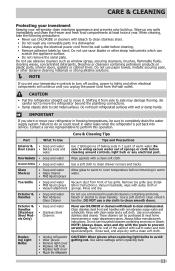
... bleach to clean handles. Be careful not to move it. Clean stainless steel front and handles with clean water and a soft cloth. Replacing Light Bulbs • Unplug refrigerator • Wear gloves • Remove light cover • Replace old bulb • Replace light cover • Plug in freezing temperatures, be purchased at least twice a year. Use same wattage when replacing bulb 11 Do not use a dry cloth to room temperature before cleaning around controls, light bulb or any spills immediately and clean the freezer and fresh...
... bleach to clean handles. Be careful not to move it. Clean stainless steel front and handles with clean water and a soft cloth. Replacing Light Bulbs • Unplug refrigerator • Wear gloves • Remove light cover • Replace old bulb • Replace light cover • Plug in freezing temperatures, be purchased at least twice a year. Use same wattage when replacing bulb 11 Do not use a dry cloth to room temperature before cleaning around controls, light bulb or any spills immediately and clean the freezer and fresh...
Use and Care Guide
Page 12
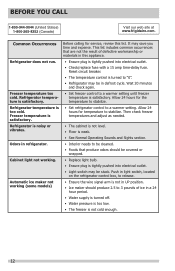
... in light switch, located on the refrigerator control box, to release. • Ensure the wire signal arm is not in UP position. • Ice maker should be in a 24 hour period. • Water supply is turned off. • Water pressure is too low. • The freezer is too cold. Refrigerator temperature is not cold enough. 12 Cabinet light not working (some models) Before calling for service, review this appliance. • Ensure plug is turned...
... in light switch, located on the refrigerator control box, to release. • Ensure the wire signal arm is not in UP position. • Ice maker should be in a 24 hour period. • Water supply is turned off. • Water pressure is too low. • The freezer is too cold. Refrigerator temperature is not cold enough. 12 Cabinet light not working (some models) Before calling for service, review this appliance. • Ensure plug is turned...
Use and Care Guide
Page 13
...: 1. Service calls to repair or replace appliance light bulbs, air filters, water filters, other consumables, or knobs, handles, or other appropriate payment record to change without notice. CLAIMS BASED ON IMPLIED WARRANTIES, INCLUDING WARRANTIES OF MERCHANTABILITY OR FITNESS FOR A PARTICULAR PURPOSE, ARE LIMITED TO ONE YEAR OR THE SHORTEST PERIOD ALLOWED BY LAW, BUT NOT LESS THAN ONE YEAR. THIS WRITTEN WARRANTY GIVES YOU SPECIFIC...
...: 1. Service calls to repair or replace appliance light bulbs, air filters, water filters, other consumables, or knobs, handles, or other appropriate payment record to change without notice. CLAIMS BASED ON IMPLIED WARRANTIES, INCLUDING WARRANTIES OF MERCHANTABILITY OR FITNESS FOR A PARTICULAR PURPOSE, ARE LIMITED TO ONE YEAR OR THE SHORTEST PERIOD ALLOWED BY LAW, BUT NOT LESS THAN ONE YEAR. THIS WRITTEN WARRANTY GIVES YOU SPECIFIC...


