
Complete Owner's Guide (English)
Page 1
All about the Use &Care of your Refrigerator 242063800 (November 2009) TABLE OF CONTENTS Important Safety Instructions 2 Installation 4 Door Removal Instructions 5 Handle Installation 6 Connecting Water Supply 8 Ice Service 9 Controls 9 Normal Operating Sounds and Sights 10 Care and Cleaning 11 Before you Call 12 Major Appliance Warranty 13 www.frigidaire.com USA 1-800-944-9044 www.frigidaire.ca Canada 1-800-265-8352
All about the Use &Care of your Refrigerator 242063800 (November 2009) TABLE OF CONTENTS Important Safety Instructions 2 Installation 4 Door Removal Instructions 5 Handle Installation 6 Connecting Water Supply 8 Ice Service 9 Controls 9 Normal Operating Sounds and Sights 10 Care and Cleaning 11 Before you Call 12 Major Appliance Warranty 13 www.frigidaire.com USA 1-800-944-9044 www.frigidaire.ca Canada 1-800-265-8352

Complete Owner's Guide (English)
Page 2
...finishes if they come in contact with other hazards. • DO NOT operate the refrigerator in the presence of automatic ice maker. • Remove all safety messages that follow this refrigerator. Definitions This is important but not hazard-related. WARNING WARNING indicates a potentially hazardous ... is used to alert you to avoid possible injury or death. recheck in Ice Maker House water supply connected to refrigerator No water leaks present at all instructions before using this symbol to potential personal injury hazards. Read product labels for...
...finishes if they come in contact with other hazards. • DO NOT operate the refrigerator in the presence of automatic ice maker. • Remove all safety messages that follow this refrigerator. Definitions This is important but not hazard-related. WARNING WARNING indicates a potentially hazardous ... is used to alert you to avoid possible injury or death. recheck in Ice Maker House water supply connected to refrigerator No water leaks present at all instructions before using this symbol to potential personal injury hazards. Read product labels for...

Complete Owner's Guide (English)
Page 3
...appliance is unpacked. The receptacle must be replaced by an authorized service technician to prevent any exterior wrapping material immediately after the refrigerator is equipped with rugs, bedspreads, plastic sheets or stretch wrap may break suddenly if nicked, scratched, or exposed to a ...the temperature control panel (Electronic controls), or turning the Freezer and Fresh Food controls to "0" (Mechanical controls) will disable your refrigerator's cooling system, but does not disconnect the power to play. CAUTION To avoid personal injury or property damage, handle tempered glass...
...appliance is unpacked. The receptacle must be replaced by an authorized service technician to prevent any exterior wrapping material immediately after the refrigerator is equipped with rugs, bedspreads, plastic sheets or stretch wrap may break suddenly if nicked, scratched, or exposed to a ...the temperature control panel (Electronic controls), or turning the Freezer and Fresh Food controls to "0" (Mechanical controls) will disable your refrigerator's cooling system, but does not disconnect the power to play. CAUTION To avoid personal injury or property damage, handle tempered glass...

Complete Owner's Guide (English)
Page 4
...is essential for the proper operation of direct sunlight and away from the range, dishwasher or other heat sources. • The refrigerator must rest firmly on a floor that is placed with adjustable front rollers or front leveling screws to help level your model.... 55°F (13°C) or rise above 110°F (43°C). Then level the refrigerator from front to maintain proper temperatures inside the refrigerator. Before starting the refrigerator, follow these important first steps. Installation Installation clearances • Allow the following clearances for models ...
...is essential for the proper operation of direct sunlight and away from the range, dishwasher or other heat sources. • The refrigerator must rest firmly on a floor that is placed with adjustable front rollers or front leveling screws to help level your model.... 55°F (13°C) or rise above 110°F (43°C). Then level the refrigerator from front to maintain proper temperatures inside the refrigerator. Before starting the refrigerator, follow these important first steps. Installation Installation clearances • Allow the following clearances for models ...
Complete Owner's Guide (English)
Page 5
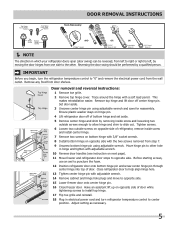
... Screw AND Phillips™ Head OR Socket Wrench Set OR Adjustable Wrench 3/8" Fixed Wrench NOTE The direction in which your refrigerator doors open (door swing) can be performed by removing inside screw and install center hinge. 7 Remove two screws on bottom hinge ...adjustable wrench and save for reassembly. Set door aside. 3 Unscrew center hinge pin using adjustable wrench. IMPORTANT Before you begin, turn refrigerator temperature control to "0" and remove the electrical power cord from door shelves. This makes reinstallation easier. Tighten screws. 6 Loosen two...
... Screw AND Phillips™ Head OR Socket Wrench Set OR Adjustable Wrench 3/8" Fixed Wrench NOTE The direction in which your refrigerator doors open (door swing) can be performed by removing inside screw and install center hinge. 7 Remove two screws on bottom hinge ...adjustable wrench and save for reassembly. Set door aside. 3 Unscrew center hinge pin using adjustable wrench. IMPORTANT Before you begin, turn refrigerator temperature control to "0" and remove the electrical power cord from door shelves. This makes reinstallation easier. Tighten screws. 6 Loosen two...

Complete Owner's Guide (English)
Page 6
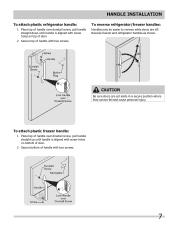
... with the two (2) holes in bottom of door and align the two (2) holes in the Use & Care Guide to installing the handles. To attach metal refrigerator handle: 1 Place rounded part of handle onto shoulder screw on the rounded part of the handle until the handle is flush with the two (2) holes...
... with the two (2) holes in bottom of door and align the two (2) holes in the Use & Care Guide to installing the handles. To attach metal refrigerator handle: 1 Place rounded part of handle onto shoulder screw on the rounded part of the handle until the handle is flush with the two (2) holes...
Complete Owner's Guide (English)
Page 7
... be easier to reverse while doors are set aside in a secure position where they cannot fall and cause personal injury. Reverse freezer and refrigerator handles as shown. To attach plastic freezer handle: 1 Place top of handle over dovetail screw, pull handle straight down until handle is ...aligned with screw holes on bottom of door. 2 Secure bottom of handle with two screws. 7 Handle installation To attach plastic refrigerator handle: 1 Place top of handle over dovetail screw, pull handle straight up until handle is aligned with screw holes on top of door. ...
... be easier to reverse while doors are set aside in a secure position where they cannot fall and cause personal injury. Reverse freezer and refrigerator handles as shown. To attach plastic freezer handle: 1 Place top of handle over dovetail screw, pull handle straight down until handle is ...aligned with screw holes on bottom of door. 2 Secure bottom of handle with two screws. 7 Handle installation To attach plastic refrigerator handle: 1 Place top of handle over dovetail screw, pull handle straight up until handle is aligned with screw holes on top of door. ...

Complete Owner's Guide (English)
Page 8
...connected to the household water supply line. Please refer to www.frigidaire.com/store for homes without an existing valve, Electrolux recommends its Smart Choice® water line kit 5305513409 (with your refrigerator is first connected to soft water, ensure that your water dispenser ... Supply Line, You Will Need: • Basic Tools: adjustable wrench, flat-blade screwdriver, and PhillipsTM screwdriver • Access to the refrigerator. Stainless Steel Water Line) and for more information. 8 To Connect Water Supply Line To Ice Maker Inlet Valve 1. Remove plastic cap ...
...connected to the household water supply line. Please refer to www.frigidaire.com/store for homes without an existing valve, Electrolux recommends its Smart Choice® water line kit 5305513409 (with your refrigerator is first connected to soft water, ensure that your water dispenser ... Supply Line, You Will Need: • Basic Tools: adjustable wrench, flat-blade screwdriver, and PhillipsTM screwdriver • Access to the refrigerator. Stainless Steel Water Line) and for more information. 8 To Connect Water Supply Line To Ice Maker Inlet Valve 1. Remove plastic cap ...
Complete Owner's Guide (English)
Page 9
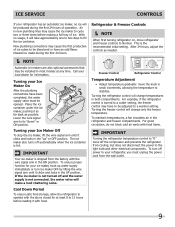
... back as needed. NOTE Automatic ice makers are also optional accessories that may cause the first production of operation. Turning the refrigerator control will change only the freezer temperature. To turn ice maker OFF by lifting the wire signal arm until it clicks and locks in...With no ice will be adjusted to a warmer setting. For good circulation, do not block cold air vents with food items. IMPORTANT Turning the refrigerator temperature control to "0" turns off and the water supply is turned to a colder setting, the freezer control may cause the ice maker to cycle ...
... back as needed. NOTE Automatic ice makers are also optional accessories that may cause the first production of operation. Turning the refrigerator control will change only the freezer temperature. To turn ice maker OFF by lifting the wire signal arm until it clicks and locks in...With no ice will be adjusted to a warmer setting. For good circulation, do not block cold air vents with food items. IMPORTANT Turning the refrigerator temperature control to "0" turns off and the water supply is turned to a colder setting, the freezer control may cause the ice maker to cycle ...
Complete Owner's Guide (English)
Page 10
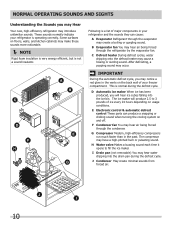
... You may notice a red glow in the past. IMPORTANT During the automatic defrost cycle, you may hear air being forced through the refrigerator by the evaporator fan. F Condenser fan You may make these sounds more noticeable. NOTE Rigid foam insulation is very energy... (not removable) You may create a boiling or gurgling sound. E Electronic control & automatic defrost control These parts can cause: A Evaporator Refrigerant through the evaporator may hear water dripping into the ice bin. Following is normal during the defrost cycle. D Automatic ice maker When ice ...
... You may notice a red glow in the past. IMPORTANT During the automatic defrost cycle, you may hear air being forced through the refrigerator by the evaporator fan. F Condenser fan You may make these sounds more noticeable. NOTE Rigid foam insulation is very energy... (not removable) You may create a boiling or gurgling sound. E Electronic control & automatic defrost control These parts can cause: A Evaporator Refrigerant through the evaporator may hear water dripping into the ice bin. Following is normal during the defrost cycle. D Automatic ice maker When ice ...

Complete Owner's Guide (English)
Page 11
...light bulbs to clean smooth handles. Soap and water Glass cleaner Mild liquid sprays Allow glass to warm to clean stainless steel. Unplug refrigerator Wear gloves Remove light cover Replace old bulb Replace light cover Plug in warm water. When cleaning, take the following precautions: •... Vacuum dust from the wall outlet. Wipe up . Do not use household cleaners containing ammonia or bleach. CAUTION • Pull the refrigerator straight out to lights and other abrasive cleaning materials or strong alkaline solutions. NOTE If you set your temperature controls to turn...
...light bulbs to clean smooth handles. Soap and water Glass cleaner Mild liquid sprays Allow glass to warm to clean stainless steel. Unplug refrigerator Wear gloves Remove light cover Replace old bulb Replace light cover Plug in warm water. When cleaning, take the following precautions: •... Vacuum dust from the wall outlet. Wipe up . Do not use household cleaners containing ammonia or bleach. CAUTION • Pull the refrigerator straight out to lights and other abrasive cleaning materials or strong alkaline solutions. NOTE If you set your temperature controls to turn...

Complete Owner's Guide (English)
Page 12
... temperature to stabilize. • Set refrigerator control to a warmer setting until freezer... freezer control to a warmer setting. Push in light switch, located on the refrigerator control box, to be cleaned. • Foods that are not the result ... plug is tightly pushed into electrical outlet. • Light switch may be in refrigerator. Cabinet light not working . (some models) Before calling for service, review this...includes common occurrences that produce odors should produce 2.5 to "O". • Refrigerator may save you time and expense. Before You Call 1-800-944-9044 (United...
... temperature to stabilize. • Set refrigerator control to a warmer setting until freezer... freezer control to a warmer setting. Push in light switch, located on the refrigerator control box, to be cleaned. • Foods that are not the result ... plug is tightly pushed into electrical outlet. • Light switch may be in refrigerator. Cabinet light not working . (some models) Before calling for service, review this...includes common occurrences that produce odors should produce 2.5 to "O". • Refrigerator may save you time and expense. Before You Call 1-800-944-9044 (United...

Complete Owner's Guide (English)
Page 13
... service companies; In the USA, your receipt, delivery slip, or some other than genuine Electrolux parts or parts obtained from its original owner to any refrigerator or freezer failures. 6. Electrolux authorizes no person to change without notice. Box 212378 Augusta, GA 30907 Canada 1.800.265.8352 Electrolux Canada Corp. 5855 Terry...
... service companies; In the USA, your receipt, delivery slip, or some other than genuine Electrolux parts or parts obtained from its original owner to any refrigerator or freezer failures. 6. Electrolux authorizes no person to change without notice. Box 212378 Augusta, GA 30907 Canada 1.800.265.8352 Electrolux Canada Corp. 5855 Terry...

Wiring Diagram (All Languages)
Page 2
...BRACKET ICE MAKER LT. BLUE BLACK BLACK GRN/YEL BLUE MACHINE COMPARTMENT LT. BLUE FREEZER LIGHT SWITCH NOTE DENOTES NOT ON ALL MODELS. REFRIGERATOR COMPARTMENT DEFROST TIMER BROWN ORANGE RED LT. BLUE SPLICE D DIODES TO BE POLARIZED AS SHOWN. BLUE BLACK RED YELLOW LT. TM Dynamic... With Optional Water Through The Door Or Mid-level Lighting COMPRESSOR WIRING Induction Run Compressor with Relay BLUE REFRIGERATOR LIGHT LT. BLUE YEL/BLACK REFRIGERATOR LIGHT SWITCH BLACK COLD CONTROL YEL/BLACK YEL/BLACK ORANGE BLACK GRN/YEL TAN BROWN RED LT. BLUE BLACK YELLOW...
...BRACKET ICE MAKER LT. BLUE BLACK BLACK GRN/YEL BLUE MACHINE COMPARTMENT LT. BLUE FREEZER LIGHT SWITCH NOTE DENOTES NOT ON ALL MODELS. REFRIGERATOR COMPARTMENT DEFROST TIMER BROWN ORANGE RED LT. BLUE SPLICE D DIODES TO BE POLARIZED AS SHOWN. BLUE BLACK RED YELLOW LT. TM Dynamic... With Optional Water Through The Door Or Mid-level Lighting COMPRESSOR WIRING Induction Run Compressor with Relay BLUE REFRIGERATOR LIGHT LT. BLUE YEL/BLACK REFRIGERATOR LIGHT SWITCH BLACK COLD CONTROL YEL/BLACK YEL/BLACK ORANGE BLACK GRN/YEL TAN BROWN RED LT. BLUE BLACK YELLOW...

Installation Instructions (All Languages)
Page 1
... If you need to remove the doors to back. To level cabinet or change door height: 1. Then level the refrigerator from side to side. 1 2 HAND TRUCKING • Load refrigerator from side of cabinet only. • Do not run retaining straps over handles. • Do not over-tighten retaining...icemaker OFF if water supply is not recommended. To be removed by the customer after unit is in place. Remove toe grille. 2. The refrigerator should slope ¼" to ½" from doors only after installation is complete INSTALLATION CHECKOFF LIST Doors Handles are secure and tight Door seals ...
... If you need to remove the doors to back. To level cabinet or change door height: 1. Then level the refrigerator from side to side. 1 2 HAND TRUCKING • Load refrigerator from side of cabinet only. • Do not run retaining straps over handles. • Do not over-tighten retaining...icemaker OFF if water supply is not recommended. To be removed by the customer after unit is in place. Remove toe grille. 2. The refrigerator should slope ¼" to ½" from doors only after installation is complete INSTALLATION CHECKOFF LIST Doors Handles are secure and tight Door seals ...


