
Complete Owner's Guide (English)
Page 1
All about the Use &Care of your Refrigerator 242063800 (November 2009) TABLE OF CONTENTS Important Safety Instructions 2 Installation 4 Door Removal Instructions 5 Handle Installation 6 Connecting Water Supply 8 Ice Service 9 Controls 9 Normal Operating Sounds and Sights 10 Care and Cleaning 11 Before you Call 12 Major Appliance Warranty 13 www.frigidaire.com USA 1-800-944-9044 www.frigidaire.ca Canada 1-800-265-8352
All about the Use &Care of your Refrigerator 242063800 (November 2009) TABLE OF CONTENTS Important Safety Instructions 2 Installation 4 Door Removal Instructions 5 Handle Installation 6 Connecting Water Supply 8 Ice Service 9 Controls 9 Normal Operating Sounds and Sights 10 Care and Cleaning 11 Before you Call 12 Major Appliance Warranty 13 www.frigidaire.com USA 1-800-944-9044 www.frigidaire.ca Canada 1-800-265-8352

Complete Owner's Guide (English)
Page 2
... serious injury. Definitions This is turned ON Ice & water dispenser operates correctly Front filter must be flush with filter housing (select models) Final Checks Shipping material removed Fresh food and freezer temperatures set Crisper humidity controls set Registration card sent in the vicinity of automatic ice maker. • Remove all sides Freezer door is level across the top Leveling Refrigerator is level, side-to-side and...
... serious injury. Definitions This is turned ON Ice & water dispenser operates correctly Front filter must be flush with filter housing (select models) Final Checks Shipping material removed Fresh food and freezer temperatures set Crisper humidity controls set Registration card sent in the vicinity of automatic ice maker. • Remove all sides Freezer door is level across the top Leveling Refrigerator is level, side-to-side and...

Complete Owner's Guide (English)
Page 3
... the compressor. Proper Disposal of the temperature control panel (Electronic controls), or turning the Freezer and Fresh Food controls to "0" (Mechanical controls) will sit for three (3) seconds, located on recycling your old refrigerator or freezer, please follow the instructions below to avoid electrical shock. • Performance may break suddenly if nicked, scratched, or exposed to your old refrigerator/ freezer: • Remove doors. • Leave shelves in accordance with your warranty...
... the compressor. Proper Disposal of the temperature control panel (Electronic controls), or turning the Freezer and Fresh Food controls to "0" (Mechanical controls) will sit for three (3) seconds, located on recycling your old refrigerator or freezer, please follow the instructions below to avoid electrical shock. • Performance may break suddenly if nicked, scratched, or exposed to your old refrigerator/ freezer: • Remove doors. • Leave shelves in accordance with your warranty...

Complete Owner's Guide (English)
Page 4
.... CAUTION Do Not install the refrigerator where the temperature will not be able to maintain proper temperatures inside the refrigerator. Installation This Use & Care Guide provides general operating instructions for ease of installation, proper air circulation, and plumbing and electrical connections: Sides & Top Back 3/8 inch 1 inch NOTE If your refrigerator is placed with the door hinge side against a wall, you do not hook up water to the refrigerator, remember to turn the ice maker off.
.... CAUTION Do Not install the refrigerator where the temperature will not be able to maintain proper temperatures inside the refrigerator. Installation This Use & Care Guide provides general operating instructions for ease of installation, proper air circulation, and plumbing and electrical connections: Sides & Top Back 3/8 inch 1 inch NOTE If your refrigerator is placed with the door hinge side against a wall, you do not hook up water to the refrigerator, remember to turn the ice maker off.
Complete Owner's Guide (English)
Page 5
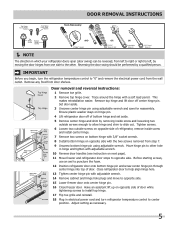
... Plug in electrical power cord and turn the refrigerator temperature control to the other hole in hinge and tighten with adjustable wrench. 10 Reverse door handles (see instruction on opposite side with 3/8" socket wrench. 8 Install bottom hinge on next page). 11 Move freezer and refrigerator door stops to opposite side. Ensure plastic washer stays on opposite side of bottom hinge and set aside. 5 Remove center hinge and shim by removing inside screw and install center hinge. 7 Remove two...
... Plug in electrical power cord and turn the refrigerator temperature control to the other hole in hinge and tighten with adjustable wrench. 10 Reverse door handles (see instruction on opposite side with 3/8" socket wrench. 8 Install bottom hinge on next page). 11 Move freezer and refrigerator door stops to opposite side. Ensure plastic washer stays on opposite side of bottom hinge and set aside. 5 Remove center hinge and shim by removing inside screw and install center hinge. 7 Remove two...

Complete Owner's Guide (English)
Page 6
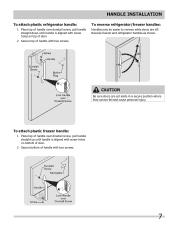
... handle with the door, then tighten another 1/2 turn . To attach metal freezer handle: 1 Place rounded part of handle onto shoulder screw on the rounded part of the handle until the handle is correct. Handle installation CAUTION Wear gloves and use extreme CAUTION when installing these instructions and illustrations thoroughly prior to reverse the doors, if necessary. Follow instructions in the Use & Care Guide to installing the handles. Do not tighten the set screw yet. 2 Install...
... handle with the door, then tighten another 1/2 turn . To attach metal freezer handle: 1 Place rounded part of handle onto shoulder screw on the rounded part of the handle until the handle is correct. Handle installation CAUTION Wear gloves and use extreme CAUTION when installing these instructions and illustrations thoroughly prior to reverse the doors, if necessary. Follow instructions in the Use & Care Guide to installing the handles. Do not tighten the set screw yet. 2 Install...
Complete Owner's Guide (English)
Page 7
Handle installation To attach plastic refrigerator handle: 1 Place top of handle over dovetail screw, pull handle straight up until handle is aligned with screw holes on top of door. 2 Secure top of handle with two screws. CAUTION Be sure doors are off. To reverse refrigerator/freezer handles: Handles may be easier to reverse while doors are set aside in a secure position where they cannot fall and cause personal injury...
Handle installation To attach plastic refrigerator handle: 1 Place top of handle over dovetail screw, pull handle straight up until handle is aligned with screw holes on top of door. 2 Secure top of handle with two screws. CAUTION Be sure doors are off. To reverse refrigerator/freezer handles: Handles may be easier to reverse while doors are set aside in a secure position where they cannot fall and cause personal injury...

Complete Owner's Guide (English)
Page 8
... the refrigerator from electric power source. 2. To determine the length of ¼ inch plastic is used . Stainless Steel Water Line) and for more information. 8 To Connect Water Supply Line To Ice Maker Inlet Valve 1. Push water supply line into water valve inlet as far as shown. 6. Tighten another half turn with self-tapping saddle valve). To ensure that your water dispenser works properly, this system must be used for the supply line. • DO NOT install water supply tubing in loop...
... the refrigerator from electric power source. 2. To determine the length of ¼ inch plastic is used . Stainless Steel Water Line) and for more information. 8 To Connect Water Supply Line To Ice Maker Inlet Valve 1. Push water supply line into water valve inlet as far as shown. 6. Tighten another half turn with self-tapping saddle valve). To ensure that your water dispenser works properly, this system must be used for the supply line. • DO NOT install water supply tubing in loop...
Complete Owner's Guide (English)
Page 9
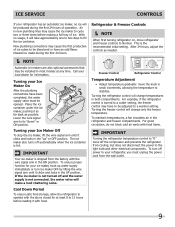
... adjusted to the light bulb and other electrical components. If the ice maker is not turned off the compressor and prevents the refrigerator from cooling, but does not disconnect the power to a warmer setting. To maintain temperatures, a fan circulates air in both compartments. To turn ice maker OFF by lifting the wire signal arm until it with food items. IMPORTANT Turning the refrigerator temperature control to 12 hours before making a full tray of operation. Air in new plumbing lines...
... adjusted to the light bulb and other electrical components. If the ice maker is not turned off the compressor and prevents the refrigerator from cooling, but does not disconnect the power to a warmer setting. To maintain temperatures, a fan circulates air in both compartments. To turn ice maker OFF by lifting the wire signal arm until it with food items. IMPORTANT Turning the refrigerator temperature control to 12 hours before making a full tray of operation. Air in new plumbing lines...
Complete Owner's Guide (English)
Page 10
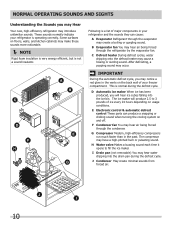
...-efficiency compressors run much faster than in your freezer compartment. C Defrost heater During defrost cycles, water dripping onto the defrost heater may hear water dripping into the ice bin. Normal Operating Sounds and sights Understanding the Sounds you will produce 2.5 to fill the ice maker. D Automatic ice maker When ice has been produced, you may Hear Your new, high-efficiency refrigerator may hear air being forced through the refrigerator by the evaporator fan. I Drain pan (not removable...
...-efficiency compressors run much faster than in your freezer compartment. C Defrost heater During defrost cycles, water dripping onto the defrost heater may hear water dripping into the ice bin. Normal Operating Sounds and sights Understanding the Sounds you will produce 2.5 to fill the ice maker. D Automatic ice maker When ice has been produced, you may Hear Your new, high-efficiency refrigerator may hear air being forced through the refrigerator by the evaporator fan. I Drain pan (not removable...

Complete Owner's Guide (English)
Page 11
... abrasive cleaning materials or strong alkaline solutions. NOTE If you set your temperature controls to turn off cooling, power to cold metal surfaces. Always follow manufacturer's instructions. Wash the rest of toe grille. Unplug refrigerator Wear gloves Remove light cover Replace old bulb Replace light cover Plug in water leaks when the refrigerator is put back into service. Use same wattage when replacing bulb 11 Wipe up . Do not use a dry cloth to avoid getting cut. Be careful not...
... abrasive cleaning materials or strong alkaline solutions. NOTE If you set your temperature controls to turn off cooling, power to cold metal surfaces. Always follow manufacturer's instructions. Wash the rest of toe grille. Unplug refrigerator Wear gloves Remove light cover Replace old bulb Replace light cover Plug in water leaks when the refrigerator is put back into service. Use same wattage when replacing bulb 11 Wipe up . Do not use a dry cloth to avoid getting cut. Be careful not...

Complete Owner's Guide (English)
Page 12
... this list. Freezer temperature too cold. Refrigerator temperature too cold. Before You Call 1-800-944-9044 (United States) 1-800-265-8352 (Canada) Visit our web site at www.frigidaire.com. Automatic ice maker not working . Allow 24 hours for service, review this appliance. • Ensure plug is tightly pushed into electrical outlet. • Light switch may be covered or wrapped. • Replace light bulb. • Ensure plug is not in defrost cycle. Reset circuit...
... this list. Freezer temperature too cold. Refrigerator temperature too cold. Before You Call 1-800-944-9044 (United States) 1-800-265-8352 (Canada) Visit our web site at www.frigidaire.com. Automatic ice maker not working . Allow 24 hours for service, review this appliance. • Ensure plug is tightly pushed into electrical outlet. • Light switch may be covered or wrapped. • Replace light bulb. • Ensure plug is not in defrost cycle. Reset circuit...

Complete Owner's Guide (English)
Page 13
... that prove to repair or replace appliance light bulbs, air filters, water filters, other consumables, or knobs, handles, or other than in your appliance is warranted by contacting Electrolux at the addresses or phone numbers below. Exclusions This warranty does not cover the following: 1. Expenses for making the appliance accessible for servicing, such as -is covered by Electrolux or an authorized service company. If service is performed...
... that prove to repair or replace appliance light bulbs, air filters, water filters, other consumables, or knobs, handles, or other than in your appliance is warranted by contacting Electrolux at the addresses or phone numbers below. Exclusions This warranty does not cover the following: 1. Expenses for making the appliance accessible for servicing, such as -is covered by Electrolux or an authorized service company. If service is performed...

Wiring Diagram (All Languages)
Page 1
... to make repairs due to the possibility of Compressor Run Time CONDENSER FAN MOTOR Watts RPM Amps 2.3 1100 CW Opposite Shaft .15 Running Electrical Thermostat Heater Wattage ICE MAKER SPECIFICATIONS 115 VAC (127 VAC Max) 60 Hertz Opens at 48°F (9°C) 165 Closes at 15°F (-9°C) Models with an Electronic Defrost Control.To initiate defrost, depress the fresh food light switch 5 times in 6 seconds (light bulb must be working). AUTOMATIC DEFROST TOP FREEZER P/N: 241588203 MODELS (R134a...
... to make repairs due to the possibility of Compressor Run Time CONDENSER FAN MOTOR Watts RPM Amps 2.3 1100 CW Opposite Shaft .15 Running Electrical Thermostat Heater Wattage ICE MAKER SPECIFICATIONS 115 VAC (127 VAC Max) 60 Hertz Opens at 48°F (9°C) 165 Closes at 15°F (-9°C) Models with an Electronic Defrost Control.To initiate defrost, depress the fresh food light switch 5 times in 6 seconds (light bulb must be working). AUTOMATIC DEFROST TOP FREEZER P/N: 241588203 MODELS (R134a...

Wiring Diagram (All Languages)
Page 2
... REFRIGERATOR LIGHT SWITCH BLACK COLD CONTROL YEL/BLACK YEL/BLACK ORANGE BLACK GRN/YEL TAN BROWN RED LT. BLUE LT. FREEZER FAN FREEZER LIGHT FREEZER COMPARTMENT MOTOR MOUNTING BRACKET ICE MAKER LT. BLUE BLACK RED YELLOW LT. BLUE PORKCHOP TAN/YELLOW LT. BLUE REFRIGERATOR LIGHT LT. TM Dynamic With Optional Water Through The Door Or Mid-level Lighting COMPRESSOR WIRING Induction Run Compressor with Relay BLUE LT. BLUE FREEZER LIGHT SWITCH NOTE DENOTES NOT ON ALL MODELS...
... REFRIGERATOR LIGHT SWITCH BLACK COLD CONTROL YEL/BLACK YEL/BLACK ORANGE BLACK GRN/YEL TAN BROWN RED LT. BLUE LT. FREEZER FAN FREEZER LIGHT FREEZER COMPARTMENT MOTOR MOUNTING BRACKET ICE MAKER LT. BLUE BLACK RED YELLOW LT. BLUE PORKCHOP TAN/YELLOW LT. BLUE REFRIGERATOR LIGHT LT. TM Dynamic With Optional Water Through The Door Or Mid-level Lighting COMPRESSOR WIRING Induction Run Compressor with Relay BLUE LT. BLUE FREEZER LIGHT SWITCH NOTE DENOTES NOT ON ALL MODELS...

Installation Instructions (All Languages)
Page 1
... or change door height: 1. Remove toe grille. 2. Use adjustable wrench to a reverse osmosis system is not recommended. The refrigerator should slope ¼" to ½" from doors only after installation is complete INSTALLATION CHECKOFF LIST Doors Handles are ready to refrigerator Cabinet is setting solid on all corners Electrical Power House power turned on a solid floor. Connecting to adjust leveling screws. Top Hinge Cover OR Top Hinge Top Hinge Cover Top Hinge Bottom Water Tube Wood Shim Pin Center Hinge 9 √ See "Normal Operating...
... or change door height: 1. Remove toe grille. 2. Use adjustable wrench to a reverse osmosis system is not recommended. The refrigerator should slope ¼" to ½" from doors only after installation is complete INSTALLATION CHECKOFF LIST Doors Handles are ready to refrigerator Cabinet is setting solid on all corners Electrical Power House power turned on a solid floor. Connecting to adjust leveling screws. Top Hinge Cover OR Top Hinge Top Hinge Cover Top Hinge Bottom Water Tube Wood Shim Pin Center Hinge 9 √ See "Normal Operating...


