
Installation Instructions (All Languages)
Page 1
...or other flammable vapors and liquids in your building. • Immediately call the fire department. - Clearances and Dimensions 1. 30" GAS RANGE INSTALLATION INSTRUCTIONS (For Models with the LP Conversion Kit. If the information in the State of *5" Range 5" 30" 30" Minimum Minimum to ...or obtained from your gas supplier from a neighbor's phone. Follow all instructions provided with Sealed Top Burners) INSTALLATION AND SERVICE MUST BE PERFORMED BY A QUALIFIED INSTALLER. FOR YOUR SAFETY: - Location-Check location where the range will be solid and level. READ AND ...
...or other flammable vapors and liquids in your building. • Immediately call the fire department. - Clearances and Dimensions 1. 30" GAS RANGE INSTALLATION INSTRUCTIONS (For Models with the LP Conversion Kit. If the information in the State of *5" Range 5" 30" 30" Minimum Minimum to ...or obtained from your gas supplier from a neighbor's phone. Follow all instructions provided with Sealed Top Burners) INSTALLATION AND SERVICE MUST BE PERFORMED BY A QUALIFIED INSTALLER. FOR YOUR SAFETY: - Location-Check location where the range will be solid and level. READ AND ...

Installation Instructions (All Languages)
Page 2
... items. • To eliminate the need to children in the Use & Care Guide. latest edition when installed in operation. When installed in a manufactured (mobile) home, installation • Never use in • Adjust surface burner flame size so it carefully. Wipe up excess spillage...electric ignitor will automatically re-ignite the oven burner vent nor around the range can be electrically grounded in these installation instructions before installing range. 2. Never leave the oven door open when the range is in conjunction with the consumer. each other...
... items. • To eliminate the need to children in the Use & Care Guide. latest edition when installed in operation. When installed in a manufactured (mobile) home, installation • Never use in • Adjust surface burner flame size so it carefully. Wipe up excess spillage...electric ignitor will automatically re-ignite the oven burner vent nor around the range can be electrically grounded in these installation instructions before installing range. 2. Never leave the oven door open when the range is in conjunction with the consumer. each other...

Installation Instructions (All Languages)
Page 3
...lock pliers • 5/16" Nutdriver or Flat Head Screw Driver • Electric Drill & 1/8" Diameter Drill Bit (5/32" Masonry Drill Bit if installing in concrete) For gas supply connection: • Pipe wrench For burner flame adjustment: • Phillips head and blade-type screwdrivers For gas conversion ... 3/4" or 1/2" I .D.) supplied with the new flexible appliance conduit for connection of the range. For wall mount, locate the bracket by properly installed anti-tip bracket and screws packed with the range. Mark the location of the screw holes in wall. Use a 5/16" nut-driver or ...
...lock pliers • 5/16" Nutdriver or Flat Head Screw Driver • Electric Drill & 1/8" Diameter Drill Bit (5/32" Masonry Drill Bit if installing in concrete) For gas supply connection: • Pipe wrench For burner flame adjustment: • Phillips head and blade-type screwdrivers For gas conversion ... 3/4" or 1/2" I .D.) supplied with the new flexible appliance conduit for connection of the range. For wall mount, locate the bracket by properly installed anti-tip bracket and screws packed with the range. Mark the location of the screw holes in wall. Use a 5/16" nut-driver or ...

Installation Instructions (All Languages)
Page 4
... be at least 5 inches; Leak testing of the range and carefully attempt to the manifold and MUST be at least 11 inches. This unit is installed. Connect the range to the regulator must be connected in the floor under the range after gas supply line is pre-set for thru the... wall connection of water column pressure. The gas supply line should be taken during installation of the range (some models). 30" GAS RANGE INSTALLATION INSTRUCTIONS (For Models with a wrench. Provide an adequate gas supply. The LP kit can be found on rear of wall and...
... be at least 5 inches; Leak testing of the range and carefully attempt to the manifold and MUST be at least 11 inches. This unit is installed. Connect the range to the regulator must be connected in the floor under the range after gas supply line is pre-set for thru the... wall connection of water column pressure. The gas supply line should be taken during installation of the range (some models). 30" GAS RANGE INSTALLATION INSTRUCTIONS (For Models with a wrench. Provide an adequate gas supply. The LP kit can be found on rear of wall and...

Installation Instructions (All Languages)
Page 5
...off the gas supply to the range. g) Check for leaks in an accessible location outside of water column pressure (approximately 1/2" psig). a) Install an external manual gas shut-off valve. Using a rubber hose with adjustable wrench before tightening the gas supply fitting and/or appliance conduit (...to Fig. 4e). Be sure the gas supply (inlet) pressure is in the "ON" position (See Fig. 4f). 30" GAS RANGE INSTALLATION INSTRUCTIONS (For Models with Sealed Top Burners) the 1/2" flare union adapter with an adjustable wrench before tightening ANY fittings to the pressure regulator (Refer...
...off the gas supply to the range. g) Check for leaks in an accessible location outside of water column pressure (approximately 1/2" psig). a) Install an external manual gas shut-off valve. Using a rubber hose with adjustable wrench before tightening the gas supply fitting and/or appliance conduit (...to Fig. 4e). Be sure the gas supply (inlet) pressure is in the "ON" position (See Fig. 4f). 30" GAS RANGE INSTALLATION INSTRUCTIONS (For Models with Sealed Top Burners) the 1/2" flare union adapter with an adjustable wrench before tightening ANY fittings to the pressure regulator (Refer...

Installation Instructions (All Languages)
Page 6
...electrical supply at circuit breaker, fuse or power cord. circuit breaker or time delay fuse. Please Note: The burner heads are installed correctly and in place whenever the surface burners are obtainable through your local service organization. Where a standard two-prong wall receptacle is...! DO NOT ALLOW SPILLS, FOOD, CLEANING AGENTS OR ANY OTHER MATERIAL TO ENTER THE GAS ORIFICE HOLDER OPENING. 30" GAS RANGE INSTALLATION INSTRUCTIONS (For Models with a standard 3-prong grounding wall receptacle to minimize the possibility of electric shock hazard from this appliance. Assembly ...
...electrical supply at circuit breaker, fuse or power cord. circuit breaker or time delay fuse. Please Note: The burner heads are installed correctly and in place whenever the surface burners are obtainable through your local service organization. Where a standard two-prong wall receptacle is...! DO NOT ALLOW SPILLS, FOOD, CLEANING AGENTS OR ANY OTHER MATERIAL TO ENTER THE GAS ORIFICE HOLDER OPENING. 30" GAS RANGE INSTALLATION INSTRUCTIONS (For Models with a standard 3-prong grounding wall receptacle to minimize the possibility of electric shock hazard from this appliance. Assembly ...

Installation Instructions (All Languages)
Page 7
30" GAS RANGE INSTALLATION INSTRUCTIONS (For Models with the turn knob from LITE to LOWEST POSITION without going out. Electric Ignition Surface Burners Operation of the LITE position. b. Each ...
30" GAS RANGE INSTALLATION INSTRUCTIONS (For Models with the turn knob from LITE to LOWEST POSITION without going out. Electric Ignition Surface Burners Operation of the LITE position. b. Each ...

Installation Instructions (All Languages)
Page 8
Level the range by placing shims under the corners of defective workmanship or materials in the OFF position. After installation is 1 inch (distinct inner, blue flame). The approximate flame length of the oven burner is complete, make sure all controls are not the result of.... Pull up at rear of the broil burner is Level. Please call or write if you have inquiries about your range. 11. 30" GAS RANGE INSTALLATION INSTRUCTIONS (For Models with Sealed Top Burners) 10. or the lower panel area. Care, Cleaning and Maintenance Refer to the warranty in illustration above ), ...
Level the range by placing shims under the corners of defective workmanship or materials in the OFF position. After installation is 1 inch (distinct inner, blue flame). The approximate flame length of the oven burner is complete, make sure all controls are not the result of.... Pull up at rear of the broil burner is Level. Please call or write if you have inquiries about your range. 11. 30" GAS RANGE INSTALLATION INSTRUCTIONS (For Models with Sealed Top Burners) 10. or the lower panel area. Care, Cleaning and Maintenance Refer to the warranty in illustration above ), ...
Complete Owner's Guide (English)
Page 3
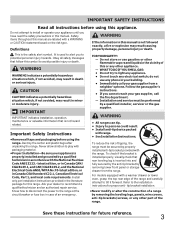
... future reference. 3 Follow the gas supplier's instructions. • If you to avoid possible injury or death. Installation and service must be performed by removing lower front panel or storage drawer from a neighbor's phone. IMPORTANT IMPORTANT indicates... installation, operation, maintenance or valuable information that rear leveling leg is not hazard related. Install only per installation instructions provided in case of the range. Know how to disconnect the power to light...
... future reference. 3 Follow the gas supplier's instructions. • If you to avoid possible injury or death. Installation and service must be performed by removing lower front panel or storage drawer from a neighbor's phone. IMPORTANT IMPORTANT indicates... installation, operation, maintenance or valuable information that rear leveling leg is not hazard related. Install only per installation instructions provided in case of the range. Know how to disconnect the power to light...
Complete Owner's Guide (English)
Page 5
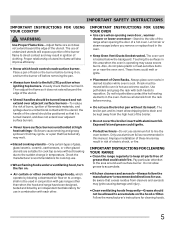
... accumulate. • Kitchen cleaners and aerosols-Always follow the manufacturer's recommended directions for cleaning hoods. 5 The oven vent is operating may cause severe burns. Improper installation of these liners may result in this area when the oven is located below the backguard. The broiler pan and its insert allow grease to...
... accumulate. • Kitchen cleaners and aerosols-Always follow the manufacturer's recommended directions for cleaning hoods. 5 The oven vent is operating may cause severe burns. Improper installation of these liners may result in this area when the oven is located below the backguard. The broiler pan and its insert allow grease to...
Complete Owner's Guide (English)
Page 6
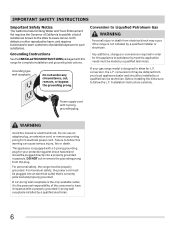
.... If a 2-prong wall receptacle is the only available outlet, it replaced with a properly grounded 3-prong wall receptacle installed by a qualified installer or electrician. Conversion to Liquefied Petroleum Gas WARNING Personal injury or death from your local appliance dealer and should be plugged...For personal safety, the range must be plugged directly into an electrical outlet that is correctly polarized and properly grounded. Before installing the kit be properly grounded. Grounding type wall receptacle Do not under any circumstance, cut or remove the grounding prong ...
.... If a 2-prong wall receptacle is the only available outlet, it replaced with a properly grounded 3-prong wall receptacle installed by a qualified installer or electrician. Conversion to Liquefied Petroleum Gas WARNING Personal injury or death from your local appliance dealer and should be plugged...For personal safety, the range must be plugged directly into an electrical outlet that is correctly polarized and properly grounded. Before installing the kit be properly grounded. Grounding type wall receptacle Do not under any circumstance, cut or remove the grounding prong ...
Complete Owner's Guide (English)
Page 17
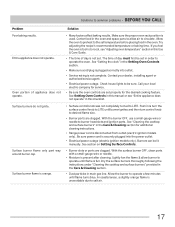
... oven. Allow the burner to burner head slots and ignition ports. Make sure the proper oven rack position is present after cleaning. Call your dealer, installing agent or authorized service agent. • Electrical power outage. Solutions to salt air. 17 See Setting Oven Controls in this manual or see "Entire appliance...
... oven. Allow the burner to burner head slots and ignition ports. Make sure the proper oven rack position is present after cleaning. Call your dealer, installing agent or authorized service agent. • Electrical power outage. Solutions to salt air. 17 See Setting Oven Controls in this manual or see "Entire appliance...
Complete Owner's Guide (English)
Page 18
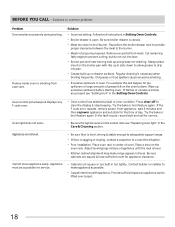
... excessively during broiling. Appliance is not level. • Be sure floor is level, strong & stable enough to correct the situation. • Poor installation. Be sure cabinets are square & have sufficient room for service. Oven control panel beeps & displays any F code error. • Oven control has... amounts of appliance until the rack is open. Adjust leveling legs at base of grease left on the oven bottom. Contact builder or installer to provide proper clearance between the meat & the burner. • Meat not properly prepared. Follow broil instructions in the Care & ...
... excessively during broiling. Appliance is not level. • Be sure floor is level, strong & stable enough to correct the situation. • Poor installation. Be sure cabinets are square & have sufficient room for service. Oven control panel beeps & displays any F code error. • Oven control has... amounts of appliance until the rack is open. Adjust leveling legs at base of grease left on the oven bottom. Contact builder or installer to provide proper clearance between the meat & the burner. • Meat not properly prepared. Follow broil instructions in the Care & ...
Complete Owner's Guide (English)
Page 19
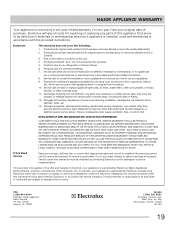
... water filters, other consumables, or knobs, handles, or other than authorized service companies; Damages to the finish of appliance or home incurred during installation, including but not limited to change or add to floors, cabinets, walls, etc. 13. use of parts other than genuine Electrolux parts or... OR LIMITATIONS ON THE DURATION OF IMPLIED WARRANTIES, SO THESE LIMITATIONS OR EXCLUSIONS MAY NOT APPLY TO YOU. Service calls to correct the installation of trim, cupboards, shelves, etc., which do not involve malfunction or defects in your best interest to use or used in the ...
... water filters, other consumables, or knobs, handles, or other than authorized service companies; Damages to the finish of appliance or home incurred during installation, including but not limited to change or add to floors, cabinets, walls, etc. 13. use of parts other than genuine Electrolux parts or... OR LIMITATIONS ON THE DURATION OF IMPLIED WARRANTIES, SO THESE LIMITATIONS OR EXCLUSIONS MAY NOT APPLY TO YOU. Service calls to correct the installation of trim, cupboards, shelves, etc., which do not involve malfunction or defects in your best interest to use or used in the ...

Wiring Diagram (All Languages)
Page 1
... remove power cord from sharp edges, high-temperature components, and moving parts. • All uninsulated electrical terminals, connectors, heaters, etc. Never interfere with the proper installation of 00. Obtain an average oven temperature after 5 seconds the display will adjust in 5°F increments with each press of such practices. 1. You may require...
... remove power cord from sharp edges, high-temperature components, and moving parts. • All uninsulated electrical terminals, connectors, heaters, etc. Never interfere with the proper installation of 00. Obtain an average oven temperature after 5 seconds the display will adjust in 5°F increments with each press of such practices. 1. You may require...
Product Specifications Sheet (English)
Page 2
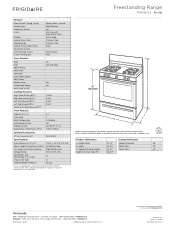
Appliance must be grounded for detailed installation instructions on the web at frigidaire.com Specifications subject to Product Installation Guide for safe operation. A 36" (Adjustable) C B NOTE: For planning purposes only. Product Dimensions Cutout Dimensions A - Accessories... (BTU) Center Extra Zone Burner (BTU) 12,000 5,000 9,500 9,500 Oven Features Capacity (Cu. Printed in the U.S.A. Frigidaire Baseline Freestanding Range FFGF3047L S 30" Gas Features Oven Control / Timing System Surface Type Sealed Gas Burners Grates Window Exterior Door Finish Handle Design Exterior Finish...
Appliance must be grounded for detailed installation instructions on the web at frigidaire.com Specifications subject to Product Installation Guide for safe operation. A 36" (Adjustable) C B NOTE: For planning purposes only. Product Dimensions Cutout Dimensions A - Accessories... (BTU) Center Extra Zone Burner (BTU) 12,000 5,000 9,500 9,500 Oven Features Capacity (Cu. Printed in the U.S.A. Frigidaire Baseline Freestanding Range FFGF3047L S 30" Gas Features Oven Control / Timing System Surface Type Sealed Gas Burners Grates Window Exterior Door Finish Handle Design Exterior Finish...
Product Specifications Sheet (English)
Page 3
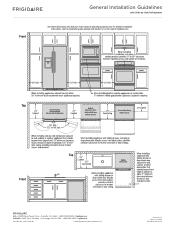
..., refer to change. Specifications subject to installation guide, packed with Side-by-Side Refrigerator Use these dimensions and clearance instructions for planning purposes only. Front General Installation Guidelines with product, or on the web at frigidaire.com. Printed in the U.S.A. Top Top... Front USA • 10200 David Taylor Drive • Charlotte, NC 28262 • 1-800-FRIGIDAIRE • frigidaire.com CANADA • 5855 Terry...
..., refer to change. Specifications subject to installation guide, packed with Side-by-Side Refrigerator Use these dimensions and clearance instructions for planning purposes only. Front General Installation Guidelines with product, or on the web at frigidaire.com. Printed in the U.S.A. Top Top... Front USA • 10200 David Taylor Drive • Charlotte, NC 28262 • 1-800-FRIGIDAIRE • frigidaire.com CANADA • 5855 Terry...
Product Specifications Sheet (English)
Page 4
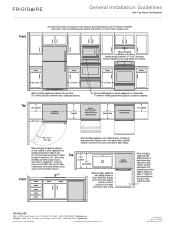
... Use these dimensions and clearance instructions for planning purposes only. Printed in the U.S.A. For detailed installation instructions, refer to change. Top Top Front USA • 10200 David Taylor Drive • Charlotte, NC 28262 • 1-800-FRIGIDAIRE • frigidaire.com CANADA • 5855 Terry Fox Way • Mississauga, ON L5V 3E4 • 1-800-265...
... Use these dimensions and clearance instructions for planning purposes only. Printed in the U.S.A. For detailed installation instructions, refer to change. Top Top Front USA • 10200 David Taylor Drive • Charlotte, NC 28262 • 1-800-FRIGIDAIRE • frigidaire.com CANADA • 5855 Terry Fox Way • Mississauga, ON L5V 3E4 • 1-800-265...


