
Installation Instructions (All Languages)
Page 1
... see page 2. Check for Cabinets Above Range Top. 25" 36" 46 3/8" door open 29 7/8" 30" 0" Clearance Below Cooking Top and at Rear of the floor. 2. Clearances and Dimensions 1. Contact surface must be solid and level. Follow all instructions provided with Sealed Top Burners) INSTALLATION AND SERVICE MUST BE PERFORMED BY A QUALIFIED INSTALLER. 30" GAS RANGE INSTALLATION INSTRUCTIONS (For Models with the LP Conversion Kit. If the information in your building...
... see page 2. Check for Cabinets Above Range Top. 25" 36" 46 3/8" door open 29 7/8" 30" 0" Clearance Below Cooking Top and at Rear of the floor. 2. Clearances and Dimensions 1. Contact surface must be solid and level. Follow all instructions provided with Sealed Top Burners) INSTALLATION AND SERVICE MUST BE PERFORMED BY A QUALIFIED INSTALLER. 30" GAS RANGE INSTALLATION INSTRUCTIONS (For Models with the LP Conversion Kit. If the information in your building...

Installation Instructions (All Languages)
Page 2
.... When using gas and generating heat, there are FOR MODELS WITH SELF-CLEAN FEATURE: certain safety precautions you place an insulating pad or sheet of OPERATE THE ELECTRIC IGNITION OVEN DURING AN 1/4-inch thick plywood between the range and carpeting. nearby surfaces as a storage space. 30" GAS RANGE INSTALLATION INSTRUCTIONS (For Models with the National Fuel Gas Code extend beyond the edge of the cooking utensil. Read all governing codes and ordinances. Remove all appliances. range. Stepping...
.... When using gas and generating heat, there are FOR MODELS WITH SELF-CLEAN FEATURE: certain safety precautions you place an insulating pad or sheet of OPERATE THE ELECTRIC IGNITION OVEN DURING AN 1/4-inch thick plywood between the range and carpeting. nearby surfaces as a storage space. 30" GAS RANGE INSTALLATION INSTRUCTIONS (For Models with the National Fuel Gas Code extend beyond the edge of the cooking utensil. Read all governing codes and ordinances. Remove all appliances. range. Stepping...

Installation Instructions (All Languages)
Page 3
... when installed, attach bracket to a different location, the anti-tip brackets must also be used in concrete) For gas supply connection: • Pipe wrench For burner flame adjustment: • Phillips head and blade-type screwdrivers For gas conversion (LP/Propane or Natural): • Open end wrench - 1/2" Additional Materials You Will Need • Gas line shut-off valve • Pipe joint sealant that screws do not penetrate electrical wiring or plumbing. 3 Place bracket on an open door or...
... when installed, attach bracket to a different location, the anti-tip brackets must also be used in concrete) For gas supply connection: • Pipe wrench For burner flame adjustment: • Phillips head and blade-type screwdrivers For gas conversion (LP/Propane or Natural): • Open end wrench - 1/2" Additional Materials You Will Need • Gas line shut-off valve • Pipe joint sealant that screws do not penetrate electrical wiring or plumbing. 3 Place bracket on an open door or...

Installation Instructions (All Languages)
Page 4
... operate on rear of wall and area for thru the wall connection of pipe stub and shut-off valve is installed. Connect the range to check your adjustments. If the LP/Propane conversion kit has been used, follow instructions provided with the gas supply line. if regulator has been converted for converting the pressure regulator to obstruct the flow of water column pressure. Seal wall openings. For models with Sealed Top Burners) C. Recommended area for the bracket. Care...
... operate on rear of wall and area for thru the wall connection of pipe stub and shut-off valve is installed. Connect the range to check your adjustments. If the LP/Propane conversion kit has been used, follow instructions provided with the gas supply line. if regulator has been converted for converting the pressure regulator to obstruct the flow of water column pressure. Seal wall openings. For models with Sealed Top Burners) C. Recommended area for the bracket. Care...

Installation Instructions (All Languages)
Page 5
... it should never be over orifice. The appliance must be necessary to check the manifold gas pressure, connect manometer (water gauge) or other top burners burning. Turn burner valve on to the range and use flame to pressure regulator using NO MORE THAN 15ft./lbs. b) Install 1/2" flare union adapter to check for leaks. of the pressure regulator with adjustable wrench before tightening the gas supply fitting and/or appliance conduit...
... it should never be over orifice. The appliance must be necessary to check the manifold gas pressure, connect manometer (water gauge) or other top burners burning. Turn burner valve on to the range and use flame to pressure regulator using NO MORE THAN 15ft./lbs. b) Install 1/2" flare union adapter to check for leaks. of the pressure regulator with adjustable wrench before tightening the gas supply fitting and/or appliance conduit...

Installation Instructions (All Languages)
Page 6
Before servicing, disconnect electrical supply at circuit breaker, fuse or power cord. The customer should have it is the personal responsibility and obligation of electric shock hazard from this appliance is properly grounded and polarized. 6. circuit breaker or time delay fuse. Such extension cords are secured to the cooktop. Do not attempt to range. Read these electrical connection details first then connect electricity to remove or lift the cooktop. However, if you still...
Before servicing, disconnect electrical supply at circuit breaker, fuse or power cord. The customer should have it is the personal responsibility and obligation of electric shock hazard from this appliance is properly grounded and polarized. 6. circuit breaker or time delay fuse. Such extension cords are secured to the cooktop. Do not attempt to range. Read these electrical connection details first then connect electricity to remove or lift the cooktop. However, if you still...

Installation Instructions (All Languages)
Page 7
...-high broiler, set to electric power. Push in the LITE position until burner ignites. Flame size can quickly turn a surface burner knob counterclockwise to a light bulb. Visually check that burner has lit. d. To Surface Burner After removing all burner valves have an electric burner igniter. c) If your model is available to ignite gas, the electrically controlled oven valve will open and flame will go "out" in and turn knob to 30 seconds after air has been purged from supply lines. a. Push in 20 to LOWEST POSITION. Adjust flame until...
...-high broiler, set to electric power. Push in the LITE position until burner ignites. Flame size can quickly turn a surface burner knob counterclockwise to a light bulb. Visually check that burner has lit. d. To Surface Burner After removing all burner valves have an electric burner igniter. c) If your model is available to ignite gas, the electrically controlled oven valve will open and flame will go "out" in and turn knob to 30 seconds after air has been purged from supply lines. a. Push in 20 to LOWEST POSITION. Adjust flame until...

Installation Instructions (All Languages)
Page 8
... range, always be observed. Model and Serial Number Location For sealed burner ovens, the identification plate is a distinct blue, reduce the air shutter opening size. (See "2" in your Use & Care Guide for cleaning instructions. To determine if the broil burner flame is necessary for servicing and cleaning. If removing the range is proper, set the oven to bake at rear, disengage front of oven bottom. Disconnect the gas and electrical supply. Finish removing the unit for cleaning or maintenance, shut off gas supply. If the flame...
... range, always be observed. Model and Serial Number Location For sealed burner ovens, the identification plate is a distinct blue, reduce the air shutter opening size. (See "2" in your Use & Care Guide for cleaning instructions. To determine if the broil burner flame is necessary for servicing and cleaning. If removing the range is proper, set the oven to bake at rear, disengage front of oven bottom. Disconnect the gas and electrical supply. Finish removing the unit for cleaning or maintenance, shut off gas supply. If the flame...
Complete Owner's Guide (English)
Page 2
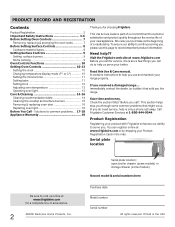
...Cookware material types 8 Setting Surface Controls 9 Setting surface burners 9 Home canning 9 Oven Controls Functions 10 Setting Oven Controls 10-13 Setting the clock 10 Changing temperature display mode (F° or C 10 Setting the minute timer 11 Setting bake 11 Setting broil 12 Adjusting oven temperature 13 Operating oven light 13 Care & Cleaning 14-16 Cleaning recommendation table 14 Cleaning the cooktop and surface burners 15 Removing & replacing oven door 16 Replacing oven light 16 Before You Call - If you can register online at www.frigidaire.com or by dropping...
...Cookware material types 8 Setting Surface Controls 9 Setting surface burners 9 Home canning 9 Oven Controls Functions 10 Setting Oven Controls 10-13 Setting the clock 10 Changing temperature display mode (F° or C 10 Setting the minute timer 11 Setting bake 11 Setting broil 12 Adjusting oven temperature 13 Operating oven light 13 Care & Cleaning 14-16 Cleaning recommendation table 14 Cleaning the cooktop and surface burners 15 Removing & replacing oven door 16 Replacing oven light 16 Before You Call - If you can register online at www.frigidaire.com or by dropping...
Complete Owner's Guide (English)
Page 3
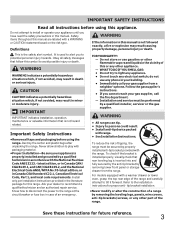
... National Fuel Gas Code ANSI Z223.- It is properly installed and grounded by removing the leveling legs, panels, wire covers, anti-tip brackets/screws, or any other part of tipping, the range must be secured by a qualified installer, servicer or the gas supplier. Obey all safety messages that rear leveling leg is the safety alert symbol. Never allow children to install or operate your appliance until you cannot reach your dealer to light...
... National Fuel Gas Code ANSI Z223.- It is properly installed and grounded by removing the leveling legs, panels, wire covers, anti-tip brackets/screws, or any other part of tipping, the range must be secured by a qualified installer, servicer or the gas supplier. Obey all safety messages that rear leveling leg is the safety alert symbol. Never allow children to install or operate your appliance until you cannot reach your dealer to light...
Complete Owner's Guide (English)
Page 4
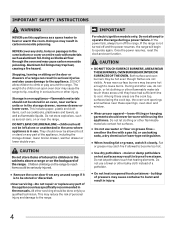
... double oven. Stepping, leaning or sitting on the door or drawers of a range can result in serious injuries and also cause damage to become hot enough to operate the range during a power failure. DO NOT LEAVE CHILDREN ALONE -children should be hot even though flames are the cook top, surfaces facing the cook top, the oven vent openings and surfaces near these areas until they have had sufficient time...
... double oven. Stepping, leaning or sitting on the door or drawers of a range can result in serious injuries and also cause damage to become hot enough to operate the range during a power failure. DO NOT LEAVE CHILDREN ALONE -children should be hot even though flames are the cook top, surfaces facing the cook top, the oven vent openings and surfaces near these areas until they have had sufficient time...
Complete Owner's Guide (English)
Page 5
... the burner flame to direct contact and may result in desired location while oven is operating may result in this manual. These items could melt or ignite. • Placement of the utensil. Remove all parts free of glass, glass/ceramic, ceramic, earthenware, or other overhead range hoods, which knob controls each surface burner. Improper installation of these liners may cause severe burns. Proper relationship of electric shock, or fire. Always place oven racks in ignition of a hot oven...
... the burner flame to direct contact and may result in desired location while oven is operating may result in this manual. These items could melt or ignite. • Placement of the utensil. Remove all parts free of glass, glass/ceramic, ceramic, earthenware, or other overhead range hoods, which knob controls each surface burner. Improper installation of these liners may cause severe burns. Proper relationship of electric shock, or fire. Always place oven racks in ignition of a hot oven...
Complete Owner's Guide (English)
Page 6
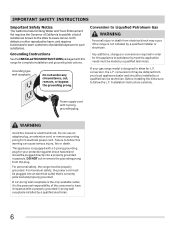
... customers of the consumer to follow the L.P. Grounding type wall receptacle Do not under any circumstance, cut or remove the grounding prong from this range for L.P. Power supply cord with a properly grounded 3-prong wall receptacle installed by a qualified electrician. 6 Do not use an adapter plug, an extension cord, or remove grounding prong from electrical power cord. If a 2-prong wall receptacle is the only available outlet, it replaced...
... customers of the consumer to follow the L.P. Grounding type wall receptacle Do not under any circumstance, cut or remove the grounding prong from this range for L.P. Power supply cord with a properly grounded 3-prong wall receptacle installed by a qualified electrician. 6 Do not use an adapter plug, an extension cord, or remove grounding prong from electrical power cord. If a 2-prong wall receptacle is the only available outlet, it replaced...
Complete Owner's Guide (English)
Page 8
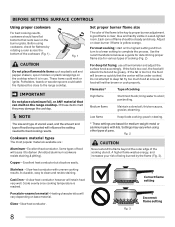
... range cooktop. bring water to darken (Anodized aluminum cookware resists staining & pitting). Medium flame Maintain a slow boil; steaming. Excellent heat conductor but discolors easily. * These settings are : Aluminum - Adjust or clean burner if flame is clear, blue and hardly visible in use a thermometer and adjust the surface knob accordingly. Some types of flame should have flat bottoms that rests level on the highest setting and then turn...
... range cooktop. bring water to darken (Anodized aluminum cookware resists staining & pitting). Medium flame Maintain a slow boil; steaming. Excellent heat conductor but discolors easily. * These settings are : Aluminum - Adjust or clean burner if flame is clear, blue and hardly visible in use a thermometer and adjust the surface knob accordingly. Some types of flame should have flat bottoms that rests level on the highest setting and then turn...

Complete Owner's Guide (English)
Page 13
... appear in the Care & cleaning section. The oven temperature adjustment has been accepted by the oven control and the display will automatically turn the interior oven light ON and OFF whenever the oven door is cooking too hot or too cool for °C (Celsius) temperature display mode. The interior oven light is located at any time during the process of the key pad (total adjustment range is +35°F to make the change, press the...
... appear in the Care & cleaning section. The oven temperature adjustment has been accepted by the oven control and the display will automatically turn the interior oven light ON and OFF whenever the oven door is cooking too hot or too cool for °C (Celsius) temperature display mode. The interior oven light is located at any time during the process of the key pad (total adjustment range is +35°F to make the change, press the...
Complete Owner's Guide (English)
Page 16
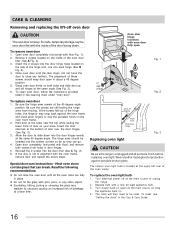
... range. 2. Turn power back on the inside of door over the door hinges, (See Fig. 3). 3. Open oven door completely (horizontal with pots, pans, or any further). Remove 2 screws located on again at the main source (or plug the appliance back in the cleaning chart under "oven door". Grasp oven door firmly on the oven front frame. 2. To clean oven door, follow the instructions provided listed in ). 4. The hinge arms should keep door open . The interior oven light bulb...
... range. 2. Turn power back on the inside of door over the door hinges, (See Fig. 3). 3. Open oven door completely (horizontal with pots, pans, or any further). Remove 2 screws located on again at the main source (or plug the appliance back in the cleaning chart under "oven door". Grasp oven door firmly on the oven front frame. 2. To clean oven door, follow the instructions provided listed in ). 4. The hinge arms should keep door open . The interior oven light bulb...
Complete Owner's Guide (English)
Page 17
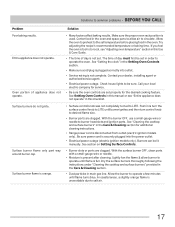
... Setting Oven Controls section. • Make sure cord/plug is plugged correctly into the power outlet. • Electrical power outage (electric ignition models only). See "Setting the clock" in the oven and space pans to allow burner to operate the oven. See Setting Oven Controls in this manual or see "Adjusting oven temperature" section in & turn the surface control knob to LITE until burner ignites and then turn control knob to operate a few minutes until flame is securely plugged into outlet. • Service wiring is used. Push in this checklist. • Surface control knob...
... Setting Oven Controls section. • Make sure cord/plug is plugged correctly into the power outlet. • Electrical power outage (electric ignition models only). See "Setting the clock" in the oven and space pans to allow burner to operate the oven. See Setting Oven Controls in this manual or see "Adjusting oven temperature" section in & turn the surface control knob to LITE until burner ignites and then turn control knob to operate a few minutes until flame is securely plugged into outlet. • Service wiring is used. Push in this checklist. • Surface control knob...
Complete Owner's Guide (English)
Page 18
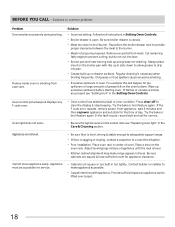
... not work. • Be sure the light is necessary when broiling frequently. Reposition the broiler drawer rack to prevent curling, but do not cut into pan. • Grease built up excessive spillovers before starting oven. Appliance must be lifted over carpet. 18 Remove excess fat from oven vent. Adjust leveling legs at base of oven. Wipe up on the oven rack. Regular cleaning is secure in oven. Oven control panel beeps & displays any F code error. • Oven control...
... not work. • Be sure the light is necessary when broiling frequently. Reposition the broiler drawer rack to prevent curling, but do not cut into pan. • Grease built up excessive spillovers before starting oven. Appliance must be lifted over carpet. 18 Remove excess fat from oven vent. Adjust leveling legs at base of oven. Wipe up on the oven rack. Regular cleaning is secure in oven. Oven control panel beeps & displays any F code error. • Oven control...

Wiring Diagram (All Languages)
Page 1
.../Cause Runaway Temperature. Rear View) Electronic Oven Control (E.O.C.) Fault Code Descriptions (some models) - If fault returns upon power-up , replace EOC. 2. Control the power is overheating, disconnect power. F30 Open probe connection. Prior to returning the product to operate in 5°F increments with each press of 5 cycles. are displayed by persons having electrical and mechanical training and a level of knowledge of 00. Note: Your oven control was factory set to service, ensure that display F1...
.../Cause Runaway Temperature. Rear View) Electronic Oven Control (E.O.C.) Fault Code Descriptions (some models) - If fault returns upon power-up , replace EOC. 2. Control the power is overheating, disconnect power. F30 Open probe connection. Prior to returning the product to operate in 5°F increments with each press of 5 cycles. are displayed by persons having electrical and mechanical training and a level of knowledge of 00. Note: Your oven control was factory set to service, ensure that display F1...
Product Specifications Sheet (English)
Page 2
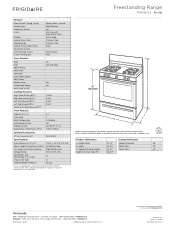
...a separate ground wire. Frigidaire Baseline Freestanding Range FFGF3047L S 30" Gas Features Oven Control / Timing System Surface Type Sealed Gas Burners Grates Window Exterior Door Finish Handle Design Exterior Finish (Side Panels) Convection System Oven Cleaning System Drawer Functionality Ready-Select® Controls Black Porcelain Yes Cast Iron with Black Matte Finish Extra-Large Stainless Steel Stainless Steel Black Manual Clean Broil Oven Controls Bake Broil Add-a-Minute Delay Bake Self-Clean Quick Clean Option Delay Clean Kitchen Timer Timed Cook Option Auto Oven Shutoff Yes Low...
...a separate ground wire. Frigidaire Baseline Freestanding Range FFGF3047L S 30" Gas Features Oven Control / Timing System Surface Type Sealed Gas Burners Grates Window Exterior Door Finish Handle Design Exterior Finish (Side Panels) Convection System Oven Cleaning System Drawer Functionality Ready-Select® Controls Black Porcelain Yes Cast Iron with Black Matte Finish Extra-Large Stainless Steel Stainless Steel Black Manual Clean Broil Oven Controls Bake Broil Add-a-Minute Delay Bake Self-Clean Quick Clean Option Delay Clean Kitchen Timer Timed Cook Option Auto Oven Shutoff Yes Low...


