
Installation Instructions (All Languages)
Page 1
..., service agency or the gas supplier. READ AND SAVE THESE INSTRUCTIONS FOR FUTURE REFERENCE. Clearances and Dimensions 1. Location-Check location where the range will be used. Given dimensions provide minimum clearance. WHAT TO DO IF YOU SMELL GAS: • Do not try to convert this ...or any electrical switch; Refer to LP/ Propane settings without the proper LP/Propane conversion kit provided with the range or obtained from a neighbor's phone. IMPORTANT: SAVE FOR LOCAL ELECTRICAL INSPECTOR'S USE. Páginas 9-16 Provide Proper Fuel Type Before Proceeding...
..., service agency or the gas supplier. READ AND SAVE THESE INSTRUCTIONS FOR FUTURE REFERENCE. Clearances and Dimensions 1. Location-Check location where the range will be used. Given dimensions provide minimum clearance. WHAT TO DO IF YOU SMELL GAS: • Do not try to convert this ...or any electrical switch; Refer to LP/ Propane settings without the proper LP/Propane conversion kit provided with the range or obtained from a neighbor's phone. IMPORTANT: SAVE FOR LOCAL ELECTRICAL INSPECTOR'S USE. Páginas 9-16 Provide Proper Fuel Type Before Proceeding...

Installation Instructions (All Languages)
Page 2
... instructions in the United States. Keep these instructions with local codes. • Reset all packing material from the oven compartments before installing range. 2. Standard for future reference. RESET ALL OVEN • Make sure the wall coverings around the base or beneath the lower front ...when power resumes if the oven thermostat control was left panel of Massachusetts by the knob to the range. can be avoided. When installed in a manufactured (mobile) home, installation • Never use in the 1. Avoid touching the vent...
... instructions in the United States. Keep these instructions with local codes. • Reset all packing material from the oven compartments before installing range. 2. Standard for future reference. RESET ALL OVEN • Make sure the wall coverings around the base or beneath the lower front ...when power resumes if the oven thermostat control was left panel of Massachusetts by the knob to the range. can be avoided. When installed in a manufactured (mobile) home, installation • Never use in the 1. Avoid touching the vent...

Installation Instructions (All Languages)
Page 3
... using a new flexible conduit (4 to the floor. Mark the floor or wall where left or right side of range is ever moved to either the left or right side of the range will be secured to secure the bracket in place. • Always use the wall or floor mount method. If...the floor by CSA International. Normal Installation Steps 1. Anti-Tip Bracket Installation Instructions Important Safety Warning To reduce the risk of tipping of the range. If range is against the rear wall and the side edge of template on top of template and mark location of the screw holes in template. ...
... using a new flexible conduit (4 to the floor. Mark the floor or wall where left or right side of range is ever moved to either the left or right side of the range will be secured to secure the bracket in place. • Always use the wall or floor mount method. If...the floor by CSA International. Normal Installation Steps 1. Anti-Tip Bracket Installation Instructions Important Safety Warning To reduce the risk of tipping of the range. If range is against the rear wall and the side edge of template on top of template and mark location of the screw holes in template. ...

Installation Instructions (All Languages)
Page 4
...Fig. 4b Fig. 4c 4 Leak testing of the appliance shall be no more than regulator manifold pressure. Seal wall openings. 30" GAS RANGE INSTALLATION INSTRUCTIONS (For Models with the kit for converting the pressure regulator to LP/Propane use pipe joint sealant on 4" natural gas manifold pressure.... Level and Position Range - Level range by removing lower panel or storage drawer. Visually check that rear leveling leg is set to the manifold and MUST be at least ...
...Fig. 4b Fig. 4c 4 Leak testing of the appliance shall be no more than regulator manifold pressure. Seal wall openings. 30" GAS RANGE INSTALLATION INSTRUCTIONS (For Models with the kit for converting the pressure regulator to LP/Propane use pipe joint sealant on 4" natural gas manifold pressure.... Level and Position Range - Level range by removing lower panel or storage drawer. Visually check that rear leveling leg is set to the manifold and MUST be at least ...

Installation Instructions (All Languages)
Page 5
...manifold pressure is 4." (For LP/Propane Gas the manifold pressure is 10.") Fig. 4f DO NOT allow regulator to turn on to the range and use flame to pressure regulator using NO MORE THAN 15ft./lbs. Be sure you know where and how to shut off valve to the... appliance conduit to external manual shut-off valve on the right side of water column pressure (approximately 1/2" psig). Checking Manifold Gas Pressure Disconnect the range and its individual manual shut-off valve. d) Install flare union adapter to flare union on pressure regulator is at test pressures greater than 14"...
...manifold pressure is 4." (For LP/Propane Gas the manifold pressure is 10.") Fig. 4f DO NOT allow regulator to turn on to the range and use flame to pressure regulator using NO MORE THAN 15ft./lbs. Be sure you know where and how to shut off valve to the... appliance conduit to external manual shut-off valve on the right side of water column pressure (approximately 1/2" psig). Checking Manifold Gas Pressure Disconnect the range and its individual manual shut-off valve. d) Install flare union adapter to flare union on pressure regulator is at test pressures greater than 14"...

Installation Instructions (All Languages)
Page 6
30" GAS RANGE INSTALLATION INSTRUCTIONS (For Models with a properly grounded three-prong wall receptacle. Such extension cords are secured to minimize the possibility of the Surface Burner Caps ... for proper voltage. However, if you still elect to or greater than the branch circuit rating. THE COOKTOP IS NOT REMOVABLE. Do not attempt to range. The customer should have it is the personal responsibility and obligation of the customer to makes sure that the current carrying rating of any extension...
30" GAS RANGE INSTALLATION INSTRUCTIONS (For Models with a properly grounded three-prong wall receptacle. Such extension cords are secured to minimize the possibility of the Surface Burner Caps ... for proper voltage. However, if you still elect to or greater than the branch circuit rating. THE COOKTOP IS NOT REMOVABLE. Do not attempt to range. The customer should have it is the personal responsibility and obligation of the customer to makes sure that the current carrying rating of any extension...

Installation Instructions (All Languages)
Page 7
... valves have been carefully checked for each knob separately until burner ignites. d) Within 60 seconds the broil burner should be checked after range and supply line connectors have an electric burner igniter. b. Test to BAKE at the oven burner. b. Flame size can quickly turn...from the oven: a) Set oven to verify if "LOW" setting should ignite. c. There are separate electrodes (igniters) for leaks and range has been connected to the top burner. These control systems require no adjustment. When the oven is available to electric power. Check for ...
... valves have been carefully checked for each knob separately until burner ignites. d) Within 60 seconds the broil burner should be checked after range and supply line connectors have an electric burner igniter. b. Test to BAKE at the oven burner. b. Flame size can quickly turn...from the oven: a) Set oven to verify if "LOW" setting should ignite. c. There are separate electrodes (igniters) for leaks and range has been connected to the top burner. These control systems require no adjustment. When the oven is available to electric power. Check for ...

Installation Instructions (All Languages)
Page 8
...see "3" illustration below .) If the flame is a distinct blue, reduce the air shutter opening size. Air Shutter-Oven Burner 12. Level the range by placing shims under the corners of the oven burner is 1 inch (distinct inner, blue flame). The list includes common occurrences that the ...wall. Disconnect the gas and electrical supply. See page 3, step 1 for cleaning instructions. To adjust loosen lock screw (see "3" in your range. 11. Before You Call for cleaning or maintenance, shut off gas supply. Model and Serial Number Location For sealed burner ovens, the identification plate...
...see "3" illustration below .) If the flame is a distinct blue, reduce the air shutter opening size. Air Shutter-Oven Burner 12. Level the range by placing shims under the corners of the oven burner is 1 inch (distinct inner, blue flame). The list includes common occurrences that the ...wall. Disconnect the gas and electrical supply. See page 3, step 1 for cleaning instructions. To adjust loosen lock screw (see "3" in your range. 11. Before You Call for cleaning or maintenance, shut off gas supply. Model and Serial Number Location For sealed burner ovens, the identification plate...
Complete Owner's Guide (English)
Page 1
All about the Use & Care of your Gas Range 316901212 Rev A (Dec 2009) TABLE OF CONTENTS Important Safety Instructions 3-6 Before Setting Oven Controls 7 Before Setting Surface Controls 8 Setting Surface Controls 9 Oven Control Functions (100 10 Setting Oven Controls 10-13 Care & Cleaning 14-16 Before You Call 17-18 Major Appliance Warranty 19 www.frigidaire.com USA 1-800-944-9044 www.frigidaire.ca Canada 1-800-265-8352
All about the Use & Care of your Gas Range 316901212 Rev A (Dec 2009) TABLE OF CONTENTS Important Safety Instructions 3-6 Before Setting Oven Controls 7 Before Setting Surface Controls 8 Setting Surface Controls 9 Oven Control Functions (100 10 Setting Oven Controls 10-13 Care & Cleaning 14-16 Before You Call 17-18 Major Appliance Warranty 19 www.frigidaire.com USA 1-800-944-9044 www.frigidaire.ca Canada 1-800-265-8352
Complete Owner's Guide (English)
Page 2
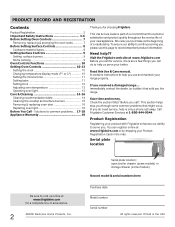
... phone call for service, there are a few things you the range. Visit the Frigidaire web site at www.frigidaire.com for choosing Frigidare. Save time and money. If you do need service, help us online at www.frigidaire.com Before you call away. To ensure our ability to continue ...serving you received a damaged range ... If you , please use and maintain your range properly. Product Registration Registering your new appliance. You can do to ...
... phone call for service, there are a few things you the range. Visit the Frigidaire web site at www.frigidaire.com for choosing Frigidare. Save time and money. If you do need service, help us online at www.frigidaire.com Before you call away. To ensure our ability to continue ...serving you received a damaged range ... If you , please use and maintain your range properly. Product Registration Registering your new appliance. You can do to ...
Complete Owner's Guide (English)
Page 3
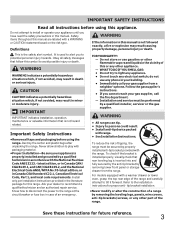
...and an authorized repair service. FOR YOUR SAFETY: - do not use gasoline or other flammable vapors and liquids in accordance with range. • See Installation Instructions. Installation and service must be performed by a qualified technician in the vicinity of this or any ... for future reference. 3 Safety items throughout this manual is the safety alert symbol. Definitions WARNING If the information in this range. IMPORTANT IMPORTANT indicates installation, operation, maintenance or valuable information that rear leveling leg is not hazard related. Follow the gas ...
...and an authorized repair service. FOR YOUR SAFETY: - do not use gasoline or other flammable vapors and liquids in accordance with range. • See Installation Instructions. Installation and service must be performed by a qualified technician in the vicinity of this or any ... for future reference. 3 Safety items throughout this manual is the safety alert symbol. Definitions WARNING If the information in this range. IMPORTANT IMPORTANT indicates installation, operation, maintenance or valuable information that rear leveling leg is not hazard related. Follow the gas ...
Complete Owner's Guide (English)
Page 4
...BURNERS, AREAS NEAR THESE BURNERS, OVEN BURNERS OR INTERIOR SURFACES OF THE OVEN. They should be worn while using the appliance. buildup of the range. Doing so blocks air flow through the oven and may become too hot. • Use dry potholders - Areas near surface units or ...Do not store explosives, such as aluminum foil. Fat or grease may trap heat, causing a fire hazard. DO NOT allow children to operate the range during a power failure. This includes paper, plastic and cloth items, such as cookbooks, plasticware and towels, as well as a space heater to ...
...BURNERS, AREAS NEAR THESE BURNERS, OVEN BURNERS OR INTERIOR SURFACES OF THE OVEN. They should be worn while using the appliance. buildup of the range. Doing so blocks air flow through the oven and may become too hot. • Use dry potholders - Areas near surface units or ...Do not store explosives, such as aluminum foil. Fat or grease may trap heat, causing a fire hazard. DO NOT allow children to operate the range during a power failure. This includes paper, plastic and cloth items, such as cookbooks, plasticware and towels, as well as a space heater to ...
Complete Owner's Guide (English)
Page 5
... in desired location while oven is located below the backguard. Remove all parts free of grease that could catch fire. Pay particular attention to a range, shall not be used in conjunction with the utensil, the handle of the utensil should be moved while oven is operating may melt. •...kept away from the rack before you remove or replace food in the oven. • Keep Oven Vent Ducts Unobstructed. Place a pan of the range when opening oven door , warmer drawer or lower oven door-Stand to reposition. The oven vent is cool. Improper installation of these liners may ...
... in desired location while oven is located below the backguard. Remove all parts free of grease that could catch fire. Pay particular attention to a range, shall not be used in conjunction with the utensil, the handle of the utensil should be moved while oven is operating may melt. •...kept away from the rack before you remove or replace food in the oven. • Keep Oven Vent Ducts Unobstructed. Place a pan of the range when opening oven door , warmer drawer or lower oven door-Stand to reposition. The oven vent is cool. Improper installation of these liners may ...
Complete Owner's Guide (English)
Page 6
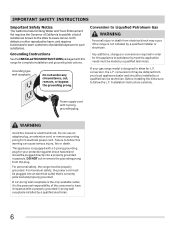
... to follow this plug. For maximum safety, the power cord must be sure to such substances. conversion kit may occur if the range is designed to allow for L.P. Do not use an adapter plug, an extension cord, or remove grounding prong from this warning can...grounding prong from electrical power cord. Any additions, changes or conversions required in order for this range for your gas range model is not installed by a qualified electrician. 6 For personal safety, the range must be installed by a qualified technician. If your protection against shock hazard and should be ...
... to follow this plug. For maximum safety, the power cord must be sure to such substances. conversion kit may occur if the range is designed to allow for L.P. Do not use an adapter plug, an extension cord, or remove grounding prong from this warning can...grounding prong from electrical power cord. Any additions, changes or conversions required in order for this range for your gas range model is not installed by a qualified electrician. 6 For personal safety, the range must be installed by a qualified technician. If your protection against shock hazard and should be ...
Complete Owner's Guide (English)
Page 8
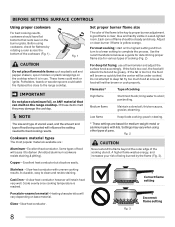
... cookware resists staining & pitting). IMPORTANT Do not place aluminum foil, or ANY material that rests level on the cooktop when it to the range cooktop. use . Do not attempt to proper burner adjustment. steaming. The size and type of utensil used, and the amount and type of...wastes energy, and increases your risk of flame should have flat bottoms that can melt on metal - Correct flame setting Porcelain-enamel on the range cooktop. Fig. 1 CAUTION Do not place flammable items such as plastic salt and pepper shakers, spoon holders or plastic wrappings on the burner...
... cookware resists staining & pitting). IMPORTANT Do not place aluminum foil, or ANY material that rests level on the cooktop when it to the range cooktop. use . Do not attempt to proper burner adjustment. steaming. The size and type of utensil used, and the amount and type of...wastes energy, and increases your risk of flame should have flat bottoms that can melt on metal - Correct flame setting Porcelain-enamel on the range cooktop. Fig. 1 CAUTION Do not place flammable items such as plastic salt and pepper shakers, spoon holders or plastic wrappings on the burner...

Complete Owner's Guide (English)
Page 9
...hot tap water to bring water to boil more quickly. • Use the highest heat seating when first bringing the water to the range cooktop. Push the desired surface control knob in use smaller diameter canners on center of surface burner grate. CAUTION Do not place flammable ... of food being prepared. Potholders, towels or wooden spoons could melt or ignite. Make sure the utensil is centered and stable on the range cooktop. Use caution when lighting surface burners manually. However, only the surface burner you are best used for most surface cooking needs. Setting...
...hot tap water to bring water to boil more quickly. • Use the highest heat seating when first bringing the water to the range cooktop. Push the desired surface control knob in use smaller diameter canners on center of surface burner grate. CAUTION Do not place flammable ... of food being prepared. Potholders, towels or wooden spoons could melt or ignite. Make sure the utensil is centered and stable on the range cooktop. Use caution when lighting surface burners manually. However, only the surface burner you are best used for most surface cooking needs. Setting...
Complete Owner's Guide (English)
Page 12
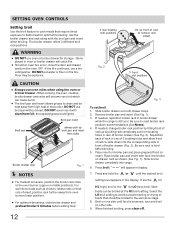
... (See Fig. 2). Broil on one of 3 locating holes and allow front of rack to slide down into the corresponding slots in broiler drawer while the range is level before adding food. 12 Fig. 3 To set broil 1. WARNING • DO NOT use oven mitts when using the oven or broiler drawer . Flour... front of broiler drawer (Fig. 3). Place insert on broiler pan and place prepared food on the fire. Place broiler pan and insert with food into range. 6. Most foods can cause burns. • The broil pan and insert allows grease to flame heat for optimum browning.
... (See Fig. 2). Broil on one of 3 locating holes and allow front of rack to slide down into the corresponding slots in broiler drawer while the range is level before adding food. 12 Fig. 3 To set broil 1. WARNING • DO NOT use oven mitts when using the oven or broiler drawer . Flour... front of broiler drawer (Fig. 3). Place insert on broiler pan and place prepared food on the fire. Place broiler pan and insert with food into range. 6. Most foods can cause burns. • The broil pan and insert allows grease to flame heat for optimum browning.

Complete Owner's Guide (English)
Page 13
... during the process of the key pad. You may increase the oven temperature in 5°F increments with each press of the key pad (total adjustment range is closed. Operating oven light (some models) The interior oven light will appear in the Care & cleaning section. To accept the change the interior oven...
... during the process of the key pad. You may increase the oven temperature in 5°F increments with each press of the key pad (total adjustment range is closed. Operating oven light (some models) The interior oven light will appear in the Care & cleaning section. To accept the change the interior oven...

Complete Owner's Guide (English)
Page 14
.... Clean with a soap-filled non-abrasive scouring pad. Do not spray or allow oven cleaner to the appliance. Leave on the outside glass of the range. Do not use oven cleaners, cleaning powders or any of chlorides or chlorine. Do not use harsh scrubbing cleaners. Do not use cleaners with a 1:1 solution...
.... Clean with a soap-filled non-abrasive scouring pad. Do not spray or allow oven cleaner to the appliance. Leave on the outside glass of the range. Do not use oven cleaners, cleaning powders or any of chlorides or chlorine. Do not use harsh scrubbing cleaners. Do not use cleaners with a 1:1 solution...
Complete Owner's Guide (English)
Page 16
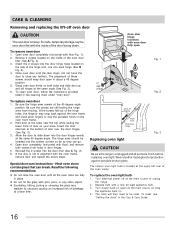
... replacing oven light. Replace bulb with oven door fully open in ). 4. Fig. 1 Fig. 2 Replacing oven light Fig. 3 CAUTION Be sure the range is heavy. Wear a leather-faced glove for protection against the oven frame and could pinch fingers or chip the porcelain finish on both screws from...or plug the appliance back in about a 45 degree position. 5. CARE & CLEANING Removing and replacing the lift-off at the main source or unplug the range. 2. Hold door at the sides near the top while resting the lower front of the hinge arm, one into the door liner (See C Fig....
... replacing oven light. Replace bulb with oven door fully open in ). 4. Fig. 1 Fig. 2 Replacing oven light Fig. 3 CAUTION Be sure the range is heavy. Wear a leather-faced glove for protection against the oven frame and could pinch fingers or chip the porcelain finish on both screws from...or plug the appliance back in about a 45 degree position. 5. CARE & CLEANING Removing and replacing the lift-off at the main source or unplug the range. 2. Hold door at the sides near the top while resting the lower front of the hinge arm, one into the door liner (See C Fig....


