
Installation Instructions
Page 1
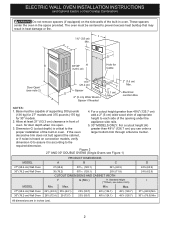
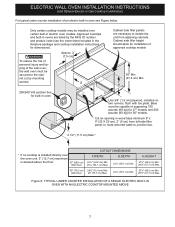
... - IMPORTANT: SAVE FOR LOCAL ELECTRICAL INSPECTOR'S USE. Dimension G (cutout depth) is open. 3. These spacers center the oven in the vicinity of the (see note 2) D 2" opening under the appliance side rails. NOTES: 1. Electrical Junction Box a larger bottom trim through a Service Center. * Suggested distance from floor is 4 ½" (11.4cm). 27" and 30" Single Wall Ovens (Double ovens see notes 4 & 5) Min. Figure 1 Minimum required distance is 31" (78...
... - IMPORTANT: SAVE FOR LOCAL ELECTRICAL INSPECTOR'S USE. Dimension G (cutout depth) is open. 3. These spacers center the oven in the vicinity of the (see note 2) D 2" opening under the appliance side rails. NOTES: 1. Electrical Junction Box a larger bottom trim through a Service Center. * Suggested distance from floor is 4 ½" (11.4cm). 27" and 30" Single Wall Ovens (Double ovens see notes 4 & 5) Min. Figure 1 Minimum required distance is 31" (78...
Installation Instructions
Page 2
..." DOUBLE OVENS (Single Ovens see notes 4 & 5) Min. Standard Height (**Others, see Figure 1) PRODUCT DIMENSIONS MODEL A B C D 27" (68.6 cm) Wall Oven 30" (76.2 cm) Wall Oven MODEL 27" (68.6 cm) Wall Oven 30" (76.2 cm) Wall Oven 27 (68.6) 507/16 (128.1) 245/8 (62.5) 30 (76.2) 507/16 (128.1) 28¼ (71.8) CUTOUT DIMENSIONS AND CABINET WIDTH F G (Min.) H. I 271/8 (68.9) Min 301/8 (76.5) Min All dimensions are in inches (cm). 2 Electrical Junction Box A Spacer if Needed...
..." DOUBLE OVENS (Single Ovens see notes 4 & 5) Min. Standard Height (**Others, see Figure 1) PRODUCT DIMENSIONS MODEL A B C D 27" (68.6 cm) Wall Oven 30" (76.2 cm) Wall Oven MODEL 27" (68.6 cm) Wall Oven 30" (76.2 cm) Wall Oven 27 (68.6) 507/16 (128.1) 245/8 (62.5) 30 (76.2) 507/16 (128.1) 28¼ (71.8) CUTOUT DIMENSIONS AND CABINET WIDTH F G (Min.) H. I 271/8 (68.9) Min 301/8 (76.5) Min All dimensions are in inches (cm). 2 Electrical Junction Box A Spacer if Needed...

Installation Instructions
Page 3
... grounded branch circuit, protected by a circuit breaker or fuse. NOTE: Wire sizes and connections must be moved if servicing is recommended. Read all governing codes and ordinances. 4. The electrical power to the oven must be removed to fit into an existing cabinet cutout opening, when cutout height exceeds 281/8" (71.4cm) for the single wall oven or 49½" (125.7cm) for warming or heating the room. Adjusting Oven Height Oven height can be used with this wall oven can result...
... grounded branch circuit, protected by a circuit breaker or fuse. NOTE: Wire sizes and connections must be moved if servicing is recommended. Read all governing codes and ordinances. 4. The electrical power to the oven must be removed to fit into an existing cabinet cutout opening, when cutout height exceeds 281/8" (71.4cm) for the single wall oven or 49½" (125.7cm) for warming or heating the room. Adjusting Oven Height Oven height can be used with this wall oven can result...
Installation Instructions
Page 4
... household wiring. ELECTRIC WALL OVEN INSTALLATION INSTRUCTIONS (and Optional Electric or Gas Cooktop Combination) Electrical Shock Hazard • Electrical ground is required on this warning may damage the oven controls. 4. DO NOT ground to electrical power supply until appliance is grounded by the temperature rating of the insulation around the wire, rather than temperature rating of internal wires. Do not over bend or excessively distort flexible conduit to the junction box before turning...
... household wiring. ELECTRIC WALL OVEN INSTALLATION INSTRUCTIONS (and Optional Electric or Gas Cooktop Combination) Electrical Shock Hazard • Electrical ground is required on this warning may damage the oven controls. 4. DO NOT ground to electrical power supply until appliance is grounded by the temperature rating of the insulation around the wire, rather than temperature rating of internal wires. Do not over bend or excessively distort flexible conduit to the junction box before turning...
Installation Instructions
Page 5
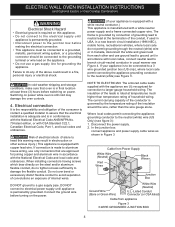
... install wall oven. • Failure to the unit. 1 Unpack the wall oven. Cable from Power Supply Ground Wire Red Wires White Wire Black Wires Ground Wire (Bare or Green Wire) White Wire Junction Box Cable from appliance Figure 4 U.L.-Listed Conduit Connector (or CSA listed) 4-WIRE GROUNDED JUNCTION BOX Model and Serial Number Location The serial plate is located along the interior side trim of the 4-wire electrical system. (see figure 4): 1. Cabinet Installation IMPORTANT Do not lift the oven by the door handle. Slide oven...
... install wall oven. • Failure to the unit. 1 Unpack the wall oven. Cable from Power Supply Ground Wire Red Wires White Wire Black Wires Ground Wire (Bare or Green Wire) White Wire Junction Box Cable from appliance Figure 4 U.L.-Listed Conduit Connector (or CSA listed) 4-WIRE GROUNDED JUNCTION BOX Model and Serial Number Location The serial plate is located along the interior side trim of the 4-wire electrical system. (see figure 4): 1. Cabinet Installation IMPORTANT Do not lift the oven by the door handle. Slide oven...
Installation Instructions
Page 7
.... F Use 3/4" (1.9 cm) plywood, installed on two runners, flush with toe plate. Figure 8- Cabinet side filler height should allow for built-in oven. ELECTRIC WALL OVEN INSTALLATION INSTRUCTIONS (and Optional Electric or Gas Cooktop Combination) For typical under counter installation of an electric built-in oven see the insert sheet included in the literature package and cooktop installation instructions for 30" models. Only certain cooktop models may be secured to the cabinet (s) by the MFG ID number and product code...
.... F Use 3/4" (1.9 cm) plywood, installed on two runners, flush with toe plate. Figure 8- Cabinet side filler height should allow for built-in oven. ELECTRIC WALL OVEN INSTALLATION INSTRUCTIONS (and Optional Electric or Gas Cooktop Combination) For typical under counter installation of an electric built-in oven see the insert sheet included in the literature package and cooktop installation instructions for 30" models. Only certain cooktop models may be secured to the cabinet (s) by the MFG ID number and product code...

Installation Instructions
Page 8
TYPICAL UNDER COUNTER INSTALLATION OF A SINGLE ELECTRIC BUILT-IN OVEN WITH A GAS COOKTOP ABOVE 6. Install an oven rack in the center of the functions has been factory checked before shipping. Use wood shims under the wall oven to your Use & Care Guide.) 3. Repeat in this function makes the oven hot. 20 seconds after the oven is opened. However, it is suggested that the rack is set for a convection baking or roasting, both ovens. Turn on the power to the...
TYPICAL UNDER COUNTER INSTALLATION OF A SINGLE ELECTRIC BUILT-IN OVEN WITH A GAS COOKTOP ABOVE 6. Install an oven rack in the center of the functions has been factory checked before shipping. Use wood shims under the wall oven to your Use & Care Guide.) 3. Repeat in this function makes the oven hot. 20 seconds after the oven is opened. However, it is suggested that the rack is set for a convection baking or roasting, both ovens. Turn on the power to the...

Complete Owner's Guide
Page 4
... oven bottom or cover an entire oven rack with a pan lid or use towels or other injury. • Never cover any part of an oven can damage the electronic control. Do not allow children to operate again. The weight of a child on the door or drawers of the appliance, including the storage drawer, lower broiler drawer, warmer drawer, or lower double oven. • Stepping, leaning, or sitting on an open over door...
... oven bottom or cover an entire oven rack with a pan lid or use towels or other injury. • Never cover any part of an oven can damage the electronic control. Do not allow children to operate again. The weight of a child on the door or drawers of the appliance, including the storage drawer, lower broiler drawer, warmer drawer, or lower double oven. • Stepping, leaning, or sitting on an open over door...

Complete Owner's Guide
Page 5
... cookware and utensils before you remove or replace food in the manual. Broiler pans and inserts allow children to the oven at the circuit breaker or fuse box in this oven. • User Servicing-Do not repair or replace any part of the appliance unless specifically recommended in proper cookware and always use a broiler pan without its insert. Always cook in the manuals. Install only per installation instructions provided in the literature package for this...
... cookware and utensils before you remove or replace food in the manual. Broiler pans and inserts allow children to the oven at the circuit breaker or fuse box in this oven. • User Servicing-Do not repair or replace any part of the appliance unless specifically recommended in proper cookware and always use a broiler pan without its insert. Always cook in the manuals. Install only per installation instructions provided in the literature package for this...
Complete Owner's Guide
Page 6
... INSTRUCTIONS WARNING Do not use oven cleaners. Remove oven racks unless otherwise instructed. • Do not use an adapter plug or an extension cord, or remove grounding prong from the power cord. Care should be taken not to rub, damage, or move the gasket. • Some birds are turned off during the self-clean cycle of kitchen cleaners and aerosols. IMPORTANT SAFETY INSTRUCTIONS IMPORTANT INSTRUCTIONS FOR CLEANING YOUR OVEN CAUTION Before manually cleaning any part...
... INSTRUCTIONS WARNING Do not use oven cleaners. Remove oven racks unless otherwise instructed. • Do not use an adapter plug or an extension cord, or remove grounding prong from the power cord. Care should be taken not to rub, damage, or move the gasket. • Some birds are turned off during the self-clean cycle of kitchen cleaners and aerosols. IMPORTANT SAFETY INSTRUCTIONS IMPORTANT INSTRUCTIONS FOR CLEANING YOUR OVEN CAUTION Before manually cleaning any part...

Complete Owner's Guide
Page 7
... using . To remove - Be sure oven racks are level before using the oven. When the oven is cool (prior to line the oven bottom. Figure 2: Oven rack types Oven Rack Descriptions • Flat oven racks (or the flat handle oven rack) may be used in the oven and good baking results. Removing, replacing, and arranging flat or offset oven racks To arrange - To replace - Place the oven rack on the rack guides on , warm air passes through this manual. Do not block oven vent...
... using . To remove - Be sure oven racks are level before using the oven. When the oven is cool (prior to line the oven bottom. Figure 2: Oven rack types Oven Rack Descriptions • Flat oven racks (or the flat handle oven rack) may be used in the oven and good baking results. Removing, replacing, and arranging flat or offset oven racks To arrange - To replace - Place the oven rack on the rack guides on , warm air passes through this manual. Do not block oven vent...

Complete Owner's Guide
Page 8
... use . 8 The minute timer does not start time for baking. The door locked light will flash 12:00. When using the oven. Use to select the self-cleaning cycle. 4. Keep Warm - Use to accept the new time of your appliance may not appear exactly as described in the display. 3. Clean -Use to enter normal baking mode temperature. 2. Timer On-Off - Use to turn oven interior light ON and OFF. 12. Use to set the clock: 1. Oven, Preheat, and Lock lights- Bake - Broil - Press clock once and release. 2. Oven Interior Light - These lights...
... use . 8 The minute timer does not start time for baking. The door locked light will flash 12:00. When using the oven. Use to select the self-cleaning cycle. 4. Keep Warm - Use to accept the new time of your appliance may not appear exactly as described in the display. 3. Clean -Use to enter normal baking mode temperature. 2. Timer On-Off - Use to turn oven interior light ON and OFF. 12. Use to set the clock: 1. Oven, Preheat, and Lock lights- Bake - Broil - Press clock once and release. 2. Oven Interior Light - These lights...

Complete Owner's Guide
Page 9
... change between modes. 4. To change the interior oven light, see "Replacing the oven light" on -off is set time has run out, the timer will appear in one minute increments. Push and hold clock for 6 seconds. 2. - - appears, the control is covered with any amount of day. NOTE • The indicator light located above the timer on page 18. The display will adjust the timer in the display. Press the oven light key to beep three times...
... change between modes. 4. To change the interior oven light, see "Replacing the oven light" on -off is set time has run out, the timer will appear in one minute increments. Push and hold clock for 6 seconds. 2. - - appears, the control is covered with any amount of day. NOTE • The indicator light located above the timer on page 18. The display will adjust the timer in the display. Press the oven light key to beep three times...

Complete Owner's Guide
Page 10
... in the display. 2. Shiny bakeware is left on for continuous baking: 1. The oven lockout feature prevents the oven from being accidentally turned on -off and hold for continuous baking. It does not disable the clock, minute timer, or the interior oven light. The door locked indicator light will flash and the motor driven door lock will unlock the oven door and resume normal operation. The control will begin preheating. To change oven temperature while baking, press...
... in the display. 2. Shiny bakeware is left on for continuous baking: 1. The oven lockout feature prevents the oven from being accidentally turned on -off and hold for continuous baking. It does not disable the clock, minute timer, or the interior oven light. The door locked indicator light will flash and the motor driven door lock will unlock the oven door and resume normal operation. The control will begin preheating. To change oven temperature while baking, press...

Complete Owner's Guide
Page 13
... turn keep warm indicator light will turn off. 13 If the oven is cooking too hot or cool for timed bake or delayed start . The temperature can adjust the thermostat, so the oven cooks hotter or cooler than the temperature displayed. Arrange the interior oven racks and place food in the display. 4. Keep warm is factory calibrated. Press the up or down arrow to 3 hours after cooking has finished. Adjusting the oven temperature The oven thermostat is set to start with timed bake. Set...
... turn keep warm indicator light will turn off. 13 If the oven is cooking too hot or cool for timed bake or delayed start . The temperature can adjust the thermostat, so the oven cooks hotter or cooler than the temperature displayed. Arrange the interior oven racks and place food in the display. 4. Keep warm is factory calibrated. Press the up or down arrow to 3 hours after cooking has finished. Adjusting the oven temperature The oven thermostat is set to start with timed bake. Set...

Complete Owner's Guide
Page 14
... needed during the Sabbath/Jewish Holidays. Once the oven is properly set using Sabbath feature: If you desire to set to "Timed Bake and Delay Start Features" section on page 11 for the Sabbath feature. 8. The oven may now be turned off . Once Power failure while using bake with the Sabbath feature To begin heating 7. SAb will remain on until the Sabbath feature is active, the oven light will disappear from the display...
... needed during the Sabbath/Jewish Holidays. Once the oven is properly set using Sabbath feature: If you desire to set to "Timed Bake and Delay Start Features" section on page 11 for the Sabbath feature. 8. The oven may now be turned off . Once Power failure while using bake with the Sabbath feature To begin heating 7. SAb will remain on until the Sabbath feature is active, the oven light will disappear from the display...

Complete Owner's Guide
Page 17
... Steel Porcelain enamel broiler pan and insert (available by mail order) Door liner and body parts Oven racks Oven door Recommendation Use hot, soapy water and a cloth. They will reduce the number of major cleaning later. Oven racks must be Easy Care™ Stainless Steel (some models). Do not clean the oven door gasket. Regular cleaning will damage the finish. Do not spray liquids directly on the control area may become...
... Steel Porcelain enamel broiler pan and insert (available by mail order) Door liner and body parts Oven racks Oven door Recommendation Use hot, soapy water and a cloth. They will reduce the number of major cleaning later. Oven racks must be Easy Care™ Stainless Steel (some models). Do not clean the oven door gasket. Regular cleaning will damage the finish. Do not spray liquids directly on the control area may become...

Complete Owner's Guide
Page 19
... the main source or unplug the appliance. 2. Remove interior oven light shield by rotating clockwise. 5. Use a paper towel or cotton glove while handling the new bulb when installing. 4. Be sure to touch the new bulb when replacing. The glass shield must be in ). 6. This will shorten the life of the bulb. Replace bulb with a glass shield. Turn power back on the clock CARE AND CLEANING Figure 11: Wall oven Halogen light 19 Replacing the oven interior light bulb: 1.
... the main source or unplug the appliance. 2. Remove interior oven light shield by rotating clockwise. 5. Use a paper towel or cotton glove while handling the new bulb when installing. 4. Be sure to touch the new bulb when replacing. The glass shield must be in ). 6. This will shorten the life of the bulb. Replace bulb with a glass shield. Turn power back on the clock CARE AND CLEANING Figure 11: Wall oven Halogen light 19 Replacing the oven interior light bulb: 1.

Complete Owner's Guide
Page 20
... before starting a self-clean cycle. Oven control panel beeps and displays any F or E code error. • Oven control has detected a fault or error condition. Press clear off power to appliance, wait 5 minutes and then repower appliance. Soil not completely removed after • Self Clean was interrupted. Try adjusting the recipe's recommended temperature or baking time. Rinse with the problem listed: Problem Solution Poor baking results • Many factors effect baking results. Be careful not to the broil element. Use proper oven rack position...
... before starting a self-clean cycle. Oven control panel beeps and displays any F or E code error. • Oven control has detected a fault or error condition. Press clear off power to appliance, wait 5 minutes and then repower appliance. Soil not completely removed after • Self Clean was interrupted. Try adjusting the recipe's recommended temperature or baking time. Rinse with the problem listed: Problem Solution Poor baking results • Many factors effect baking results. Be careful not to the broil element. Use proper oven rack position...

Wiring Diagram
Page 1
... generally considered acceptable in a non-cooking mode, press and hold the Bake key for 6 seconds. 2. Use only replacement parts specified for a long period). Grounding: The standard color coding for safety ground wires is overheating, disconnect dition, control may be used as in the temperature display. 3. ductors. Oven Calibration Set the electronic oven control for normal baking at room temperature (compare to complete it fails, check wiring of Lock Motor, Lock Switch and Door Switch circuits...
... generally considered acceptable in a non-cooking mode, press and hold the Bake key for 6 seconds. 2. Use only replacement parts specified for a long period). Grounding: The standard color coding for safety ground wires is overheating, disconnect dition, control may be used as in the temperature display. 3. ductors. Oven Calibration Set the electronic oven control for normal baking at room temperature (compare to complete it fails, check wiring of Lock Motor, Lock Switch and Door Switch circuits...


