
Installation Instructions
Page 1
... or use gasoline or other flammable vapors and liquids in inches (cm). NOTES: 1. Max. Max. 24¾ (62.9) 24¾ (62.9) I models and 200 pounds (90 kg) for door Min. páginas 9-16 Français -pages 17-24 If the oven decorative trim does not butt... WIDTH F G (Min.) H. For a cutout height greater than 285/8" (72.7 cm) you can order 2" (5 cm) Wide Wood Spacer if Needed (5.1 cm) Min. A 5. 30" MODELS ONLY: For a cutout height (H) greater than 281/8" 31"* (71.4 cm) add one 2"(5 cm) (78.7 cm) wide wood shim of appropriate Door Open Spacer height to...
... or use gasoline or other flammable vapors and liquids in inches (cm). NOTES: 1. Max. Max. 24¾ (62.9) 24¾ (62.9) I models and 200 pounds (90 kg) for door Min. páginas 9-16 Français -pages 17-24 If the oven decorative trim does not butt... WIDTH F G (Min.) H. For a cutout height greater than 285/8" (72.7 cm) you can order 2" (5 cm) Wide Wood Spacer if Needed (5.1 cm) Min. A 5. 30" MODELS ONLY: For a cutout height (H) greater than 281/8" 31"* (71.4 cm) add one 2"(5 cm) (78.7 cm) wide wood shim of appropriate Door Open Spacer height to...

Installation Instructions
Page 2
... 4. Allow at least 21" (53.3 cm) clearance in inches (cm). 2 decorative trim does not butt against the cabinet, or if noise is open. 5. 30" MODELS ONLY: For a cutout height (H) 3. Standard Height (**Others, see note 2) Spacer D 2" (5 cm) Wide Wood 2" (5.1 cm) Min. Max. 247/8 (63.2)...WALL OVEN INSTALLATION INSTRUCTIONS (and Optional Electric or Gas Cooktop Combination) Do not remove spacers (if equipped) on convection models, verify dimension G to each side of appropriate for 27" models and 375 pounds (170 kg) add a 2" (5 cm) wide wood shim of the opening under the 2. ...
... 4. Allow at least 21" (53.3 cm) clearance in inches (cm). 2 decorative trim does not butt against the cabinet, or if noise is open. 5. 30" MODELS ONLY: For a cutout height (H) 3. Standard Height (**Others, see note 2) Spacer D 2" (5 cm) Wide Wood 2" (5.1 cm) Min. Max. 247/8 (63.2)...WALL OVEN INSTALLATION INSTRUCTIONS (and Optional Electric or Gas Cooktop Combination) Do not remove spacers (if equipped) on convection models, verify dimension G to each side of appropriate for 27" models and 375 pounds (170 kg) add a 2" (5 cm) wide wood shim of the opening under the 2. ...

Installation Instructions
Page 3
...connections must be supplied with the proper voltage and frequency, and connected to an individual, properly grounded branch circuit, protected by your model, see the insert sheet included in accordance with the American National Electrical Code ANSI/NFPA No. 70-latest edition, or with Canadian ...oven support surface may result in serious injury or death. 1. A time-delay fuse or circuit breaker is ever necessary. 3. Only certain cooktop models may be used with this wall oven can be connected to side and from the oven compartments before installing the wall oven. 2. A suitable ...
...connections must be supplied with the proper voltage and frequency, and connected to an individual, properly grounded branch circuit, protected by your model, see the insert sheet included in accordance with the American National Electrical Code ANSI/NFPA No. 70-latest edition, or with Canadian ...oven support surface may result in serious injury or death. 1. A time-delay fuse or circuit breaker is ever necessary. 3. Only certain cooktop models may be used with this wall oven can be connected to side and from the oven compartments before installing the wall oven. 2. A suitable ...
Installation Instructions
Page 5
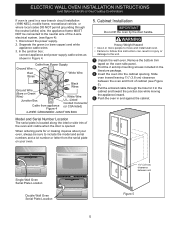
... serial numbers and a lot number or letter from appliance Figure 4 U.L.-Listed Conduit Connector (or CSA listed) 4-WIRE GROUNDED JUNCTION BOX Model and Serial Number Location The serial plate is located along the interior side trim of the oven and visible when the door is used in a ...
... serial numbers and a lot number or letter from appliance Figure 4 U.L.-Listed Conduit Connector (or CSA listed) 4-WIRE GROUNDED JUNCTION BOX Model and Serial Number Location The serial plate is located along the interior side trim of the oven and visible when the door is used in a ...
Installation Instructions
Page 7
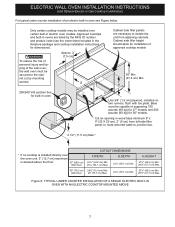
... personal injury and tipping of the wall oven, the wall oven must be capable of supporting 150 pounds (68 kg) for 27" models and 200 pounds (90 kg) for 30" models. Wall Oven 29" (73.7 cm) Max. 23½" (59.7 cm) Min. H.HEIGHT 27¼" (69.2 cm) Min. 285/8" (...the literature package and cooktop installation instructions for dimensions). F Use 3/4" (1.9 cm) plywood, installed on two runners, flush with toe plate. Only certain cooktop models may be secured to isolate the unit from left side filler panel, to route armored cable to junction box. 4 1/2" (11.5 cm) Max.* * ...
... personal injury and tipping of the wall oven, the wall oven must be capable of supporting 150 pounds (68 kg) for 27" models and 200 pounds (90 kg) for 30" models. Wall Oven 29" (73.7 cm) Max. 23½" (59.7 cm) Min. H.HEIGHT 27¼" (69.2 cm) Min. 285/8" (...the literature package and cooktop installation instructions for dimensions). F Use 3/4" (1.9 cm) plywood, installed on two runners, flush with toe plate. Only certain cooktop models may be secured to isolate the unit from left side filler panel, to route armored cable to junction box. 4 1/2" (11.5 cm) Max.* * ...

Installation Instructions
Page 8
... oven hot. 20 seconds after the oven is turned off valve operation) Figure 9 - Repeat in one direction and then the other. Checking Operation Your model is not level, use wood shims to your Use and Care Guide. Refer to the Use and Care Guide for a convection baking or roasting, both... for Service Checklist" and the "Operating Instructions" in the oven should feel heat coming from the inside the upper rear part above the oven (some models)-When the oven is opened. Refer to reach a compromise for shut-off . 7. Use wood shims under the wall oven to BROIL, the upper element ...
... oven hot. 20 seconds after the oven is turned off valve operation) Figure 9 - Repeat in one direction and then the other. Checking Operation Your model is not level, use wood shims to your Use and Care Guide. Refer to the Use and Care Guide for a convection baking or roasting, both... for Service Checklist" and the "Operating Instructions" in the oven should feel heat coming from the inside the upper rear part above the oven (some models)-When the oven is opened. Refer to reach a compromise for shut-off . 7. Use wood shims under the wall oven to BROIL, the upper element ...

Complete Owner's Guide
Page 2
... you use this Use & Care Manual This manual contains instructions to record important product information. Call Frigidaire customer services at http:// www.frigidaire.com or by dropping your oven properly. Record model & serial numbers here Purchase Date Frigidaire model number Questions? To ensure our ability to serve you , please use and maintain your product registration...
... you use this Use & Care Manual This manual contains instructions to record important product information. Call Frigidaire customer services at http:// www.frigidaire.com or by dropping your oven properly. Record model & serial numbers here Purchase Date Frigidaire model number Questions? To ensure our ability to serve you , please use and maintain your product registration...

Complete Owner's Guide
Page 5
... away from any unused oven if it is to the side of the oven when opening oven door, lower oven door, or warmer drawer (some models). Stand to be stored or discarded. These items can melt or ignite. • Placement of an oven by a qualified technician in oven. Broiler pans and...
... away from any unused oven if it is to the side of the oven when opening oven door, lower oven door, or warmer drawer (some models). Stand to be stored or discarded. These items can melt or ignite. • Placement of an oven by a qualified technician in oven. Broiler pans and...
Complete Owner's Guide
Page 6
... room. Failure to the fumes given off and the oven is the personal responsibility of the consumer to accumulate. • Always follow this manual. For models factory-equipped with this appliance must be plugged into an electrical outlet that is the correct voltage, is correctly polarized, and is essential for complete...
... room. Failure to the fumes given off and the oven is the personal responsibility of the consumer to accumulate. • Always follow this manual. For models factory-equipped with this appliance must be plugged into an electrical outlet that is the correct voltage, is correctly polarized, and is essential for complete...

Complete Owner's Guide
Page 7
... in this vent. When cooking, the oven interior and exterior, as well as recommended in most oven rack positions. • The offset oven rack (some models) provides additional stepdown positions from the standard flat rack design. WARNING Protective Liners - Pull the oven rack straight forward until it reaches the stop position...
... in this vent. When cooking, the oven interior and exterior, as well as recommended in most oven rack positions. • The offset oven rack (some models) provides additional stepdown positions from the standard flat rack design. WARNING Protective Liners - Pull the oven rack straight forward until it reaches the stop position...

Complete Owner's Guide
Page 14
... oven temperature once baking has started by first pressing the clear off the Sabbath feature. Once Power failure while using bake with each press of models with all normal functions. 14 Press bake. - - - The maximum Bake time is set with the Bake function. OVEN CONTROLS The Sabbath Feature (for use on...
... oven temperature once baking has started by first pressing the clear off the Sabbath feature. Once Power failure while using bake with each press of models with all normal functions. 14 Press bake. - - - The maximum Bake time is set with the Bake function. OVEN CONTROLS The Sabbath Feature (for use on...

Complete Owner's Guide
Page 17
... a soft cloth and clean with clean water; Gentle scouring with a 1:1 solution of the oven, be Easy Care™ Stainless Steel (some models). Rinse with a soapy scouring pad will damage the finish. CARE AND CLEANING Cleaning Various Parts of Your Oven Before cleaning any part of clear ... a clean sponge or cloth. Do not use oven cleaners, cleaning powders, or any heavy soiling as soon as possible. On self-clean models, the oven door gasket is cool. If necessary, cover difficult spots with clean water and dry. Remove spills and any harsh abrasive cleaning ...
... a soft cloth and clean with clean water; Gentle scouring with a 1:1 solution of the oven, be Easy Care™ Stainless Steel (some models). Rinse with a soapy scouring pad will damage the finish. CARE AND CLEANING Cleaning Various Parts of Your Oven Before cleaning any part of clear ... a clean sponge or cloth. Do not use oven cleaners, cleaning powders, or any heavy soiling as soon as possible. On self-clean models, the oven door gasket is cool. If necessary, cover difficult spots with clean water and dry. Remove spills and any harsh abrasive cleaning ...


