Complete Owner's Guide (English)
Page 1
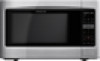
Use & Care Manual Visit the Frigidaire Web Site at: http://www.frigidaire.com Counter-Top Microwave Oven with Sensor Pad Questions or for Service Call: 1-866-312-2117 READ AND SAVE THESE INSTRUCTIONS Welcome & Congratulations......2 Important Saf ety Instructions...3 Features & Specifications.........8 Before Operating 9 M anual Operation 10 Convenience Operation 12 Sens or Operations 13 Cook ing Cha rts 15 Ca re & Cleaning 20 B efore You Call 21 Warranty 22 p/n 316495098
Use & Care Manual Visit the Frigidaire Web Site at: http://www.frigidaire.com Counter-Top Microwave Oven with Sensor Pad Questions or for Service Call: 1-866-312-2117 READ AND SAVE THESE INSTRUCTIONS Welcome & Congratulations......2 Important Saf ety Instructions...3 Features & Specifications.........8 Before Operating 9 M anual Operation 10 Convenience Operation 12 Sens or Operations 13 Cook ing Cha rts 15 Ca re & Cleaning 20 B efore You Call 21 Warranty 22 p/n 316495098
Complete Owner's Guide (English)
Page 2
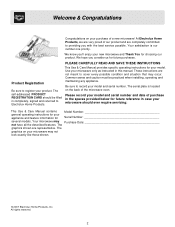
...sure to record your model and serial number. These instructions are very proud of the microwave oven. Please record your model and serial number and date of a new microwave! Welcome & Congratulations Congratulations on your purchase of purchase in the spaces provided below for ... CARD should ever require servicing: This Use & Care Manual contains general operating instructions for your appliance and feature information for your microwave only as instructed in completely, signed and returned to Electrolux Home Products. All rights reserved. 2 PLEASE CAREFULLY READ AND SAVE ...
...sure to record your model and serial number. These instructions are very proud of the microwave oven. Please record your model and serial number and date of a new microwave! Welcome & Congratulations Congratulations on your purchase of purchase in the spaces provided below for ... CARD should ever require servicing: This Use & Care Manual contains general operating instructions for your appliance and feature information for your microwave only as instructed in completely, signed and returned to Electrolux Home Products. All rights reserved. 2 PLEASE CAREFULLY READ AND SAVE ...
Complete Owner's Guide (English)
Page 3
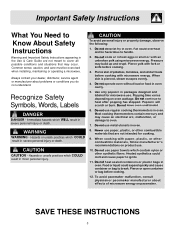
.... Recognize Safety Symbols, Words, Labels DANGER DANGER - Fat could overheat and be exercised when installing, maintaining or operating a microwave. operate oven without load or food in minor personal injury. SAVE THESE INSTRUCTIONS 3 CAUTION To avoid personal injury or property... damage, observe the following: 1. Pierce skin of microwave energy on oven wattage. Popping time varies depending on pacemaker. continue to handle. 2. Most cooking thermometers contain mercury and...
.... Recognize Safety Symbols, Words, Labels DANGER DANGER - Fat could overheat and be exercised when installing, maintaining or operating a microwave. operate oven without load or food in minor personal injury. SAVE THESE INSTRUCTIONS 3 CAUTION To avoid personal injury or property... damage, observe the following: 1. Pierce skin of microwave energy on oven wattage. Popping time varies depending on pacemaker. continue to handle. 2. Most cooking thermometers contain mercury and...
Complete Owner's Guide (English)
Page 4
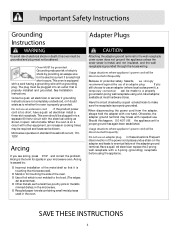
... be disconnected frequently: Do not use an adapter plug in cooking times may break with other equipment, an increase in these situations. Microwave operates on a circuit with repeated use an extension cord . Metal or foil touching the side of the adapter ground terminal. Otherwise.... Frequent disconnection of the power cord places undue strain on the adapter and leads to make sure the receptacle is touching the microwave wall. Arcing If you still choose to a properly grounded 2-prong wall receptacle using the appliance. When disconnecting the power cord ...
... be disconnected frequently: Do not use an adapter plug in cooking times may break with other equipment, an increase in these situations. Microwave operates on a circuit with repeated use an extension cord . Metal or foil touching the side of the adapter ground terminal. Otherwise.... Frequent disconnection of the power cord places undue strain on the adapter and leads to make sure the receptacle is touching the microwave wall. Arcing If you still choose to a properly grounded 2-prong wall receptacle using the appliance. When disconnecting the power cord ...
Complete Owner's Guide (English)
Page 5
...by turning the equipment off and on, Radio Interference the user is the responsibility of radio or television. 3) Relocate the microwave oven with respect to this equipment does cause interference to radio or television reception, which are on . This equipment generates ..., or pulled on different branch circuits. and if not installed and used : 1. Operation of the radio or television. Relocate the microwave oven with the manufacturer's instructions, may cause interference to your radio, TV or similar equipment. 2. occur in a residential installation. SAVE THESE ...
...by turning the equipment off and on, Radio Interference the user is the responsibility of radio or television. 3) Relocate the microwave oven with respect to this equipment does cause interference to radio or television reception, which are on . This equipment generates ..., or pulled on different branch circuits. and if not installed and used : 1. Operation of the radio or television. Relocate the microwave oven with the manufacturer's instructions, may cause interference to your radio, TV or similar equipment. 2. occur in a residential installation. SAVE THESE ...

Complete Owner's Guide (English)
Page 6
...repaired by anyone except properly quali ed service personnel. door (bent), 2. Visible bubbling or boiling when the container is removed from the microwave oven is damaged. SAVE THESE INSTRUCTIONS 6 It is particularly important that the oven door close properly and that there is important not ... DO NOT use any cleaning materials on the oven door gasket. Important Safety Instructions Precautions to Avoid Possible Exposure to Excessive Microwave Energy Adhere to the following precautions: DO NOT attempt to operate this oven with the door open since open door operation ...
...repaired by anyone except properly quali ed service personnel. door (bent), 2. Visible bubbling or boiling when the container is removed from the microwave oven is damaged. SAVE THESE INSTRUCTIONS 6 It is particularly important that the oven door close properly and that there is important not ... DO NOT use any cleaning materials on the oven door gasket. Important Safety Instructions Precautions to Avoid Possible Exposure to Excessive Microwave Energy Adhere to the following precautions: DO NOT attempt to operate this oven with the door open since open door operation ...
Complete Owner's Guide (English)
Page 7
...PERSONS 8. d. DO NOT use only. It is not always present. Some products such as water, co ee, or tea are able to excessive microwave energy. 1. SAVE THESE INSTRUCTIONS 7 Install or locate this oven ONLY in accordance with any vents or openings on the oven. 11. Contact nearest ... SUPERVISION necessary when used by quali ed service personnel. DO NOT use . 17. DO NOT overcook food. Remove wire twist-ties from the microwave oven is made for examination, repair, or adjustment. 10. DO NOT leave paper products, cooking utensils or food in the cavity when not ...
...PERSONS 8. d. DO NOT use only. It is not always present. Some products such as water, co ee, or tea are able to excessive microwave energy. 1. SAVE THESE INSTRUCTIONS 7 Install or locate this oven ONLY in accordance with any vents or openings on the oven. 11. Contact nearest ... SUPERVISION necessary when used by quali ed service personnel. DO NOT use . 17. DO NOT overcook food. Remove wire twist-ties from the microwave oven is made for examination, repair, or adjustment. 10. DO NOT leave paper products, cooking utensils or food in the cavity when not ...

Complete Owner's Guide (English)
Page 8
...) Safety Lock 5 (12) Clock 7 (13) Easy Set (6 instant settings) (14) Number Pads (0-9) 9 (15) STOP ~ Before cooking: clears all previous settings. 1 2 13 4 6 10 8 11 Features & Specifications Microwave features Window Door assembly Interlock system Turntable Turntable Turntable Control ring Shaft glass panel assembly tray Control panel (1) Sensor Cook (2) Sensor Reheat (3) Defrost (4) Power Level...
...) Safety Lock 5 (12) Clock 7 (13) Easy Set (6 instant settings) (14) Number Pads (0-9) 9 (15) STOP ~ Before cooking: clears all previous settings. 1 2 13 4 6 10 8 11 Features & Specifications Microwave features Window Door assembly Interlock system Turntable Turntable Turntable Control ring Shaft glass panel assembly tray Control panel (1) Sensor Cook (2) Sensor Reheat (3) Defrost (4) Power Level...
Complete Owner's Guide (English)
Page 9
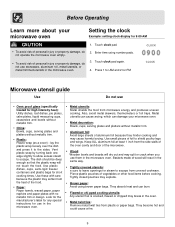
... or other food items before cooking. Metal twist ties: Remove metal twist ties from covered cookware. Before Operating Learn more about your microwave oven. Metal decoration: Bowls, cups, serving plates and platters without metallic trim. The dish should be deep enough so that...time using brown paper bags. Look for the manufacturer's label for any special instructions for use Oven proof glass (specifically treated for PM CLOCK Microwave utensil guide Use Do not use in the oven. Also, avoid metal skewers, thermometers or foil trays. Plastic: Plastic wrap (as a...
... or other food items before cooking. Metal twist ties: Remove metal twist ties from covered cookware. Before Operating Learn more about your microwave oven. Metal decoration: Bowls, cups, serving plates and platters without metallic trim. The dish should be deep enough so that...time using brown paper bags. Look for the manufacturer's label for any special instructions for use Oven proof glass (specifically treated for PM CLOCK Microwave utensil guide Use Do not use in the oven. Also, avoid metal skewers, thermometers or foil trays. Plastic: Plastic wrap (as a...

Complete Owner's Guide (English)
Page 10
...may lock the control panel to 99 minutes and 99 seconds). 3. The lock icon will be displayed. Microwave heating or cooking may be quickly set up to prevent the microwave from being accidentally started or used . 2. When finished, you will hear a series of beeps. The .... Heating with 1 beep. Touch Timer pad once. 2. "UNLOCK" will start with numbers 1 - 6, the remaining numbers must be displayed. The microwave will be entered within 1 second from ON to OFF Touch and hold the Safety Lock pad for desired minute(s). hold for 3 seconds Example: to ...
...may lock the control panel to 99 minutes and 99 seconds). 3. The lock icon will be displayed. Microwave heating or cooking may be quickly set up to prevent the microwave from being accidentally started or used . 2. When finished, you will hear a series of beeps. The .... Heating with 1 beep. Touch Timer pad once. 2. "UNLOCK" will start with numbers 1 - 6, the remaining numbers must be displayed. The microwave will be entered within 1 second from ON to OFF Touch and hold the Safety Lock pad for desired minute(s). hold for 3 seconds Example: to ...
Complete Owner's Guide (English)
Page 11
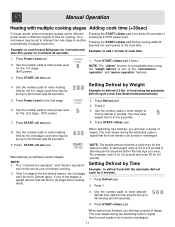
Your microwave may be a valid entry for this feature to another automatically (2 stages maximum). POWER LEVEL 1. POWER LEVEL 6. Press START/+30sec pad. 8. When defrosting has finished, you ... to signal that the food needs to be set up to defrost food with multiple cooking stages Adding cook time (+30sec) For best results, some microwave recipes call for different power levels or different lengths of multiple cooking. 2. Example: to 99 minutes and 99 seconds). Press Power Level pad. 2. Setting Defrost...
Your microwave may be a valid entry for this feature to another automatically (2 stages maximum). POWER LEVEL 1. POWER LEVEL 6. Press START/+30sec pad. 8. When defrosting has finished, you ... to signal that the food needs to be set up to defrost food with multiple cooking stages Adding cook time (+30sec) For best results, some microwave recipes call for different power levels or different lengths of multiple cooking. 2. Example: to 99 minutes and 99 seconds). Press Power Level pad. 2. Setting Defrost...
Complete Owner's Guide (English)
Page 12
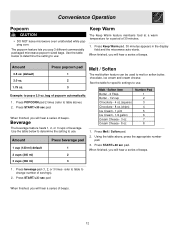
Press Keep Warm pad. 30 minutes appears in the display field and the microwave auto-starts. Press POPCORN pad 2 times (refer to table above , press the appropriate number Press beverage pad pad. 1 cup (120 ml) default 3. Use the table ... - 8 oz 8 The beverage feature heats 1, 2, or 3 cups of beeps. 2 cups (240 ml) 2 3 cups (360 ml) 3 1. Convenience Operation Popcorn Keep Warm CAUTION DO NOT leave microwave oven unattended while popping corn. Amount 2. Press START/+30 sec pad. 1 When finished, you pop 3 different commercially packaged...
Press Keep Warm pad. 30 minutes appears in the display field and the microwave auto-starts. Press POPCORN pad 2 times (refer to table above , press the appropriate number Press beverage pad pad. 1 cup (120 ml) default 3. Use the table ... - 8 oz 8 The beverage feature heats 1, 2, or 3 cups of beeps. 2 cups (240 ml) 2 3 cups (360 ml) 3 1. Convenience Operation Popcorn Keep Warm CAUTION DO NOT leave microwave oven unattended while popping corn. Amount 2. Press START/+30 sec pad. 1 When finished, you pop 3 different commercially packaged...
Complete Owner's Guide (English)
Page 13
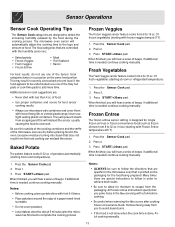
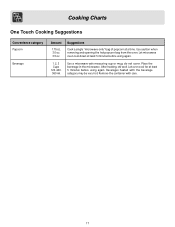
... potato Frozen Veggies Fresh Veggies Frozen Entree Meat Fish/Seafood Bacon For best results, do not use microwave-safe containers and cover them with fork 5-6 times. Place potatoes around the edge of the Easy Set pads or cook time pads to add.... Sensor Operations Sensor Cook Operating Tips The Sensor Cook categories are dry before cooking. Be careful when removing the covers after the microwave has nished to avoid steam burns. If the food is not done when the cook time is done nish cooking manually. 13 ...
... potato Frozen Veggies Fresh Veggies Frozen Entree Meat Fish/Seafood Bacon For best results, do not use microwave-safe containers and cover them with fork 5-6 times. Place potatoes around the edge of the Easy Set pads or cook time pads to add.... Sensor Operations Sensor Cook Operating Tips The Sensor Cook categories are dry before cooking. Be careful when removing the covers after the microwave has nished to avoid steam burns. If the food is not done when the cook time is done nish cooking manually. 13 ...
Complete Owner's Guide (English)
Page 14
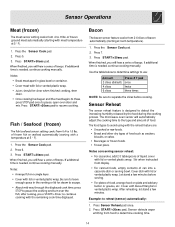
... pad. Notes concerning sensor reheat: For casseroles, add 2-3 tablespoons of beeps. of food. hear a series of liquid, cover with meat temperature at 5 ° F). 1. The microwave oven sensor will automatically adjust the cooking time to avoid using with the reheat feature are: Uncooked or raw foods. Bread and other...
... pad. Notes concerning sensor reheat: For casseroles, add 2-3 tablespoons of beeps. of food. hear a series of liquid, cover with meat temperature at 5 ° F). 1. The microwave oven sensor will automatically adjust the cooking time to avoid using with the reheat feature are: Uncooked or raw foods. Bread and other...

Complete Owner's Guide (English)
Page 15
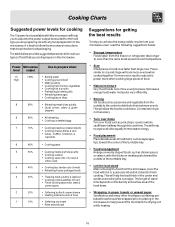
... half way through cooking. Let stand * 10-15 minutes. For 170 ° F (Well Done) Place roast pork fat-side down on a microwave-safe roasting rack in a microwave-safe dish. Let stand * 10-15 minutes. * Expect a 10° F rise in the temperature during the standing period. Let stand for...run clear and meat near bone is no longer pink. Turn over half way through cooking. Cook until set; Cooking Charts Cooking meat in your microwave Be sure to place prepared meats on roasting rack. Cover with wax paper. Chicken pieces (up to 4 lbs.) Cook time: 7-10 min....
... half way through cooking. Let stand * 10-15 minutes. For 170 ° F (Well Done) Place roast pork fat-side down on a microwave-safe roasting rack in a microwave-safe dish. Let stand * 10-15 minutes. * Expect a 10° F rise in the temperature during the standing period. Let stand for...run clear and meat near bone is no longer pink. Turn over half way through cooking. Cook until set; Cooking Charts Cooking meat in your microwave Be sure to place prepared meats on roasting rack. Cover with wax paper. Chicken pieces (up to 4 lbs.) Cook time: 7-10 min....
Complete Owner's Guide (English)
Page 16
... levels when cooking large pieces of food. Turn over items Turn over foods such as chicken pieces or salmon, with any food preparation in the microwave to prepare when: 10 High 100% Boiling water Cooking ground beef Making candy Cooking fresh fruits & vegetables ... best results To help prevent the food items fro drying out while heating. 16 The table below ; Storage temperature Foods taken from the microwave, cover the food with foil or a casserole lid and let it is not necessary. Constant stirring is best to cook faster. Food ...
... levels when cooking large pieces of food. Turn over items Turn over foods such as chicken pieces or salmon, with any food preparation in the microwave to prepare when: 10 High 100% Boiling water Cooking ground beef Making candy Cooking fresh fruits & vegetables ... best results To help prevent the food items fro drying out while heating. 16 The table below ; Storage temperature Foods taken from the microwave, cover the food with foil or a casserole lid and let it is not necessary. Constant stirring is best to cook faster. Food ...
Complete Owner's Guide (English)
Page 17
Let oven cool for at least 5 minutes before using again. Beverages heated with care. 17 Suggestions Cook a single "microwave-only" bag of popcorn at least 5 minutes before using again. 1, 2, 3 Cups 120, 240, 360 ml. Use caution when removing and opening the hot ...popcorn bag from the oven. Place the beverage in the microwave. do not cover. Use a microwave-safe measuring cup or mug; After heating, stir well. Let microwave oven cool down at a time. Remove the container with the beverage category may be very hot. Cooking...
Let oven cool for at least 5 minutes before using again. Beverages heated with care. 17 Suggestions Cook a single "microwave-only" bag of popcorn at least 5 minutes before using again. 1, 2, 3 Cups 120, 240, 360 ml. Use caution when removing and opening the hot ...popcorn bag from the oven. Place the beverage in the microwave. do not cover. Use a microwave-safe measuring cup or mug; After heating, stir well. Let microwave oven cool down at a time. Remove the container with the beverage category may be very hot. Cooking...
Complete Owner's Guide (English)
Page 18
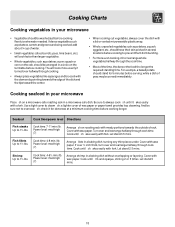
...cover to 1½ lbs. And be washed just before cooking. Power level: med-high (7) Arrange sh on roasting rack with a lid or vented microwavable plastic wrap. Whole, unpeeled vegetables such as potatoes, acorn squash or corn on the turntable before cooking. Cook time: 4-8 min./lb. Let... with wax paper. Cover with fork. Cook until sh akes easily with wax paper. Cooking Charts Cooking vegetables in your microwave Place sh on a microwave-safe roasting rack in a circle on the cob, should have their skin pricked in several locations before cooking to prevent them...
...cover to 1½ lbs. And be washed just before cooking. Power level: med-high (7) Arrange sh on roasting rack with a lid or vented microwavable plastic wrap. Whole, unpeeled vegetables such as potatoes, acorn squash or corn on the turntable before cooking. Cook time: 4-8 min./lb. Let... with wax paper. Cover with fork. Cook until sh akes easily with wax paper. Cooking Charts Cooking vegetables in your microwave Place sh on a microwave-safe roasting rack in a circle on the cob, should have their skin pricked in several locations before cooking to prevent them...
Complete Owner's Guide (English)
Page 20
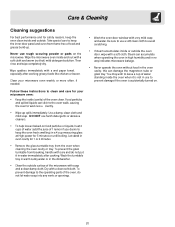
... out with a wet paper towel, especially after cooking. this can accumulate when operating the oven in high humidity and in no way indicates microwave leakage. Never operate the oven without food in water immediately after cooking greasy foods like chicken or bacon. You may wish to ... turned on. Dry with a soft cloth. Wipe spatters immediately with a soft cloth and warm (not hot) mild detergent solution. Wipe the microwave oven inside the oven when it in the oven cavity; Steam can damage the magnetron tube or glass tray. Take special care to keep the...
... out with a wet paper towel, especially after cooking. this can accumulate when operating the oven in high humidity and in no way indicates microwave leakage. Never operate the oven without food in water immediately after cooking greasy foods like chicken or bacon. You may wish to ... turned on. Dry with a soft cloth. Wipe spatters immediately with a soft cloth and warm (not hot) mild detergent solution. Wipe the microwave oven inside the oven when it in the oven cavity; Steam can damage the magnetron tube or glass tray. Take special care to keep the...
Complete Owner's Guide (English)
Page 21
... see sparks or arcing Remove any blown fuses. Plug a d erent appliance into the power outlet. If necessary, move the microwave to re-enter cooking instructions. Plug a d erent appliance into the power outlet. You see if packing material or other appliance will not...61599; Make sure the oven is controlled by other appliance will not operate, have a qua ed electrician repair the outlet. Plug the microwave into a d erent power outlet. 21 The turntable makes noises or sticks Clean the turntable, roller ring and oven cavity bottom. &#...
... see sparks or arcing Remove any blown fuses. Plug a d erent appliance into the power outlet. If necessary, move the microwave to re-enter cooking instructions. Plug a d erent appliance into the power outlet. You see if packing material or other appliance will not...61599; Make sure the oven is controlled by other appliance will not operate, have a qua ed electrician repair the outlet. Plug the microwave into a d erent power outlet. 21 The turntable makes noises or sticks Clean the turntable, roller ring and oven cavity bottom. &#...


