Use and Care Manual
Page 2
... Home Products, we are completely committed to play with the National Electrical Code ANSI/NFPA No. 70 latest edition and local electrical code requirements. We hope you consider us for future reference. Use your appliance only as instructed in the manuals. Your range may not have all instructions before using this appliance. This...
... Home Products, we are completely committed to play with the National Electrical Code ANSI/NFPA No. 70 latest edition and local electrical code requirements. We hope you consider us for future reference. Use your appliance only as instructed in the manuals. Your range may not have all instructions before using this appliance. This...
Use and Care Manual
Page 3
..., glass/ ceramic, ceramic, earthenware, or other flammable materials touch these openings, oven door and window. Do not allow children to operate the range during normal operation. • Glazed Cooking Utensils-Only certain types of the appliance. • DO NOT TOUCH SURFACE UNITS, AREAS NEAR THESE UNITS...utensils will begin to reach items could be seriously injured. Stepping, leaning or sitting on hot surfaces may result in ignition of this range can result in serious injuries and also cause damage to cause burns. This includes paper, plastic and cloth items, such as cookbooks...
..., glass/ ceramic, ceramic, earthenware, or other flammable materials touch these openings, oven door and window. Do not allow children to operate the range during normal operation. • Glazed Cooking Utensils-Only certain types of the appliance. • DO NOT TOUCH SURFACE UNITS, AREAS NEAR THESE UNITS...utensils will begin to reach items could be seriously injured. Stepping, leaning or sitting on hot surfaces may result in ignition of this range can result in serious injuries and also cause damage to cause burns. This includes paper, plastic and cloth items, such as cookbooks...
Use and Care Manual
Page 4
... before moving. • Do not use aluminum foil as the surface cooking area heats up front of electric shock. IMPORTANT INSTRUCTIONS FOR CLEANING YOUR RANGE • Clean the range regularly to keep all parts free of grease that could melt or ignite. • Placement of the ... accumulate. • Kitchen cleaners and aerosols-Always follow the manufacturer's recommended directions for models equipped with coil elements. Improper installation of electric shock, or fire. FOR CERAMIC-GLASS COOK TOP MODELS • Do Not Cook on your model is necessary for cleaning. Before...
... before moving. • Do not use aluminum foil as the surface cooking area heats up front of electric shock. IMPORTANT INSTRUCTIONS FOR CLEANING YOUR RANGE • Clean the range regularly to keep all parts free of grease that could melt or ignite. • Placement of the ... accumulate. • Kitchen cleaners and aerosols-Always follow the manufacturer's recommended directions for models equipped with coil elements. Improper installation of electric shock, or fire. FOR CERAMIC-GLASS COOK TOP MODELS • Do Not Cook on your model is necessary for cleaning. Before...
Use and Care Manual
Page 5
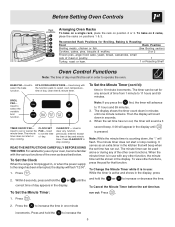
... the rack on positions 1 & 3. To bake on 2 racks, place the racks on position 2 or 3. BROIL PAD- Within 5 seconds, press and hold the or to the range has been interrupted, the display will count down in minutes until the and hold the or correct time of day. To Cancel the Minute Timer... before the set or cancel the PAD- To Set the Clock When the range is in 10 minute increments. It serves as described below. To Change the Minute Timer while it is first plugged in the display. Press and...
... the rack on positions 1 & 3. To bake on 2 racks, place the racks on position 2 or 3. BROIL PAD- Within 5 seconds, press and hold the or to the range has been interrupted, the display will count down in minutes until the and hold the or correct time of day. To Cancel the Minute Timer... before the set or cancel the PAD- To Set the Clock When the range is in 10 minute increments. It serves as described below. To Change the Minute Timer while it is first plugged in the display. Press and...
Use and Care Manual
Page 6
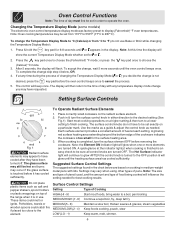
... before removing the cookware. Settings may have been turned off. Note: The size and type of utensil used, and the amount and type of the range when it has cooled sufficiently. 1. Press the key pad once to choose the (Celsius) °C mode. 3. The control will flash. Do not place plastic items...
... before removing the cookware. Settings may have been turned off. Note: The size and type of utensil used, and the amount and type of the range when it has cooled sufficiently. 1. Press the key pad once to choose the (Celsius) °C mode. 3. The control will flash. Do not place plastic items...
Use and Care Manual
Page 8
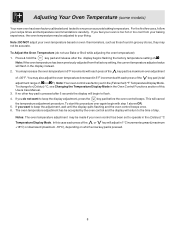
... too cool from the factory setting, the current temperature adjusted value will adjust in 5°F increments with each press of the key pad ( total adjustment range of day. Note: If the oven temperature has been previously adjusted from your baking experience, the oven temperature may not be adjusted to a maximum oven...
... too cool from the factory setting, the current temperature adjusted value will adjust in 5°F increments with each press of the key pad ( total adjustment range of day. Note: If the oven temperature has been previously adjusted from your baking experience, the oven temperature may not be adjusted to a maximum oven...
Use and Care Manual
Page 9
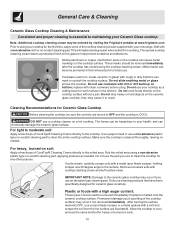
... a soft cloth. DO NOT use oven cleaners, cleaning powders or any harsh abrasive cleaning materials on Self-Cleaning models, which is made for 30 to OFF & remove the control knobs. Use the general cleaning instructions provided in the paragraph above. Rinse with an ammonia-soaked paper towel for...Rinse with clean water and a damp cloth, then scrub with a clean cloth. DO NOT use kitchen cleaners that cannot be used if sprayed on the range top. Rinse & wipe dry with a soap-filled scouring pad. Only use cleaners with clean water & let dry. Follow by rinsing the area with ...
... a soft cloth. DO NOT use oven cleaners, cleaning powders or any harsh abrasive cleaning materials on Self-Cleaning models, which is made for 30 to OFF & remove the control knobs. Use the general cleaning instructions provided in the paragraph above. Rinse with an ammonia-soaked paper towel for...Rinse with clean water and a damp cloth, then scrub with a clean cloth. DO NOT use kitchen cleaners that cannot be used if sprayed on the range top. Rinse & wipe dry with a soap-filled scouring pad. Only use cleaners with clean water & let dry. Follow by rinsing the area with ...
Use and Care Manual
Page 10
...immediately if spilled or melted onto the ceramic cooktop surface. Rub the soiled area using your new range. Plastic or foods with clean cookware before using the cooktop cleaning cream. After turning the surface ... use an abrasive type cleaning pad. Remove loosened soils with a metal razor blade scraper, holding scraper at www.frigidaire.com Prior to using a non-abrasive plastic type no -scratch cleaning pad to cool, and use a cooktop ... as pitting of soils need be ordered by visiting the Frigidaire website at a 30 degree angle to help prevent scratches and abrasions.
...immediately if spilled or melted onto the ceramic cooktop surface. Rub the soiled area using your new range. Plastic or foods with clean cookware before using the cooktop cleaning cream. After turning the surface ... use an abrasive type cleaning pad. Remove loosened soils with a metal razor blade scraper, holding scraper at www.frigidaire.com Prior to using a non-abrasive plastic type no -scratch cleaning pad to cool, and use a cooktop ... as pitting of soils need be ordered by visiting the Frigidaire website at a 30 degree angle to help prevent scratches and abrasions.
Use and Care Manual
Page 11
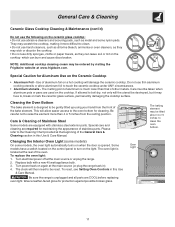
... which can burn and cause discoloration. Be sure the range is designed to touch the ceramic cooktop under ANY circumstances. • Aluminum utensils - Turn electrical power off at the main source (or plug the range back in). 4. This will the utensil be taken ...to the oven bottom for maintaining the appearance of other metals. NOTE: Additional cooktop cleaning cream may be ordered by visiting the Frigidaire website at www.frigidaire.com. General Care & Cleaning Ceramic Glass Cooktop Cleaning & Maintenance (cont'd) Do not use the following on the ceramic glass ...
... which can burn and cause discoloration. Be sure the range is designed to touch the ceramic cooktop under ANY circumstances. • Aluminum utensils - Turn electrical power off at the main source (or plug the range back in). 4. This will the utensil be taken ...to the oven bottom for maintaining the appearance of other metals. NOTE: Additional cooktop cleaning cream may be ordered by visiting the Frigidaire website at www.frigidaire.com. General Care & Cleaning Ceramic Glass Cooktop Cleaning & Maintenance (cont'd) Do not use the following on the ceramic glass ...

Use and Care Manual
Page 13
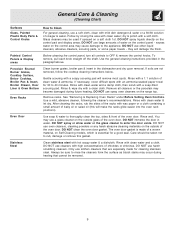
...common occurrences (shown in bold) that are square & have been used . Heavy & medium-weight pans heat evenly. Contact your local electric company for the desired function. Many factors affect baking results. Use a ceramic-glass cooktop cleaning creme to clear the display & stop ...service, review the following list. Replace or tighten bulb. See Changing Oven Light section in this will become less visible with range. Scratches or abrasions on cooktop surface (Ceramic Cooktop models) - Try adjusting the recipe's recommended temperature or baking time. Wipe...
...common occurrences (shown in bold) that are square & have been used . Heavy & medium-weight pans heat evenly. Contact your local electric company for the desired function. Many factors affect baking results. Use a ceramic-glass cooktop cleaning creme to clear the display & stop ...service, review the following list. Replace or tighten bulb. See Changing Oven Light section in this will become less visible with range. Scratches or abrasions on cooktop surface (Ceramic Cooktop models) - Try adjusting the recipe's recommended temperature or baking time. Wipe...
Parts Catalog
Page 1
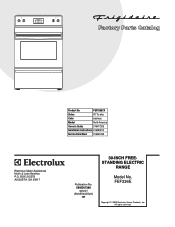
All rights reserved. Model No. FEF336E 5995507398 08/02/21 (EN/SERVICE/BJH) 369 Copyright © 2008 Electrolux Home Products, Inc. Product No. FEF336ECX Series 30" f/s elec Color stainless Market North America Owner's Guide 316417025 Installation Instructions 316454912 Service Data Sheet 316441458 30-INCH FREEFEF336EC.eps T20G0057.eps L20V1135A.eps T20T0054A.eps T20D0036A.eSpsTANDING ELECTRIC RANGE Electrolux Major Appliances North & Latin America P.O. BOX 212378 AUGUSTA, GA 30917 Publication No.
All rights reserved. Model No. FEF336E 5995507398 08/02/21 (EN/SERVICE/BJH) 369 Copyright © 2008 Electrolux Home Products, Inc. Product No. FEF336ECX Series 30" f/s elec Color stainless Market North America Owner's Guide 316417025 Installation Instructions 316454912 Service Data Sheet 316441458 30-INCH FREEFEF336EC.eps T20G0057.eps L20V1135A.eps T20T0054A.eps T20D0036A.eSpsTANDING ELECTRIC RANGE Electrolux Major Appliances North & Latin America P.O. BOX 212378 AUGUSTA, GA 30917 Publication No.
Service Data Sheet
Page 1
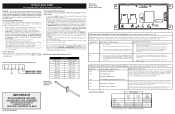
... failure. Disconnect power, wait 30 seconds and reapply power. The EOC thinks a runaway oven condition exists. If oven is made if your oven control has been set in the (Celsius) °C Temperature Display Mode. SERVICE DATA SHEET Electric Ranges with step 1 above OR;... Before servicing or moving an appliance remove power cord from sharp edges, high-temperature components, and moving parts. • All uninsulated electrical terminals, connectors, heaters, etc. Electronic Oven Control (E.O.C.) Connections (J1) Oven Temperature Adjustment (some models-models that display F1 or ...
... failure. Disconnect power, wait 30 seconds and reapply power. The EOC thinks a runaway oven condition exists. If oven is made if your oven control has been set in the (Celsius) °C Temperature Display Mode. SERVICE DATA SHEET Electric Ranges with step 1 above OR;... Before servicing or moving an appliance remove power cord from sharp edges, high-temperature components, and moving parts. • All uninsulated electrical terminals, connectors, heaters, etc. Electronic Oven Control (E.O.C.) Connections (J1) Oven Temperature Adjustment (some models-models that display F1 or ...

Installation Instructions
Page 1
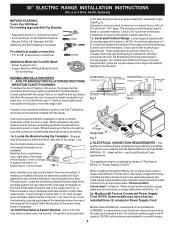
.... 3. These are listed in the Use & Care Manual, read it carefully. • Be sure your range is not followed exactly, a fire or electrical shock may result causing property damage, personal injury or death. Systems) INSTALLATION AND SERVICE MUST BE PERFORMED BY... the range and adjacent combustible surfaces. 2. Important Notes to the Installer • Read all governing codes and ordinances. • Be sure to leave these instructions with the consumer. p/n 316454901 (0509) EN 1 Español - IMPORTANT: SAVE FOR LOCAL ELECTRICAL INSPECTOR'S USE. 30" ELECTRIC RANGE INSTALLATION ...
.... 3. These are listed in the Use & Care Manual, read it carefully. • Be sure your range is not followed exactly, a fire or electrical shock may result causing property damage, personal injury or death. Systems) INSTALLATION AND SERVICE MUST BE PERFORMED BY... the range and adjacent combustible surfaces. 2. Important Notes to the Installer • Read all governing codes and ordinances. • Be sure to leave these instructions with the consumer. p/n 316454901 (0509) EN 1 Español - IMPORTANT: SAVE FOR LOCAL ELECTRICAL INSPECTOR'S USE. 30" ELECTRIC RANGE INSTALLATION ...
Installation Instructions
Page 2
...a 1/8" pilot hole where screws are to fit flush against the wall or no further than 1-1/4" from the range itself. 30" ELECTRIC RANGE INSTALLATION INSTRUCTIONS (For 3 or 4 Wire, 60 Hz. Slide range back into and fully secured by the Anti-Tip Bracket by placing the back edge of the template against the... rear wall and the side edge of the range will allow the bracket to be properly installed and ...
...a 1/8" pilot hole where screws are to fit flush against the wall or no further than 1-1/4" from the range itself. 30" ELECTRIC RANGE INSTALLATION INSTRUCTIONS (For 3 or 4 Wire, 60 Hz. Slide range back into and fully secured by the Anti-Tip Bracket by placing the back edge of the template against the... rear wall and the side edge of the range will allow the bracket to be properly installed and ...

Installation Instructions
Page 3
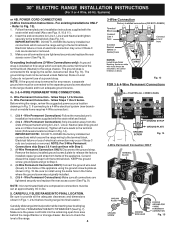
...the factory installed ground screw & plate to Fig.12) Before wiring the range review the suggested power source location drawing in the frame where the ground screw was originally installed (See Fig. 12). 5. 30" ELECTRIC RANGE INSTALLATION INSTRUCTIONS (For 3 or 4 Wire, 60 Hz. This appliance ...may occur if these 3 nuts are tightened securely and replace the rear access cover (See Fig. 9). Systems) See Range Connection Opening Size Chart (Figs. 9 & 10) ...
...the factory installed ground screw & plate to Fig.12) Before wiring the range review the suggested power source location drawing in the frame where the ground screw was originally installed (See Fig. 12). 5. 30" ELECTRIC RANGE INSTALLATION INSTRUCTIONS (For 3 or 4 Wire, 60 Hz. This appliance ...may occur if these 3 nuts are tightened securely and replace the rear access cover (See Fig. 9). Systems) See Range Connection Opening Size Chart (Figs. 9 & 10) ...
Installation Instructions
Page 4
...open floor area behind the range Warmer or storage drawer. KEEP the ground screw, ground plate and go to Step 4. 4. (4-Wire Permanent Connection ONLY) Connect the ground wire lead (Green) to the terminal block. 30" ELECTRIC RANGE INSTALLATION INSTRUCTIONS (For 3... or 4 Wire, 60 Hz. POWER CORD CONNECTIONS (3-Wire Connection Instructions . NOTE: If the ground strap is connected to a 4-Wire electrical system (new branchcircuit or mobile home requires 4-Wire connection): ...
...open floor area behind the range Warmer or storage drawer. KEEP the ground screw, ground plate and go to Step 4. 4. (4-Wire Permanent Connection ONLY) Connect the ground wire lead (Green) to the terminal block. 30" ELECTRIC RANGE INSTALLATION INSTRUCTIONS (For 3... or 4 Wire, 60 Hz. POWER CORD CONNECTIONS (3-Wire Connection Instructions . NOTE: If the ground strap is connected to a 4-Wire electrical system (new branchcircuit or mobile home requires 4-Wire connection): ...


