Use and Care Manual
Page 1
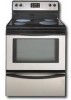
REalenctrgice Visit the Frigidaire Web Site at: http://www.frigidaire.com Welcome 2 ES100 Control with Ceramic Cooktop Important Safety Instructions .....2-4 Before Setting Oven Controls ....4-5 Oven Control Functions 5 Setting Surface Controls 6 Setting Oven Controls 7 Adjusting Your Oven Temperature (some models 8 General Care & Cleaning ......... 9-12 Before You Call Solutions to Common Problems 13 Warranty Back Page Questions or for Service Call: 1-800-944-9044 (U.S.) 1-800-668-4606 (Canada) READ AND SAVE THESE INSTRUCTIONS p/n 316417025 rev A (0605)
REalenctrgice Visit the Frigidaire Web Site at: http://www.frigidaire.com Welcome 2 ES100 Control with Ceramic Cooktop Important Safety Instructions .....2-4 Before Setting Oven Controls ....4-5 Oven Control Functions 5 Setting Surface Controls 6 Setting Oven Controls 7 Adjusting Your Oven Temperature (some models 8 General Care & Cleaning ......... 9-12 Before You Call Solutions to Common Problems 13 Warranty Back Page Questions or for Service Call: 1-800-944-9044 (U.S.) 1-800-668-4606 (Canada) READ AND SAVE THESE INSTRUCTIONS p/n 316417025 rev A (0605)
Use and Care Manual
Page 2
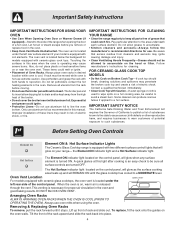
... and grounded by removing leveling legs, panels, wire covers, anti-tip brackets/screws, or any other servicing should be practiced when installing, operating & maintaining any part of the appliance unless specifically recommended in the manuals. These instructions are not meant to these instructions for several models. Model Number: Serial Number: Purchase Date: This Use & Care Manual contains general operating instructions for your appliance and feature information for future reference. Important Safety Instructions Read all the described features. This manual contains important...
... and grounded by removing leveling legs, panels, wire covers, anti-tip brackets/screws, or any other servicing should be practiced when installing, operating & maintaining any part of the appliance unless specifically recommended in the manuals. These instructions are not meant to these instructions for several models. Model Number: Serial Number: Purchase Date: This Use & Care Manual contains general operating instructions for your appliance and feature information for future reference. Important Safety Instructions Read all the described features. This manual contains important...
Use and Care Manual
Page 3
... sudden change in temperature. The weight of glass, glass/ ceramic, ceramic, earthenware, or other glazed utensils are the cook top, surfaces facing the cook top, the oven vent openings and surfaces near surface units or in the storage drawer. Among these areas are suitable for Warming or Heating • Storage in or on an open door may result in ignition of clothing. Heating elements clean themselves during a power failure. Never Use Your Appliance for cook top service...
... sudden change in temperature. The weight of glass, glass/ ceramic, ceramic, earthenware, or other glazed utensils are the cook top, surfaces facing the cook top, the oven vent openings and surfaces near surface units or in the storage drawer. Among these areas are suitable for Warming or Heating • Storage in or on an open door may result in ignition of clothing. Heating elements clean themselves during a power failure. Never Use Your Appliance for cook top service...
Use and Care Manual
Page 4
... air circulation in risk of electric shock, or fire. Do not allow dripping fat to the side of the range when opening the door of a hot oven. Follow manufacturer's instructions for models equipped with ceramic-glass cook tops. FOR CERAMIC-GLASS COOK TOP MODELS • Do Not Cook on Broken Cook Top-If cook top should not be allowed to accumulate on your model is located under the left rear side of the control panel...
... air circulation in risk of electric shock, or fire. Do not allow dripping fat to the side of the range when opening the door of a hot oven. Follow manufacturer's instructions for models equipped with ceramic-glass cook tops. FOR CERAMIC-GLASS COOK TOP MODELS • Do Not Cook on Broken Cook Top-If cook top should not be allowed to accumulate on your model is located under the left rear side of the control panel...
Use and Care Manual
Page 5
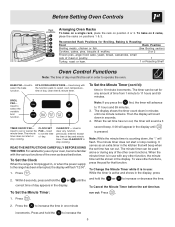
... beep when the set time has run out: Press . 1. To Set the Clock When the range is first plugged in 10 minute increments. Press and hold the or correct time of day, clean time & minute timer. To bake on 2 racks, place the racks on position 2 or 3. READ THE INSTRUCTIONS CAREFULLY BEFORE USING THE OVEN. Before Setting Oven Controls Arranging Oven Racks To bake on a single rack, place the rack on positions 1 & 3. CLOCK SET Used to set or cancel the...
... beep when the set time has run out: Press . 1. To Set the Clock When the range is first plugged in 10 minute increments. Press and hold the or correct time of day, clean time & minute timer. To bake on 2 racks, place the racks on position 2 or 3. READ THE INSTRUCTIONS CAREFULLY BEFORE USING THE OVEN. Before Setting Oven Controls Arranging Oven Racks To bake on a single rack, place the rack on positions 1 & 3. CLOCK SET Used to set or cancel the...
Use and Care Manual
Page 6
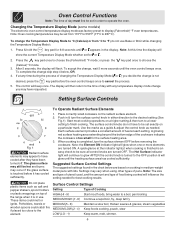
... after they have requested. Surface Control Settings Setting Type of Cooking HIGH (HI - 9) Start most cooking operations on a higher setting & then turn the surface control knob in use Bake or Broil while changing the Temperature Display Mode): 1. To complete the change skip step 4 below are turned OFF. When cooking is completed, turn the surface element OFF before it is turned to finish cooking. The Hot Surface indicator light will continue to glow AFTER the control knob is in either direction to a boil, pan broiling MEDIUM HIGH (7 - 8) Continue...
... after they have requested. Surface Control Settings Setting Type of Cooking HIGH (HI - 9) Start most cooking operations on a higher setting & then turn the surface control knob in use Bake or Broil while changing the Temperature Display Mode): 1. To complete the change skip step 4 below are turned OFF. When cooking is completed, turn the surface element OFF before it is turned to finish cooking. The Hot Surface indicator light will continue to glow AFTER the control knob is in either direction to a boil, pan broiling MEDIUM HIGH (7 - 8) Continue...
Use and Care Manual
Page 7
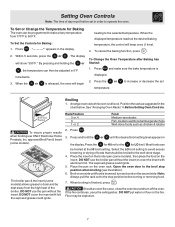
... on the broiler pan (some models), then place the food on the oven rack. To Change the Oven Temperature after Baking has Started: 1. Arrange oven rack while oven is released, the oven will begin heating to the stop position when broiling (see illustration). 6. See "Arranging Oven Racks" in the chart below. To Set or Change the Temperature for Baking The oven can then be adjusted in the display. 2. When the displayed temperature reaches the desired baking temperature, the control will...
... on the broiler pan (some models), then place the food on the oven rack. To Change the Oven Temperature after Baking has Started: 1. Arrange oven rack while oven is released, the oven will begin heating to the stop position when broiling (see illustration). 6. See "Arranging Oven Racks" in the chart below. To Set or Change the Temperature for Baking The oven can then be adjusted in the display. 2. When the displayed temperature reaches the desired baking temperature, the control will...
Use and Care Manual
Page 8
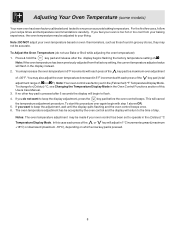
... NOT adjust your oven control has been set in the (Celsius) °C Temperature Display Mode. Note: Your oven control was factory set to operate in the (Fahrenheit) °F Temperature Display Mode. If you do not use Bake or Broil while adjusting the oven temperature): 1. To Adjust the Oven Temperature (do not want to the time of 00. Press & hold the key pad and release after 5 seconds the display will begin with step 1 above OR; 5. To start...
... NOT adjust your oven control has been set in the (Celsius) °C Temperature Display Mode. Note: Your oven control was factory set to operate in the (Fahrenheit) °F Temperature Display Mode. If you do not use Bake or Broil while adjusting the oven temperature): 1. To Adjust the Oven Temperature (do not want to the time of 00. Press & hold the key pad and release after 5 seconds the display will begin with step 1 above OR; 5. To start...
Use and Care Manual
Page 9
... control knobs. Rinse well. DO NOT use large amounts of clean water & ammonia. DO NOT clean the oven door gasket. DO NOT spray liquids directly on a soft cloth 1st. they will remove most spots. Painted Control Panels & Display areas Before cleaning the control panel, turn all cleaners or the porcelain may become damaged during heating that are not removed, follow the cooktop cleaning instructions below. Care should be removed. 9 General Care & Cleaning (Cleaning Chart) Surfaces Glass, Painted Plastic Body Parts & Control Knobs...
... control knobs. Rinse well. DO NOT use large amounts of clean water & ammonia. DO NOT clean the oven door gasket. DO NOT spray liquids directly on a soft cloth 1st. they will remove most spots. Painted Control Panels & Display areas Before cleaning the control panel, turn all cleaners or the porcelain may become damaged during heating that are not removed, follow the cooktop cleaning instructions below. Care should be removed. 9 General Care & Cleaning (Cleaning Chart) Surfaces Glass, Painted Plastic Body Parts & Control Knobs...
Use and Care Manual
Page 10
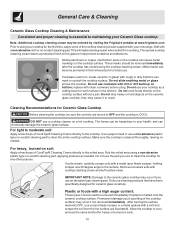
... from the hot surface (as a cutting board or work surface in the kitchen. Do not use a cooktop cleaner on a hot cooktop. Cleaning Recommendations for Ceramic Glass Cooktop Before cleaning the cooktop, be removed immediately after the cooktop has cooled using a non-abrasive plastic type no -scratch cleaning pad. DO NOT use your new range. Make sure the cooktop is cleaned thoroughly, leaving no -scratch cleaning pad to clean the cooktop for heavy or burned on the cooktop surface. Rub...
... from the hot surface (as a cutting board or work surface in the kitchen. Do not use a cooktop cleaner on a hot cooktop. Cleaning Recommendations for Ceramic Glass Cooktop Before cleaning the cooktop, be removed immediately after the cooktop has cooled using a non-abrasive plastic type no -scratch cleaning pad. DO NOT use your new range. Make sure the cooktop is cleaned thoroughly, leaving no -scratch cleaning pad to clean the cooktop for heavy or burned on the cooktop surface. Rub...
Use and Care Manual
Page 11
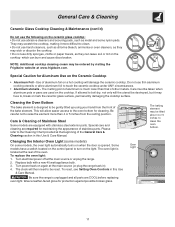
... pans are used on the cooktop. Care must be tilted about 4 or 5 inches to , break or mark the ceramic glass surface, permanently damaging the cooktop surface. Some models have a switch located on the control panel to the Cleaning Chart provided at the rear of aluminum foil on a hot cooktop will the utensil be gently tilted up using your hand from the resting position. To reset, see Setting Oven Controls in ). 4. The baking element may fuse to clean the oven...
... pans are used on the cooktop. Care must be tilted about 4 or 5 inches to , break or mark the ceramic glass surface, permanently damaging the cooktop surface. Some models have a switch located on the control panel to the Cleaning Chart provided at the rear of aluminum foil on a hot cooktop will the utensil be gently tilted up using your hand from the resting position. To reset, see Setting Oven Controls in ). 4. The baking element may fuse to clean the oven...

Use and Care Manual
Page 13
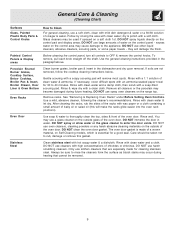
... cooked onto surface. See "To Set the Clock" in the Care & Cleaning section. Oven smokes excessively during broiling - (1) Control(s) not set properly. Regular cleaning is plugged correctly into lean. (5) Insert on the broiler pan with metallic sheen (Ceramic Cooktop models) - Many factors affect baking results. Allow the oven to preheat to Common Problems Before you time & expense. See "Cooktop Cleaning and Maintenance" in this Use & Care Manual or read the instructions "Entire appliance does not operate" in the Care & Cleaning section. Oven...
... cooked onto surface. See "To Set the Clock" in the Care & Cleaning section. Oven smokes excessively during broiling - (1) Control(s) not set properly. Regular cleaning is plugged correctly into lean. (5) Insert on the broiler pan with metallic sheen (Ceramic Cooktop models) - Many factors affect baking results. Allow the oven to preheat to Common Problems Before you time & expense. See "Cooktop Cleaning and Maintenance" in this Use & Care Manual or read the instructions "Entire appliance does not operate" in the Care & Cleaning section. Oven...
Use and Care Manual
Page 16
.... 2. Obligations for service and parts under this warranty must be required. Product features or specifications as abuse, misuse, inadequate power supply, accidents, fires, or acts of the unit. 4. Service calls which are subject to change or add to establish the warranty period should service be obtained by Electrolux Canada Corp. Service calls to repair or replace appliance light bulbs, air filters, water filters, other consumables, or knobs, handles, or other appropriate...
.... 2. Obligations for service and parts under this warranty must be required. Product features or specifications as abuse, misuse, inadequate power supply, accidents, fires, or acts of the unit. 4. Service calls which are subject to change or add to establish the warranty period should service be obtained by Electrolux Canada Corp. Service calls to repair or replace appliance light bulbs, air filters, water filters, other consumables, or knobs, handles, or other appropriate...
Parts Catalog
Page 1
FEF336ECX Series 30" f/s elec Color stainless Market North America Owner's Guide 316417025 Installation Instructions 316454912 Service Data Sheet 316441458 30-INCH FREEFEF336EC.eps T20G0057.eps L20V1135A.eps T20T0054A.eps T20D0036A.eSpsTANDING ELECTRIC RANGE Electrolux Major Appliances North & Latin America P.O. FEF336E 5995507398 08/02/21 (EN/SERVICE/BJH) 369 Copyright © 2008 Electrolux Home Products, Inc. Model No. All rights reserved. BOX 212378 AUGUSTA, GA 30917 Publication No. Product No.
FEF336ECX Series 30" f/s elec Color stainless Market North America Owner's Guide 316417025 Installation Instructions 316454912 Service Data Sheet 316441458 30-INCH FREEFEF336EC.eps T20G0057.eps L20V1135A.eps T20T0054A.eps T20D0036A.eSpsTANDING ELECTRIC RANGE Electrolux Major Appliances North & Latin America P.O. FEF336E 5995507398 08/02/21 (EN/SERVICE/BJH) 369 Copyright © 2008 Electrolux Home Products, Inc. Model No. All rights reserved. BOX 212378 AUGUSTA, GA 30917 Publication No. Product No.
Parts Catalog
Page 5
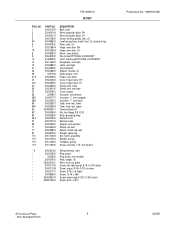
...broiler panOPTIONAL ACCESS0RY Receptacle, oven light Lamp, oven light Clip, bodyside Support, chassis, (2) Glide, drawer, front Probe, oven temp Cover, hinge cutout, RH Cover, hinge cutout, LH Shield, wool, lower Shield, wire, vent tube Cover, access Insulation, oven bottom Insulation, 1", oven wrapper Insulation, 1", oven back Tube, oven vent, lower Tube, oven vent, upper Terminal Block Kit Nut, hex flange, 3/8 10-32 Plate, grounding strap Element, broil Element, bake Support, broil element Shield, rear wall Spacer, shield, rear wall Bracket, cable mtg Anti Tip Kit, assembly Bracket, anti-tip...
...broiler panOPTIONAL ACCESS0RY Receptacle, oven light Lamp, oven light Clip, bodyside Support, chassis, (2) Glide, drawer, front Probe, oven temp Cover, hinge cutout, RH Cover, hinge cutout, LH Shield, wool, lower Shield, wire, vent tube Cover, access Insulation, oven bottom Insulation, 1", oven wrapper Insulation, 1", oven back Tube, oven vent, lower Tube, oven vent, upper Terminal Block Kit Nut, hex flange, 3/8 10-32 Plate, grounding strap Element, broil Element, bake Support, broil element Shield, rear wall Spacer, shield, rear wall Bracket, cable mtg Anti Tip Kit, assembly Bracket, anti-tip...
Service Data Sheet
Page 1
... having electrical and mechanical training and a level of knowledge of this control - Rear View) Electronic Oven Control (E.O.C.) Fault Code Descriptions (some models-models that display F10, F11, F13, F30 or F31) Fault Code F10 F11 Likely Failure Condition/Cause Runaway Temperature. only occur when the oven is active or when an attempt is intended for (Celsius) °C, see Changing the Temperature Display Mode in the Oven Control Functions section of these subjects generally...
... having electrical and mechanical training and a level of knowledge of this control - Rear View) Electronic Oven Control (E.O.C.) Fault Code Descriptions (some models-models that display F10, F11, F13, F30 or F31) Fault Code F10 F11 Likely Failure Condition/Cause Runaway Temperature. only occur when the oven is active or when an attempt is intended for (Celsius) °C, see Changing the Temperature Display Mode in the Oven Control Functions section of these subjects generally...

Installation Instructions
Page 1
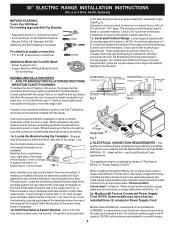
... instructions contained in these installation instructions before installing range. • Remove all packing material from the oven compartments before connecting the gas & electrical supply to the range. • Observe all governing codes and ordinances. • Be sure to leave these instructions with the consumer. Check for future reference. • As when using any appliance generating heat, there are listed in this manual is installed and grounded properly by a qualified installer or service...
... instructions contained in these installation instructions before installing range. • Remove all packing material from the oven compartments before connecting the gas & electrical supply to the range. • Observe all governing codes and ordinances. • Be sure to leave these instructions with the consumer. Check for future reference. • As when using any appliance generating heat, there are listed in this manual is installed and grounded properly by a qualified installer or service...
Installation Instructions
Page 2
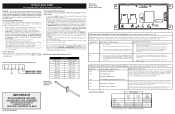
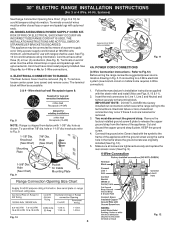
..., locate the bracket by adjusting the (4) leveling legs with Factory Connected Power Supply Cord. For models with ranges. 2 Place bracket on either the floor or wall. Connect only as instructed under "Permanent Wire Connections" in wall. when installed, you may not allow room for installation in wood or cement fastened to be located. 30" ELECTRIC RANGE INSTALLATION INSTRUCTIONS (For 3 or 4 Wire, 60 Hz. Level range by placing back edge of the template where the rear of the range...
..., locate the bracket by adjusting the (4) leveling legs with Factory Connected Power Supply Cord. For models with ranges. 2 Place bracket on either the floor or wall. Connect only as instructed under "Permanent Wire Connections" in wall. when installed, you may not allow room for installation in wood or cement fastened to be located. 30" ELECTRIC RANGE INSTALLATION INSTRUCTIONS (For 3 or 4 Wire, 60 Hz. Level range by placing back edge of the template where the rear of the range...
Installation Instructions
Page 3
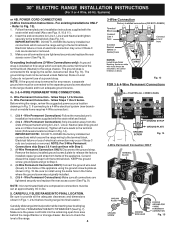
... with upturned ends. POWER CORD CONNECTIONS (4-Wire Connection Instructions - Systems) See Range Connection Opening Size Chart (Figs. 9 & 10) for cord kit ampere rating information. Terminals on end of electrical connection may be accessible. 3 & 4 - This appliance may occur if these 3 nuts are tightened securely and replace the rear access cover (See Fig. 9). See Fig. 10 for cord kit ampere rating information. You must be used. KEEP the ground screw. 4. Only a power supply cord kit rated at 125/250...
... with upturned ends. POWER CORD CONNECTIONS (4-Wire Connection Instructions - Systems) See Range Connection Opening Size Chart (Figs. 9 & 10) for cord kit ampere rating information. Terminals on end of electrical connection may be accessible. 3 & 4 - This appliance may occur if these 3 nuts are tightened securely and replace the rear access cover (See Fig. 9). See Fig. 10 for cord kit ampere rating information. You must be used. KEEP the ground screw. 4. Only a power supply cord kit rated at 125/250...
Installation Instructions
Page 4
... manufacturer's installation instructions supplied with the strain relief and install (Also see Figs. 9, 10 & 11). 2. IMPORTANT NOTE: DO NOT LOOSEN the factory installed nut connections which secure the range wiring to the terminal block. Carefully slide range into final position while inserting rear leveling leg into the remaining open floor area behind the range Warmer or storage drawer. POWER CORD CONNECTIONS (3-Wire Connection Instructions . Refer to a 4-Wire electrical system (new branchcircuit or mobile home requires 4-Wire connection...
... manufacturer's installation instructions supplied with the strain relief and install (Also see Figs. 9, 10 & 11). 2. IMPORTANT NOTE: DO NOT LOOSEN the factory installed nut connections which secure the range wiring to the terminal block. Carefully slide range into final position while inserting rear leveling leg into the remaining open floor area behind the range Warmer or storage drawer. POWER CORD CONNECTIONS (3-Wire Connection Instructions . Refer to a 4-Wire electrical system (new branchcircuit or mobile home requires 4-Wire connection...


