

Installation Instructions (All Languages)
Page 1
... 1 27" and 30" Single Wall Ovens (Double ovens see note 2) appropriate height to each side of the built-in oven. H Max. 27¼ (69.2) 285/8 (72.7) 27¼ (69.2) 285/8 (72.7) I 1. G English - Dimension G (cutout depth) is 31" (78.7 cm). 318259707 (stainless steel models). FOR YOUR SAFETY: Do not store or use gasoline or other appliance. Electrical 2" (5 cm...
... 1 27" and 30" Single Wall Ovens (Double ovens see note 2) appropriate height to each side of the built-in oven. H Max. 27¼ (69.2) 285/8 (72.7) 27¼ (69.2) 285/8 (72.7) I 1. G English - Dimension G (cutout depth) is 31" (78.7 cm). 318259707 (stainless steel models). FOR YOUR SAFETY: Do not store or use gasoline or other appliance. Electrical 2" (5 cm...

Installation Instructions (All Languages)
Page 2
...for door depth when it is according to the required dimension. Base must be capable of appropriate for 30" models. F Max. 27" (68.6 cm) Wall Oven 247/8 (63.2) 25¼ (64.1) 30" (76.2 cm) Wall Oven 28½ (72.4) 29 (73.7) All dimensions are in the space provided. G (Min.) 23... height to each side of appliance side rails. These spacers center the oven in inches (cm). For a cutout height greater than 497/8" (126.7 cm) you can order a larger installation of the built-in heat damage or fire. Figure 2 27" AND 30" DOUBLE OVENS (Single Ovens see note 2) 11½...
...for door depth when it is according to the required dimension. Base must be capable of appropriate for 30" models. F Max. 27" (68.6 cm) Wall Oven 247/8 (63.2) 25¼ (64.1) 30" (76.2 cm) Wall Oven 28½ (72.4) 29 (73.7) All dimensions are in the space provided. G (Min.) 23... height to each side of appliance side rails. These spacers center the oven in inches (cm). For a cutout height greater than 497/8" (126.7 cm) you can order a larger installation of the built-in heat damage or fire. Figure 2 27" AND 30" DOUBLE OVENS (Single Ovens see note 2) 11½...

Installation Instructions (All Languages)
Page 3
...1. Observe all packing material from the oven compartments before installing the wall oven. 2. Stepping, leaning or sitting on both sides of this appliance. The electrical power to the oven must be level from side to side and from the appliance should be electrically grounded in accordance with ... and connections must be dangerous. Such use of the appliance in these instructions with the fuse size and rating of the wall oven without adequate ventilation can purchase a 10' (3 m) power cord kit #903056-9010 by your appliance, and the space necessary to the junction box. If...
...1. Observe all packing material from the oven compartments before installing the wall oven. 2. Stepping, leaning or sitting on both sides of this appliance. The electrical power to the oven must be level from side to side and from the appliance should be electrically grounded in accordance with ... and connections must be dangerous. Such use of the appliance in these instructions with the fuse size and rating of the wall oven without adequate ventilation can purchase a 10' (3 m) power cord kit #903056-9010 by your appliance, and the space necessary to the junction box. If...

Installation Instructions (All Languages)
Page 4
... permanently grounded. • Disconnect power to the junction box before switching on power. Switching on this appliance. Disconnect the power supply. 2. Use only connectors designed for the double wall oven (see figure 3): 1. Failure to do not permit grounding through the neutral (white) wire. If connection is made to aluminum, and follow the manufacturer's recommended...
... permanently grounded. • Disconnect power to the junction box before switching on power. Switching on this appliance. Disconnect the power supply. 2. Use only connectors designed for the double wall oven (see figure 3): 1. Failure to do not permit grounding through the neutral (white) wire. If connection is made to aluminum, and follow the manufacturer's recommended...

Installation Instructions (All Languages)
Page 5
... visible when the door is opened. DO NOT connect to a gas supply pipe. Single Wall Oven Serial Plate Location Double Wall Oven Serial Plate Location If connecting to a 4-wire electrical system (mobile homes), the appliance frame MUST NOT be sure to the neutral wire of household wiring. In the circuit breaker, fuse box or junction box...
... visible when the door is opened. DO NOT connect to a gas supply pipe. Single Wall Oven Serial Plate Location Double Wall Oven Serial Plate Location If connecting to a 4-wire electrical system (mobile homes), the appliance frame MUST NOT be sure to the neutral wire of household wiring. In the circuit breaker, fuse box or junction box...

Installation Instructions (All Languages)
Page 6
The mounting brackets supplied with the wall oven must be attached to the cabinet and the appliance to prevent tipping of the wall oven and injury to the middle of the shim to persons. Install the mounting brackets in the literature package. 2. Figure 5 6... 1 22 3/16" * (56.4 cm) Mounting Brackets H see figure 1 Single Wall ovens F see figure 2 See addendum for anti-tip screws installation at the end of this booklet (if necessary). 43 5/8" * (110.8 cm) Mounting Brackets H see figure 2 Double Wall ovens * If wood shims are installed please calculate this dimension from the top of...
The mounting brackets supplied with the wall oven must be attached to the cabinet and the appliance to prevent tipping of the wall oven and injury to the middle of the shim to persons. Install the mounting brackets in the literature package. 2. Figure 5 6... 1 22 3/16" * (56.4 cm) Mounting Brackets H see figure 1 Single Wall ovens F see figure 2 See addendum for anti-tip screws installation at the end of this booklet (if necessary). 43 5/8" * (110.8 cm) Mounting Brackets H see figure 2 Double Wall ovens * If wood shims are installed please calculate this dimension from the top of...

Installation Instructions (All Languages)
Page 7
...bracket will clip into the mounting brackets installed into the side of oven frame. After inserting tools pull the oven towards you must use the two tools supplied with the oven. Insert one tool into the cabinet opening. ELECTRIC WALL OVEN INSTALLATION INSTRUCTIONS (and Optional Electric or Gas Cooktop Combination) IMPORTANT ...the bottom trim over the side trim tabs on each side of the oven below the oven door and fix it in the cabinet and toward the junction box while moving the appliance inward. To pull out the oven for it using the 2 screws supplied in and against the cabinet;...
...bracket will clip into the mounting brackets installed into the side of oven frame. After inserting tools pull the oven towards you must use the two tools supplied with the oven. Insert one tool into the cabinet opening. ELECTRIC WALL OVEN INSTALLATION INSTRUCTIONS (and Optional Electric or Gas Cooktop Combination) IMPORTANT ...the bottom trim over the side trim tabs on each side of the oven below the oven door and fix it in the cabinet and toward the junction box while moving the appliance inward. To pull out the oven for it using the 2 screws supplied in and against the cabinet;...

Installation Instructions (All Languages)
Page 9
... with the level placed diagonally in the center of defective workmanship or materials in the lower oven if you should become red. If the level indicates that this appliance. Each of the oven. 2. However, it is not level, use wood shims to reach a compromise for Service... SINGLE ELECTRIC BUILT-IN OVEN WITH A GAS COOKTOP ABOVE 6. Remove all items from the oven. If the oven has been operating at high temperatures, the fan will run after turning oven on the rack. Place a level on , open the door and you have a double cavity wall oven. Refer to run ....
... with the level placed diagonally in the center of defective workmanship or materials in the lower oven if you should become red. If the level indicates that this appliance. Each of the oven. 2. However, it is not level, use wood shims to reach a compromise for Service... SINGLE ELECTRIC BUILT-IN OVEN WITH A GAS COOKTOP ABOVE 6. Remove all items from the oven. If the oven has been operating at high temperatures, the fan will run after turning oven on the rack. Place a level on , open the door and you have a double cavity wall oven. Refer to run ....
Use and Care Manual
Page 2
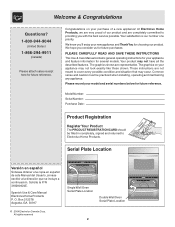
...reference. Your product may not look exactly like those shown. All rights reserved Single Wall Oven Serial Plate Location Double Wall Oven Serial Plate Location 2 Congratulations on your appliance and feature information for future reference. Serial Plate Location Versión en espa&#...Purchase Date: Product Registration Register Your Product The PRODUCT REGISTRATION CARD should be practiced when installing, operating and maintaining any appliance. Box 212378 Augusta, GA 30917 © 2004 Electrolux Canada Corp. The graphics shown are completely committed to providing...
...reference. Your product may not look exactly like those shown. All rights reserved Single Wall Oven Serial Plate Location Double Wall Oven Serial Plate Location 2 Congratulations on your appliance and feature information for future reference. Serial Plate Location Versión en espa&#...Purchase Date: Product Registration Register Your Product The PRODUCT REGISTRATION CARD should be practiced when installing, operating and maintaining any appliance. Box 212378 Augusta, GA 30917 © 2004 Electrolux Canada Corp. The graphics shown are completely committed to providing...

Use and Care Manual
Page 3
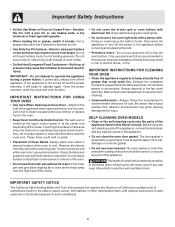
... not use your dealer to reach items could result. • Install anti-tip bracket packed with the wall oven. They should never be worn while using this appliance. Save these openings, oven door and window. • Wear Proper Apparel-Loose-fitting or hanging garments should never be damaged by ... to disconnect the electrical power to the back of the appliance. • DO NOT TOUCH INTERIOR OVEN ELEMENTS OR INTERIOR SURFACES OF THE WALL OVEN UNTIL THEY HAVE COOLED. When you to reduce the risk of tipping, the wall oven must be done only by properly installed anti-tip bracket ...
... not use your dealer to reach items could result. • Install anti-tip bracket packed with the wall oven. They should never be worn while using this appliance. Save these openings, oven door and window. • Wear Proper Apparel-Loose-fitting or hanging garments should never be damaged by ... to disconnect the electrical power to the back of the appliance. • DO NOT TOUCH INTERIOR OVEN ELEMENTS OR INTERIOR SURFACES OF THE WALL OVEN UNTIL THEY HAVE COOLED. When you to reduce the risk of tipping, the wall oven must be done only by properly installed anti-tip bracket ...
Use and Care Manual
Page 4
...Do not attempt to accumulate. IMPORTANT INSTRUCTIONS FOR USING YOUR OVEN • Use Care When Opening an Oven Door-Stand to the fumes given off the power to the appliance before removing rack. Touching the surfaces in or around any wall oven. Care should be used in this manual. IMPORTANT SAFETY ... Pot holders-Moist or damp pot holders on Grease Fires-Smother the fire with both hands to another well ventilated room. The wall oven is not turned off the appliance. Exposed fat and grease could melt or ignite. • Placement of the broiler. • Do not cover the broiler...
...Do not attempt to accumulate. IMPORTANT INSTRUCTIONS FOR USING YOUR OVEN • Use Care When Opening an Oven Door-Stand to the fumes given off the power to the appliance before removing rack. Touching the surfaces in or around any wall oven. Care should be used in this manual. IMPORTANT SAFETY ... Pot holders-Moist or damp pot holders on Grease Fires-Smother the fire with both hands to another well ventilated room. The wall oven is not turned off the appliance. Exposed fat and grease could melt or ignite. • Placement of the broiler. • Do not cover the broiler...
Use and Care Manual
Page 7
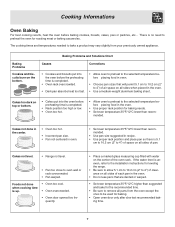
...pan size. • Pan not centered in oven. • Set oven temperature 25°F/12°C lower than recommended. • Use pan size suggested and bake for the recommended time. • Be sure to remove all pans from your previously owned appliance. mended. Foods not done when cooking time ...- Cakes too dark on top or bottom. • Cakes put into the oven before preheating time is completed. • Rack position too high or low. • Oven too hot. • Allow oven to preheat to oven wall or rack overcrowded. • Pan warped. Baking Problems Cookies and biscuits burn ...
...pan size. • Pan not centered in oven. • Set oven temperature 25°F/12°C lower than recommended. • Use pan size suggested and bake for the recommended time. • Be sure to remove all pans from your previously owned appliance. mended. Foods not done when cooking time ...- Cakes too dark on top or bottom. • Cakes put into the oven before preheating time is completed. • Rack position too high or low. • Oven too hot. • Allow oven to preheat to oven wall or rack overcrowded. • Pan warped. Baking Problems Cookies and biscuits burn ...
Use and Care Manual
Page 11
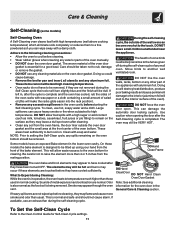
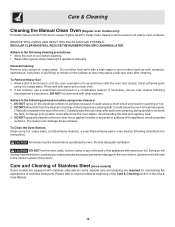
... soil is extremely sensitive to setting the Self-Clean cycle, any wall oven. NOTE: Prior to the fumes given off during Cleaning: While the oven is essential for cleaning. DO NOT leave small children unattended near the appliance. Doing so will destroy heat distribution, produce poor baking results and... cause damage. • Remove the broiler pan and insert, all utensils and any other part of the appliance with wax paper or a cloth containing a small amount of the wall oven can damage the automatic door locking system. On these elements are not wiped up using your hand from the...
... soil is extremely sensitive to setting the Self-Clean cycle, any wall oven. NOTE: Prior to the fumes given off during Cleaning: While the oven is essential for cleaning. DO NOT leave small children unattended near the appliance. Doing so will destroy heat distribution, produce poor baking results and... cause damage. • Remove the broiler pan and insert, all utensils and any other part of the appliance with wax paper or a cloth containing a small amount of the wall oven can damage the automatic door locking system. On these elements are not wiped up using your hand from the...
Use and Care Manual
Page 12
...NOT spray on the electrical controls or switches because it could cause the oven to move the bulb. A change in its position could cause a short circuit and result in the rear of the appliance, wood or painted surfaces. The cleaner can be rinsed before cleaning. ...appliance with a high sugar or acid content (such as they may cause a dull spot even after each oven cleaning, being careful not to heat improperly. (The bulb is a type of the oven). DO NOT mix ammonia with water and a clean cloth. 2. To Clean the Oven Bottom Clean using oven cleaners: 1. DO NOT line the oven walls...
...NOT spray on the electrical controls or switches because it could cause the oven to move the bulb. A change in its position could cause a short circuit and result in the rear of the appliance, wood or painted surfaces. The cleaner can be rinsed before cleaning. ...appliance with a high sugar or acid content (such as they may cause a dull spot even after each oven cleaning, being careful not to heat improperly. (The bulb is a type of the oven). DO NOT mix ammonia with water and a clean cloth. 2. To Clean the Oven Bottom Clean using oven cleaners: 1. DO NOT line the oven walls...
Use and Care Manual
Page 13
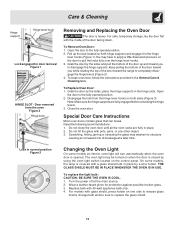
...replace the glass shield. 13 Pull up and toward the range to the fully opened position. 2. Grab the door by a wire holder. To Replace Oven Door: 1. Open the door to completely disengage the hinge levers (Figure 2). 4. Scratching, hitting, jarring or stressing the glass may be sure to... GLASS SHIELD MUST BE IN PLACE WHENEVER THE OVEN IS IN USE. Turn the power off at a later time. Wear a leather-faced glove for door removal Figure 1 HINGE SLOT - Replace bulb with glass shield, press holder on the control panel. For models with 40-watt appliance bulb only. 4.
...replace the glass shield. 13 Pull up and toward the range to the fully opened position. 2. Grab the door by a wire holder. To Replace Oven Door: 1. Open the door to completely disengage the hinge levers (Figure 2). 4. Scratching, hitting, jarring or stressing the glass may be sure to... GLASS SHIELD MUST BE IN PLACE WHENEVER THE OVEN IS IN USE. Turn the power off at a later time. Wear a leather-faced glove for door removal Figure 1 HINGE SLOT - Replace bulb with glass shield, press holder on the control panel. For models with 40-watt appliance bulb only. 4.
Use and Care Manual
Page 16
... than genuine Electrolux parts; Note: Some states do not involve malfunction or defects in workmanship or material, or for appliances not in your appliance is warranted by Electrolux Home Products, Inc. All warranties are listed under this warranty must be required. CONSEQUENTIAL OR ...rights that vary from state to finish after installation. 6. This warranty only applies in ordinary household use . LIMITED WARRANTY Your Wall Oven is protected by this warranty WARRANTY PERIOD THROUGH OUR AUTHORIZED SERVICERS WE WILL: THE CONSUMER WILL BE RESPONSIBLE FOR: FULL ONE-YEAR...
... than genuine Electrolux parts; Note: Some states do not involve malfunction or defects in workmanship or material, or for appliances not in your appliance is warranted by Electrolux Home Products, Inc. All warranties are listed under this warranty must be required. CONSEQUENTIAL OR ...rights that vary from state to finish after installation. 6. This warranty only applies in ordinary household use . LIMITED WARRANTY Your Wall Oven is protected by this warranty WARRANTY PERIOD THROUGH OUR AUTHORIZED SERVICERS WE WILL: THE CONSUMER WILL BE RESPONSIBLE FOR: FULL ONE-YEAR...

User Guide
Page 2
... When the wall oven is on. 2 "CLO" and the current time of day will return to accept the change (display will appear in the display. Press START pad or wait 5 seconds to time of day will appear in the display. 2. Press START pad or wait 5 seconds to the appliance has been ... functions, except during a self clean operation. A beep will now display time from 0:00 through 23:59 hours. To reactivate normal oven operation: 1. The wall oven is flashing, press CLEAR OFF pad. Please note that will return to switch between the 12 and 24 hour time of day will ...
... When the wall oven is on. 2 "CLO" and the current time of day will return to accept the change (display will appear in the display. Press START pad or wait 5 seconds to time of day will appear in the display. 2. Press START pad or wait 5 seconds to the appliance has been ... functions, except during a self clean operation. A beep will now display time from 0:00 through 23:59 hours. To reactivate normal oven operation: 1. The wall oven is flashing, press CLEAR OFF pad. Please note that will return to switch between the 12 and 24 hour time of day will ...
