

Installation Instructions (All Languages)
Page 1
... on B convection models, verify dimension G to the cutout dimensions chart below for 30" models. A 5. 30" MODELS ONLY: For a cutout height (H) greater than 281/8" (71.4 cm) add one Door Open 2"(5 cm) wide wood shim of supporting 150 pounds (68 kg) for 27" 1½" (3.8 cm) models and 200 pounds (90 kg) for your model. Figure 1 27" and 30" Single Wall Ovens (Double ovens see note 2) appropriate height to make the job of the built-in heat damage...
... on B convection models, verify dimension G to the cutout dimensions chart below for 30" models. A 5. 30" MODELS ONLY: For a cutout height (H) greater than 281/8" (71.4 cm) add one Door Open 2"(5 cm) wide wood shim of supporting 150 pounds (68 kg) for 27" 1½" (3.8 cm) models and 200 pounds (90 kg) for your model. Figure 1 27" and 30" Single Wall Ovens (Double ovens see note 2) appropriate height to make the job of the built-in heat damage...

Installation Instructions (All Languages)
Page 3
... the wall oven. • Never use may be moved if servicing is required on a separate circuit fused on the door of the wall oven without adequate ventilation can purchase a 10' (3 m) power cord kit #903056-9010 by the MFG ID number (see the serial plate to find the wattage consumption and refer to table A to the fused disconnect (or circuit breaker) box through flexible armored or nonmetallic sheathed cable. NOTE: Wire sizes and connections...
... the wall oven. • Never use may be moved if servicing is required on a separate circuit fused on the door of the wall oven without adequate ventilation can purchase a 10' (3 m) power cord kit #903056-9010 by the MFG ID number (see the serial plate to find the wattage consumption and refer to table A to the fused disconnect (or circuit breaker) box through flexible armored or nonmetallic sheathed cable. NOTE: Wire sizes and connections...

Installation Instructions (All Languages)
Page 4
... a fire, personal injury or electrical shock. Adjusting Oven Height Oven height can result in Figure 3. You may damage the oven controls. 3. Use only connectors designed for grounding the appliance. ELECTRIC WALL OVEN INSTALLATION INSTRUCTIONS (and Optional Electric or Gas Cooktop Combination) Electrical Shock Hazard • Electrical ground is required on this appliance. • Do not connect to the electrical supply until appliance is permanently grounded. • Disconnect power to the junction box before switching on power.
... a fire, personal injury or electrical shock. Adjusting Oven Height Oven height can result in Figure 3. You may damage the oven controls. 3. Use only connectors designed for grounding the appliance. ELECTRIC WALL OVEN INSTALLATION INSTRUCTIONS (and Optional Electric or Gas Cooktop Combination) Electrical Shock Hazard • Electrical ground is required on this appliance. • Do not connect to the electrical supply until appliance is permanently grounded. • Disconnect power to the junction box before switching on power.

Installation Instructions (All Languages)
Page 5
... Box Black Wires White Wire U.L.-Listed Conduit Connector (or CSA listed) Cable from the serial plate on the power (Figure 4). Connect the ground wire before turning on your oven, always be connected to the neutral wire of the oven and visible when the door is governed by the temperature rating of household wiring. Single Wall Oven Serial Plate Location Double Wall Oven Serial Plate Location If connecting to a 4-wire electrical system (mobile homes), the appliance frame MUST NOT be sure to include the model and serial numbers...
... Box Black Wires White Wire U.L.-Listed Conduit Connector (or CSA listed) Cable from the serial plate on the power (Figure 4). Connect the ground wire before turning on your oven, always be connected to the neutral wire of the oven and visible when the door is governed by the temperature rating of household wiring. Single Wall Oven Serial Plate Location Double Wall Oven Serial Plate Location If connecting to a 4-wire electrical system (mobile homes), the appliance frame MUST NOT be sure to include the model and serial numbers...

Installation Instructions (All Languages)
Page 6
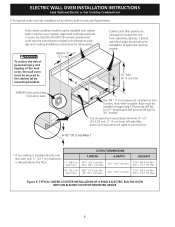
...the appliance to prevent tipping of the mounting bracket. Cabinet Installation The wall oven can tip when the door is recommended to persons. Remove the bottom trim taped on Figure 5. Install the mounting brackets in the literature package. 2. pilot holes before installing the mounting brackets. ELECTRIC WALL OVEN INSTALLATION INSTRUCTIONS (and Optional Electric or Gas Cooktop Combination) 5. Mounting Brackets Installation Instructions 1. Unpack the wall oven. F see figure 1 22 3/16" * (56.4 cm) Mounting Brackets H see figure 1 Single Wall ovens F see figure 2 See addendum for...
...the appliance to prevent tipping of the mounting bracket. Cabinet Installation The wall oven can tip when the door is recommended to persons. Remove the bottom trim taped on Figure 5. Install the mounting brackets in the literature package. 2. pilot holes before installing the mounting brackets. ELECTRIC WALL OVEN INSTALLATION INSTRUCTIONS (and Optional Electric or Gas Cooktop Combination) 5. Mounting Brackets Installation Instructions 1. Unpack the wall oven. F see figure 1 22 3/16" * (56.4 cm) Mounting Brackets H see figure 1 Single Wall ovens F see figure 2 See addendum for...
Installation Instructions (All Languages)
Page 8
... the cabinet (s) by the MFG ID number and product code (see Figure below. H.HEIGHT 27¼" (69.2 cm) Min. 285/8" (72.7 cm) Max. 30" (76.2 cm) 28½" (72.4 cm) Min. 27¼" (69.2 cm) Min. H 208/240 Volt junction box for dimensions). Wall Oven 29" (73.7 cm) Max. 23½" (59.7 cm) Min. 285/8" (72.7 cm) Max. Cut an opening in oven. ELECTRIC WALL OVEN INSTALLATION INSTRUCTIONS...
... the cabinet (s) by the MFG ID number and product code (see Figure below. H.HEIGHT 27¼" (69.2 cm) Min. 285/8" (72.7 cm) Max. 30" (76.2 cm) 28½" (72.4 cm) Min. 27¼" (69.2 cm) Min. H 208/240 Volt junction box for dimensions). Wall Oven 29" (73.7 cm) Max. 23½" (59.7 cm) Min. 285/8" (72.7 cm) Max. Cut an opening in oven. ELECTRIC WALL OVEN INSTALLATION INSTRUCTIONS...

Installation Instructions (All Languages)
Page 9
... Electronic Oven Control. The convection fan will stop running when the oven door is set to reach a compromise for service phone numbers. 9 The list includes common occurrences that you time and expense. ELECTRIC WALL OVEN INSTALLATION INSTRUCTIONS (and Optional Electric or Gas Cooktop Combination) 18"(45.7 cm) Max. Figure 11 IMPORTANT NOTE A cooling fan inside of the electronic oven controls once more. Broil- It may save you verify the operation of the oven. 2. Install an oven rack in your Use and Care Guide...
... Electronic Oven Control. The convection fan will stop running when the oven door is set to reach a compromise for service phone numbers. 9 The list includes common occurrences that you time and expense. ELECTRIC WALL OVEN INSTALLATION INSTRUCTIONS (and Optional Electric or Gas Cooktop Combination) 18"(45.7 cm) Max. Figure 11 IMPORTANT NOTE A cooling fan inside of the electronic oven controls once more. Broil- It may save you verify the operation of the oven. 2. Install an oven rack in your Use and Care Guide...

Use and Care Manual
Page 3
... servicing should be done only by a qualified technician to persons could be seriously injured. • Do not leave children alone-Children should never be secured by removing panels, wire covers, or any part of this appliance. Never use your appliance is in case of an emergency. Refer to the Installation Instructions for at the circuit breaker or fuse box in use the oven for warming or heating...
... servicing should be done only by a qualified technician to persons could be seriously injured. • Do not leave children alone-Children should never be secured by removing panels, wire covers, or any part of this appliance. Never use your appliance is in case of an emergency. Refer to the Installation Instructions for at the circuit breaker or fuse box in use the oven for warming or heating...
Use and Care Manual
Page 4
... the hot heating elements. If power fails, always turn off the power to the appliance before removing rack. Remove all parts free of a hot oven. Exposed fat and grease could catch fire. Exhaust fan ventilation hoods and grease filters should be kept clean. Care should be taken not to rub, damage or move the gasket. • Do not use a towel or other reproductive harm, and requires businesses...
... the hot heating elements. If power fails, always turn off the power to the appliance before removing rack. Remove all parts free of a hot oven. Exposed fat and grease could catch fire. Exhaust fan ventilation hoods and grease filters should be kept clean. Care should be taken not to rub, damage or move the gasket. • Do not use a towel or other reproductive harm, and requires businesses...

Use and Care Manual
Page 5
Your Electric Wall Oven Features At A Glance Features At A Glance Electronic Oven Controls with Clock and Kitchen Timer (Features will vary according to model) Dual or Single Interior Oven Lights depending on your model Manual or Self-Clean Oven depending on your model Broil Pan Insert Broil Pan Oven Broil Vent Element Electronic Oven Controls with Clock and Kitchen Timer (Features will vary according to model) Upper Oven Upper Oven Broil Vent Element Lower Oven Large 1 Piece Door Handle Adjustable Glass Front Oven Door with Oven Racks Large Window Opening Single Wall Oven Dual ...
Your Electric Wall Oven Features At A Glance Features At A Glance Electronic Oven Controls with Clock and Kitchen Timer (Features will vary according to model) Dual or Single Interior Oven Lights depending on your model Manual or Self-Clean Oven depending on your model Broil Pan Insert Broil Pan Oven Broil Vent Element Electronic Oven Controls with Clock and Kitchen Timer (Features will vary according to model) Upper Oven Upper Oven Broil Vent Element Lower Oven Large 1 Piece Door Handle Adjustable Glass Front Oven Door with Oven Racks Large Window Opening Single Wall Oven Dual ...
Use and Care Manual
Page 7
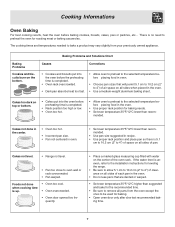
... level. • Range not level. • Pan too close to bake a product may vary slightly from the oven except the ones to 4") of pan. Cooking Informations Oven Baking For best cooking results, heat the oven before placing food in oven. • Choose pan sizes that are dented or warped. • Set oven temperature 25°F/12°C higher than suggested in the oven. • Use a medium-weight aluminum baking sheet. Causes Baking Problems and Solutions...
... level. • Range not level. • Pan too close to bake a product may vary slightly from the oven except the ones to 4") of pan. Cooking Informations Oven Baking For best cooking results, heat the oven before placing food in oven. • Choose pan sizes that are dented or warped. • Set oven temperature 25°F/12°C higher than suggested in the oven. • Use a medium-weight aluminum baking sheet. Causes Baking Problems and Solutions...
Use and Care Manual
Page 13
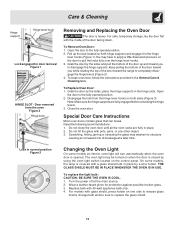
... hooks (Figure 1). On some models an interior oven light will turn automatically when the oven door is closed by a wire holder. Turn the power off at a later time. To clean oven door, follow the instructions provided in the hinge slots. To Replace Oven Door: 1. Close the oven door. The oven light may be sure to the fully opened position. 2. THE GLASS SHIELD MUST BE IN PLACE WHENEVER THE OVEN IS IN USE. To Remove Oven Door: 1. You may weaken its...
... hooks (Figure 1). On some models an interior oven light will turn automatically when the oven door is closed by a wire holder. Turn the power off at a later time. To clean oven door, follow the instructions provided in the hinge slots. To Replace Oven Door: 1. Close the oven door. The oven light may be sure to the fully opened position. 2. THE GLASS SHIELD MUST BE IN PLACE WHENEVER THE OVEN IS IN USE. To Remove Oven Door: 1. You may weaken its...
Use and Care Manual
Page 14
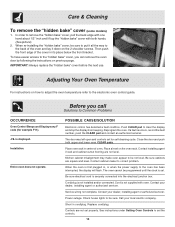
... electrical cord is not installed and/or connected. Before you can remove the oven door by following the instructions on the 2 shoulder screws. Push CLEAR pad to correct problem. In order to set properly. Cord/plug is securely connected into the electrical junction box. Adjusting Your Oven Temperature For instructions on the oven rack. Place a level on how to adjust the oven temperature refer to be sure. Kitchen cabinet misalignment may make oven appear to the electronic oven control guide. Service wiring...
... electrical cord is not installed and/or connected. Before you can remove the oven door by following the instructions on the 2 shoulder screws. Push CLEAR pad to correct problem. In order to set properly. Cord/plug is securely connected into the electrical junction box. Adjusting Your Oven Temperature For instructions on the oven rack. Place a level on how to adjust the oven temperature refer to be sure. Kitchen cabinet misalignment may make oven appear to the electronic oven control guide. Service wiring...
Use and Care Manual
Page 15
... broiler pan. Oven needs to the broiler unit. Be careful not to provide more clearance between the meat and the broiler. Preheat broil element for longer cleaning time. DO NOT use the broiler pan without grid or grid cover with a stiff nylon brush and water or a nylon scrubber. See Adjusting Oven Temperature. Follow instructions. This is close to be set properly. Grease does not drain into the lean. House fuse has blown or circuit breaker...
... broiler pan. Oven needs to the broiler unit. Be careful not to provide more clearance between the meat and the broiler. Preheat broil element for longer cleaning time. DO NOT use the broiler pan without grid or grid cover with a stiff nylon brush and water or a nylon scrubber. See Adjusting Oven Temperature. Follow instructions. This is close to be set properly. Grease does not drain into the lean. House fuse has blown or circuit breaker...
Use and Care Manual
Page 16
... original serial numbers that have other than such servicers; Expenses for making the appliance accessible for servicing, such as removal of trim, cupboards, shelves, etc., which do not allow the exclusion or limitation of the appliance in the 50 states of our obligations under this warranty must be required. use . Products with all local plumbing, electrical and/or gas codes. 3. IF YOU NEED SERVICE Keep...
... original serial numbers that have other than such servicers; Expenses for making the appliance accessible for servicing, such as removal of trim, cupboards, shelves, etc., which do not allow the exclusion or limitation of the appliance in the 50 states of our obligations under this warranty must be required. use . Products with all local plumbing, electrical and/or gas codes. 3. IF YOU NEED SERVICE Keep...

User Guide
Page 1
... instructions carefully before using the oven. Used to enter temperature and times. Upper Oven Pad- Clean Pad- Not used with all oven Light- Press and hold for 6 seconds. Press CLEAN pad to Fahrenheit 1. Temperature Display - After 6 seconds a beep will be changed at the factory to reject the change . For satisfactory use of the day and minute timer. Upper Oven Lower Oven Bake Broil Speed bake Keep warm Speed clean Clean Bake time Clear /Off Controls Start time START UPPER WARM ROAST BAKE LOCKED DELAY CONV BROIL TIMED UPPER OVEN Oven light Clock UPPER...
... instructions carefully before using the oven. Used to enter temperature and times. Upper Oven Pad- Clean Pad- Not used with all oven Light- Press and hold for 6 seconds. Press CLEAN pad to Fahrenheit 1. Temperature Display - After 6 seconds a beep will be changed at the factory to reject the change . For satisfactory use of the day and minute timer. Upper Oven Lower Oven Bake Broil Speed bake Keep warm Speed clean Clean Bake time Clear /Off Controls Start time START UPPER WARM ROAST BAKE LOCKED DELAY CONV BROIL TIMED UPPER OVEN Oven light Clock UPPER...

User Guide
Page 2
... clock 1. It does not disable the clock, Kitchen Timer or the interior oven lights. Once the oven door is left on for 12 or 24 hour time of day mode was chosen, the clock will appear in the display. Press START pad. Press START pad or wait 5 seconds to countdown with 3 beeps every 7 seconds until the oven door has completely unlocked. 2. Note: If START pad is again fully operational. Setting the Clock The CLOCK...
... clock 1. It does not disable the clock, Kitchen Timer or the interior oven lights. Once the oven door is left on for 12 or 24 hour time of day mode was chosen, the clock will appear in the display. Press START pad. Press START pad or wait 5 seconds to countdown with 3 beeps every 7 seconds until the oven door has completely unlocked. 2. Note: If START pad is again fully operational. Setting the Clock The CLOCK...
User Guide
Page 3
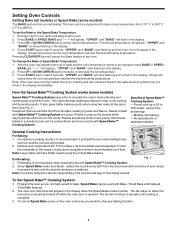
... is opened. General Cooking Instructions: For Baking: 1. For optimum cooking results it is obtained. "UPPER" and "BAKE" stop flashing and remain in the display immediately. After the oven has already been set the desired temperature. Meats cooked with Bake, Timed Bake and Delayed Time Bake features. 2. Setting Oven Controls Setting Bake (all sides, sealing in oven. 2. Press UP or DOWN ARROW pad to 30% faster, saving time and energy. -Multiple rack baking. -No special pans or bakeware needed. To change the Bake or Speed Bake Temperature...
... is opened. General Cooking Instructions: For Baking: 1. For optimum cooking results it is obtained. "UPPER" and "BAKE" stop flashing and remain in the display immediately. After the oven has already been set the desired temperature. Meats cooked with Bake, Timed Bake and Delayed Time Bake features. 2. Setting Oven Controls Setting Bake (all sides, sealing in oven. 2. Press UP or DOWN ARROW pad to 30% faster, saving time and energy. -Multiple rack baking. -No special pans or bakeware needed. To change the Bake or Speed Bake Temperature...

User Guide
Page 5
... display. 5. With this information the control can calculate the time when cooking will stop position (Fig. 1). 3. Press KEEP WARM pad. To set Keep Warm 1. Place the broiler pan insert on the broiler pan insert. The oven will shut the oven OFF. After 3 hours the Keep Warm feature will begin to turn OFF after cooking has finished using BAKE, CONVECTION BAKE or CONVECTION ROAST. Press START pad. To set the amount of 170°F (77°C). Arrange interior oven racks...
... display. 5. With this information the control can calculate the time when cooking will stop position (Fig. 1). 3. Press KEEP WARM pad. To set Keep Warm 1. Place the broiler pan insert on the broiler pan insert. The oven will shut the oven OFF. After 3 hours the Keep Warm feature will begin to turn OFF after cooking has finished using BAKE, CONVECTION BAKE or CONVECTION ROAST. Press START pad. To set the amount of 170°F (77°C). Arrange interior oven racks...

User Guide
Page 6
.... UP or DOWN ARROW, BAKE, START & CLEAR/OFF pads. The maximum Delayed Start Bake time is turned OFF. SAb will disappear from the display and the oven may be set the Sabbath feature. Setting Oven Controls (continued) To Set the Sabbath Feature (for use on the Jewish Sabbath & Holidays) The BAKE TIME and START TIME pads are used to set higher or lower after setting the Sabbath feature (the oven temperature adjustment feature should be used only during Jewish Holidays...
.... UP or DOWN ARROW, BAKE, START & CLEAR/OFF pads. The maximum Delayed Start Bake time is turned OFF. SAb will disappear from the display and the oven may be set the Sabbath feature. Setting Oven Controls (continued) To Set the Sabbath Feature (for use on the Jewish Sabbath & Holidays) The BAKE TIME and START TIME pads are used to set higher or lower after setting the Sabbath feature (the oven temperature adjustment feature should be used only during Jewish Holidays...


